Friday, May 28, 2021

{BYSHC} Sketch Challenge 10 ~ Warm Wishes ~ The Greeting Farm

Hello there crafty friend!
I am back with one more {BYSHC} Sketch 10 card before we go into June... can you believe it's almost June?! Like days away from it?! This year is flying by! Anywho, I've used another sweet stamp from The Greeting Farm called Warm Wishes. I adore the cute boy and girl in this stamp set but I only had room for one with this sketch so I opted for the girl but I also added the adorable little snowman from the Miss Anya Hello Winter stamp set.


I used the absolutely gorgeous Winter Playground papers from Bo Bunny! So many pretty blues and flourishes... and all those beautiful snowflakes! I love love love this gorgeous paper!! Enough about that... I did a little coloring and I paper pieced her coat and boots. All of my layers have a slightly larger mat of white card stock. I fussy cut the stamped images only partially leaving a little hill of snow... it got tricky around her legs and I had to use my Fiskars Fingertip Craft Knife, but I think it turned out ok. Oh, and I almost forgot I ran my bottom layer through the Big Shot with a snowflake embossing folder from Darice just called Snowflake.


Here's a list of the Copic markers I used for this cutie:

Skin ~ E000, E00, E11, R00, R20
Hair ~ B000, N0, N1, N3, N6, N8
Jacket / Socks / Mittens ~ C00, C2, BG70, BG72
Skirt ~ N0, N3, N6
Snowman ~ C00, C2, YR68


Here's another look at {BYSHC} Sketch 10... there's just a few more days to play along with the sketch! Come join us in the Build Your Stash Holiday Cardmakers Facebook group to see more inspiration or stop by the {BYSH} Cardmakers blog... we share inspiration on the blog each week.


Thanks so much for stopping by!
See ya next time.

Inky Hugs,
Crystal


{Please note that comment moderation is ON. Your comment will appear shortly.}

Thursday, May 27, 2021

Hello Sunshine ~ Pool Hair Days ~ Polka Dot Orchard

 Hey there crafty friend!
Today I'm sharing a bit of sunshine with the fun Pool Hair Days digi stamp from Polka Dot Orchard! I am loving this beautiful summer inspired digi stamp set! Paired up with a fun summer color combo and it's perfect!! It doesn't hurt that the Mojo Monday sketch is a fun slimline sketch... I couldn't resist using it!


So fun & cheerful! It just makes me smile to look at it!
I started by preparing my background which is actually the piece I cut off of the full white sheet of card stock when I cut the slimline base of 7 x 8-1/2". I scored the base a 3-1/2" and set it aside. I was left with a 4 x 8-1/2" piece of white card stock to blend my background on. 


I used the Cloud & Wave stencil from Unity Stamp Co. and blended Kitsch Flamingo, Squeezed Lemonade and Spiced Marmalade over the stencil that I had to reposition with each color to cover the whole background piece. The pattern in the waves is repetitive though so it was easy to line up the stencil and blend the next color. I started at the bottom and blended my way up to the top.


Once I was happy with my blending, I set the background aside to dry and print off my digi stamps to color. I combined and resized both images and the sentiment on one Word document. I knew the approximate measurements I wanted to work with since the sketch I used had dimensions listed on it.


All that was left was to color them up with the following Copic markers:

Skin ~ E000, E00, E11
Hair ~ E00, E13, E21
Bikini ~ YR12, YR15, YR20
Flip Flop Floatie ~ RV10, RV52, RV63, Y06, Y15, Y35
Pineapple Cup ~ Y06, Y15, Y35, E55
Umbrella ~ Y06, Y18, Y35, RV10, RV52, RV63, YR12, YR15, YR20
Grounding / Outline ~ E33, E37, B0000, B000


Here's a look at the fun Mojo Monday 560 Slimline Edition sketch that I used... isn't it fun?!


And one more look at the card in whole... doesn't it just make you smile?! I love it!


Here's a look at all the fun digi stamps included in the Pool Hair Days digi stamp set!!
Polka Dot Orchard has some great new digi stamps in stock... but they also have over 200 fabulous digi stamps in the shop!! So many fun and fabulous designs to play with! Stop by and check them out!


Thanks so much for stopping by!
See ya next time.

Inky Hugs,
Crystal


{Please note that comment moderation is ON. Your comment will appear shortly.}

Tuesday, May 25, 2021

Crafty Elves' Countdown to Christmas ~ May 2021 Edition ~ The Greeting Farm

 Hello there crafty friend... or should I say crafty elf? 
Haha... I'm so excited today to be guesting with The Crafty Elves! I adore making Christmas cards... which at this point can't be a surprise, and I've truly enjoyed hopping each month with the Crafty Elves. They always share the cutest cards! So I jumped at the chance to join in the fun!


One of the best parts about creating Christmas cards early is actually getting to use the stamps and goodies that you have in your stash. I have been able to use so many neglected Christmas stamps and I'm super excited about my card today because I've had this adorable stamp from The Greeting Farm for quite awhile... I believe it was released during the Simon Says Stamp STAMPtember celebration in 2018 and can you believe this is the first time I've inked it up?! So sad... it's too cute not to see ink!


What do you think? Am I right?! Too cute! And a dream to color and paper piece... which is exactly what I did! I created my background layers with the Doodlebug Design Christmas Town papers. The kraft paper layer is 5-1/4 x 4" and adhered to a white A2 top fold card base. The red paper is 2-3/4 x 3-5/8" with a mat of white card stock measuring 2-7/8 x 3-3/4". The tree paper is 4-1/4 x 2-5/8" with a mat of white card stock measuring 4-3/8 x 2-3/4". The little snow drifts are die cut from the Lawn Fawn Stitched Hillside Borders dies. I adhered them to the tree paper before adhering it to the white mat. 


I thought that the red hearts paper was perfect to paper piece for the little girls coat and the boys scarf... it goes so nicely with the hearts on the front of her coat. Here's a list of the Copic markers I used to color up these cuties:

Skin ~ E000, E00, E11, R00, R20

Girl's Hair ~ Y21, YR12, YR14, E15
Girl's Mittens / Coat / Tights / Hat ~ C00, C2, C4, R14, R27
Girl's Skirt / Shoes ~ N1, N3, N4, N8, R000, R14, R27
Girl's Purse ~ RV0000, RV14, RV52

Boy's Hair ~ B00, N1, N3, N8
Boy's Coat / Hat ~ YG11, G14, G17, C00, C2, C4
Boy's Jeans / Shoes ~ B93, B95, B97, N1, N3, N4, N8


I fussy cut these cuties and cleaned up the edges with a Memento Tuxedo black marker. I then adhered the red paper pieces. To make them level on the card, I added a couple of layers of scrap paper to the back upper portion of their bodies. I trimmed a couple of banner flags and adhered them to the sentiment that I had stamped and punched out with a 1" circle punch. I then adhered the sentiment and the cuties to the card.


I used the fun {BYSHC} Sketch Challenge 10 flipped on the side for my card.
I've had so much fun with this sketch!


I hope you've been inspired to get a head start on your holiday cards! Be sure to stop by The Crafty Elves' blogs to see their fantastic creations this month:


Thanks so much for stopping by!
See ya next time.

Inky Hugs,
Crystal


{Please note that comment moderation is ON. Your lovely comment will appear shortly.}

Monday, May 24, 2021

Stellar Galaxy Birthday ~ Out of This World ~ Polka Dot Orchard

 Hello there crafty friend!

Today is a day of celebration... it's my youngest son's 12th birthday and I thought I'd share the card that I made for him using the Out of This World digi stamp set from Polka Dot Orchard. This fun set is extra special because I designed it from a special illustration that I created for my son's birthday last year. He loved the original design and I think he'll love this one too.


So since I was using a digi stamp I planned out the design in a Word document. I combined and resized all the images, even the sentiment in the same general area. I then print it on copy paper using the Draft print quality so as not to waste a lot of ink to see that the placement of all the images would work for the card design. I had to adjust the images just a smidge, but it looked good. So I copied each of the images and placed them on the same Word document but in the lower portion of the paper so that I would have clean images to color, as well. Now, I knew I was going to make a galaxy background so I did my ink blending before I print my images onto the blended background. I knew the general area of the images thanks to my draft print so on my card stock I blended the Twisted Citron, Salty Ocean, Seedless Preserves, and Black Soot Distress Oxide inks. 


I print my images on the blended background and added some water splatter and some white acrylic paint splatter. I set that aside to dry and did a little coloring on the astronaut, stars and the sentiment.

Astronaut ~ C00, C2, C4, B0000, B000, B00, Colorless Blender
Stars ~ Y02, Y06, Y15, Y35
Sentiment ~ B0000, B000, B00, Colorless Blender


Once my background was dry, I die cut it with an A2 Layers Die from Waffle Flower. I fussy cut each of the stars and the astronaut and cleaned up the edges with a Memento Tuxedo black marker. I then adhered them to the background and trimmed the excess off of the astronaut image. I adhered the background to a black card front measuring 4-1/4 x 5-1/2". I trimmed the sentiment and mat it with a strip of black card stock and then adhered it to the card front. I think it turned out pretty cute.


Here's a look at the whole digi stamp set... so fun! It's on sale now at Polka Dot Orchard!

That's it for me today!


Thanks so much for stopping by!
See ya next time.

Inky Hugs,
Crystal


{Please note that comment moderation is ON. Your lovely comment will appear shortly.}

Friday, May 21, 2021

{BYSHC} Sketch Challenge 10 ~ Pure and Simple ~ Unity Stamp Co.

 Hello there crafty friend!

So I am loving using the Angie Girls for this sketch... if you haven't noticed! This time I'm using the beautiful Pure and Simple stamp set from Unity Stamp Co.! I really liked using the background paper as a backdrop for Elsa Girl so I did that again for this card.


Such a great way to use up those hoards and hoards of Christmas paper!! I used the I Love Winter papers by Echo Park Paper... a favorite paper pad, for sure! I love the mix of blues and touches of red! I pulled some of those colors from the papers to color up the image. It's hard to see in the photo, but I actually paper pieced her jacket and then added a little shading with a Copic marker. There is the faintest design in the papers... so pretty in person! I stamped the sentiment on a scrap of the red pattern paper with Wow Clear Embossing ink and then I melted Alabaster White embossing powder. Another great way to use up those papers!


Here's a list of the Copic markers I used for this image:

Skin ~ E000, E00, E11
Hair ~ E21, E25, E29
Scarf / Hat / Mittens ~ B0000, B91, BG01, BG10, BG11, R14, R29
Jacket ~ E51
Pants ~ E51, E55
Cup ~ R000, R14, R29, E51, G46


Here's another look at {BYSHC} Sketch 10... I sure hope that you're inspired to pull out your holiday stamps and papers and get a jump on your holiday cards!


Thanks so much for stopping by!
See ya next time.

Inky Hugs,
Crystal


{Please note that comment moderation is ON. Your comment will appear shortly.}

Thursday, May 20, 2021

Simple Dimension ~ May 2021 Whit Kit ~ Unity Stamp Co.

 Hello there crafty friend!
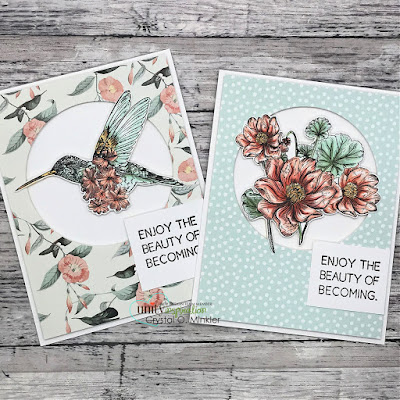
I have two more cards to share using the beautiful May 2021 Whit Kit called Beauty of Becoming from Unity Stamp Co. You may have noticed that all of my cards with this kit have had a similar sketch design but each of them have also been different depending on the products I've used. I hope you've been inspired to pull out your kit and play as well! I hope you'll share you're creations in the Unity Show & Tell Facebook group if you do get a chance to play.
 

My first card today features the gorgeous flowers in the Beauty of Becoming stamp set. I really enjoyed coloring these! I used similar colors to the papers in the kit. The pretty patterned paper layer is die cut with a circle die from the Additional Circles Dies by Waffle Flower.


I colored the pretty flowers with the following Copic markers:

Petals ~ R05, R12, R22, Colorless Blender
Flower Centers ~ YR12, YR20, YR31
Leaves ~ G0000, G00, YG61, YG63


My second card features the lovely hummingbird!! I love this stamp! I used the same Copic colors to color this image. I fussy cut both the flowers and the hummingbird and adhered the tips of the images to the patterned paper. 


I stamped the sentiments with VersaFine Onyx black ink and then heat embossed with Hero Arts Clear Embossing powder. I adhered the sentiments to the patterned paper as well and then popped up the entire top layer with foam tape... a bunch of it!


I love the dimension that the foam tape gives to the card, but also the dimension in the coloring!
You can check out my process video for this card here... Simple Dimension | May 2021 Whit Kit | Unity Stamp Co.


Here's a look at the contents of the May 2021 Whit Kit
Head on over to Unity Stamp Co. to sign up for this amazing membership!


Thanks so much for stopping by!
See ya next time.

Inky Hugs,
Crystal


{Please note that comment moderation is ON. Your lovely comment will appear shortly.}

Wednesday, May 19, 2021

Layered Stencils ~ May 2021 Whit Kit ~ Unity Stamp Co.

 Hello there crafty friend!
I am back with another pretty card featuring the May 2021 Whit Kit called Beauty of Becoming. This time the card kind of had a mind of it's own and went in a totally different direction than I had planned. So funny how that can happen! 


This card has a similar design as the first card with the circle focal piece... but I stamped the beautiful flower stamp repeatedly with Classic Kraft ink on Kraft card stock for a watermark look. I also used the gorgeous Glacier Paste included in the kit for the fun sparkly polka dot background on the circle die cut.


The beautiful hummingbird is stamped with Gina K. Design Amalgam black ink and then heat set with a Mini Wagner heat tool. 


I watercolored the bird with Vintage Pastel watercolors from Prima Marketing. I added some more shading and dimension with Prismacolor Pencils. And finished the detail on the bird with a white gel pen... adding highlights to the eye and the centers of the flowers.


I stamped the sentiment on a scrap of white card stock with Vintage Photo Distress Oxide ink. I trimmed it and adhered it directly to the card. The hummingbird is popped up with a whole bunch of mini stampin' dimensionals. You can check out my video for this card here... Layered Stencils | May 2021 Whit Kit | Unity Stamp Co.


Here's a look at the contents of the May 2021 Whit Kit
Head on over to Unity Stamp Co. to sign up for this amazing membership!
I'll be back tomorrow with not one, but two more cards using this fabulous kit!


Thanks so much for stopping by!
See ya next time.

Inky Hugs,
Crystal


{Please note that comment moderation is ON. Your lovely comment will appear shortly.}

Tuesday, May 18, 2021

No Coloring ~ May 2021 Whit Kit ~ Unity Stamp Co.

 Hello there crafty friend!
I'll be sharing some fun inspiration using the new May 2021 Whit Kit this week. First up is a No Coloring card! I know that sometimes I just don't feel like coloring and the gorgeous stamps in the Beauty of Becoming set in the kit have SO much detail that you can absolutely get away without coloring them!!


Here's a very simple card featuring the beautiful hummingbird. I cut a piece of the patterned paper to 4-1/8 x 5-3/8" and adhered it to a white A2 top fold card base. I die cut the circle from another piece of the beautiful paper in the Simple Spring paper pack... absolutely gorgeous papers in this kit!!


Now, I wanted to make this one into a birthday card so I pulled out one of favorite sentiments from the Aging Gorgeously sentiment kit and stamped it directly on the bottom layer of pattern paper. Done! So easy... I have a little process video to share that also shows all the fun contents in the kit. You can check that out here... No Coloring | May 2021 Whit Kit | Unity Stamp Co.


Here's a look at the contents of the May 2021 Whit Kit. This kit is  available at Unity Stamp Co.

I'll be back tomorrow with another card I created with the May 2021 Whit Kit.

Thanks so much for stopping by!
See ya next time.

Inky Hugs,
Crystal


{Please note that comment moderation is ON. Your lovely comment will appear shortly.}

Monday, May 17, 2021

Slimline Feather Card ~ Unity Stamp Co.

 Hello there crafty friend!
Today I'm sharing a pretty slimline card using the new Slimline Feather from Unity Stamp Co.!! Another beautiful stamp illustrated by Angie Blom... I love all the different flowers and designs on this feather!! So much fun to color in so many different ways!


I chose to do kind of a rainbow of colors with the following Copic markers:

Purples ~ V0000, V01, V04
Blues ~ B000, B00, B02
Greens ~ YG0000, YG11, YG13, G12, G14
Yellows ~ Y06, Y15, Y35, Y38
Oranges ~ YR15, YR21, YR68
Pinks ~ RV06, RV17, RV23, R11, R43


For the base of the card I scored a 7 x 8-1/2" piece of white card stock at 3-1/2" and adhered a Scalloped Stitched Slimline die by Gina Marie Designs cut from white card stock. I splattered some pretty Liquid Pixie Dust from Ink on 3 all over the scalloped die before adhering it.


I fussy cut the Slimline Feather leaving a skinny white border and splattered it with some of the Liquid Pixie Dust... actually I splattered a lot! I popped up the feather with a lot of foam tape... this is such a huge stamp! Then I fussy cut around the sentiment from the newly released Floral and Buds stamp set. I love the font for this 'hi' sentiment... so pretty! I used a combination of foam tape and Tombow Mono Multi Purpose glue to also pop up the 'hi' sentiment but also overlap the feather just a tad.

The big Birthday Sale continues!! Be sure to stop by Unity Stamp Co. to see all the gorgeous new releases and save with an amazing 50% off stamps!!


Thanks so much for stopping by!
See ya next time.

Inky Hugs,
Crystal


{Please note that comment moderation is ON. Your lovely comment will appear shortly.}

Sunday, May 16, 2021

CAS Sending Good Vibes ~ May 2021 KOM Summer Vibes ~ Unity Stamp Co.

 Hello there crafty friend!
I still had the May 2021 Kit of the Month called Summer Vibes from Unity Stamp Co. on my desk and got to thinking the flip flops would be fun to ink up. AND I happened to see that the cue over at Casology is Outside... so here I am with a fun CAS flip flop card.


A very clean and simple card... I stamped the flip flops and sentiment on a white card front with Memento Tuxedo black ink and colored up the flip flops with the following Copic markers:

Flip Flop #1 ~ RV04, RV23, Y06, Y15
Flip Flop #2 ~ BG10, BG13, BG23
Flip Flop #3 ~ YG11, YG13, RV23, RV25


I used a B000 to outline the flip flops... giving them a tiny bit of dimension on the card. I trimmed the card front to 4-1/8 x 5-3/8" and adhered it to a white A2 top fold card base. Easy and peasy... done!


Be sure to head over and see the fun cards being shared on the CASology blog!! Such a fun cue!


Thanks so much for stopping by!
See ya next time.

Inky Hugs,
Crystal


{Please note that comment moderation is ON. Your lovely comment will appear shortly.}

Saturday, May 15, 2021

Relax It's Your Day ~ May 2021 KOM Summer Vibes ~ Unity Stamp Co.

 Hello there crafty friend!
I had a fun idea for the girl in the new May 2021 Kit of the Month called Summer Vibes from Unity Stamp Co. so I inked her up and gave it a go!


I stamped the image with Wow Clear Embossing ink and then heat set a fine black embossing powder. I then watercolored a fun relaxing sunset scene with lots of pretty colors. I even decided to add some clouds using Copic Opaque White ink.


I trimmed the panel down and tore the left bottom corner. I roughed up the edges with a Tim Holtz Tonic Paper Distresser but the card still needed something... so I decided to add some waves with the Cloud & Wave stencil from Unity. I love the soft subtle background it gives to the watercolored scene.


That's it for me today!

Thanks so much for stopping by!
See ya next time.

Inky Hugs,
Crystal


{Please note that comment moderation is ON. Your lovely comment will appear shortly.}

Friday, May 14, 2021

{BYSHC} Sketch Challenge 10 ~ Christine Girl ~ Unity Stamp Co.

 Hello there crafty friend!

Today I'm sharing another fun Christmas card for the {BYSHC} Sketch Challenge 10 over in the Build Your Stash Holiday Cardmakers Facebook group. I had so much fun last week with the card I made using Elsa Girl that I decided to ink up another Angie Girl that hadn't seen ink yet... Christine Girl! Isn't she gorgeous?! I had an absolute blast coloring her too!


I went with a simple color palette of black, red and white for this card! So classic for Christmas. The papers I chose to use for my layers are the My Favorite Christmas papers by Echo Park Paper. I had to use a larger panel for Christine Girl than it calls for in the sketch, but as I always say... the sketch is to inspire not require. So the panel measures 2-1/2 x 4-5/8" with a 2-5/8 x 4-3/4" black mat.


The sentiment, which is actually from the Cuddlebug Frog stamp set, is stamped on True Black card stock with Wow Clear Embossing ink and then I melted Alabaster White embossing powder from Brutus Monroe. I trimmed it up and ended up putting it on the right side... I think it works better on that side. I used the following Copic markers to color up Christine Girl:

Skin ~ E000, E00, E11
Hair ~ E21, E25, E29
Clothes ~ R000, R14, R27, C00, C2, C4, N0, N2, N4, N6, N10, Y06, Y28, Y35


Here's another look at {BYSHC} Sketch 10... I sure hope that you're inspired to pull out your holiday stamps and papers and get a jump on your holiday cards! I'll be back again next week with another fun Christmas card! Be sure to stop by Unity Stamp Co... their big Birthday Sale is happening right now and stamps are over 50% off!!


Thanks so much for stopping by!
See ya next time.

Inky Hugs,
Crystal


{Please note that comment moderation is ON. Your comment will appear shortly.}

Thursday, May 13, 2021

Galaxy Mini Slimline ~ Floral and Buds ~ Unity Stamp Co.

 Hello there crafty friend!
Today I'm sharing another fabulous new release from Unity Stamp Co. called Floral and Buds and it's illustrated by the wonderfully talented Angie Blom!!! So super excited to see so many fabulous new releases from Angie during the big Birthday Sale!!


This gorgeous flower from the Floral and Buds stamp set is HUGE!! It's approximately 4 x 6"!! My first thought was to do a slimline card, but since I'm really loving the mini slimline cards I decided to do that instead. Of course, that meant I had to trim off some of the pretty flower but I really do love this size of card!


I wanted to do purple and thought it would be fun to do a galaxy flower by pairing it with the Stargazer papers from The Paper Studio. I added some white acrylic paint splatter to the paper and the flower to add to the galaxy theme. I think it turned out pretty nice!


Here's a close up of the flower and the list of Copic markers I used to color it up:

Petals ~ BV0000, BV000, BV13, B0000, B00
Pistil {Center} ~ Y06, Y15, Y35
Stem / Leaves ~ YG0000, YG11, YG13, YG23


I'm thinking this card would be great to send to a friend or family member to just say hi.
Be sure to check out the big Birthday Sale going on over at Unity Stamp Co.!! Lots of new fantastic stamps and over 50% off stamps!!


Thanks so much for stopping by!
See ya next time.

Inky Hugs,
Crystal


{Please note that comment moderation is ON. Your lovely comment will appear shortly.}