Saturday, July 30, 2022

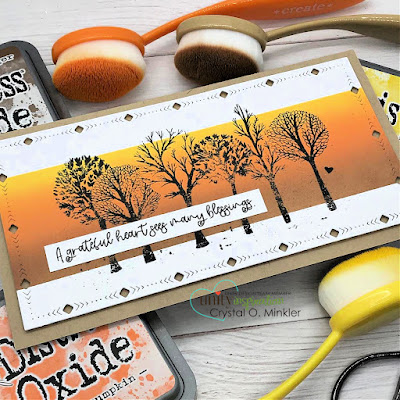
Silhouette Stamping ~ Many Blessings Grove ~ Unity Stamp Co.

 Hello there crafty friend!
I'm back and this time I'm not sharing a Christmas card!! LOL! Phew... if you've been kind enough to stop by my blog during the Christmas in July Linky Party, thank you so much for the visits! I know that it can be a little much when it's Christmas everyday. Anywho, today I'm excited to share a new release from Unity called Many Blessings Grove. I do love to make Fall cards!


I did a bit of silhouette stamping over a masked inked blended background of Distress Oxide inks. A very easy technique and so beautiful!


I masked my panel with iCraft Removable Pixie Tape and ink blended Mustard Seed, Carved Pumpkin, and Vintage Photo Distress Oxide inks. I stamped the beautiful silhouette of trees over top with Ranger Jet Black Archival ink.


I ran the panel through my Big Shot with the Tribal Stitched Mini Slimline die from Gina Marie Designs and then I popped it up on a Kraft mini slimline card base measuring 7 x 6-1/2"; scored at 3-1/2". I trimmed the sentiment and adhered it directly to the tree panel. Done... so easy peasy and pretty too! Head on over to Unity and check out the latest release and of course, there's a fab sale going on!! 


Thanks so much for stopping by!
See ya next time.

Inky Hugs,
Crystal


{Please note that comment moderation is on. Your lovely comment will appear shortly.}

Friday, July 29, 2022

Christmas in July 2022 {BYSHC} Linky Party ~ Merry Merry Mini ~ Colorado Craft Company

 Hello there crafty friend!
It's the last day for the Christmas in July 2022 {BYSHC} Linky Party and I'm sharing a card featuring four Sponsors for our Linky Party... first, I've used the beautiful Merry Merry Mini Savvy Sentiment stamp from return Sponsor Colorado Craft Company. I stamped it with Candied Apple Distress Oxide ink.


I then die cut it with the Wonky Stitched Rectangle die from return Sponsor Gina Marie Designs. I cut all my layers of pretty pattern paper from the Meowy Christmas paper pad from return Sponsor Newton's Nook Designs.


 And to stay a bit closer to the sketch I decided to stamp the super cute coffee cup from the Perfect Blend mini stamp set from return Sponsor Gina K. Designs. Since the focal piece is the sentiment my little cup takes the place of the sentiment in the sketch. I stamped the little cup with Memento Tuxedo Black ink and then colored it up with the following Copic Markers:

Whipped Cream ~ C00, C2
Candies / Straw ~ R20, R14
Cup ~ YG11, YG23


I fussy cut the cup along the black line and colored the edge of the cup with a Memento Tuxedo black marker. I added a bit of foam tape to the back of the cup and popped it up on the card front. I adhered the card front to a white A2 top fold card base. All done!


There's still a bit of time to play along with this month's Sketch 24!! This sketch has been great for using those pretty pattern papers. No matter how hard I try to use up some of my papers, I seem to always manage to grow my stash! Crazy how that happens! LOL


Colorado Craft Company just released some seriously adorable Christmas stamps and coordinating dies... you should really stop by their shop and check them out! I think the new Sweater Weather stamp will be coming to my house. :)  So cute! I hope you'll stop by the Christmas in July 2022 {BYSHC} Linky Party to check out all the wonderful Holiday inspiration being shared!! So many wonderful cards and tags have been shared so far... I'm so inspired to keep on building my stash of holiday cards! I hope you'll join in the fun and play along!


Thanks so much for stopping by!
See ya next time.

Inky Hugs,
Crystal


{Please note that comment moderation is ON. Your comment will appear shortly.}

Thursday, July 28, 2022

Christmas in July 2022 {BYSHC} Linky Party ~ Cheery Deer ~ Lawn Fawn

 Hello there crafty friend!
We're nearing the end of the Christmas in July 2022 {BYSHC} Linky Party with just today and tomorrow left for linking up those holiday cards. I'm sharing my 7th card for the linky party and this one may just be my favorite!! I used the absolutely adorable Cheery Deer die set from NEW Sponsor Lawn Fawn for a cute CAS card! I just love a cute CAS card!


I started by die cutting all my pieces for the cute Cheery Deer. I die cut the full deer from Chocolate Chip card stock from Stampin' Up! And then I die cut the outline deer from Close to Cocoa (SU!) and Kraft card stock from Papertrey Ink putting the colors in two separate Craft Embellishment Trays from return Sponsor Twiddler's Nook. This is a great way to keep your die cut colored pieces separate but contained... no losing them on your crafty desk!! Twiddler's Nook has several styles of embellishment trays too. The little Cloud Craft Embellishment Tray is one of my favorites. So cute!  


I adhered the Close to Cocoa deer outline to the Chocolate Chip full deer back piece and then put the Kraft antlers, eye areas and belly pieces on their little spaces. I die cut the little pink ears from Pretty in Pink card stock (SU!) and adhered them to the deer. And then I die cut the hooves from True Black card stock (PTI) and adhered them to the deer too. Isn't he the cutest?! I added that adorable red enamel dot from the Rainbow Mirror Foil Enamel Dots from Sponsor Gina Marie Designs and turned my deer into Rudolph. 


I set Rudolph aside and die cut the cute string of lights which also comes in the die set. The lights are also two dies... a base light string and the outline. I die cut them both from True Black card stock and adhered them together. Rather than die cut the whole string from several colors I just die cut one light bulb from each colors of scrap card stock. I used Real Red, Tempting Turquoise, Daffodil Delight, Green Galore, Orchid Opulence and Only Orange card stocks from Stampin' Up! I adhered the lights to Rudolph's antlers and then added foam tape to the back of him and set him aside.


For my very simple background, all I did was blend some Salvaged Patina Distress Oxide ink with a large post-it note on the bottom to make that straight edge. I used my Ranger Anti Static Pouch all over the oxide ink and then stamped the blended background with a couple snowflakes from the Winter Skies stamp set from Lawn Fawn using Sugar Cube White Pigment ink from Taylored Expressions. And then I applied some Alabaster White Embossing powder from Sponsor Brutus Monroe and melted it with my heat tool. I stamped a few more tiny snowflakes with the white ink and then I added some dots of snow with a Sakura White Gelly Roll pen.


And then I goofed up and stamped my sentiment just under that blended ink. I didn't give myself enough room for Rudolph to sit so to fix my goof I found a scrap of white card stock that would fit under the ink blended area. I lined it all up this time with Rudolph in place and then stamped the sentiment again. The 'Wishing You a Magical' sentiment is from the Winter Skies stamp set from Lawn Fawn. The 'Christmas' sentiment is a die cut from the Cursive Merry Christmas Word die from Gina Marie Designs. It's actually Merry Christmas together but I trimmed off the Merry so it would work with the sentiment I wanted on my card. I die cut it from True Black card stock three times and then adhered them all together and then adhered it on the card front. I trimmed the card front and then adhered it to the white A2 top fold card base. Card #7 done!


Be sure to stop by Lawn Fawn to check out all the adorable Christmas goodies!! So many adorable stamps and dies to play with! I hope you'll also stop by the Christmas in July 2022 {BYSHC} Linky Party to check out all the wonderful Holiday inspiration being shared!! So many wonderful cards and tags have been shared so far... I'm so inspired to keep on building my stash of holiday cards! I hope you'll join in the fun and play along!


Thanks so much for stopping by!
See ya next time.

Inky Hugs,
Crystal


{Please note that comment moderation is ON. Your comment will appear shortly.}

Wednesday, July 27, 2022

Christmas in July 2022 {BYSHC} Linky Party ~ Hipster Christmas ~ Jaded Blossom

 Hello there crafty friend!
I can't believe that it's already day 6 of the Christmas in July 2022 {BYSHC} Linky Party... time is just flying by!! Today I'm sharing a cute mini slimline with the most adorable Hipster Santa stamp that I just HAD to have!!! This cute stamp from the Hipster Christmas stamp set is from NEW Sponsor Jaded Blossom!!! So excited to have Jaded Blossom as a new sponsor for our linky party!!


I paired up this cool Santa stamp with one of my favorite paper packs from Sponsor Brutus Monroe called Candy Stripe. Unfortunately, it looks like this paper has been discontinued. Bummer! It reminds me of the old fashioned candies my Granny always had during the holidays.


I used this fun new sketch from my Tawny Owl Paperie | Inky Inspiration Facebook group. I'd love to invite you to join the Tawny Owl Paperie | Inky Inspiration Facebook group... it's a fun little group that I just started back up. I share monthly sketches and crafty tips... and really enjoy all the cards being shared in the group! I hope that you'll join us and play along with the new August sketch! The sketch is just for fun... no prizes or anything yet. Just a fun way to get our mojos working when we get a little stuck or in a slump. Hope to see you there!


Back to my card... I started by die cutting a piece of Stampers Select white card stock from Papertrey Ink with the Big and Little Chain Mini Slimline die from Sponsor Gina Marie Designs. Now the sketch is designed for an A2 card so I had to do a little bit of figuring and cut my pattern paper pieces for the mini slimline as follows... 1-1/8 x 1-7/8" {top left}; 1-1/2 x 1-7/8" {top right}; 1-1/8 x 3-5/8" {bottom left}; 1-1/2 x 3-5/8" {bottom right}. These fit nicely in the middle of the mini slimline die cut.


I set that aside and stamped the Hipster Santa with Memento Tuxedo black ink... again, my favorite black ink for clear stamps for easy clean up. This time before I inked it up I rubbed the clear stamp with my index finger. Most clear stamps have a little film on them that can distort the image when you ink it and stamp right out of the package. I've found that if I rub my finger over the stamp it removes that film and I get a wonderful crisp image. You can also use a white eraser but mine isn't always handy... unlike my finger!! LOL!


Here's a quick list of the Copic markers I used to color up this stamp:

 Skin ~ E000, E00, E11, E04
Hair ~ C00, C2, C3
Hat ~ C00, C2, C3, R20, R14, R27, YG11, G24, G46
Glasses ~ R20, R14


I die cut a scrap piece of white card stock with the Big and Little Pierced Chain Circle dies from Gina Marie Designs and popped it up on the panel with foam tape. I adhered the panel to a white mini slimline card base measuring 7 x 6-1/2", scored at 3-1/2". I fussy cut Hipster Santa and 'cleaned up' the edges by coloring them with my Memento Tuxedo black marker. I popped up Hipster Santa on the circle die with foam tape. I stamped the fun sentiment with Mowed Lawn Distress Oxide ink and then Twisted Citron Distress Oxide ink and then again with Mowed Lawn... this gave me a very similar green to the greens in the papers. I trimmed up the sentiment, cut a flag on the left side and adhered it to the card. Done! What do you think? Loving the Hipster Santa? I do!!   


Before you leave, be sure to stop by Jaded Blossom to check out their upcoming release which is Autumn inspired but they have lots of fun Christmas goodies too AND lots of fun gnome dies and stamps!! Woohoo!! If you haven't already, stop by the Christmas in July 2022 {BYSHC} Linky Party to check out all the wonderful Holiday inspiration being shared!! So many wonderful cards and tags have been shared so far... I'm so inspired to keep on building my stash of holiday cards! I hope you'll join in the fun and play along!


Thanks so much for stopping by!
See ya next time.

Inky Hugs,
Crystal


{Please note that comment moderation is ON. Your comment will appear shortly.}

Tuesday, July 26, 2022

Christmas in July 2022 {BYSHC} Linky Party ~ Up On the Rooftop ~ Brutus Monroe

 Hello there crafty friend!
I'm back for day 5 of the Christmas in July 2022 {BYSHC} Linky Party and today I'm sharing a sweet card using a stamp from return Sponsor Brutus Monroe called Up On the Rooftop!! Oh my goodness... I just love the detail in this beautiful stamp! One of my many weaknesses when it comes to Christmas stamps is Santa stamps and I just love this one! Sadly, I'm not seeing this stamp on the Brutus Monroe website anymore but I did see a whole bunch of fab new releases for Christmas in July!! 


I stamped the image with Memento Tuxedo Black ink on Stampers Select white card stock from Papertrey Ink. I like to use Memento black ink for clear stamps because it's cleans off very nicely. I did use my Stamp Platform to stamp this image... I find sometimes with clear stamps you have to be sure not to have air bubbles under your stamp otherwise the stamp doesn't give you a clean crisp image. It did take me a few tries to stamp this image but boy was it worth it! Love it!


Here's my quick list of Copic markers that I used to color up this sweet Santa card:

Skin ~ E00, E11, E04
Hair ~ C00, C2
Santa Suit ~ C00, C2, R20, R14, R27
Santa's Bag ~ R20, R14, R27, Y35 {ribbon}
Chimney ~ E23, E19
Trees ~ YG11, G24, G46
House ~ E23, E25
Snow ~ C00, C2, C3
Sky ~ B0000, B00, B91, B93, B95, B97, B99


Once I was done coloring I splattered a bunch of white acrylic paint all over the image for some snow. At first I had only done some in the sky for stars but then I got to thinking it's Christmas... who doesn't love a white Christmas?! So I went a little nuts with the snow. But I think it adds to the card!


I die cut a piece of white card stock with the Wonky Stitched Rectangle die from Gina Marie Designs. I then trimmed the Santa panel to fit just inside the wonky stitched lines of the white layer. I adhered the two layers together and then adhered them to a True Black card front measuring 4-1/4 x 5-1/2". I adhered my entire panel to a white A2 top fold card base and set it aside. I stamped the sentiment on True Black card stock from Papertrey Ink with Clear Embossing ink from Brutus Monroe and melted some Alabaster White embossing powder, also from Brutus Monroe. I trimmed it up and popped it up on the card with foam tape. Done! Love it!


Before you leave, be sure to stop by Brutus Monroe to check out the new Christmas in July release!! Woohoo!! And they also have some beautiful Christmas products in their Clearance section! If you haven't already, stop by the Christmas in July 2022 {BYSHC} Linky Party to check out all the wonderful Holiday inspiration being shared!! I am really enjoying all the wonderful creations... so many beautiful cards and so inspiring! I hope you'll join in the fun and play along! Let's build our stash of holiday cards this week!!


Thanks so much for stopping by!
See ya next time.

Inky Hugs,
Crystal


{Please note that comment moderation is ON. Your comment will appear shortly.}

Monday, July 25, 2022

Christmas in July 2022 {BYSHC} Linky Party ~ Beary Christmas Tags ~ Not 2 Shabby

Hello there crafty friend!
I'm super excited to share my holiday projects for today... tags!! They turned out SO cute! I just fell in love with the sweet Beary Christmas stamp set from returning Sponsor Not 2 Shabby and couldn't wait to play with them as soon as they got to my house!! It was impossible to pick just one so I inked them all up. Aren't they just THE cutest!?!
 

These adorable bears and the coordinating dies are the Stamp and Die of the Month... a wonderful subscription available at Not 2 Shabby. You can sign up to receive the Stamp and Die of the month each month with an 18% discount or you can select to just buy the stamp and die of the month without signing up for that monthly subscription at the full retail price. I love that you get the option to just buy the combo!


Anywho, I paired them up with the darling Meowy Christmas paper pad from returning Sponsor Newton's Nook Designs. Having the papers picked out really helped when it came to coloring up these cuties! I stamped the four bears with Memento Tuxedo Black ink... this is my favorite ink when stamping with clear stamps because it cleans off nicely. I then die cut the four bears with the coordinating die. 


I also die cut the four tag bases from Stampers Select White card stock from Papertrey Ink with the Make A Tag {die set} from Sponsor Unity Stamp Co. I then die cut the smallest tags from the pattern paper. And then I got to coloring with my Copic markers:

Christmas Tree Bear:
Tree ~ YG11, YG23, R27, Y06, Y35, E21, E23, E25
Ear Muffs ~ C00, C2, R20, R14, R27
Bear ~ W00, W1, W3, W5

Chocolate Chip Ice Cream Bear:
Hat ~ C00, C2, R20, R27, YG11, YG23
Ice Cream ~ YG11, YG23, E21, E23, E25
Bear ~ W00, W1, W2, W4


Santa Bear:
Hat ~ C00, C2, C3, R20, R14, R27
Scarf ~ R20, R14, R27 
Bear ~ W00, W1, W3, W5

Gift Bear:
Gift ~ YG11, YG23, R27
Bear ~ W00, W2, W4


I adhered the tags together and used my Crop-a-dile to punch the hole in the tops. I used a white organdy ribbon that I tied with a candy cane twine. I also looped a skinny green ribbon through the hole so I can attach the tags to gifts. I popped up the bears on the tags with foam tape. And then to finish them all off I stamped the sentiment which also has coordinating dies... bonus! I adhered the sentiments to the tags with a combination of liquid glue and foam tape so that they will lay flat on the tag. I just love how these turned out! I hope to make a card or two with these cuties too... love them!


Before you leave, be sure to stop by Not 2 Shabby and use coupon code XMASJULY for 20% off the Clearance section!! And if you haven't already, stop by the Christmas in July 2022 {BYSHC} Linky Party to check out all the wonderful Holiday inspiration being shared!! I am really enjoying all the wonderful creations being shared... so many beautiful cards and so inspiring! I hope you'll join in the fun and play along! Let's build our stash of holiday cards this week!!


Thanks so much for stopping by!
See ya next time.

Inky Hugs,
Crystal


{Please note that comment moderation is ON. Your comment will appear shortly.}

Sunday, July 24, 2022

Christmas in July 2022 {BYSHC} Linky Party ~ October 2019 KOM Keeping Spirits Bright ~ Unity Stamp Co.

Hello there crafty friend!
I'm back with another card for the Christmas in July 2022 {BYSHC} Linky Party and this time I'm featuring a card using a gorgeous stamp from the Keeping Spirits Bright {October 2019 KOM} from Unity Stamp Co. Now, I have to confess... I found this beautiful image already colored in my stash. Score! It made for a quick card for today! 


I die cut the colored focal piece with the Pleated Lace Rectangles die from returning Sponsor Gina Marie Designs. Since my image was already colored I had to go looking through my Christmas papers to find one that would work and I happened to find my hoarded Figgy paper pack from BasicGrey!! Love these papers!!! I've been hoarding them for years! Anywho... the colors work really well with the colored image so I trimmed my papers and adhered them to a white A2 top fold card base.


Since this image was colored up a while ago I didn't have my list of colors to share here, but I did put a list together of which Copic Markers I think I used:

Boots ~ BG000, BG10, BG01, BG13, BG72
Ribbon ~ Y35, R000, R14, R27
Greenery ~ G24, G46
Berries ~ R000, R14, R56
Baubles ~ Y06, Y15, Y35, B0000, B00, B02
Ground ~ N0, N3


I adhered the little flag to the top left side of the die cut panel and then I popped up the focal piece and little flag piece with foam tape. I stamped the sentiment, also from the Keeping Spirits Bright KOM, with Clear Embossing ink from returning Sponsor Brutus Monroe on a scrap piece of red pattern paper and melted some Alabaster White Embossing powder also from Brutus Monroe. I trimmed the sentiment and adhered it directly over the image... I kinda wish I hadn't done that. I try not to cover up colored images. It just doesn't seem right after all the work in coloring an image, but I didn't like any other position for the sentiment on the card. I actually tried to pull it up but the glue had set quick so it is what it is!


I used another past sketch... {BYSHC} Sketch 10!! This was a fave! It also worked really well with this colored image. Have you visited the Build Your Stash Holiday Cardmakers Facebook group? We host a fun sketch challenge each month to inspire our holiday cardmaking all year long. I love revisiting the sketches and even use them for cards of all occasions.


Before you leave, be sure to stop by Unity Stamp Co... they're having a Mega Summer Warehouse sale!! Gotta love a good sale!! And if you haven't already, stop by the Christmas in July 2022 {BYSHC} Linky Party to check out all the wonderful Holiday inspiration being shared!! I'm so excited to continue building my stash of holiday cards for 2022... I hope you'll join in the fun and play along! Let's build our stash of holiday cards this week!!


Thanks so much for stopping by!
See ya next time.

Inky Hugs,
Crystal


{Please note that comment moderation is ON. Your comment will appear shortly.}
Saturday, July 23, 2022

Christmas in July 2022 {BYSHC} Linky Party ~ Home for the Holidays ~ Polka Dot Orchard

 Hello there crafty friend!
Today I'm sharing a sweet and simple card using the adorable Home for the Holidays digital stamp from returning Sponsor Polka Dot Orchard. I've actually had this sweet digi stamp printed off for awhile but I hadn't gotten around to coloring it or using it for a card. I thought now was the perfect time! 


I had resized the truck digi and the sentiment in a Word Document and print it off on white card stock. I die cut the card front with the largest stitched die from the Scallops & Rectangles {nesting dies} from returning Sponsor Unity Stamp Co. And then I went looking through my Christmas papers... I found some sweet papers that were leftover from my Scrapping for Less Design Team days. I thought they were perfect for this card and even more so since they were designed by returning Sponsor Teresa Russell of Fresh and Renewed with Teresa.


I only have a few scrap pieces left of these papers so I combined two pieces together to cover the front of my white A2 top fold card base (turned on it's side). And then I trimmed a couple scraps and adhered them to the focal piece.


Here's a quick list of the Copic Markers I used to color up this cute digi stamp:

Truck ~ R20, R14, R27 
Windows ~ B0000, B00
Tires ~ N0, N1, N3, N5, N7
Headlights ~ Y11, Y06, Y35
Tree ~ YG11, G24, G46
Ground ~ N0, N3


My inspiration for my card was last month's {BYSHC} Sketch 23... such a simple sketch design! I did change up my little banner flags so they worked with my design.


Before you leave, be sure to stop by Polka Dot Orchard... they're having a wonderful sale on all the Christmas digital stamps!! Woohoo!! I just love a good sale! And if you haven't already, stop by the Christmas in July 2022 {BYSHC} Linky Party to check out all the wonderful Holiday inspiration being shared!! I'm so excited to continue building my stash of holiday cards for 2022... I hope you'll join in the fun and play along! Let's build our stash of holiday cards this week!!


Thanks so much for stopping by!
See ya next time.

Inky Hugs,
Crystal


{Please note that comment moderation is ON. Your comment will appear shortly.}

Friday, July 22, 2022

Christmas in July 2022 {BYSHC} Linky Party ~ Christmas Wishes Pinecones ~ Angie Blom Digital Designs

  Hello there crafty friend!
I'm so excited to share my first card for the Christmas in July 2022 {BYSHC} Linky Party!! For my first card I'm featuring the wonderful Christmas Wishes Pinecones digital stamp from returning Sponsor Angie Blom Digital Designs. I adore this beautiful stamp! There's just something about pinecones for Christmas... I can almost smell cinnamon and cloves in the air!


I started this card by first resizing my image and sentiment in a Word Document. I then print them off on a piece of white card stock. Next, I chose the gorgeous White Winter {paper pack} from returning Sponsor Unity Stamp Co. for my paper layers. I cut all my paper layers including a kraft card stock mat for the star pattern paper. 


I adhered all my pattern papers together and then adhered them to an A2 top fold card base of Kraft card stock from Papertrey Ink. I just love the mix of patterns in this paper pack... so soft & beautiful!


I colored up the beautiful pinecone image with the following Copic markers:

Berries ~ R20, R14, R27
Leaves ~ YG13, YG67
Pine Needles ~ YG13, YG67, YG97
Pinecones ~ E21, E23, E25, E29


I used a variation of our current {BYSHC} Sketch Challenge 24 for my card design today switching out the square for my fussy cut focal piece. I hope you'll join in the fun and play along with our sketch challenge. We have new challenges each month in the Build Your Stash Holiday Cardmakers Facebook Group. A great way to get ahead on those holiday cards!


Yay!! I'm also a Sponsor for the Christmas in July 2022 {BYSHC} Linky Party and this is the fabulous prize package that I am offering for one lucky winner. For a chance to win this fun prize make a Christmas card and link it up to the Christmas in July 2022 {BYSHC} Linky Party blog post on the Build Your Stash Holiday Cardmakers blog.


Before you leave, be sure to stop by Angie Blom Digital Designs ~ Angie is having a wonderful sale on all her Christmas digital stamps!! Woohoo!! I love a great sale! And if you haven't already, stop by the Christmas in July 2022 {BYSHC} Linky Party to check out all the wonderful Holiday inspiration being shared!! I'm so excited to continue building my stash of holiday cards for 2022... I hope you'll join in the fun and play along! Let's build our stash of holiday cards this week!!


Thanks so much for stopping by!
See ya next time.

Inky Hugs,
Crystal


{Please note that comment moderation is ON. Your comment will appear shortly.}