Showing posts with label #coffeecard. Show all posts

Saturday, July 20, 2024

Christmas in July 2024 {BYSHC} Linky Party ~ Merry & Bright Mug ~ Angie Blom Digital Designs

 Hello there crafty friend!
I'm back for Day 2 of the Christmas in July 2024 {BYSHC} Linky Party with another cute holiday card! It was so much fun checking out the inspiration shared yesterday for the start of the Linky Party. So many wonderful cards! Today I'm sharing a card using a sweet digital stamp from our sweet return Sponsor Angie Blom Digital Designs called Merry & Bright Mug.


I started by inserting the Merry & Bright Mug printout sheet into a Word Document and then I cropped the mug. I combined it with a couple more images {you'll see them later this week} and printed the document. I colored up the beautiful mug with my Copic markers and fussy cut the mug. I used a Memento Tuxedo Black marker to color the edges of fussy cutting. This technique helps the fussy cutting look all nice and neat. I added foam tape from our awesome Sponsor Therm O Web called iCraft 3D Foam Tape Jumbo Roll (white) to the back of the mug and set it aside.

Here's a quick list of the Copic markers I used to color up this cute mug:
Mug: R20, R14, R46
Holly: R20, R14, R46, YG11, G24, G46
Whipped Cream: C00, C1, C3
Candy Cane: R00, R20, R46, C00, C1, C3
Leaf: YG11, G24, G46


I'm also playing along with the Color Hues Challenge today! Red and Green are so perfect for a Christmas card! This fun challenge is open until July 29th, if you want to play along! 


To create my background I used the awesome A2 Card Layout Die Set from our wonderful Sponsor Newton's Nook Designs. I trimmed four pieces of pattern paper from the beautiful Christmas Time 6x6 Paper Pad, also from Newton's Nook Designs. I secured them two at a time to the back of the die using washi tape. The washi tape was also cut by the die but that's ok. I have so much washi tape. I don't mind using it.


I adhered all my layers together using iCraft UltraBond Adhesive from Sponsor Therm O WebI adhered the card front of Real Red card stock from Stampin' Up to a white A2 top fold card base turned on its side for a landscape card. I removed the backing from the foam tape on the back of the mug and popped up the mug on the card. I then added three green enamel dots from the Red & Green Foil Mirror Enamel Dots from our lovely Sponsor Gina Marie Designs to finish off the card. 


Love Newton's Nook Designs products as much as I do? Be sure to check out the current Inky Paws Challenge for details on how to win a $20 store credit to add some NND products to your stash!


 Woohoo!! I'm so excited to have another card done for my stash! If you haven't already, stop by the Christmas in July 2024 {BYSHC} Linky Party to check out all the wonderful Holiday inspiration being shared!! Have a fantastic day!


Thanks so much for stopping by!
See ya next time.

Inky Hugs,
Crystal


{Please note that comment moderation is ON. Your comment will appear shortly.}

Tuesday, June 25, 2024

Tawny Owl Paperie Inky Inspiration Sketch 23 ~ Coffee is Not Enough ~ Unity Stamp Co.

 Hello there crafty friend!
Today I'm sharing my first card for the Tawny Owl Paperie Inky Inspiration Sketch Challenge 23 in the Tawny Owl Paperie Inky Inspiration Facebook group.  I couldn't resist playing with this fabulous new release from Unity called Coffee is Not Enough.


I definitely take this sentiment to heart! Hahaha... a new fave, for sure! And she was so much fun to color up! I knew the background was going to be all neutral so I wanted her to pop with lots of color. Speaking of the background... I paired her up with the awesome Perk Me Up {paper pack} from Unity. Love all the fabulous patterns in these papers! It was hard to pick and choose what I wanted to use for the card.


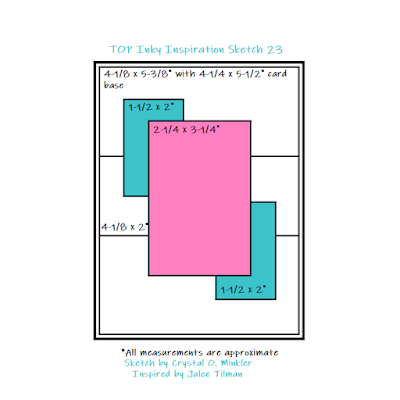
Here's a look at the fun sketch for Tawny Owl Paperie Inky Inspiration Sketch Challenge 23. The sketch, as always, is meant to inspire not require. So let the sketch lead in your design, but don't feel limited by it. I added dimensions as a guide, but my focal image is larger than the one on the sketch. A good example of letting the sketch lead, but not limiting the design.


 I found a stitched rectangle on my desk for a kind of backdrop for the girl and kitty. It was die cut using the smallest die from the Scallops & Rectangles {nesting dies}. I probably could of softened the white with a bit of Antique Linen Distress ink but in the moment I was liking the pop of white. I colored up the girl and kitty using my Copic markers. Fussy cut them leaving a bit of a white border around the images.

Here's a quick list of the Copic markers I used: 
Skin: E000, E00, E11, E04
Hair: E70, E71, E74, E77
Pajamas: R20
Robe: BV20, BV11, BV34
Mug: BG000, BG01, BG45
Coffee: E51, E23, E25
Slippers: Y11, Y15, Y38
Kitty: R00, R20, C00, C1, C3


I adhered the stitched rectangle to the smaller pattern paper rectangles and then I added foam tape to the back of the whole panel. Popped them up on the card for some fun dimension. I trimmed up the sentiment and added a small piece of foam tape on the far right side so it would lay flat on the card. All of my layers are adhered to a white A2 top fold card base. I hope you all have fun with this sketch! I can't wait to see what you create with it. Have an ink-tastic week!

Thanks so much for stopping by!
See ya next time.

Inky Hugs,
Crystal


{Please note that comment moderation is on. Your lovely comment will appear once approved.}

Monday, June 17, 2024

Inky Paws Challenge #225 ~ Sketch Challenge Reminder

 Hello there crafty friend!
 There's still time to play along with the Inky Paws Challenge 225 - Sketch Challenge! You have until this coming Friday, June 21st to get your entries in for this fun challenge and a chance to win a $20 store credit to Newton's Nook Designs!


This is such a fun sketch to play with. I was excited to try a coffee themed card for my reminder card.


I recently added the beautiful Heartfelt Coffee Stamp Set to my collection and I've been really wanting to ink it up. I love it! I ink smooshed a piece of Stampers Select White Card Stock from Papertrey Ink using Vintage Photo and Ground Espresso Distress Inks. I dried it completely with the Wagner Precision Heat Tool. I applied TE Anti Static Powder to the background. And then I stamped the heart shaped coffee stamp onto the ink smooshed background using Sugar Cube White Pigment Ink from Taylored Expressions. I dusted the background with Alabaster White Embossing Powder from Brutus Monroe and then melted the powder using my heat tool. I followed the same steps again but only partially stamping the heart so I could die cut the circle with the cup as my focal image.


I die cut the center of the heart using the coordinating Heart Frames Die Set. And then I die cut the circle using the Circle Frames Die Set. I wanted a thin mat for the circle so I just fussy cut it. I heat embossed the sentiment using the same steps I used for the Heartfelt Coffee Stamp Set only on Early Espresso Card Stock from Stampin' Up. I die cut it using the same heart die and adhered it over the heart.


I ink smooshed another 4-1/4 x 5-1/2" panel of Stampers Select White Card Stock using the Vintage Photo and Ground Espresso Distress Inks again. I left a lot of white space this time for some contrast. I die cut the ink smooshed background using the largest die from the Framework Die Set. I also die cut a scrap of white card stock using the same die. I adhered the postage die cut pieces to a white A2 top fold card base. I adhered the circle to the heart and then added foam tape to the back of both. I removed the backing and popped them up on the card. To make the cup on the circle pop a bit more, I watercolored it with ZIG Clean Color Real Brush markers using Mid Brown, Dark Brown, Light Carmine and a water pen to blend them a bit. So happy to have another birthday card in my stash!


Now it's your turn to get your paws inky with your Newton's Nook Designs products and create a project using the sketch. Be sure to link up to the Inky Paws Challenge! Can't wait to see your projects!


Thanks so much for stopping by!
See ya next time.

Inky Hugs,
Crystal


{Please note that comment moderation is on. Your lovely comment will appear once approved.}

Wednesday, March 27, 2024

Membership Wednesday ~ March 2024 BOM & UU ~ Unity Stamp Co.

  Hello there crafty friend!
Today I'm sharing a fun coffee card featuring the fabulous March 2024 Background of the Month membership along with the awesome coffee cup stamp from the March 2024 Uniquely Unity membership from Unity. These stamps were made for each other!!


I ink smooshed a 4-1/4 x 5-1/2" piece of Stampers Select White Card Stock from Papertrey Ink using Antique Linen and Vintage Photo Distress Oxide Inks. Once I was happy with my ink smooshed background, I stamped the awesome Global Brew background stamp using Ground Espresso Distress Oxide ink. I cleaned off my stamp and also inked it up with the Antique Linen oxide ink but just at a diagonal across the stamp. I love how it gives a distressed look to the background.


I die cut the background using the largest die from the Scallops & Rectangles {nesting dies}. I stamped the coffee ring and coffee bean a few times on the background using Vintage Photo Distress Oxide ink. I adhered the background to a white A2 top fold card base. 

I stamped the Thanks A Latte cup on white card stock using the Ground Espresso Distress Oxide ink. I smooshed the Salvaged Patina Distress Oxide ink pad on my round acrylic block and used my water pen to pull some ink and color the coffee cup. Since I stamped on white card stock and not watercolor paper, I didn't use a lot of water and I only went over the cup once with the ink. I then put my panel back in my stamp platform and stamped it again with the Ground Espresso Distress Oxide ink. This made any of the stamped areas that ran a bit with the water nice and crisp again. I fussy cut the cup and popped it up using a bunch of foam tape.


I die cut a scrap piece of white card stock using a die from the Scallops & Banners {nesting dies} and stamped the sentiment using the Ground Espresso oxide ink. I used an acetate grid to help me with placement. I had to shift the stamp a couple of times to get it just right. I adhered the sentiment directly to the card and trimmed off the excess from the top.


Here's a quick look at the Background of the Month membership this month! Love it! 


Here's a quick look at this month's Uniquely Unity membership! So amazing!

 Well, that's it for me today! Hope you have an ink-tastic day!


Thanks so much for stopping by!
See ya next time.

Inky Hugs,
Crystal


{Please note that comment moderation is on. Your lovely comment will appear once approved.}

Friday, March 22, 2024

{BYSHC} Sketch Challenge 43 ~ Peppermint Candy Embellishment Mix ~ Twiddler's Nook

Hello there crafty friend!
I'm so happy to finally be playing again with the sketch challenge over in the Build Your Stash Holiday Cardmakers Facebook group! Today I'm sharing a sweet Christmas card featuring the Peppermint Candy Embellishment Mix from this month's fabulous sponsor, Twiddler's Nook! Unfortunately, it looks like these peppermints aren't available anymore but there's another fun mix called Christmas Confetti Clay Embellishment Mix that is available and includes some cute peppermints in the mix. 


Twiddler's Nook has an amazing assortment of clay embellishment mixes!! I have a whole bunch in my collection. Some people use them for shaker cards, but I really like to use some of the bits on my cards. I used just a handful of peppermints for this card. 


I paired up the cute peppermint clay bits with the beautiful Peppermint Latte 6x6 Paper Pad and the coordinating ephemera pack from Not 2 Shabby. I love using paper pads when I'm working with so many layers! The papers are already made to coordinate. I just need to decide which papers I want where! I mat each of my paper layers with Real Red card stock from Stampin' Up. The cute ephemera was the perfect peppermint touch!


I die cut the circle of Stampers Select White Card Stock from Papertrey Ink using the Scallops & Circles {nesting dies} from Unity. The sentiment is from the Warm & Cozy Stamp Set from Not 2 Shabby. I just love how this card turned out and it was so easy just following along with the measurements from the sketch.


Here's a look at {BYSHC} Sketch Challenge 43 for the month of March. Loving all the layers in this fun sketch! I can't wait to see what everyone does with it. I hope you'll join us and play along with the sketch! If you're interested in seeing a bit more inspiration for this sketch, check out the amazing inspiration from the design team over on the {BYSH} Cardmakers blog! Lots of beautiful inspiration this month from the design team.


Thanks so much for stopping by!
See ya next time.

Inky hugs,
Crystal


{Please note that comment moderation is ON. Your lovely comment will appear shortly.}

Wednesday, February 21, 2024

Membership Wednesday ~ February 2024 KOM and BOM ~ Unity Stamp Co.

  Hello there crafty friend!
Today I'm sharing a lovely card featuring the fabulous February 2024 Kit of the Month membership along with the gorgeous background stamp from the February 2024 Background of the Month membership from Unity.


I stamped the beautiful Artistic Pallet background stamp on Crumb Cake card stock from Stampin' Up with Vintage Photo Distress Ink. Super easy background for a pretty card!


I stamped the pretty cup of flowers from the Grace and More Grace KOM using Black Amalgam ink on Stampers Select White Card Stock from Papertrey Ink. I colored it up with some Copic markers and die cut it with a stitched tag die from the Make a Tag {die set}. I also die cut a mat from Chocolate Chip card stock {also from Stampin' Up} using the next largest tag die from the set. Here's a quick list of the Copic markers I used:

Cup: BG70, BG01, BG34
Leaves: YG03, YG93
Yellow Flowers: Y06, Y15, Y35, YR27
Orange Flower: Y15, Y35, YR15, YR27
Pink Flowers: R00, R83, R32
Purple Flowers: V000, V12, V15
Teal Flowers: BG01, BG34
Steam: C00, C1
Grounding: C00, C1, C3


I trimmed the background down to 4-1/8 x 5-3/8" and adhered it to a Chocolate Chip card stock mat. I adhered the tags together and adhered them to the card. I stamped a lovely sentiment from the recently released Navigating Grief {Edition One} sentiment kit. Love the sentiments in this kit!


Here's a quick look at the Background of the Month membership this month! Love it! 


Here's a quick look at this month's Kit of the Month membership! So amazing!

 Well, that's it for me today! Hope you have an ink-tastic day!


Thanks so much for stopping by!
See ya next time.

Inky Hugs,
Crystal


{Please note that comment moderation is on. Your lovely comment will appear once approved.}

Monday, January 22, 2024

Inky Paws Challenge #215 ~ Color Challenge

Hello there crafty friend!
It's time for a new Inky Paws Challenge... a beautiful Color Challenge
I sure hope that you'll join in the fun and play along with us with your Newton's Nook Designs products! You have until Friday, February 2nd to get your entries in for the #215 Color Challenge and a chance to win a $20 store credit to Newton's Nook Designs!


Absolutely gorgeous colors... Pink, Teal, Ice Blue & Cookie Dough Brown!! Love them!


I'm trying to ink up some stamps that I haven't used yet so I thought the Caffeinated Cats Stamp Set would be a cute stamp for this challenge. But I wasn't quite in a mood to color up the whole image so the Spotlight Technique was perfect for this card. I die cut the panel using the large postage stamp die from the Framework Die Set. And die cut a portion of the kitty panel using a stitched circle die from the Circle Frames Die Set. I also die cut a piece of Coastal Cabana card stock from Stampin' Up using the scalloped and stitched circle die also from the die set. 


Here's a quick list of the Copic Markers I used to color up the spotlight circle:

Cookie Dough Brown Cat: RV10, RV13, R00, R20, E30, E31, E33, Colorless Blender
White Cats: RV10, RV13, R00, R20, C00, C1, C3
Cookie Dough Brown & Ice Blue Cups: E30, E31, B000, B00
Ice Blue & Pink Cups: B0000, B000, B00, RV10, RV13
Teal & Pink Cups: BG0000, BG11, BG34, RV10, RV13


I heat embossed the sentiment with my go to combination of products... I applied TE Anti Static Powder to the Coastal Cabana card stock, stamped the sentiment with Sugar Cube Pigment ink from Taylored Expressions, added Alabaster White Embossing Powder to the ink from Brutus Monroe and melted the powder with my Wagner Precision Heat Tool. Once the sentiment was cooled I wiped off the excess anti static powder with a microfiber cloth, trimmed up the sentiment and popped it {and the spotlight circle} up on the card using Scrapbook Adhesive Crafty Foam Tape.


Now it's your turn to get your paws inky with your Newton's Nook Designs products and create a project using the color combo of Pink, Teal, Ice Blue & Cookie Dough Brown. Be sure to link up to the Inky Paws Challenge! Can't wait to see your projects!


Thanks so much for stopping by!
See ya next time.

Inky Hugs,
Crystal


{Please note that comment moderation is on. Your lovely comment will appear once approved.}

Monday, January 15, 2024

Inky Paws Challenge #214 ~ Warm & Cozy Theme Challenge Reminder

 Hello there crafty friend!
 There's still time to play along with the Inky Paws Challenge #214 - Warm & Cozy Theme Challenge!! You have until this coming Friday, January 19th to get your entries in for this fun challenge and a chance to win a $20 store credit to Newton's Nook Designs!


We're in the midst of some really cold weather that's dipping below zero... the perfect time for some warm and cozy cardmaking!


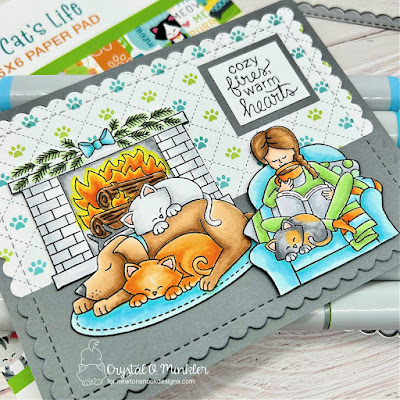
Nothing is more cozy during a super cold day than a roaring fire in the fireplace while drinking hot coffee, reading and sitting with all the critters hanging out. I just had to combine the sweet stamp from Sips & Stories Stamp Set with the adorable stamp from the Fireside Friends Stamp Set. Both were stamped with Memento Tuxedo Black ink and fussy cut with my Cutter Bee Scissors. I cleaned up the edges by coloring them with my Memento Tuxedo Black marker so my fussy cutting looks nice and neat.


I paired up this sweet scene with a pattern paper from A Cat's Life 6x6 Paper Pad. I thought the cute paw prints were just perfect as wallpaper. I grounded the scene with a piece of Weathervane Card Stock from Papertrey Ink. This grey card stock coordinates with the grey in the pattern paper really nicely.

Here's a list of the Copic Markers I used to color up my scene:
Bow / Rug / Chair: BG0000, BG000, BG02, BG45
Greenery: YG11, G24, G46
Fireplace: C00, C1, C3, N0, N1, N3, N5
Fire / Wood: Y06, YR21, YR15, YR68, E55, E57, E59
White Cat: R00, R20, C00, C1, C2
Orange Cat: R00, R20, YR0000, YR21, YR15, YR68
Dog: E51, E55, E57, E59
Skin / Hair: E000, E00, E11, E51, E55, E57, E59
Pajamas / Socks: YG11, G24, YR21, YR15
Pillows / Blanket: YG11, G24, BG0000, BG000, BG02, BG45, YR21, YR15, YR68, C00, C1, C3
Tortoise Shell Cat: R00, R20, N0, N1, N3, YR21, YR15
Mug / Coffee: YR0000, YR21, YR15, YR68, C00, C1, C3, E51, E55, E57
Book: C00, C1, C3


I die cut the pattern paper and the grey card stock using the large stitched scalloped rectangle die from the Frames & Flags Die Set. I then trimmed the grey card stock with my guillotine trimmer and adhered it to the pattern paper background. I added a little scrap of card stock to the back of the fireplace so the image would lay flat on the card. I added foam tape to the back of the girl in the chair and popped her up on the card. I like the dimension this gives the card but I think it also helps with the size difference between the images. To finish off the card, I stamped the sentiment and framed it with a grey card stock mat. I just adhered it directly to the card.


Now it's your turn to get your paws inky with your Newton's Nook Designs products and create a project using the warm & cozy theme. Be sure to link up to the Inky Paws Challenge! Can't wait to see your projects!


Thanks so much for stopping by!
See ya next time.

Inky Hugs,
Crystal


{Please note that comment moderation is on. Your lovely comment will appear once approved.}

Monday, November 6, 2023

Inky Paws Challenge #210 ~ Sketch Challenge Reminder

 Hello there crafty friend!
 There's still time to play along with the Inky Paws Challenge #210 - Sketch Challenge! You have until this coming Friday, November 10th to get your entries in for this fun challenge and a chance to win a $20 store credit to Newton's Nook Designs!


I am seriously loving this sketch! Have you given it a try? So many possibilities!


When I was putting away my goodies from my card last week, I noticed the Coffee House Stories 6x6 Paper Pad in my collection and I just HAD to make a coffee themed card for the sketch this week. I used a couple of scraps from the paper pad for the vertical and horizontal paper layers. I die cut the cute coffee cup papers using the largest scalloped die from the Frames & Flags Die Set


I stamped the adorable kitty and sentiment from the Newton Loves Coffee Stamp Set using Memento Tuxedo Black ink. I colored him up with my Copic markers and fussy cut him with my scissors. If fussy cutting isn't your thing, there's a fabulous coordinating Newton Loves Coffee Die Set! I just added it to my wishlist! I trimmed up the sentiment and adhered it directly to the card.

Quick list of the Copic Markers I used:
Kitty: W00, W1, W3, R00, R20
Collar: E23, E25, E27, BG0000, BG000, BG11, BG32
French Press: BG0000, BG000, BG11, BG32, E23, E25, E27, C00, C1


I pulled out my handy dandy vellum card stock and die cut a piece using the decorative square die from the Frames Squared Die Set. I just couldn't cover up these pretty layers of papers! I adhered Newton to the vellum and then applied liquid glue behind Newton and adhered the vellum decorative square. To finish off the card, I added a few enamel dots. Still trying to make a dent in my surplus of enamel dots!!


Newton's Nook Designs is a Sponsor of the Fall | Winter Coffee Lovers Blog Hop. So fun! I'm linking up my card to the hop. If you have time, join in the fun and link up too! 


Now it's your turn to get your paws inky with your Newton's Nook Designs products and create a project using the stripes theme. Be sure to link up to the Inky Paws Challenge! Can't wait to see your projects!


Thanks so much for stopping by!
See ya next time.

Inky Hugs,
Crystal


{Please note that comment moderation is on. Your lovely comment will appear once approved.}

Monday, October 16, 2023

Inky Paws Challenge #209 ~ Color Challenge

Hello there crafty friend!
It's time for a new Inky Paws Challenge... a fun Color Challenge
I sure hope that you'll join in the fun and play along with us with your Newton's Nook Designs products! You have until Friday, October 27th to get your entries in for the #209 Color Challenge and a chance to win a $20 store credit to Newton's Nook Designs!

Absolutely gorgeous colors... Rusty Orange, Honey Yellow, Cornflower Blue, and Caramel Brown.


I was so happy that I finally found my Autumn 6x6 Paper Pad {I knew I had it somewhere!} because I thought the colors in the paper pad would work great with this color challenge and I was right! I love it! I used the fabulous Framework Die Set to die cut my background paper that I adhered to a kraft A2 card base. I adhered my paper layers together using the stitched and scalloped frame die to frame out my little Fall scene. I also cut a stitched hillside using a die from the Land Borders Die Set.


Inspiration for my card came from one of the sketches over at Build Your Stash Holiday Cardmakers Facebook Group. This one is a favorite of mine and it was perfect for this card!


I stamped the coffee girl, pumpkin and sentiment from the Pumpkin Latte Stamp Set using Memento Tuxedo Black ink. Colored up the coffee girl and pumpkin with Copic markers listed below. I die cut them using the coordinating dies from the Pumpkin Latte Die Set. And adhered them to the little scene inside the frame.

Here's a quick list of the Copic Markers I used to color up the coffee girl, pumpkin and coffee cup:

Skin: E000, E00, E11, E04
Hair: E70, E74, E77
Scarf: YR15, YR24, YR27, Y11, Y15, Y38 
Jacket: B000, B41, B23, B66, Y11, Y15, Y38
Pants: E51, E34, E35
Boots: E51, E34, E35, E37
Pumpkins ~ YR15, YR24, YR27, E34, E35, E37
Coffee Cup ~ E51, B000, B41, B23, B66, YR15, YR24, YR27


I trimmed the sentiment and added foam tape to either side of the sentiment so that it would lay flat on the card over the frame.


Now it's your turn to get your paws inky with your Newton's Nook Designs products and create a project using the color combo of Rusty Orange, Honey Yellow, Cornflower Blue, and Caramel Brown. Be sure to link up to the Inky Paws Challenge! Can't wait to see your projects!


Thanks so much for stopping by!
See ya next time.

Inky Hugs,
Crystal


{Please note that comment moderation is on. Your lovely comment will appear once approved.}