Showing posts with label #sketchchallenge. Show all posts

Monday, September 9, 2024

Inky Paws Challenge #231 ~ Sketch Challenge Reminder

 Hello there crafty friend!
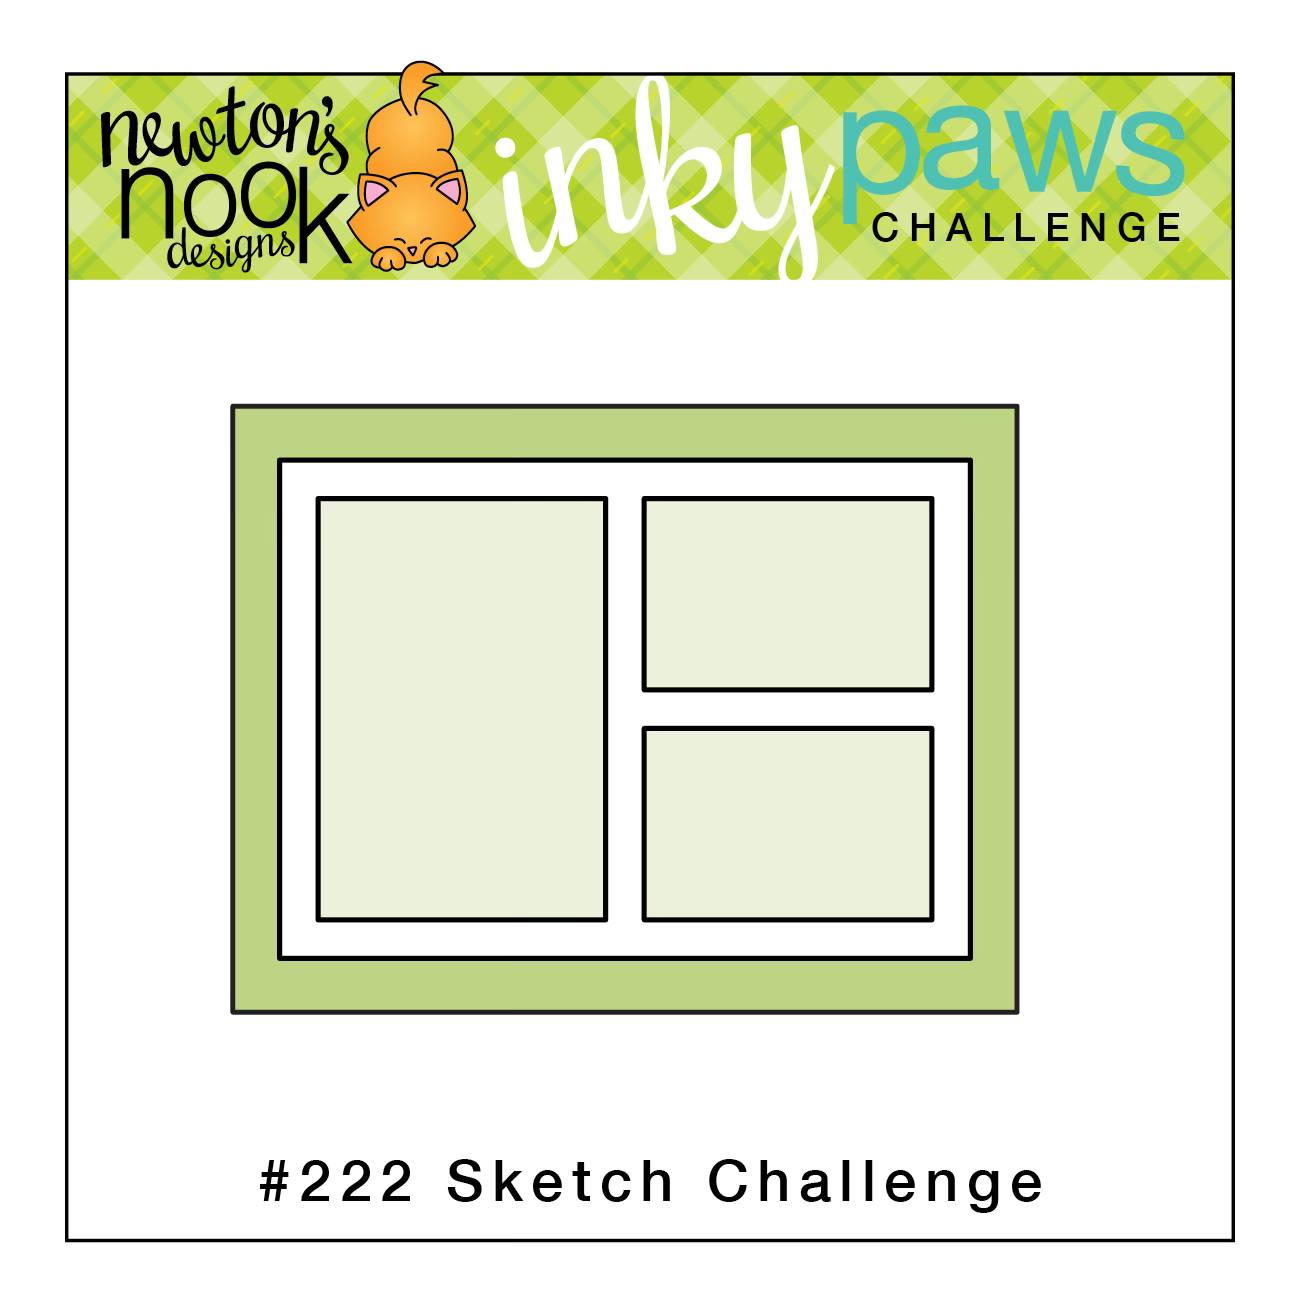
 There's still time to play along with the Inky Paws Challenge 231 - Sketch Challenge! You have until this coming Friday, September 13th to get your entries in for this fun challenge and a chance to win a $20 store credit to Newton's Nook Designs!


This just may be my most favorite sketch so far! I couldn't wait to make a Christmas card using this sketch!


This time I wanted to stick more closely to the sketch so I picked a cute cup stamp from the Cup of Cocoa Stamp Set for my focal image. I stamped the cup on a scrap of card stock and stamped the sentiment on a larger scrap. I die cut the sentiment using a circle die from the Circle Frames Die Set being sure there was a good amount of room for the cup on the left side.

Here's a quick list of the Copic markers I used:
Snowman: C00, C3, YR15, YR16, R14
Snow / Whipped Cream: C00, C3
Mug: R20, R14, R46
Candy Cane: C00, C3, YG11, G24, G46
Candies: R14, G24


I used a fun mix of papers from the Meowy Christmas 6x6 Paper Pad. The best thing about the papers in this paper pad is that you could literally pick any three papers and they will work perfectly with each other for a fun background.


I shared these measurements last week but wanted to share them again. I think it's easiest to start with a piece of pattern paper that measures 4 x 5-1/4", but for my card today I used scraps of pattern paper. I just didn't have enough full sheets of the pattern papers. So I cut my example above and used the pieces as a guide for my pattern papers. I placed them over my pattern paper scraps and just traced around the edges with pencil and trimmed the pattern papers. I adhered the pattern paper pieces together on a lightweight card stock and then adhered them to a white A2 top fold card base.


I was surprised to discover that I don't have the coordinating Cup of Cocoa Die Set so I fussy cut the cup on the line. Colored the edges of the fussy cutting with a Memento Tuxedo black marker to make it look nice and neat and then I popped it up on the card with foam tape. I finished off the card with three red rhinestones from the Rainbow Bling Rhinestones from Gina Marie Designs.


Now it's your turn to get your paws inky with your Newton's Nook Designs products and create a project using the sketch. Be sure to link up to the Inky Paws Challenge! Can't wait to see your projects!


Thanks so much for stopping by!
See ya next time.

Inky Hugs,
Crystal


{Please note that comment moderation is on. Your lovely comment will appear once approved.}

Monday, July 29, 2024

Inky Paws Challenge #228 ~ Sketch Challenge Reminder

 Hello there crafty friend!
 There's still time to play along with the Inky Paws Challenge 228 - Sketch Challenge! You have until this coming Friday, August 2nd to get your entries in for this fun challenge and a chance to win a $20 store credit to Newton's Nook Designs!


Such a fun sketch! I couldn't wait to make a Halloween card using my favorite Halloween stamp!


I stamped the adorable Newton's Perfect Pumpkin using Memento Tuxedo Black ink and colored it up with my Copic markers. I fussy cut this cutie and colored up the edges with a Memento Tuxedo Black marker making the fussy cutting nice and neat! I heat embossed the sweet sentiment using Sugar Cube White Pigment ink from Taylored Expressions along with Alabaster White Embossing Powder from Brutus Monroe. This is my favorite combo for a pretty white heat embossed sentiment. I melted the powder with a Wagner Precision Heat Tool and then trimmed the sentiment.

Here's a quick list of the Copic markers I used:
Kitty: R00, R20, N0, N2, N4
Hat: N2, N4, N6, N8, YG11, YG23
Pumpkin: E53, E55, E57, YR21, YR15, YR68, YR14


I die cut a hexagon from True Black card stock from Papertrey Ink using a die from the awesome Hexagon Frames Die Set. I adhered the sentiment across the bottom of the hexagon and adhered the kitty just on top... I think the pumpkin lays over the sentiment strip just a tiny bit. I added foam tape to the back of the hexagon and sentiment and set it aside.


I die cut the background paper using the stitched scalloped die from the Frames & Flags Die Set and I adhered it to a black A2 top fold card base. I cut the rest of my fun pattern papers from the Halloween Meows 6x6 Paper Pad. The orange striped papers measures 1-1/2 x 4-5/8". The cute kitty pumpkin paper measures 1-3/4 x 4-1/8". And the orange pumpkin paper measures 4-1/4 x 1-1/2". I adhered my paper layers to the card and then popped up the focal kitty! So happy to add a cute Halloween card to my stash!


Now it's your turn to get your paws inky with your Newton's Nook Designs products and create a project using the sketch. Be sure to link up to the Inky Paws Challenge! Can't wait to see your projects!


Thanks so much for stopping by!
See ya next time.

Inky Hugs,
Crystal


{Please note that comment moderation is on. Your lovely comment will appear once approved.}

Monday, July 22, 2024

Inky Paws Challenge #228 ~ Sketch Challenge ~ Christmas in July 2024 {BYSHC} Linky Party

 Hello there crafty friend!
Who's up for a new challenge?! It's time to get our paws inky with a fun sketch challenge! I love a good sketch! You have until Friday, August 2nd to get your entries in for the #228 Sketch Challenge and a chance to win a $20 store credit to Newton's Nook Designs!


Another fun sketch! I can't wait to see what you create with it!


For my card today, I started with my paper layers. I knew that I wanted to make a holiday card so I grabbed my Christmas Time 6x6 Paper Pad and picked out a few pieces for my layers. I chose pattern papers that would contrast each other when layered. Doing that means I didn't need to add mats to the layers. I adhered all my layers using iCraft UltraBond Adhesive from Therm O Web.


I'm playing along with the Christmas in July 2024 {BYSHC} Linky Party. I invite you to stop by the linky party to check out all the wonderful Holiday inspiration being shared!! I have really been enjoying the cards being shared so far! If you have time, come join in the fun and build your stash of holiday cards for a chance to win a prize. Newton's Nook Designs is one of our amazing sponsors. So you could use the new Inky Paws Challenge sketch with a Christmas theme and enter both challenges. It's a fun twofer!!


I stamped the adorable kitties from the Cat Christmas Tree Stamp Set using Memento Tuxedo Black ink. I colored the image up with my Copic markers and then die cut it using the coordinating Cat Christmas Tree Die Set. I die cut an oval from vellum card stock using the Oval Frames Die Set to mat my focal image. Adhered the kitties to the vellum and then applied glue behind the kitties only. Securing the vellum to the card without the glue being visible.

Here's a quick list of the Copic markers I used:
White Cats: R00, R20, C00, C1, C3
Orange Cats: R00, R20, YR000, YR21, YR15, YR68
White Belly: C00, C1, C3
Light Gray Cat: R00, R20, N0, N1, N3
Dark Gray Cat: R00, R20, N0, N2, N4, N6, C00, C1
Star: Y11, Y15
Christmas Lights: R20, R14, YG11, G14, B0000, B00, Y11, Y15, N0, N2, N4, N6 
Red Ornament: R20, R14, R46, N0, N2, N4
Green Ornament: YG11, G14, N0, N2, N4


I heat embossed the sentiment using Sugar Cube Pigment White ink from Taylored Expressions on Real Red Card Stock from Stampin' Up. Before stamping I did use the TE Anti-Static Powder Tool, also from Taylored Expressions. I added some Alabaster White Embossing Powder from Brutus Monroe to the wet ink and melted the powder using a Wagner Precision Heat Tool. Once the embossed sentiment cooled I rubbed the card stock with a microfiber cloth to remove the excess powder. I trimmed the sentiment and adhered it to the card. So happy to have another card for my stash! 


Now it's your turn to get your paws inky with your Newton's Nook Designs products and create a project using this super fun sketch. Be sure to link up to the Inky Paws Challenge! Can't wait to see your projects!


Thanks so much for stopping by!
See ya next time.

Inky Hugs,
Crystal


{Please note that comment moderation is on. Your lovely comment will appear once approved.}

Monday, June 17, 2024

Inky Paws Challenge #225 ~ Sketch Challenge Reminder

 Hello there crafty friend!
 There's still time to play along with the Inky Paws Challenge 225 - Sketch Challenge! You have until this coming Friday, June 21st to get your entries in for this fun challenge and a chance to win a $20 store credit to Newton's Nook Designs!


This is such a fun sketch to play with. I was excited to try a coffee themed card for my reminder card.


I recently added the beautiful Heartfelt Coffee Stamp Set to my collection and I've been really wanting to ink it up. I love it! I ink smooshed a piece of Stampers Select White Card Stock from Papertrey Ink using Vintage Photo and Ground Espresso Distress Inks. I dried it completely with the Wagner Precision Heat Tool. I applied TE Anti Static Powder to the background. And then I stamped the heart shaped coffee stamp onto the ink smooshed background using Sugar Cube White Pigment Ink from Taylored Expressions. I dusted the background with Alabaster White Embossing Powder from Brutus Monroe and then melted the powder using my heat tool. I followed the same steps again but only partially stamping the heart so I could die cut the circle with the cup as my focal image.


I die cut the center of the heart using the coordinating Heart Frames Die Set. And then I die cut the circle using the Circle Frames Die Set. I wanted a thin mat for the circle so I just fussy cut it. I heat embossed the sentiment using the same steps I used for the Heartfelt Coffee Stamp Set only on Early Espresso Card Stock from Stampin' Up. I die cut it using the same heart die and adhered it over the heart.


I ink smooshed another 4-1/4 x 5-1/2" panel of Stampers Select White Card Stock using the Vintage Photo and Ground Espresso Distress Inks again. I left a lot of white space this time for some contrast. I die cut the ink smooshed background using the largest die from the Framework Die Set. I also die cut a scrap of white card stock using the same die. I adhered the postage die cut pieces to a white A2 top fold card base. I adhered the circle to the heart and then added foam tape to the back of both. I removed the backing and popped them up on the card. To make the cup on the circle pop a bit more, I watercolored it with ZIG Clean Color Real Brush markers using Mid Brown, Dark Brown, Light Carmine and a water pen to blend them a bit. So happy to have another birthday card in my stash!


Now it's your turn to get your paws inky with your Newton's Nook Designs products and create a project using the sketch. Be sure to link up to the Inky Paws Challenge! Can't wait to see your projects!


Thanks so much for stopping by!
See ya next time.

Inky Hugs,
Crystal


{Please note that comment moderation is on. Your lovely comment will appear once approved.}

Monday, June 10, 2024

Inky Paws Challenge #225 ~ Sketch Challenge

 Hello there crafty friend!
Who's up for a new challenge?! It's time to get our paws inky with a fun sketch challenge! I am always up for good sketch! You have until Friday, June 21st to get your entries in for the #225 Sketch Challenge and a chance to win a $20 store credit to Newton's Nook Designs!


Another super fun sketch! I can't wait to see what you create with it!


I'm so excited I finally inked up the adorable Newton's Reading List Stamp Set . Isn't this just the cutest stamp?! I love it! I stamped it and the sentiment on the cover of the book with Memento Tuxedo Black ink and colored it up with Copic markers. And then I die cut it using the die from the coordinating Newton's Reading List Die Set.

Here's a quick list of the Copic markers I used:
Kitty: R00, R20, YR000, YR21, YR15
Collar: Y11, Y28
Books: BG000, BG01, BG15, Y11, Y15, Y35, YR000, YR21, YR15, N0, N1, N3
Pages: C00, C1, C3


 I paired up the adorable kitty with the A Cat's Life 6x6 Paper Pad. I used similar colors from these papers for my coloring. The colors are great in the papers so I knew they'd be great in the coloring. I trimmed the turquoise papers to 4 x 5-1/4" and adhered it to a white A2 top fold card base. The gray cat silhouette papers measure 4-1/4 x 2-3/4". 


I stamped the sentiment on white card stock with the same black ink as the kitty. I die cut the sentiment using the smallest circle die from the Circle Frames Die Set. I also die cut a larger circle of white card stock. I adhered the gray kitty paper and the large white circle to the card. I adhered the small sentiment circle to the kitty and then added foam tape to the bac of both. I removed the backing and popped them up on the card. To finish off the card, I added some glossy accents from Ranger to the kitty's glasses and added two turquoise enamel dots from my stash.


Now it's your turn to get your paws inky with your Newton's Nook Designs products and create a project using this awesome sketch. Be sure to link up to the Inky Paws Challenge! Can't wait to see your projects!


Thanks so much for stopping by!
See ya next time.

Inky Hugs,
Crystal


{Please note that comment moderation is on. Your lovely comment will appear once approved.}

Monday, May 6, 2024

Inky Paws Challenge #222 ~ Sketch Challenge Reminder

 Hello there crafty friend!
 There's still time to play along with the Inky Paws Challenge 222 - Sketch Challenge! You have until this coming Friday, May 10th to get your entries in for this fun challenge and a chance to win a $20 store credit to Newton's Nook Designs!


I am seriously loving this sketch! And something else I seriously love is cherry blossoms. It reminds me of my grandparents and their home. They had a gorgeous cherry tree in the front yard. I loved to visit when it bloomed! So gorgeous!


It was only natural that I played with the new Cherry Blossoms Stamp Set. It's so beautiful! And a must have for my collection. I stamped the cherry blossom sprig and a few of the extra blossom on a scrap of Stampers Select White Card Stock from Papertrey Ink. I colored them up with Copic markers and then die cut them with the coordinating Cherry Blossom Die Set.

Here's a quick list of the Copic markers I used:

Blossoms / Buds: RV0000, RV10, RV02, RV14
Stem: E21, E23, E27


I set aside the pretty cherry blossoms and grabbed a card front of Stampers Select White card stock measuring 4-1/4 x 5-1/2". I wanted to stick with pink for a monochromatic card so I grabbed Kitsch Flamingo and Picked Raspberry Distress Oxide inks and ink smooshed them on my glass table. I spritzed the ink a bit with water and then dabbed my card stock into the pools of ink leaving some white until I was happy with the background.


I die cut the ink smooshed background using the largest die from the Frames & Tags Die Set. I have to say I think this die set has become my new favorite! Of course, it works perfectly with this sketch but also I love all the components of the set. Anywho, I adhered the background to my white A2 top fold card base that I turned on it's side for a landscape card. I die cut a white frame using the frame die from the same die set. I die cut the cute little tag and stamped the 'hello'. I wrapped a bit of ivory twine around the inside of the frame and thread it through the hole of the tag and then tied a bow. I adhered the frame to the card and added foam tape to the back of the tag to pop it up. I also added foam tape to the back of all of the cherry blossoms and popped them up on the card. 


Now it's your turn to get your paws inky with your Newton's Nook Designs products and create a project using the sketch. Be sure to link up to the Inky Paws Challenge! Can't wait to see your projects!


Thanks so much for stopping by!
See ya next time.

Inky Hugs,
Crystal


{Please note that comment moderation is on. Your lovely comment will appear once approved.}

Monday, April 29, 2024

Inky Paws Challenge #222 ~ Sketch Challenge

 Hello there crafty friend!
Who's up for a new challenge?! It's time to get our paws inky with a fun sketch challenge! I love a good sketch! You have until Friday, May 10th to get your entries in for the #222 Sketch Challenge and a chance to win a $20 store credit to Newton's Nook Designs!


Absolutely loving this sketch! I can't wait to see what you create with it!


I absolutely love the colors in these papers! I used the lovely Coffee House Stories 6x6 Paper Pad. So perfect paired up with the adorable Cozy Home Stamp Set. I trimmed the paw print paper to 5-1/2 x 4-1/4" and adhered it to a white A2 top fold card base turned on the side. I trimmed the three pieces of pattern papers and die cut them for the three windows in the frame from the Frames & Tags Die Set. I also die cut a frame from Ocean Tides card stock from Papertrey Ink.


I stamped all the cozy elements and kitty from the Cozy Home Stamp Set using Memento Tuxedo Black ink and colored it up with my Copic markers. I die cut it using the coordinating Cozy Home Die Set. Here's a quick list of the Copic markers I used:

Tabby: R00, R20, YR21, YR15, Colorless Blender
Chair: W0, W2, W3, W5, C00, C1, C3
Pillow: BG70, BG72, BG75
Blanket: Y11, Y15, Y35
Mug: V000, V12, V15
Books: V000, V12, V15, B000, B00, B02, W0, W2, W3, W5, BG70, BG72
Table: C00, C1, C3


I stamped the sentiment on white card stock with the same black ink as the images. I die cut the sentiment using the smallest circle die from the Circle Frames Die Set. Adhered the pattern paper layers to the card base. Adhered the cozy elements together and then adhered them to the card. Added some foam tape to the back of the sentiment and popped it up on the card. 


Now it's your turn to get your paws inky with your Newton's Nook Designs products and create a project using this awesome sketch. Be sure to link up to the Inky Paws Challenge! Can't wait to see your projects!


Thanks so much for stopping by!
See ya next time.

Inky Hugs,
Crystal


{Please note that comment moderation is on. Your lovely comment will appear once approved.}

Monday, March 25, 2024

Inky Paws Challenge #219 ~ Sketch Challenge Reminder

 Hello there crafty friend!
 There's still time to play along with the Inky Paws Challenge #219 - Sketch Challenge! You have until this coming Friday, March 29th to get your entries in for this fun challenge and a chance to win a $20 store credit to Newton's Nook Designs!


So bummed I was sick and wasn't able to play with this sketch the first week! I had a blast making a fun birthday card using the sketch.


I love the pretty colors in the Birthday Party 6x6 Paper Pad. They're so bright and really cover the entire rainbow of colors so I thought they would pair up perfectly with some red mushrooms using the Fabulous Fungus Stamp Set. I love the variety of mushrooms in this stamp set! The background plaid paper measures 4-1/4 x 5-1/2". The polka dot paper measures 4-1/4 x 2-1/2". The party hat paper measures 2 x 5". And the streamer paper measures 3-1/4 x 1".


I die cut the Copic colored mushrooms using a stitched circle die from the Circle Frames Die Set. I also die cut a piece of Real Red card stock from Stampin' Up using the next largest circle die from the set.

Here's a quick list of the Copic markers I used:

Mushrooms: R20, R14, R46, W00, W1, W3
Grass: YG11, YG23
Sky: B0000, B000


I stamped the mushrooms and the sentiment using my go-to black ink for clear photopolymer stamps... Memento Tuxedo Black ink. I trimmed the sentiment and adhered it to the circles and then I added a bunch of foam tape to the back of both and popped them up on the card.


Now it's your turn to get your paws inky with your Newton's Nook Designs products and create a project using the sketch. Be sure to link up to the Inky Paws Challenge! Can't wait to see your projects!


Thanks so much for stopping by!
See ya next time.

Inky Hugs,
Crystal


{Please note that comment moderation is on. Your lovely comment will appear once approved.}

Monday, February 12, 2024

Inky Paws Challenge #216 ~ Sketch Challenge Reminder

 Hello there crafty friend!
 There's still time to play along with the Inky Paws Challenge #216 - Sketch Challenge! You have until this coming Friday, February 16th to get your entries in for this fun challenge and a chance to win a $20 store credit to Newton's Nook Designs!


I am seriously loving this sketch! Have you given it a try?


I had a fun idea to make two cute Valentine's Day cards using the sketch and they turned out cuter than I thought they would. This sketch is so easy to duplicate once you have the measurements figured out! I love it! 


I die cut the background papers using the largest scalloped die from the Frames & Flags Die Set. I used scraps of striped pattern papers cut down to 1-3/4" wide for my next layer. I also die cut these with the largest scalloped die so it fits just right on the background layer.


I used the adorable Love & Meows 6x6 Paper Pad for my first card. I paired up the papers with the super cute Newton's Heart Stamp Set. The top layer with the fishtail bottom measures 3 x 4". I found the center of the paper and measure up about 1/2" and drew lines from the corner to the center point and then fussy cut my fishtails. I sure hope that makes sense!


I stamped the adorable kitty, pup and sentiments using Memento Tuxedo Black ink. I colored them up with my Copic markers and used the coordinating Newton's Heart Die Set to die cut the kitty and the Puppy Heart Die Set to die cut the puppy. 

Here's a quick list of the Copic Markers I used for the kitty: R00, R20, N0, N1, N3, YR21, YR15, Colorless Blender.


For my second card I used the cute Love & Woofs 6x6 Paper Pad and the sweet Puppy Heart Stamp Set. Love the fun sentiments in these stamp sets!

Here's a quick list of the Copic Markers I used for the puppy: N1, N3, N5, E51, E21, E23, E25.


I also stamped the kitty and pup on scraps of pattern paper and fussy cut the hearts. I used a Memento Tuxedo Black marker to color the edges of my fussy cutting to neaten them up and adhered them to the hearts on the kitty and pup.


I die cut a scalloped stitched circle from vellum card stock using a circle die from the Circle Frames Die Set. I love to add a layer of vellum when I don't want to cover up my background completely, but I want a little something between my focal image and the background. I adhered the kitty and pup to the vellum and then adhered the vellum circles by adding glue just behind the kitty and pup. That way none of the glue shows through the vellum and gives the card a bit of dimension since the vellum doesn't lay down completely flat.


Now it's your turn to get your paws inky with your Newton's Nook Designs products and create a project using the sketch. Be sure to link up to the Inky Paws Challenge! Can't wait to see your projects!


Thanks so much for stopping by!
See ya next time.

Inky Hugs,
Crystal


{Please note that comment moderation is on. Your lovely comment will appear once approved.}