Showing posts with label #valentinesday. Show all posts

Monday, February 12, 2024

Inky Paws Challenge #216 ~ Sketch Challenge Reminder

 Hello there crafty friend!
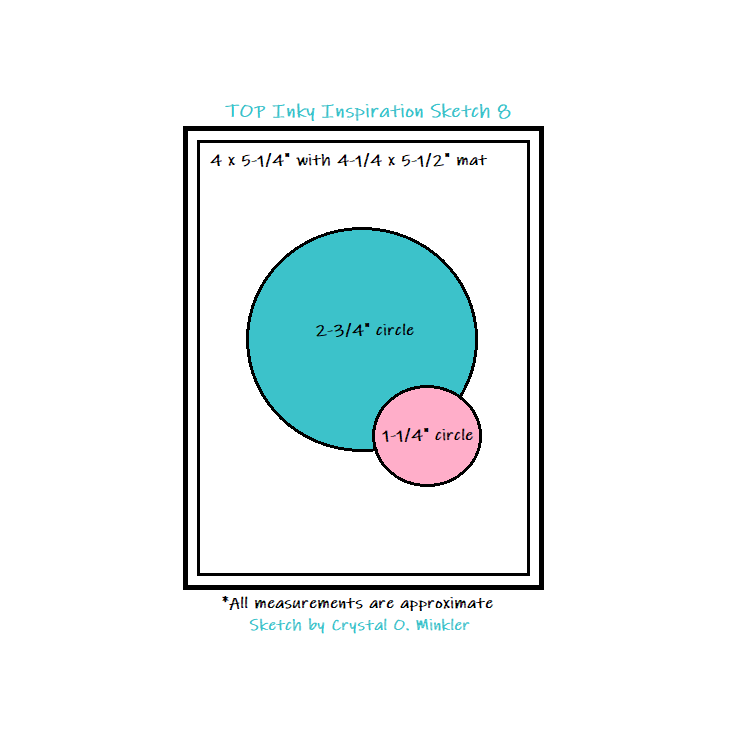
 There's still time to play along with the Inky Paws Challenge #216 - Sketch Challenge! You have until this coming Friday, February 16th to get your entries in for this fun challenge and a chance to win a $20 store credit to Newton's Nook Designs!


I am seriously loving this sketch! Have you given it a try?


I had a fun idea to make two cute Valentine's Day cards using the sketch and they turned out cuter than I thought they would. This sketch is so easy to duplicate once you have the measurements figured out! I love it! 


I die cut the background papers using the largest scalloped die from the Frames & Flags Die Set. I used scraps of striped pattern papers cut down to 1-3/4" wide for my next layer. I also die cut these with the largest scalloped die so it fits just right on the background layer.


I used the adorable Love & Meows 6x6 Paper Pad for my first card. I paired up the papers with the super cute Newton's Heart Stamp Set. The top layer with the fishtail bottom measures 3 x 4". I found the center of the paper and measure up about 1/2" and drew lines from the corner to the center point and then fussy cut my fishtails. I sure hope that makes sense!


I stamped the adorable kitty, pup and sentiments using Memento Tuxedo Black ink. I colored them up with my Copic markers and used the coordinating Newton's Heart Die Set to die cut the kitty and the Puppy Heart Die Set to die cut the puppy. 

Here's a quick list of the Copic Markers I used for the kitty: R00, R20, N0, N1, N3, YR21, YR15, Colorless Blender.


For my second card I used the cute Love & Woofs 6x6 Paper Pad and the sweet Puppy Heart Stamp Set. Love the fun sentiments in these stamp sets!

Here's a quick list of the Copic Markers I used for the puppy: N1, N3, N5, E51, E21, E23, E25.


I also stamped the kitty and pup on scraps of pattern paper and fussy cut the hearts. I used a Memento Tuxedo Black marker to color the edges of my fussy cutting to neaten them up and adhered them to the hearts on the kitty and pup.


I die cut a scalloped stitched circle from vellum card stock using a circle die from the Circle Frames Die Set. I love to add a layer of vellum when I don't want to cover up my background completely, but I want a little something between my focal image and the background. I adhered the kitty and pup to the vellum and then adhered the vellum circles by adding glue just behind the kitty and pup. That way none of the glue shows through the vellum and gives the card a bit of dimension since the vellum doesn't lay down completely flat.


Now it's your turn to get your paws inky with your Newton's Nook Designs products and create a project using the sketch. Be sure to link up to the Inky Paws Challenge! Can't wait to see your projects!


Thanks so much for stopping by!
See ya next time.

Inky Hugs,
Crystal


{Please note that comment moderation is on. Your lovely comment will appear once approved.}

Thursday, February 9, 2023

Valentina Girl with Chatty Hearts ~ February Sketch Challenge ~ Unity Stamp Co.

Hello there crafty friend!
Today I'm sharing more inspiration for the Unity February Sketch Challenge that I'm hosting in the Unity Show & Tell Facebook group. A lovely Valentine's Day card with non-traditional colors!! I used the gorgeous Valentina Girl along with the awesome new Chatty Hearts {stamp & stencil duo}.


I'm always drawn to the blue-green colors and wanted to use those in my design but also wanted a touch of the traditional colors for a Valentine's Day card. The background was created using Evergreen Bough and Pumice Stone Distress Oxide inks over the two stencils in the Chatty Hearts {stamp & stencil duo}


My inspiration for my color combo though I think my blue-green color is lighter. I do love this combination and probably wouldn't have used the light gray in a Valentine's Day card at all.


The pretty corals, reds and pinks in the heart wreath contrast well with the background. 
Here's a quick list of the Copic markers I used:

Skin ~ E000, E00, E11, E04
Hair ~ E21, E23, E27, E29
Clothes ~ C00, C1, C3, BG11, BG70, BG72
Flowers ~ R01, R30, R22, R32, R43, RV34, RV19, Y11, Y15 
Leaves ~ G00, G02
Hearts ~ RV34, RV19


I finished off the card with two little banners using complimentary colors that I found in my stash. This time I remembered to staple them to the card front before I adhered it to the card base... but I ended up covering the staples with the two cute hearts that I stamped with the oxides and fussy cut. Speaking of those cute hearts, I discovered that the background for Chatty Hearts is not just a background. It's a sheet of cute sentiments!! Each one of those adorable sentiments {49 of them, to be exact!} is cut out and can be used separately and then replaced in the background so you can use it as a background. This was a jaw-dropping moment for me! I had no clue and I love it even more!!


Here's another look at the sketch! Please know that the sketch is meant to inspire and not require. Feel free to alter it to work for your creation and most importantly have some inky fun! I can't wait to see what you create! Be sure to share your cards in the Unity Show & Tell group and also add them to the sketch challenge album in the group to be entered for a prize!! I'll see you back here next Thursday with more inspiration for this month's sketch challenge.

Thanks so much for stopping by!
See ya next time.

Inky Hugs,
Crystal


{Please note that comment moderation is on. Your lovely comment will appear once approved.}

Monday, February 6, 2023

Inky Paws Challenge #191 ~ Color Challenge

Hello there crafty friend!
I'm so excited to be joining the amazing Newton's Nook Designs Inky Paws Challenge Team!! I'm always up for a fun challenge and the Inky Paws Challenges are just that... super fun!! If you're not familiar with the challenges, there's a new challenge every other Monday. The themes of the challenges alternate between sketches, color challenges and then fun themes like winter, love, birthday, and a whole bunch more. I sure hope that you'll join in the fun and play along with us! You have until Friday, February 17th to get your entries in for the #191 Color Challenge and a chance to win a $20 store credit to Newton's Nook Designs!


How amazing are these colors... Cherry Red, Pewter Gray, Daffodil Yellow, and White.


I wanted to go with a simple card design with almost a CAS {Clean & Simple} vibe. I actually was thinking about leaving my background completely white, but then I saw the envelope pattern paper in the adorable Love & Meows 6x6 paper pad. Since it has a lot of white I think I've still achieved at least a CAS vibe.


I die cut the cute gray paws pattern paper from the same paper pad using the third largest die in the Circle Frames die set. It almost looks like my kitty is laying on a rug. So cute! Confession... I got a little confused while making my card. I mixed up the Love Theme challenge with the Color Challenge so I originally die cut a striped heart for my card. When I started taking photos of my card, I remembered... lol. So I die cut the cute little heart from yellow pattern paper from the Springtime 6x6 paper pad. I adhered it right over the striped heart. An easy peasy fix!


I stamped the sweet kitty from the Newton's Heart stamp set using Memento Tuxedo black ink. And I die cut the kitty using the coordinating Newton's Heart die set. Here's a quick list of the Copic markers I used to color up my kitty:

Fur ~ C00, C1, C3
Ears / Nose / Pads ~ R00, R20
Heart ~ R20, R14, R27


My card design was inspired by Sketch 8 that I shared recently in my Tawny Owl Paperie Inky Inspiration Facebook group. I like to share sketches just for fun to inspire creativity when we find ourselves in a bit of a rut.


Now it's your turn to get your paws inky with your Newton's Nook Designs products and create a project using the color combo of Cherry Red, Pewter Gray, Daffodil Yellow, and White. Be sure to link up to the Inky Paws Challenge! Can't wait to see your projects!


Thanks so much for stopping by!
See ya next time.

Inky Hugs,
Crystal


{Please note that comment moderation is on. Your lovely comment will appear once approved.}

Tuesday, January 31, 2023

Tawny Owl Paperie Inky Inspiration Sketch 8 ~ Big Candy Heart ~ Unity Stamp Co.

 Hello there crafty friend!
Sharing a fun new sketch for the month of February in my Tawny Owl Paperie Inky Inspiration Facebook group. This sketch is pretty versatile as I think it can be used for a super CAS card or you could add pretty papers for a background layer like I did for my first card using the sketch.


What do you think? As with all the sketches I share the measurements and elements are not required. Just the basic design is supposed to be a help to boost inspiration. 


I was inspired to play with the new fabulous Big Candy Heart!! I couldn't wait to ink up this beautiful heart. I inked it up with Black Amalgam ink and colored it up with a handful of Copic markers. I also inked up the adorable ladybug from the Little Lady Greetings Itty Bitty stamps. I've had this cute stamp in my stash forever and just now inked it up! Using new goodies with old goodies in my stash is always so much fun!


Here's a quick list of the Copic Markers I used to color up the big heart and the ladybug:

Candy Heart ~ R00, R01, R02, Colorless Blender
Ladybug ~ R00, R01, R02, R22, R43, T3, Colorless Blender


My background layers were created using the gorgeous Enveloped in Love {paper pack}!! Love love love these gorgeous papers! I've had them set aside for awhile to play and make some Valentine's Day cards. I cut the pretty pink papers to 4-1/4 x 5-1/2" for my card front layer and adhered it to my white A2 top fold card base measuring 4-1/4 x 11"; scored at 5-1/2". 


I die cut the 'i love you' pattern papers with the second largest postage stamp die from the Postage Stamp {nesting dies} also from Unity (currently out of stock). I adhered it directly to the card. I adhered the ladybug to the bottom of the heart with a bit of liquid glue and then added foam tape to the back of both. I popped them up on the card and then finished it off with a few Translucent enamel dots from Gina Marie Designs. I think it turned out pretty cute!


Thanks so much for stopping by!
See ya next time.

Inky Hugs,
Crystal


{Please note that comment moderation is on. Your lovely comment will appear once approved.}