Friday, September 30, 2022

{BYSHC} Sketch Challenge 26 ~ More Cards with Let it Snow ~ Doodlebug Design

 Hello there crafty friend!
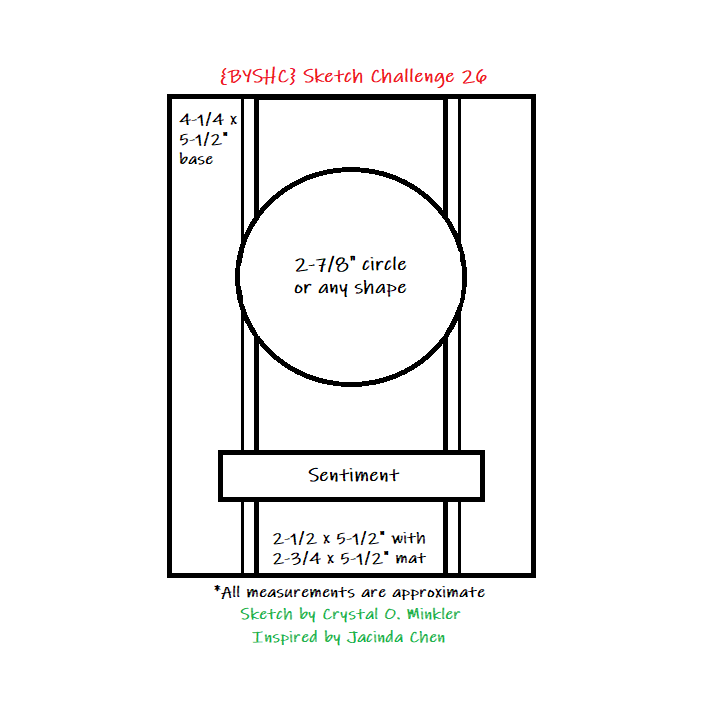
I'm back with my weekly Christmas card using the {BYSHC} Sketch 26 from the Build Your Stash Holiday Cardmakers Facebook group. I shared a couple cards earlier this month using the Let it Snow collection from Doodlebug Design and while I was making them I realized I had another Let it Snow paper pad. So I decided to make a couple more cards using the collection. So today I'm sharing a couple more cards using a couple more adorable Doodlebug Doodle Pops.


I cut my layers and adhered them all together. I cut (2) 1/8" strips of white card stock and adhered them along the edge of the Santa paper - a trick I love to do rather than matting the pattern paper. It makes for a less bulky card.


I removed the backing from the Santa Doodlebug Pop and adhered it to a white stitched circle die cut. I also added a couple hearts from the Let it Snow Shape Sprinkles stickers pack. Since the Santa Doodlebug Pop has some dimension to it I decided not to pop up the focal piece and just adhered it to the card.


The sentiment is a cut apart sentiment from the Let it Snow paper pad that I trimmed and mat on a scrap of white card stock. I adhered the sentiment directly to the card front and then I adhered the card front to a white A2 top fold card base.


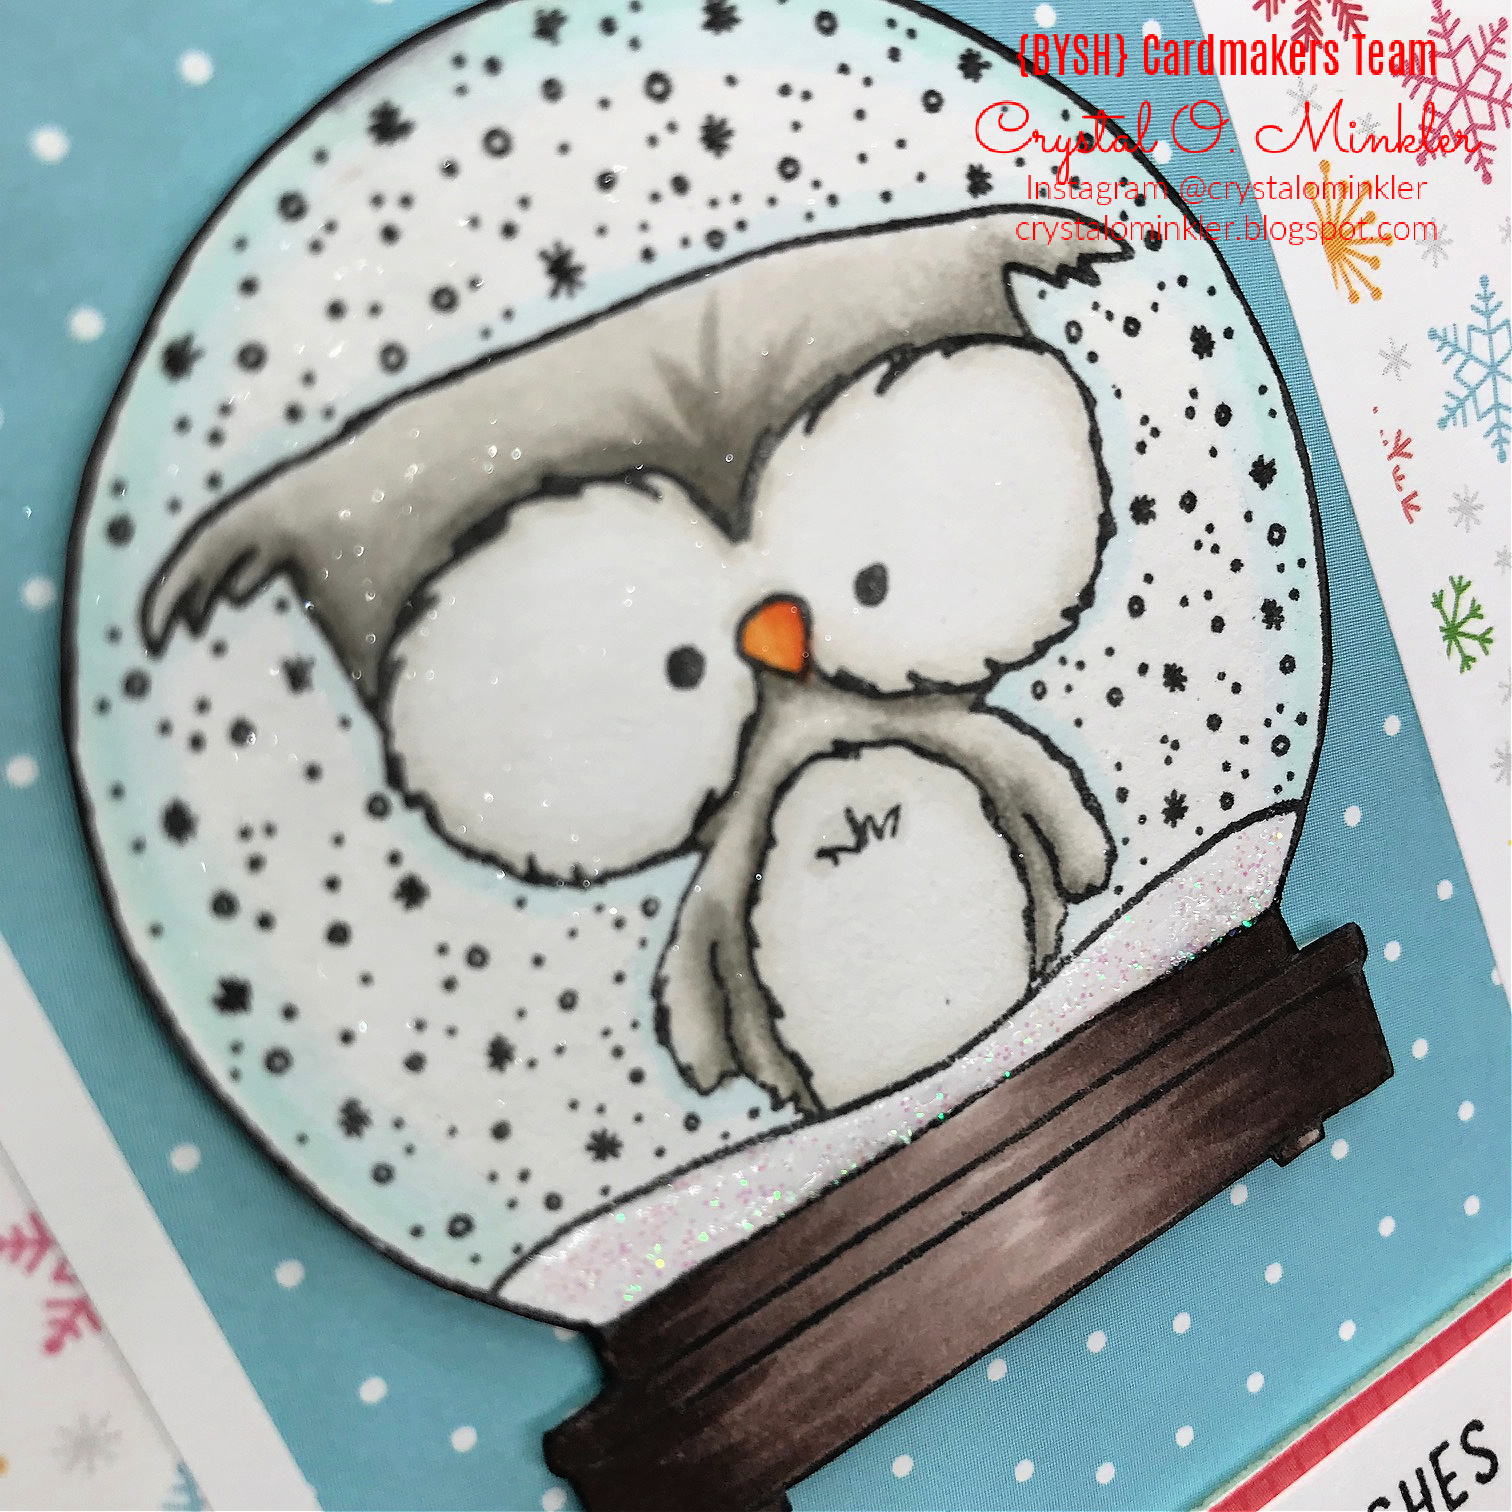
I just love this cute polar bear and squirrel Doodlebug Pop!! I decided for my second card to turn the sketch... what do you think?


I think it's really cute turned on the side. I moved the sentiment just under the striped paper. I think it pops a bit better there.


Do you have a favorite?! I don't know if I can pick... I really love that Santa but the critters in the second card are just too cute!


Here's another look at the {BYSHC} Sketch 26!
 I hope that my cards today have inspired you to pull out those Christmas goodies and make some cards! This year just keeps flying by! The holidays will be here before we know it! If you're interested in seeing more inspiration for this sketch, head over to the {BYSH} Cardmakers blog... the design team is sharing some really cute cards this week! Today is the last day to play along with the {BYSHC} Sketch Challenge 26... I'll be back tomorrow with my first card for the {BYSHC} Sketch Challenge 27!!


Thanks so much for stopping by!
See ya next time.

Inky Hugs,
Crystal


{Please note that comment moderation is on. Your lovely comment will appear shortly.}

Wednesday, September 28, 2022

Fun with Ephemera ~ September 2022 Whit Kit ~ Unity Stamp Co.

Hello there crafty friend!
I'm back with a couple more cards that I created using the beautiful September 2022 Whit Kit from Unity Stamp Co. I couldn't resist playing with the pretty ephemera in the kit... so many wonderful pieces and I thought it would be fun to make a no-stamping card!


I just love the beautiful papers in this card kit too! I chose the print paper for my background. I was going for a kinda monochromatic card.


I just love this beautiful mushroom ephemera piece!! I used four ephemera pieces for this card. The mushroom and the 327 piece are both popped up on the card with foam tape. Does that paper clip look real in this photo or what?! It's not! I almost added a real paper clip but didn't want to take away from this one.


I wrapped the top layer with some {Natural} May Arts Burlap string. I really love how this card turned out and it was really quick once I had my ephemera pieces picked out. If you're interested in seeing my process video for making this card you can check it out here... Pattern Paper & Ephemera Card | September 2022 Whit Kit | Unity Stamp Co.


I did make one last card with the kit... a birthday card for a very dear friend of mine. I can't wait to give it to her... I hope she likes it! I used two papers from the Vintage Naturalist {paper pack} from the card kit. I trimmed them down and distressed the edges with Vintage Photo Distress ink and I also distressed (roughed up) the edges with a Paper Distresser from Tim Holtz.


I mat both layers with a Kraft card stock and adhered them together. I picked a few ephemera pieces for this card too... love love love the butterflies!! I distressed the edges of the rectangle ephemera piece with the Vintage Photo Distress ink and mat it with Kraft card stock. I adhered it to the card and then wrapped the layers with {Natural} May Arts Burlap string securing it on the back of the card front with scotch tape.


I then adhered the entire card front to a Kraft A2 top fold card base measuring 4-1/4 x 11"; scored at 5-1/2". I popped up the other two pieces of ephemera with foam tape. And then I die cut my sentiment using the Chic Script Salutations {die set} from Unity. First, I die cut the outlines from Kraft card stock and then I die cut 'happy' and 'birthday' each three times from True Black card stock. I adhered the three sentiments together and then adhered them to the Kraft outlines and then adhered them to the card. To finish the card I added a few green enamel dots. 


Here's a look at the beautiful card kit for the month of September! Be sure to check out the Whit Kit membership at Unity... there's still time to sign up for this kit!! If you already have the kit, I hope you share your creations in the Unity Show & Tell Facebook group! I'd love to see what you create! I'll be back on Friday with not one, but TWO Christmas cards!!


Thanks so much for stopping by!
See ya next time.

Inky Hugs,
Crystal


{Please note that comment moderation is on. Your lovely comment will appear shortly.}

Tuesday, September 27, 2022

Snail Mail Vintage Style Card ~ Making Spirits Bright with Christmas Express ~ Unity Stamp Co.

 Hello there crafty friend!
I don't know about you but as a cardmaker there's just something about postage style stamps and envelopes and mailboxes! I just adore them and love to use them in my cards! I especially love when they are Christmas themed and Unity just released two stamps... Making Spirits Bright and Christmas Express!! Both are a Must Have!!! Oh my gosh! 


The Christmas Express stamps just scream to be part of a background... I used a bunch of the stamps to create my background. This could easily be a full sheet that you could cut into four card fronts and make multiple cards from!


I went with a vintage style card which was easy to achieve with just a bit of distressing with some Vintage Photo Distress ink and the Paper Distressing tool from Tim Holtz to rough up the edges. I also added a bit of splatter with the Vintage Photo Distress ink. I mat that background layer with a slightly larger piece of True Black card stock. Under that is a layer of pretty pattern paper from the Old World Winter paper pack from The Paper Studio... it adds a bit more color and interest to the card. I die cut a piece of True Black card stock from Papertrey Ink with the Postage Stamp {nesting die} from Unity and adhered my layers on top of that. For my last layer I kept going back and forth between red and kraft... but with the mailbox being red I think the Pure Poppy card stock {Papertrey Ink} really helped to make the mailbox pop on the card.  


I wrapped the layers five times with {Natural} May Arts Burlap string and tied a little knot to the left. I fussy cut the Copic colored image leaving a skinny white border. I tend to fussy cut a white border when the image has small details that are harder to cut around like the leaves and berries. And I've also found that it helps the image to pop a bit more on the card. To add to the dimension of the image I did use foam tape to pop the mailbox on the card. I stamped the cute sentiment and distressed it with a bit of Vintage Photo Distress ink and mat it with black card stock. I also popped it up on the card with foam tape.


Here's a quick list of the Copic markers I used to color up the mailbox:

Mailbox ~ R20, R14, R27; N2, N5 {slot}
Snow ~ C00, C3
Letters ~ W00, W1, W3
Leaves ~ YG11, G24, G46
Berries ~ R20, R14, R27
Gifts ~ YG11, G24, G46 {green}; BG70, BG72, BG75 {blue}; Y15, Y35, Y28 {yellow}
Under Mailbox {to coordinate with the distressed edges} ~ E30, E31, E33


I'm sharing a new sketch based on my card today in my Tawny Owl Paperie Inky Inspiration Facebook group. It's similar to a sketch I shared a couple months ago but this one has layers and I've added string/twine. If you're liking this sketch, I hope you'll give it a try and share your card or project in the group.


To finish off the card I added a few red rhinestones from the Rainbow Bling rhinestones from Gina Marie Designs. I really like how this turned out! Head over to Unity and check out all the fab new releases... if you love Christmas stamps this release is one that you don't want to miss!! 


Thanks so much for stopping by!
See ya next time.

Inky hugs,
Crystal


{Please note that comment moderation is on. Your lovely comment will appear shortly.}

Monday, September 26, 2022

Membership Monday ~ September 2022 WK Vintage Naturalist ~ Unity Stamp Co.

 Hello there crafty friend!
I've been anxious to get to play with my September 2022 Whit Kit from Unity... it came just before we left for our family vacation and I didn't even get a chance to open it up and give it a good look. But now I have and oooohhhh... it's so beautiful! I made a few different cards with the kit but today I'm just sharing two cards. I had a fun idea to use the Deckle Edge Ruler die that was included in the kit and die cut six different papers and use those for a fun pattern paper background.


I just love how it turned out!! I also made a practice card and that's the second card you can check out further down in my blog post. I didn't add the distressing with Vintage Photo Distress ink to the practice card and I think that really added a certain touch to the design of the card.


I wrapped the pattern paper background with {Naturals} May Arts Burlap string and popped up the wood slice, sentiment and even the butterfly!


Such a pretty card! I hope you like it too. If you're interested you can check out my process video for this card here... Pattern Paper Background | September 2022 Whit Kit | Unity Stamp Co.


And here's a look at my practice card... what do you think? It's okay but I think the added distress ink on the edges of the die cut papers really makes the card so much prettier!!


I just love that sentiment... so true!


Here's a look at the beautiful card kit for the month of September! Be sure to check out the Whit Kit membership at Unity... there's still time to sign up for this kit!! If you already have the kit, I hope you share your creations in the Unity Show & Tell Facebook group! I'd love to see what you create! I'll be back on Wednesday with one more card using this fantastic kit.


Thanks so much for stopping by!
See ya next time.

Inky Hugs,
Crystal


{Please note that comment moderation is ON. Your comment will appear shortly.}

Friday, September 23, 2022

{BYSHC} Sketch Challenge 26 ~ Winter Birdie Swag ~ Unity Stamp Co.

 Hello there crafty friend!
I'm so excited to share my weekly Christmas card using the {BYSHC} Sketch Challenge 26 today because it's an adorable new Christmas stamp that was just released at Unity Stamp Co. and it's called Winter Birdie Swag! Isn't he just THE cutest bird?!? I just adore him!


I paired him up with the Simple Vintage Country Christmas 6x8 paper pad from Simple Stories. I think the polka dots worked well with the pom poms on his hat and the berries on the tree. And to break up the pretty polka dots I went with a red sentiment paper. The 1/8" strips of the green paper add just a touch more green to compliment the green from the polka dots.


Here's a quick list of the Copic markers I used to color up this sweet bird:

Bird ~ W00, W1, W3
Hat ~ YG11, G24, G46
Pom Poms ~ C00, C2, C3
Branch ~ E55, E57, E59
Berries ~ R20, R14, R27


I die cut the cute Winter Birdie Swag with a die from the X Stitched Circles dies from Gina Marie Designs. Now I had some fun with Sketch 26 this time and made it into a Fun Fold Card... yay!! I just love how it turned out too! I think you can see the bit of shadow under the right side of the focal piece... the card opens on that side and the polka dot paper continues under there on another flap for the card. I did a little boomerang video showing the card opened. You can see that below.


Such a fun twist on the sketch! The card base measures 5-1/2 x 11"; scored at 3-1/2" and 7-3/4".


Here's a look at {BYSHC} Sketch 26 for the month of September!
I hope you'll join us and play along with the sketch! If you're interested in seeing a bit more inspiration for this sketch, check out the amazing inspiration from the design team over on the {BYSH} Cardmakers blog! I'll be back next week with my weekly Christmas card using this fun sketch!


Thanks so much for stopping by!
See ya next time.

Inky hugs,
Crystal


{Please note that comment moderation is ON. Your lovely comment will appear shortly.}

Friday, September 16, 2022

{BYSHC} Sketch Challenge 26 ~ Shakin' Things Up ~ Unity Stamp Co.

 Hello there crafty friend!
I'm back with my weekly Christmas card for the {BYSHC} Sketch Challenge 26 and this time I'm using one of my most favorite stamps from Unity called Shakin' Things Up! The adorable owls from Unity have been some of my most favorite stamps and I collect snow globes so this one was a must!! I just adore it! And it's not super Christmassy so really it could be used for different occasions.


I chose to go with a wintry Christmas card for this one. I happened to color it up before picking my papers but with so little color other than neutrals I decided to focus on the blue I colored around the edge of the globe. I went searching through my papers and thought the Really Rainbow Christmas paper pack from Lawn Fawn was perfect!  


I cut the rainbow snowflakes paper to 4-1/4 x 5-1/2" and adhered it to a white A2 top fold card base. I then adhered the 2-1/2 x 5-1/2" blue with white polka dot paper in the center and then I used a little trick I like for a faux mat. I cut two 1/8" strips of white card stock and adhered them on either side of the blue pattern paper. It breaks up the pattern papers like a mat does but it doesn't have the same bulk.


I fussy cut the snow globe and cleaned up the edges by coloring them with a Memento Tuxedo black marker. It gives the image a nice black edge. I trimmed up the sentiment and adhered it to a scrap of red pattern paper. I popped up both the snow globe and the sentiment on the card with foam tape.


Before I had fussy cut the snow globe I added some glitter. I used a Nuvo Aqua Shimmer Glitter Gloss pen to add glitter to the top portion of the snow globe. You can see a bit of the glitter around the owls eyes.


And then for the bottom portion of the snow globe where the snow would sit in the snow globe, I used Nuvo White Blizzard Glitter drops to just color in the space. It dried clear and left it all pretty and sparkly! You can see some more of the glitter on the owl in this picture.


Here's a look at {BYSHC} Sketch 26 for the month of September!
I hope you'll join us and play along with the sketch! If you're interested in seeing a bit more inspiration for this sketch, check out the amazing inspiration from the design team over on the  {BYSH} Cardmakers blog! I'll be back next week with my weekly Christmas card using this fun sketch!


Thanks so much for stopping by!
See ya next time.

Inky hugs,
Crystal


{Please note that comment moderation is ON. Your lovely comment will appear shortly.}

Wednesday, September 14, 2022

Thanksgiving Place Cards ~ Fall, That's All ~ Unity Stamp Co.

 Hello there crafty friend!
Today I'm sharing adorable Thanksgiving place cards using the new Fall, That's All stamps from Unity Stamp Co. Love this sweet set of stamps!! I had created these to share as part of my Fall is in the Air Collab with my sweet friend Teresa, but sadly she's unavailable currently with a health issue so we've postponed our collab. I would really love if you would lift her up in prayer or send good vibes her way. I bet she'd appreciate it! Well, let's get to these cute cards...


Aren't they just the cutest?! These stamps are perfect for some cute 3 x 3" place cards! How fun are these and so easy to make! A fun addition to your Thanksgiving table this year!


I paired up these cute stamps with the Celebrate Autumn 6 x 6" paper pad from Echo Park Paper Co. I die cut the circles from Orange Zest and Dark Chocolate card stock (both from Papertrey Ink) using a die from the Stitched Circle Stacklets dies from Taylored Expressions... it measures approx. 2-1/8".


So these are just top fold 3 x 3" notecards of Kraft card stock measuring 6 x 3"; scored at 3". I trimmed up the pattern papers using my Tim Holtz Tonic Deckle Torn Edge Trimmer so they're about 2-7/8" square. Ha! I just realized I forgot to color the name tag for my second pumpkin card! Ooops! I got rushed finishing up my video and missed that! Oh, well... let's just imagine it has that bit of shading.


The pattern papers are adhered to the 3 x 3" place cards. I went with this size so that I could also write little notes inside. So fun!


I had so much fun coloring up these stamped images! I just love coloring Fall images... something about the rich beautiful colors of Fall!


I adhered the bottom portion of the circles to the top of the note cards. I thought about popping up the fussy cut images but decided to just leave all the layers flat. Here's a quick list of the Copic Markers I used to color up the images:

Pumpkin Pie ~ E30, E31, E33, YR21, YR15, YR24, C00, C2
Acorn ~ E21, E23, E25, E29
Pumpkin ~ E21, E23, E25, E29, YR21, YR15, YR68, YR27


I just love this pumpkin pie stamp! It's definitely my fave... and I think it could be used for other pies! I have a video sharing my coloring of the three images and then I assemble just one of the cards so it's not a super long video. I hope you'll check it out!! Here's the link... Thanksgiving Place Cards | Fall, That's All | Unity Stamp Co.


Here's another look at the set of Thanksgiving Place Cards. Today is the last day for the Tag Sale over at Unity Stamp Co. Be sure to stop by and check out all the amazing new releases and the sale, of course!!


Thanks so much for visiting my blog and YouTube channel!
See ya next time.

Inky Hugs,
Crystal


{Please note that comment moderation is on. Your lovely comment will appear shortly.} 

Tuesday, September 13, 2022

Mixing Pattern Papers ~ Otter Little Things ~ Unity Stamp Co.

 Hello there crafty friend!
Have you ever thought about mixing up your pattern papers from different paper packs?! I have!! Today I'm sharing a sweet card with the cute freebie stamp with $50 purchase from Unity Stamp Co. This cutie is called Otter Little Things... I just love this cute little scene stamp and that otter is adorbs!! 


But let's get back to the pattern papers... I think as long as you find paper packs with similar colors, it's easy peasy to mix them up! I chose the Plant a Garden {paper pack} and Pretty Polka's {paper pack} ~ both from Unity! They both have brown tones in the color palette and the green papers in both are similar so I chose the green polka dot papers from the Pretty Polka's {paper pack} to mix up with the pretty gingham paper and the butterflies paper. 


To help the whole design be cohesive I also used similar colors in my Copic coloring. 
Here's a quick list of the Copic markers I used for this cute otter scene:

Otter ~ C00, C1, C3, C5, R20, R000
Heart ~ R30, R12, R22
Ground ~ YG03, YG63, YG91
Leaves / Stem ~ YG03, YG63
Flower ~ Y11, Y15, Y38, R30, R12, R22
Sky ~ B0000, B000


The adorable otter scene was die cut with a Large Cross-Stitched Circles die from Lawn Fawn. I popped it up on the card with foam tape. I finished off the card with a few glitter enamel dots that I think are from Gina Marie Designs but I'm not sure. They were in my stash without packaging. I have a  process video for this card that you can check out here... Mixing Pattern Papers | Otter Little Things | Unity Stamp Co.


This adorable otter is available as the freebie for just a couple more days! Be sure to stop by Unity and check out all the amazing new releases!! And there's an amazing Tag Sale going on right now!! If you haven't checked it out... you really should! Lots of amazing deals!


Thanks so much for stopping by!
See ya next time.

Inky Hugs,
Crystal


{Please note that comment moderation is on. Your lovely comment will appear shortly.}

Monday, September 12, 2022

Membership Monday ~ September 2022 UU Bountiful Sunflower ~ Unity Stamp Co.

 Hello there crafty friend!
Happy Membership Monday! I'm sharing a pretty card using the September 2022 Uniquely Unity membership kit from Unity Stamp Co. called Bountiful Sunflower. A big, gorgeous sunflower for this month's membership stamp! I love it!! Sunflowers are one of my favorite flowers and so perfect for Fall cards!  


The sunflower is stamped with Gina K. Black Amalgam ink on Stampers Select white card stock from Papertrey Ink and copic colored. I used two stencils from the Tim Holtz Mini Stencil Set 5 for a bit of a background for my sunflower. I actually didn't add any ink to my blending brushes just used what was on them so I'm not sure which inks may have been on the yellow brush. I do know that I've only used the little brown blending brush with Vintage Photo Distress ink. I die cut the panel with the largest die from the Postage Stamp {nesting dies} from Unity.


Here's a quick list of the Copic markers I used for the sunflower:

Petals ~ Y11, Y06, Y15, Y38, YR27
Center ~ E23, Y15
Stem / Leaves ~ YG01, YG03, YG67
Bud ~ YG01, YG03, YG67, Y15, Y38


I trimmed up the sentiment and mat it with a piece of Summer Sunrise card stock from Papertrey Ink. And then I adhered it to the panel. I also cut a card front measuring 4-1/4 x 5-1/2" of Summer Sunrise card stock. I wrapped the top corner of the postage stamp panel with a bit of {Natural} May Arts Burlap String and secured it on the back with a piece of scotch tape. I tied the other piece of string into a bow on the bottom corner. I adhered the postage stamp panel to the card front and then adhered the entire panel to a white A2 top fold card base measuring 4-1/4 x 11"; scored at 5-1/2".


Isn't that stamp just gorgeous!! So lovely and fun to color! Be sure to check out the Uniquely Unity membership over at Unity Stamp Co.


Thanks so much for stopping by!
See ya next time.

Inky Hugs,
Crystal


{Please note that comment moderation is ON. Your lovely comment will appear shortly.}