Showing posts with label #vintagecard. Show all posts

Wednesday, May 22, 2024

Membership Wednesday ~ May 2024 BOM Grandma's Rose ~ Unity Stamp Co.

  Hello there crafty friend!
Today I'm sharing a super quick vintage card featuring the awesome background stamp from the May 2024 Background of the Month membership from Unity. This background reminds me of my grandparents couch when I was a kid. I just had to do a reddish pink hue to capture the color of their couch.


I ink smooshed a 4-1/4 x 5-1/2" piece of Kraft card stock from Papertrey Ink using Festive Berries and Tattered Rose Distress Oxide Inks. I completely dried the background using a Wagner Precision heat tool. And then I stamped the Grandma's Rose Background stamp using Vintage Photo Distress Ink. 


I die cut the Grandma's Rose background stamp using the largest die from the Scallops & Rectangles {nesting dies}. Adhered it to a 4-1/4 x 5-1/2" piece of Early Espresso Card Stock from Stampin' Up that I then adhered to a Kraft A2 top fold card base. I stamped the sassy vintage gal from Queen of the Universe. Love her sass! She actually reminds me of my Granny!


I went ahead and used the Vintage Photo Distress Ink to stamp the Queen of the Universe and the sentiment onto scraps of Kraft card stock. I die cut the queen using a die from the Deckle & Stitches Nesting Dies. I mat both pieces using scraps of the Early Espresso card stock. I adhered the sentiment overlapping the queen just a bit and then added foam tape to the back of both pieces. I removed the backing and popped them up on the card. I felt like the card needed a little something so I tied a pretty bow of Dark Chocolate 1/2" Satin Solid Ribbon from Papertrey Ink and adhered it to the card using a glue dot.
 

And here's a look at the awesome Background of the Month membership! So nostalgic! I love it! Well, that's it for me today! I hope you've been inspired to play with your membership stamps!
Have an ink-redible day!


Thanks so much for stopping by!
See ya next time.

Inky Hugs,
Crystal


{Please note that comment moderation is on. Your lovely comment will appear once approved.}

Thursday, February 29, 2024

Unity Lovers ATC ~ Galentines ~ Unity Stamp Co.

Hello there crafty friend! 
I know that Galentines and Valentine's Day are well passed us but I just wanted to share the Galentines ATCs that I made for the Unity Lovers ATC swap. I used a whole bunch of Unity goodies to make these ATCs. It's always so much fun to turn on one of my audible e-books and get inky while I listen. Often times I can remember bits of the story that I listened to when I look at the projects I was working on. In fact, I remember I was listening to Divine Rivals by Rebecca Ross. I really enjoyed this book... a bit of romance, some fantasy and magic all during a time of war between gods. A really good read!


I started with two full sheets of Distress Watercolor Card Stock from Ranger measuring 8-1/2 x 11". I ink smooshed Lost Shadow, Spun Sugar, Picked Raspberry, Vintage Photo, and Speckled Egg Distress Oxide inks on each sheet. I dried the card stock completely with a heat tool. Stamped the cute hearts from Mousing Around: Hiya Pal all over the card stock using Speckled Egg, Ground Espresso, and Picked Raspberry. I wasn't thinking about the direction of the hearts and how I'd need to cut the card stock for the ATCs. So I ended up needing to ink smoosh another full sheet of card stock. Ooops! I splattered all three sheets using Tarnished Brass Mica Spray and Picket Fence Spray Stain and cut them up into ATCs. And then I distressed the edges with Vintage Photo Distress Oxide ink.


I stamped the distressed hearts from A Little Grunge Love using Picked Raspberry Distress Oxide ink and lightly blended some Kitsch Flamingo Distress Oxide ink over them. I also stamped the 'love' sentiment from Winter Cheer and Deer using the same Picked Raspberry ink. I fussy cut each of the hearts and the 'love' sentiments. Oy... that took some time! I think my eyes went a bit cross eyed once or twice! LOL!


And then I die cut Early Espresso card stock from Stampin' Up using the Unity {metal die}... I die cut 36 of those babies! {Sadly, I'm not seeing this die on the website right now... it must be out of stock}. Adhered two together using my new favorite Bearly Art Precision Craft Glue. I love this glue for die cut sentiments! The fine tip is amazing and I haven't had an issue with clogging. All that was left to do was adhere the sentiments to the ATCs and I popped up the hearts with foam tape. I did shift the placement of the popped up hearts depending on the ATC. I didn't want to cover up all the pretty hearts in the background. So the cards aren't quite identical but they are pretty close!

That's it for me today! Have an ink-tastic day!

Thanks so much for stopping by!
See ya next time.

Inky hugs,
Crystal

{Please note that comment moderation is on. Your lovely comment will appear shortly.}

Saturday, February 24, 2024

Snarky Birthday Card ~ Sup, Cool Cat ~ Unity Stamp Co.

Hello there crafty friend! 
I just had to ink up the seriously intellectual and adorable Sup, Cool Cat from Unity Stamp Co. I couldn't make a card with this kitty without also using the awesome new Cozy Nook stamp. Ohhh... I think they are so perfect together!


I really wanted to use one of the new paper packs and the Nostalgic Amour {paper pack} just arrived in my latest order. I wasn't totally sure at first that it would work, but I think it does! The colors in these papers are so romantic and endearing. They also have the whole vintage vibe so I'm really glad I used them. All of my layers are die cut using the Deckle & Stitches Nesting Die Set. My mats are Early Espresso card stock from Stampin' Up. And I adhered all of my layers to a white A2 card base of Stampers Select White card stock from Papertrey Ink.


I stamped the Sup, Cool Cat kitty with Black Amalgam ink on Stampers Select White card stock from Papertrey Ink. Colored up the kitty very simply with my Copic markers and also stamped the book nook to coordinate with the pretty papers. 

Here's a quick list of the Copic Markers I used: 
Kitty: R00, R20, N0, N1, N3, N5
Bookcase: E51, E53, E55, E57
Red Books / Vase / Flowers: RV34, R37, RV69
Tan Books: E51, E53, E55
Yellow Books / Vase / Flowers: YR21, YR23
Green Pot / Leaves / Ground: YG95, YG97


 I distressed the edges of the Cozy Nook layer and a tiny bit on the kitty using Vintage Photo Distress Ink. The fun sentiment is from the Snarky Cat Thoughts stamps, also from Unity and I distressed edges, too. I love the sentiments in this kit! To finish off the card, I fussy cut the kitty leaving a white skinny border and then I popped it up on the card using lots of foam tape. That's it for me today! Have an ink-tastic day!

Thanks so much for stopping by!
See ya next time.

Inky hugs,
Crystal

{Please note that comment moderation is on. Your lovely comment will appear shortly.}

Wednesday, December 13, 2023

Membership Wednesday ~ December 2023 Uniquely Unity Cardinal Comfort ~ Unity Stamp Co.

  Hello there crafty friend!
Today I'm sharing a sweet vintage style card using the lovely cardinal stamp from the fantastic December 2023 Uniquely Unity membership from Unity called Cardinal Comfort. 


I stamped the pretty cardinal with Black Amalgam ink and colored it up with the following Copic markers:

Cardinal: R20, R14, R46, YR0000, YR15, YR09
Pine Needles: YG11, G24, G46
Snow: C00, C1, C3


I die cut the pretty cardinal using a die from the Scallops & Squares {nesting dies}. I also die cut the paper layers from the Yuletide Memories {paper pack} using the largest two dies from the Scallops & Rectangles {nesting dies}.


I adhered the pattern papers to a Kraft card front measuring 4-1/4 x 5-1/2" and then I wrapped the panel three times with {Natural} May Arts Burlap String and tied a pretty bow. I added foam tape to the top and bottom portions of the cardinal panel and then popped it up on the card.


Here's a quick look at the Uniquely Unity membership this month! Isn't it just beautiful?! Well, that's it for me today! I'll be back next week with inspiration for the December 2023 Kit of the Month. Until then have an ink-tastic day!


Thanks so much for stopping by!
See ya next time.

Inky Hugs,
Crystal


{Please note that comment moderation is on. Your lovely comment will appear once approved.}

Tuesday, December 12, 2023

Advent Calendar Day 12 ~ Unity Stamp Co.

Hello there crafty friend!
It's time for Day 12 of the 2023 Advent Calendar from Unity!! I'm revealing the Advent Calendar stamp on my YouTube channel each day and also have a short blog post. I hope you're enjoying your new stamps so far. Today's stamp is so beautiful!


A beautiful holiday postmark stamp is the next Advent Calendar stamp! I stamped the postmark several times on the front of a Kraft A2 card base with Vintage Photo Distress ink. I also stamped it on a die cut white circle that I die cut using a die from the Scallops & Circles {nesting dies}. I die cut a mat from Kraft card stock using the next largest circle die.


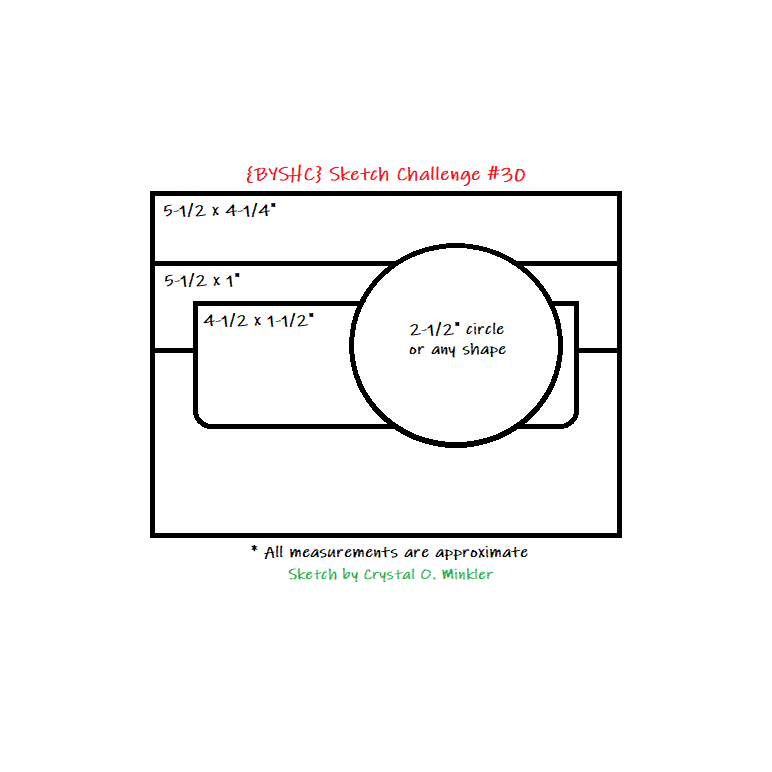
Inspiration for today's card comes from the {BYSHC} Sketch Challenge 30. I pretty much followed the sketch for this one... I think my circles may be a tad smaller and I still haven't found my corner rounder punch. Of course, I kinda gave up looking for it too. LOL


I paired today's Advent Calendar stamp with the gorgeous Yuletide Memories {paper pack}. A new fave!! So gorgeous! And they have a vintage vibe already... so perfect for what I wanted for this card!


I heat embossed the sentiment using the TE Anti Static Powder tool and Sugar Cube Pigment ink from Taylored Expressions. I also used Alabaster White Embossing Powder from Brutus Monroe. And melted the ep using a Wagner Precision Heat Tool.

You can check out my video revealing the Advent Calendar Day 12 stamp and my process in making this card here... Advent Calendar Day 12 | Unity Stamp Co.


I believe there are still some Advent Calendars available if you didn't order one yet. 24 fantastic stamps!! I'll be back tomorrow for Day 13 of the 2023 Advent Calendar from Unity! Have an ink-tastic day!


Thanks so much for stopping by!
See ya next time.
 
Inky Hugs,
Crystal


{Please note that comment moderation is on. Your lovely comment will appear once approved.}

Tuesday, October 3, 2023

Heartfelt Holiday Wishes ~ Velveteen Noel ~ Unity Stamp Co.

Hello there crafty friend!
I finally had some time to play with the new releases at Unity. Of course, I had to play with the new Velveteen Rabbit stamps! Oh my heart... so I've mentioned a few times before that my daughter loves bunnies. I got her The Velveteen Rabbit book years ago and it's a favorite for us! 


And I do love to make Christmas cards so... it was only natural for me to be drawn to the Velveteen Noel stamps. So cute! I gave my card a vintage feel with some Vintage Photo Distress Ink.


Inspiration for my card came from the Tawny Owl Paperie Inky Inspiration Sketch 15. I flipped the sketch and omitted the fishtail banner for a small sentiment on the side. 


The background is stamped with The Wisdom of Becoming Real background stamp and then I ink smooshed it just a bit with Candied Apple Distress Oxide ink. I also splattered some Vintage Photo Distress ink that was left on my desk. I colored up the adorable Velveteen Rabbit with the following Copic markers:

Rabbit: W00, W1, W3, W5, R20
Stocking: C00, C1, C3, R20, R14, R46, YG11, G24, G46


I die cut the background layer, a piece of vellum card stock and a piece of Kraft card stock using dies from the Postage Stamp {nesting dies}. I wrapped the corners of the background layer with a bit of Ivory May Arts Burlap String that I secured on the back of the panel with some tape.

I'm entering my card in the Cut It Up Challenge #287 Inspired by a Book.

Head on over to Unity to check out all the fab new releases! Lots of cute holiday stamps and, of course, the fun Velveteen Rabbit stamps! Have an ink-tastic day!

Thanks so much for stopping by!
See ya next time.

Inky hugs,
Crystal


{Please note that comment moderation is ON. Your lovely comment will appear once approved.}

Wednesday, June 21, 2023

Membership Wednesday ~ June 2023 Uniquely Unity A Tapestry of Stories ~ Unity Stamp Co.

  Hello there crafty friend!
Today I'm sharing a pretty simple vintage style card using the lovely stamp from the wonderful June 2023 Uniquely Unity membership from Unity called A Tapestry of Stories. I just love this stamp!! My dad had a red bug when I was kid and I've always had a fondness for them. I couldn't wait to color up this one!


So, I had a color scheme in mind for coloring the bug and luggage but I didn't pick out my papers until afterwards... phew! That was a bit of a task looking through my papers after coloring, but I found my stash of Basic Grey papers and Oh. My. Gosh. Not only did I fall in love with these papers once again, I found the perfect papers to pair up with my coloring of the bug!! Woohoo! I used the Blush paper pad which has a bit of a vintage vibe to it. But really don't they all?!


I went with a classic card design with two pattern papers for my background. The stripes and the flower dots contrast each other so nicely and the colors are so perfect. Here's a quick list of the Copic markers that I used to color up the bug and luggage:

VW Bug ~ R20, R17, R27, C00, C1, N0, N2, N4
Luggage ~ BG70, BG72, V20, V22, V28, E70, E74, E77
Ground ~ N0, N2


I die cut the colored panel with the largest stitched die from the Scallops & Rectangle {nesting dies}. It was a very bright white which looked okay but doesn't really go with a vintage card so I distressed the edges just a bit with Vintage Photo and Antique Linen Distress Oxide inks. A mix of both of those colors gave me just the right tone of brown to work with the pattern paper. I wanted to add a little something to the empty corners so I wrapped them with a couple scraps of {Natural} May Arts Burlap String and secured them behind the panel with some scotch tape. I then covered the back of the panel with foam tape and popped up the panel on my pattern paper card front. The card front was then adhered to a white A2 top fold card base measuring 4-1/4 x 11", scored at 5-1/2".


That's it for me today! I'll be back next week with inspiration for the June 2023 Whit Kit! I know I say this just about every month, but have you seen this month's card kit?! I LOVE it!! I'm so excited to play! I hope you'll give me a visit and check out what I share! Until then have an ink-tastic day!


Thanks so much for stopping by!
See ya next time.

Inky Hugs,
Crystal


{Please note that comment moderation is on. Your lovely comment will appear once approved.}

Monday, May 1, 2023

{BYSHC} Sketch Challenge 33 ~ A Beautiful Sight ~ Unity Stamp Co.

Hello there crafty friend!
It's time for a new sketch challenge over in the Build Your Stash Holiday Cardmakers! Today I'm sharing a Christmas card with a vintage vibe using a beautiful stamp from Unity Stamp Co. called A Beautiful Sight. I love this pretty stamp!


I paired up this itty bitty stamp with the Old World Winter paper pack from The Paper Studio. It's one of my favorites and I just love the colors in these papers! I distressed the edges a bit with Vintage Photo Distress Ink.


I stamped the tree background with Antique Linen, Evergreen Bough, and Forest Moss Distress Oxide inks. I inked up different sections of the stamp with each color and then stamped it. I repeatedly stamped it until I was happy with the colors.


I wanted the tree to stand out a bit more so I used Antique Linen, Evergreen Bough, and Vintage Photo Distress Crayons to color the tree. It was super easy and I love how the tree pops. I mat a couple of my layers with Kraft card stock. And finished off my top layer by wrapping it a few times with a pretty Ivory burlap string. I tied a pretty bow and the I popped up the top layer with a thin foam tape.


Here's a look at {BYSHC} Sketch Challenge #33 for the month of May. I hope you'll join us and play along with the sketch! If you're interested in seeing a bit more inspiration for this sketch, check out the amazing inspiration from the design team over on the {BYSH} Cardmakers blog!


Thanks so much for stopping by!
See ya next time.

Inky hugs,
Crystal


{Please note that comment moderation is ON. Your lovely comment will appear shortly.}

Friday, April 14, 2023

{BYSHC} Sketch Challenge 32 ~ Sugar Cookie Christmas ~ Prima Marketing Inc.

 Hello there crafty friend!
I'm sharing another Christmas card for the {BYSHC} Sketch Challenge 32 for the Build Your Stash Holiday Cardmakers Facebook group. I had a fun idea for a vintage style card filled with sweet ephemera and pretty papers from Prima Marketing Inc. called Sugar Cookie Christmas.


I've had these beautiful papers in my stash for quite awhile. It's been a long time since I've played with them though so I grabbed them. This is a large card... one that wouldn't fit in an envelope unless I made one. But I'm thinking this one will go in a package or maybe I'll hand deliver it. The Vintage Cream card base measures 8 x 10" and it's scored at 5". So it's a 8 x 5" card.


I just couldn't cut that paper... I wanted the girl and the roses on the other side. I did cover up some of the roses with the Santa paper and the ephemera pieces but still. I couldn't cut into it. 


There's a lot of dimension here too. I added foam tape between the Santa ephemera pieces. And then I added more foam tape to the combined Santas doubling up the foam tape on the Santa in the front so that he'd lay flat. The holly ephemera was just stuck to the back of the foam tape and then I added liquid glue to adhere the whole piece onto the die cut circle. The Santa paper is also in the paper pad. I die cut it with one of the circle dies from the Scallops & Circles {nesting dies} from Unity.


The bottom piece {with the lines on it} is also a piece of ephemera along with the sentiment and the mint heart. I adhered the die cut circle to the bottom ephemera piece and then I added another layer of foam tape so the whole thing is popped up. 


I wrapped the front of the card with some of the Sugar Cookie Christmas Trims... it's like a glittery eye-lash string or ribbon. I wrapped it around three times and adhered it inside the card with some scotch tape. I cut a 4-7/8 x 7-7/8" piece of Vintage Cream card stock from Papertrey Ink and adhered it inside the card to cover up the trim and tape. Love how this big vintage style card turned out!


Here's a look at {BYSHC} Sketch Challenge #32 for the month of April. I hope you'll join us and play along with the sketch! If you're interested in seeing a bit more inspiration for this sketch, check out the amazing inspiration from the design team over on the {BYSH} Cardmakers blog!

Thanks so much for stopping by!
See ya next time.

Inky hugs,
Crystal


{Please note that comment moderation is on. Your lovely comment will appear once approved.}

Sunday, February 26, 2023

Clean & Simple Vintage ~ February 2023 Whit Kit ~ Unity Stamp Co.

 Hello there crafty friend!
A quick blog post to share one last card using the gorgeous goodies from the February 2023 Whit Kit. I just can't get enough of the Newsprint Greetings {paper pack} that's included in this month's card kit. I love it so much!! It makes for a quick and easy background for a card.


I kept this card very simple. Letting the pattern paper be my background... all I did was die cut it with the largest die from the Scallops & Rectangles {nesting dies} from Unity. I adhered it to a kraft A2 top fold card base measuring 4-1/4 x 11"; scored at 5-1/2".


I stamped the pretty flowers on white card stock and die cut them with a circle die from the Scallops & Circles {nesting dies} also from Unity. I colored them up with the following Copic markers: 

Daffodils ~ RV000, RV10, RV21
Iris ~ RV10, RV21, RV34
Tulip ~ RV000, RV91, RV93, RV32
Leaves / Stems ~ YG11, YG03


I stamped the sentiment with Sugar Cube Pigment ink from Taylored Expressions on Kraft card stock from Papertrey Ink. Applied some Alabaster White embossing powder from Brutus Monroe and melted the ep with a Wagner heat tool. I trimmed the sentiment and adhered it to the card. To finish off the card I added one of the Wax Seal Stickers from the Whit Kit. The pink in the sticker was also my color inspiration. It's not totally a CAS card because of the layers but it's a pretty clean style, I think. 


Inspiration for my last card is the Tawny Owl Paperie Inky Inspiration Sketch 8. I've had some fun with this sketch this month. If you're interested in seeing more of my sketches, join my Tawny Owl Paperie | Inky Inspiration Facebook Group. I'd love to have you join and play along with my sketches!


Here's a look at the wonderful Whit Kit for February!! So beautiful and lots of fun, too! This wonderful card kit is available for only $42.99. That includes shipping! You also get a $6.95 discount on every order from Unity over $45. Members are also able to purchase past Whit Kit stamp sets for just $14 and past Whit Kit paper packs for $2 off!! So awesome!!! 

I'll be back on Wednesday with inspiration for one of the Memberships at Unity! Still not sure what I want to play with first! There are SO many amazing new goodies coming!


Thanks so much for stopping by!
See ya next time.

Inky Hugs,
Crystal


{Please note that comment moderation is on. Your lovely comment will appear once approved.}

Monday, January 30, 2023

Membership Monday ~ January 2023 Whit Kit Espresso to You ~ Unity Stamp Co.

 Hello there crafty friend!
So happy to have you stop by for my last Membership Monday post! I'll be continuing this series... only it'll be moving to Membership Wednesdays. I'm excited to share some fun projects with you in the month of February... lots of beautiful stamps coming out next month for all four memberships that are available at Unity Stamp Co. Eeep! Can't wait! Anywho... back to today's cards. I'm sharing a pretty vintage style card using the January 2023 Whit Kit called Espresso to You.


I just adore this beautiful stamp from the kit and the vintage papers are gorgeous! I just had to go with one of my favorite color combos for this one... throwing a bit of turquoise and red in there. I just love how it pops with the browns!


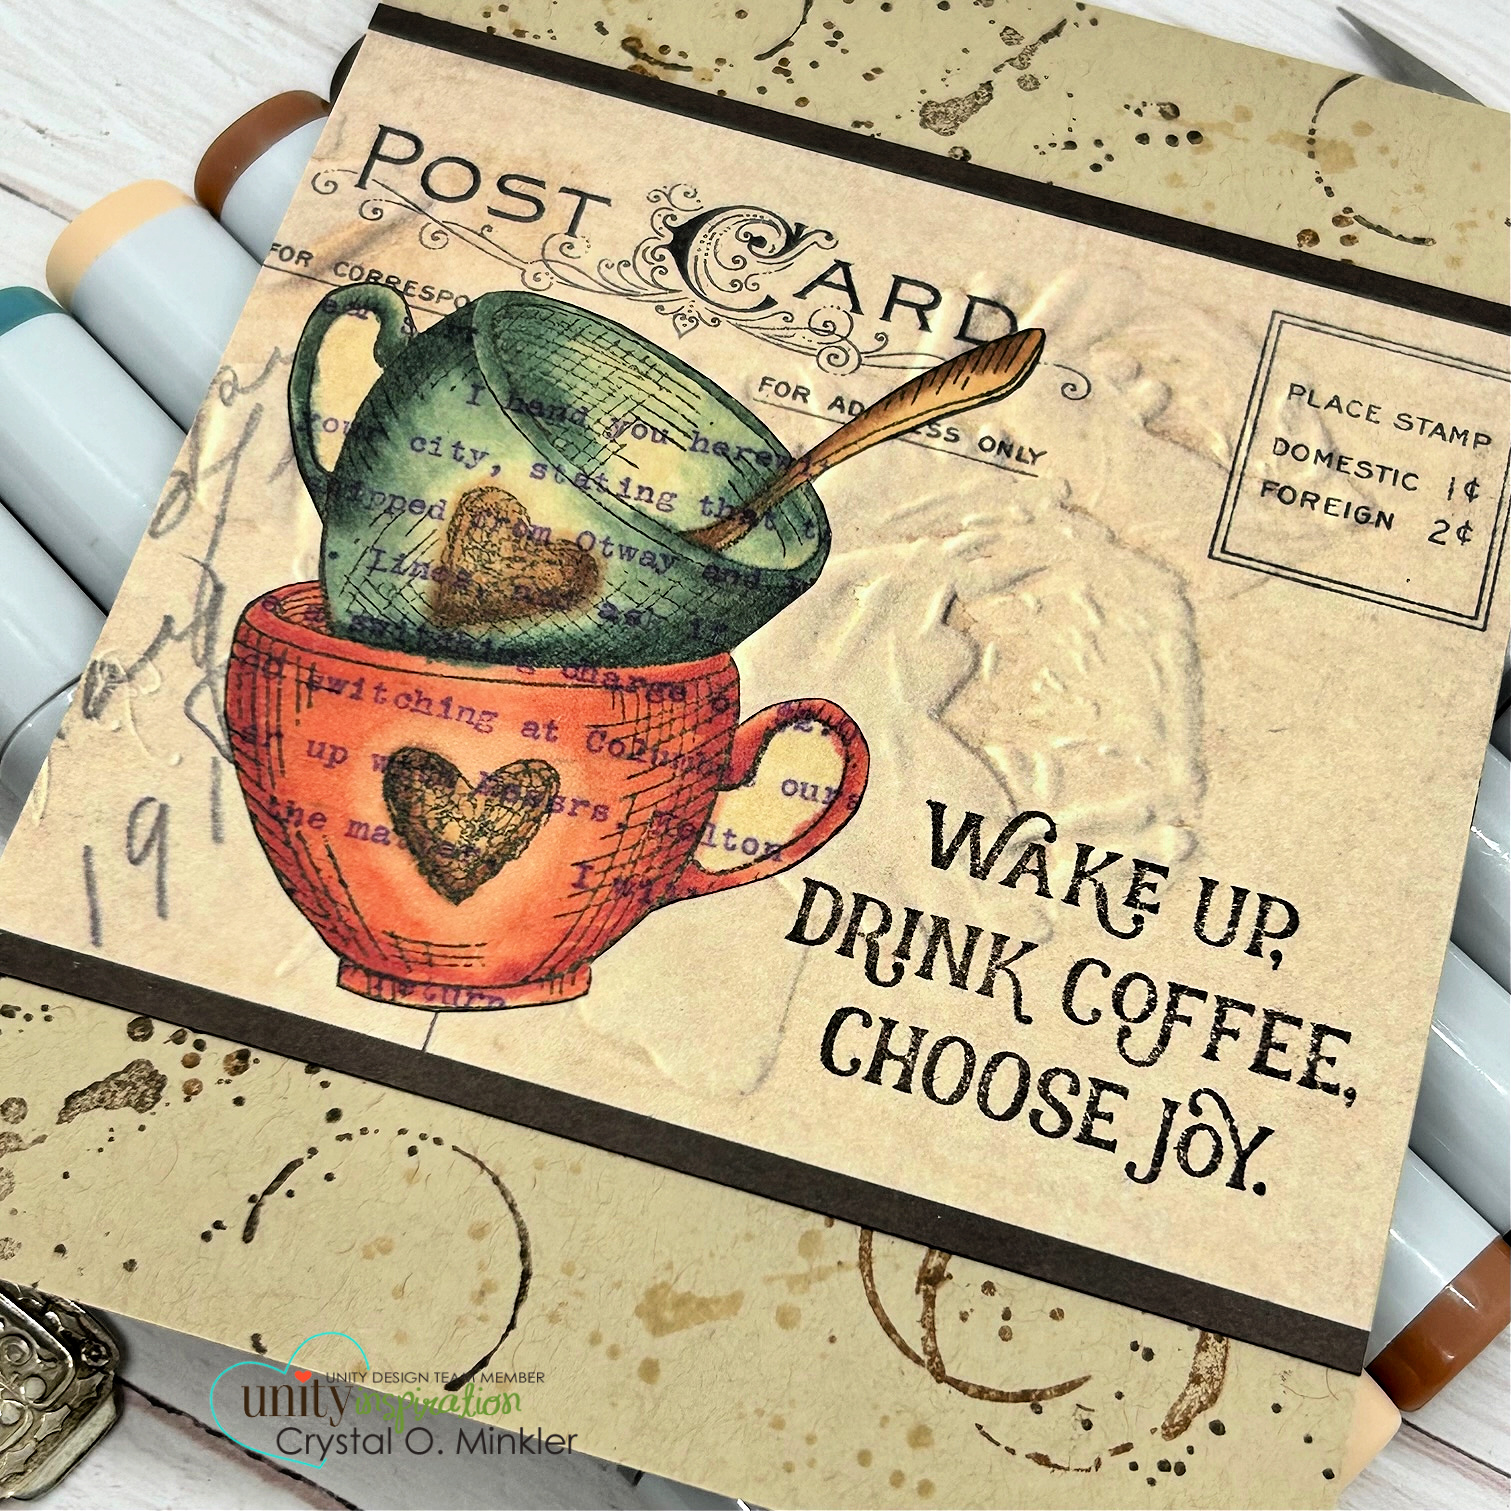
I used Peacock Feathers and Uncharted Mariner Distress Oxide inks to watercolor the cups on Canson XL watercolor paper. Feeling out of practice once again with my watercoloring skills. I kind of fixed my attempt at watercoloring by distressing the edges of the cups with a bit of Vintage Photo Distress Oxide ink. I think it adds to the vintage vibe of the card too. 

You can check out my process video for this card here... Vintage Coffee Card | January 2023 Whit Kit | Unity Stamp Co.


I did a bit of stamping on the vintage paper as well using the splatter and coffee rings stamps. I also distressed the edges of the papers with a bit of Vintage Photo and Ground Espresso Distress Oxide inks. And then distressed them again with a paper distresser that roughed up the edges a bit. I stamped the sentiment with white pigment ink and heat embossed some white embossing powder. I wrapped the paper layers with some of the burlap string included in the card kit. I popped up the cups with foam tape and finished off the card with a few enamel dots from my stash. I'm really liking how this one turned out!


For my bonus card, I stamped the cups onto one of the vintage papers in the kit using Black Amalgam ink. I colored up the cups with Copic markers {listed down below}, fussy cut them and adhered them to this pretty vintage paper piece. I stamped the splatter and coffee rings all over the front of my kraft card base using Vintage Photo, Antique Linen, and Ground Espresso Distress Inks.


I adhered the vintage paper to the kraft card base. Cut two 1/8" strips of dark brown card stock and adhered them to either side of the vintage paper. This is my favorite trick to avoid extra layers to a card but still make it look like there's some dimension and layers. I stamped the sentiment directly on the vintage paper with Ground Espresso Distress ink. 


Just a little note about the vintage papers. If you look at the handles of my cups you can see that the Copic markers bled out of the lines {inside of the handles}. The vintage papers are pretty thin so I probably should have used less ink and maybe blended a little less. So if you decide to Copic color on these papers just be careful not to oversaturate your paper like I did. Here's a quick list of the Copic markers I used:

Blue-Greens ~ BG70, BG72, BG78
Browns ~ E21, E23, E27, E29
Reds ~ R20, R14, R37


Here's a look at the beautiful card kit! Be sure to check out the Whit Kit membership at Unity... there's still time to sign up for this kit!! If you already have the kit, I hope you share your creations in the Unity Show & Tell Facebook group! I'd love to see what you create! 


Thanks so much for stopping by!
See ya next time.

Inky Hugs,
Crystal


{Please note that comment moderation is on. Your lovely comment will appear shortly.}

Saturday, January 7, 2023

~ Friends of Unity January 2023 Blog Hop ~

  Hello there crafty friend!
Happy New Year to you! It's the first Saturday of January and I bet you know what that means... it's time for our Friends of Unity Blog Hop!! This month's cue is all about Birthdays.


I don't know about you, but I think Birthday cards are just about THE card that is most needed in my stash. I did a terrible job last year making birthday cards and an even worse job sending them. I'm not going to say it's a New Years Resolution or anything like that but it is a serious goal that I make AND send more birthday cards in 2023.  Who's with me?! Anybody else have the same goal?


My first card is a vintage style card using the new amazing January Background of the Month called Old News. I stamped the background twice on Kraft card stock with Black Amalgam ink. I trimmed the first one down to 4 x 5-1/4" and die cut the bottom with a stitched edge die. 


I distressed the edges with a bit of Vintage Photo Distress Ink and then just a touch of Ground Espresso Distress Ink to darken the edges a bit more. I popped it up on a Kraft A2 top fold card with some thin foam tape. And then I stamped the sentiment from the Could Be Better {June 2022 Sentiment Kit} with Ground Espresso Distress ink. Isn't that sentiment just too funny?! 


I die cut my second stamped background with a scalloped heart die from the Dashes and Frills Hearts {die set}. I distressed the edges with the same inks I used for the other background piece. And then I die cut a slightly larger stitched heart from a piece of Early Espresso card stock from Stampin' Up. 


I decided to stamp inside the card with another sentiment from the same sentiment kit. I think it's perfect along with the sentiment I used on the front of the card. And this makes it sort of a birthday card... well, I may have stretched it with this one, but my next cards are actual birthday cards.


I finally got a chance to play with the gorgeous Newsprint Floral Greetings background stamp. I inked smooshed some Evergreen Bough, Mustard Seed and Twisted Citron Distress Oxide inks onto a piece of Stampers Select White card stock from Papertrey Ink and a piece of Tim Holtz Distress Watercolor card stock. I usually use the white card stock from Papertrey Ink but I wanted to see how the background would look on the distressed watercolor card stock.


This is the ink smooshed background on the Stampers Select White card stock.
Once the ink smooshed backgrounds were dry I stamped them both with the background using Black Amalgam ink. I also stamped the sentiments with the same ink. I trimmed the sentiments and colored the edges with a Memento Tuxedo black marker to clean up my fussy cutting around the sentiment box.


This is the ink smooshed background on the Distressed Watercolor card stock.
I die cut the backgrounds with the largest stitched scalloped die from the Scallops & Rectangles {nesting dies}. I adhered the backgrounds to white A2 top fold card bases. I then popped up the sentiments with a thin foam tape.


And my last card is one that I made for my Father-in-Law using the Let Your Soul Wander {paper pad}. I saw a fun idea for this card a while back and thought it would be great for my FIL. I don't have any specific measurements other than the background piece is 4 x 5-1/4". The top corner piece (the collar) is just a corner from the 6x6 pattern paper. I laid it on the background piece how I wanted it and then flipped the papers over and drew a line where the papers met so I could cut it.


The pocket was die cut using one of the smaller dies from the Labels 5 Nested die set from Gina Marie Designs. I also die cut a scrap of white card stock with the same die. I cut both pieces and adhered them together and then I popped them up on the card with thin foam tape. I stamped the 'celebrate' sentiment from the Extended Celebration {May 2022 Sentiment Kit} by partially masking the stamp with a post it note before inking it up and then removing the post it note before stamping.


The buttons are from a Blueprints 19 die set that I've had in my stash for a long time and it's from My Favorite Things. I'm not sure, but I think it's retired now. I do think a small circle die would work just as well for the buttons. And maybe a tiny circle die could work for the button holes or you could draw them in. 


To finish off the card I stamped two sentiments on the inside. I couldn't decide if I wanted to just do 'happy birthday' or the other sentiment so I did them both! I really like how this one turned out. I hope my FIL likes it too. Well, that's it for my cards this time.

Now before we get to the hopping, I chose two lucky winners from the comments on last month's hop to win a couple fun prizes and the lucky winners are...


... Kelly Brillhart and Laurie2cats!! Congratulations, Kelly and Laurie!!
Please email me at crystalominkler@gmail.com to claim your prize. 
Prize must be claimed within two weeks. 

Well, that's it for me this time! Please hop along and enjoy some more inspiration from the Friends of Unity! I'm so excited to see all the creations from our friends this month... I'm always needing inspiration for birthday cards!! I will be doing another fun giveaway this month!! Be sure to hop along and comment for a chance to win. {When you comment please leave your name just in case it posts as anonymous.} I'll announce the winner next month! 


Let's get to the hopping...


Crystal <--- you're here

up next ---> Amber


Thanks so very much for supporting our little hop!
We appreciate you!!

See ya next time.

Inky Hugs,
Crystal


{Please note that comment moderation is ON. Your comment will appear shortly.}