Tuesday, May 31, 2022

Fun New Sketch ~ TOP Inky Inspiration Sketch 1 ~ May 2022 Whit Kit ~ Unity Stamp Co.

 Hello there crafty friend!
As you may know, I love card sketches... they are seriously THE backbone to my mojo. I use sketches all the time! In fact, when I look at a card I often see the sketch design before I notice the pretty elements. I got to thinking that us cardmakers sometimes get in a funk when our mojo's aren't cooperating. And for me when that happens I look at past sketches or some of my older cards... and even head over to Pinterest to look for sketch ideas. For over a year and a half now I've been sharing sketches with the Build Your Stash Holiday Cardmaker Facebook group which has been lots of fun and inspiring to get our Christmas card stash done for 2022. I got to thinking... why not start sharing sketches in my Tawny Owl Paperie | Inky Inspiration Facebook group!! Even better, the sketches aren't tied to a theme so you can use any stamps for any occasion!! So fun! And believe it or not, the sketch I'm sharing today helped me in designing my third card using the May 2022 Whit Kit from Unity Stamp Co


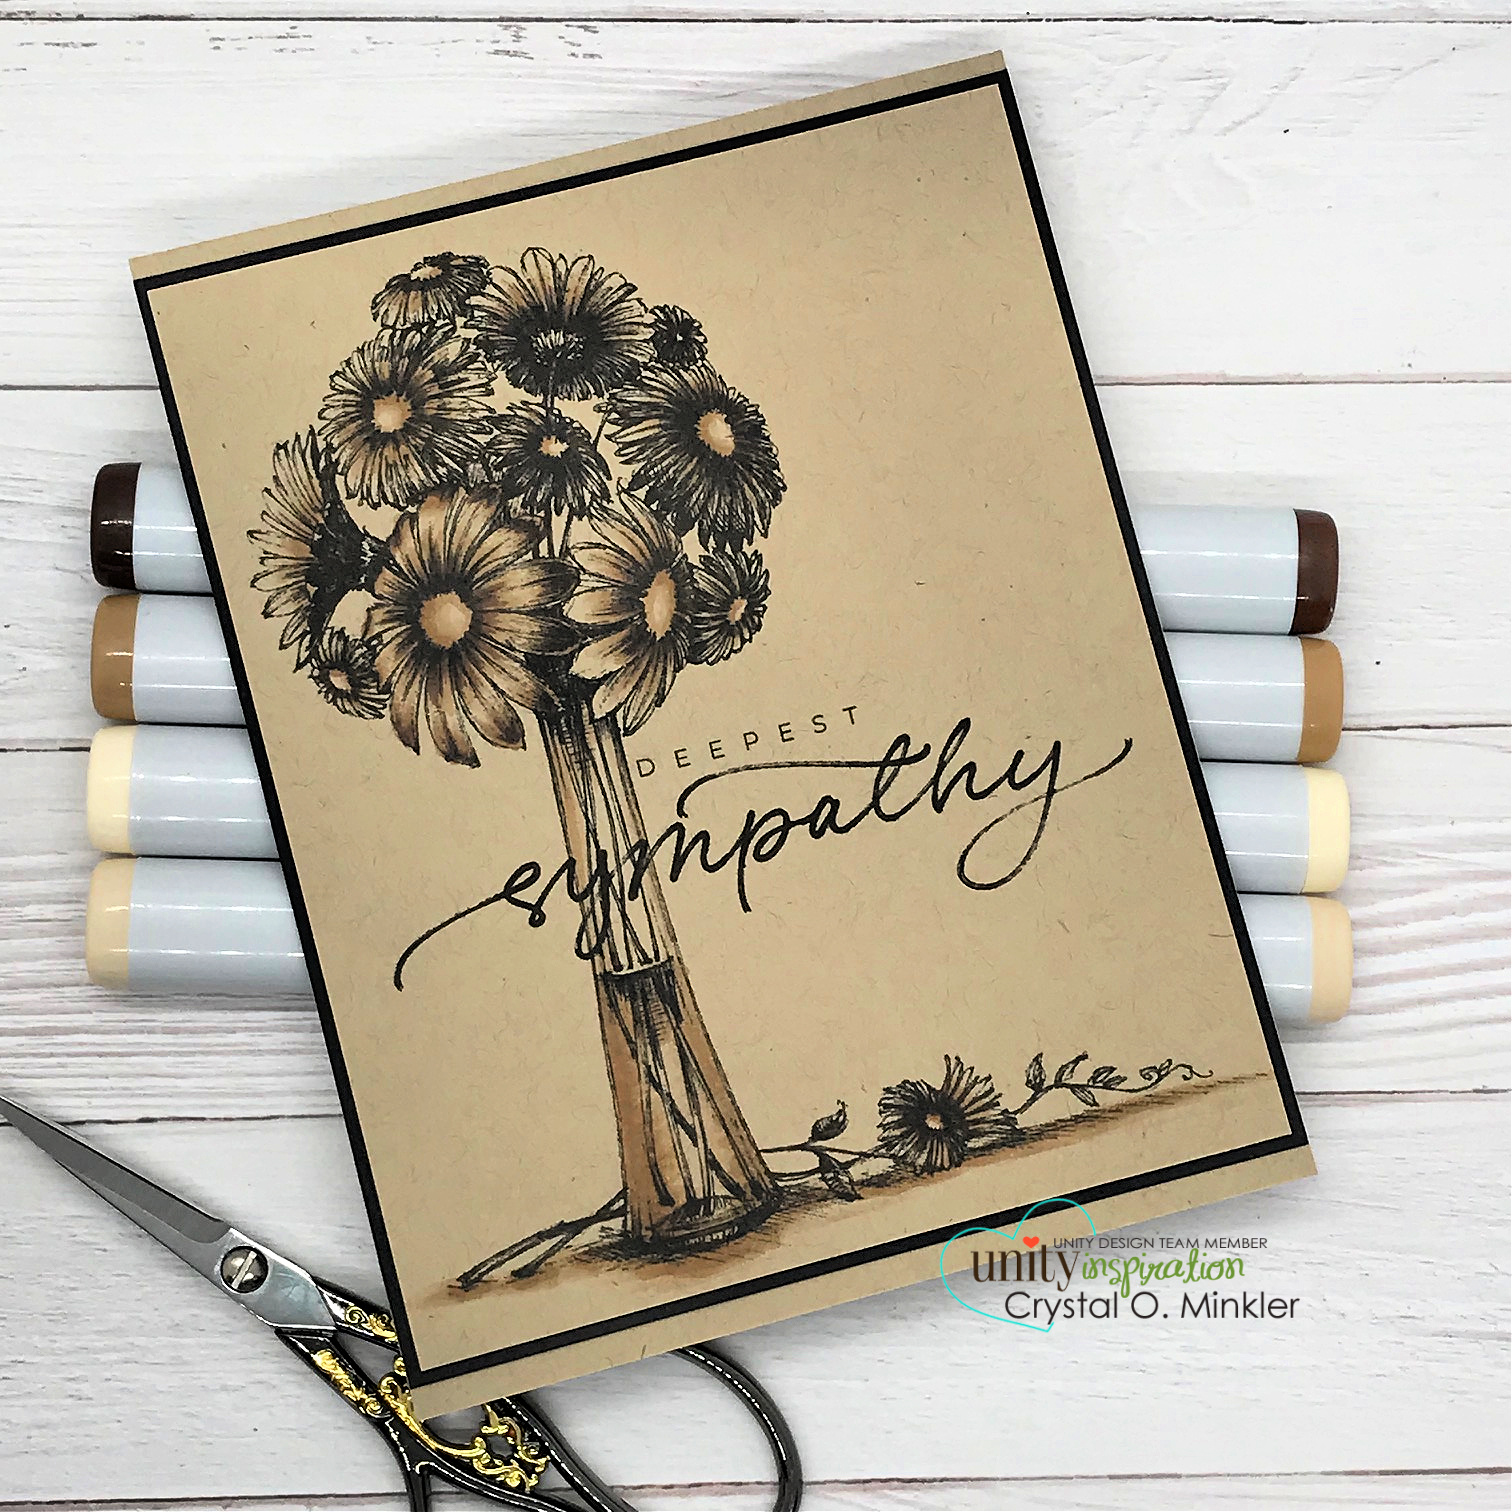
Here is a look at the very first TOP Inky Inspiration Sketch 1!! Woohoo!! I'm so excited for this sketch... I hope that you like it and maybe it'll inspire you to get inky!


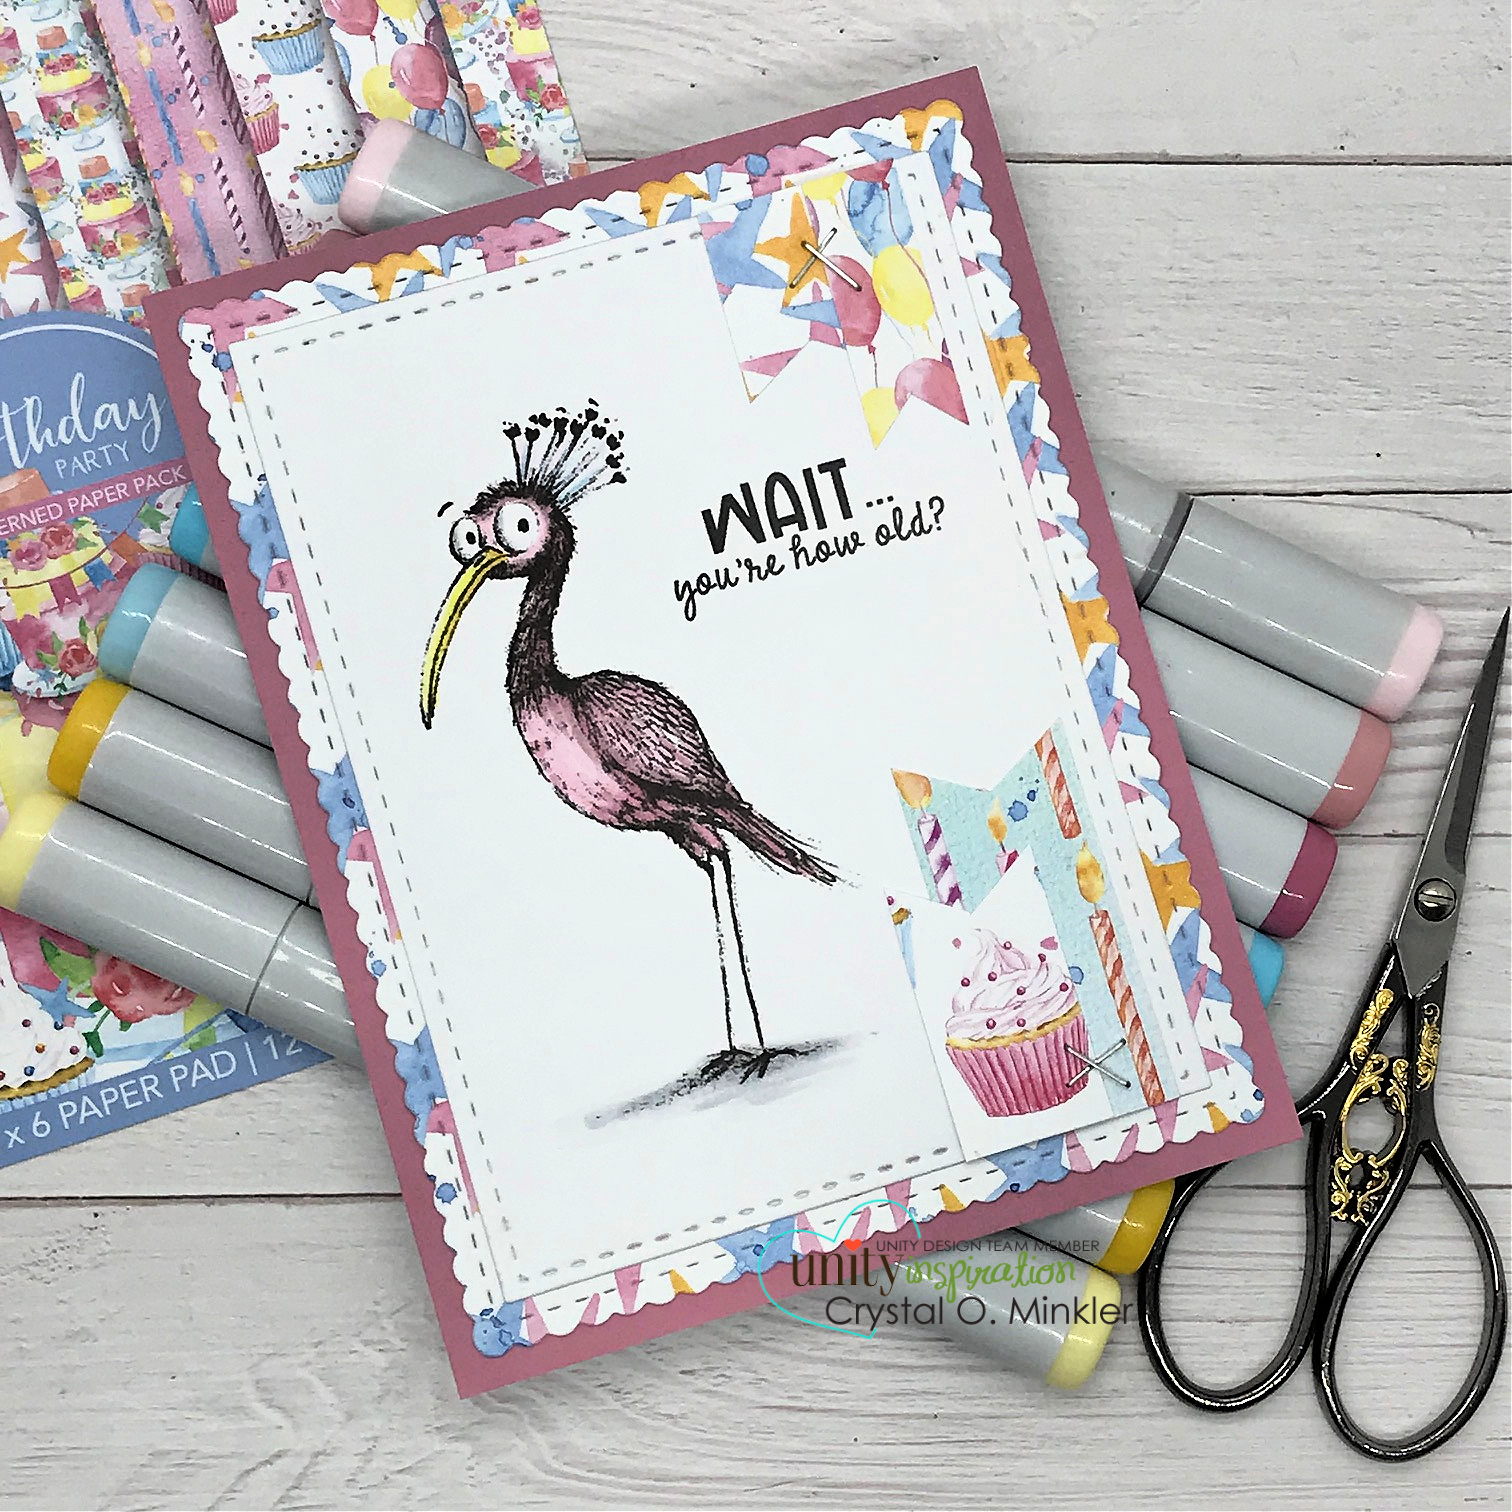
As I mentioned above, I used the wonderful May 2022 Whit Kit from Unity for my card. I was so stuck trying to think of a card design for my third make with the kit and then I saw the sketch print out that I had on my desk and it was like... DUH!! LOL!


Once I had the sketch in mind, my card came together pretty quickly. You can check out my process video here... Fun New Sketch | TOP Inky Inspiration Sketch 1 | Unity.


Here's a quick list of the Copic Markers I used:

Watering Can ~ R00, R30
Daisies ~ B60, B0000, Y11, Y15, Y26
Pinks ~ R00, R21
Blues ~ B0000, B60
Yellows ~ Y000, Y11, Y15, Y26
Greens ~ YG11, YG91, YG95


And here's a look at the card kit! Be sure to check out the Whit Kit membership at Unity!! Today is the last day to sign up for the May 2022 kit!! If you already have the kit, I hope you share your creations in the Unity Show & Tell Facebook group! Also, I'd love to invite you to join the Tawny Owl Paperie | Inky Inspiration Facebook group... it's a fun little group that I just started back up and I hope that you'll join us and play along with the first sketch! The sketch is just for fun... no prizes or anything yet. Just a fun way to get our mojos working when we get in a slump. Hope to see you there!


Thanks so much for stopping by!
See ya next time.

Inky Hugs,
Crystal


{Please note that comment moderation is ON. Your comment will appear shortly.}

Monday, May 30, 2022

Membership Monday ~ May 2022 Whit Kit ~ Unity Stamp Co.

 Hello there crafty friend!
I finally got my May 2022 Whit Kit from Unity... yay!! I played a bit this weekend and made a few cards. I'm going to share two with you today. Since I got my kit so late I decided to make a couple pretty simple cards to share for inspiration.


My first card uses one of the pretty papers from the Hello Daisy {paper pack} that's included in the kit. I die cut it with the largest stitched scalloped die from the Scallops & Rectangles {nesting dies} also from Unity.


I adhered it to a white A2 top fold card base measuring 4-1/4 x 11"; scored at 5-1/2". I wrapped the front of the card with {Naturals} May Arts Burlap string a few times and just used some scotch tape to adhere the string ends behind where the stamped image would go. I decided to wait on a sentiment for this one. I couldn't decided what occasion I wanted to use it for.


I stamped the pretty watering can of flowers with Gina K. Designs Black Amalgam ink and colored it up with the following Copic Markers:

Daisies ~ C00, C2, Y11, Y15, Y26
Pinks ~ R00, R30, R21
Purples ~ V0000, V01, V12
Greens ~ YG11, YG91, YG95
Watering Can ~ Y000, Y11, Y15, Y26


For my second card I really wanted to use the black pattern paper from the Hello Daisy {paper pack} and I thought it would be fun to just die cut the one daisy and the Dashes and Frills Hearts {die set} was perfect to die cut that one pretty daisy.


I used the next largest heart die to die cut a white mat so the heart die cut image would pop on the card. I cut a 1 x 4-1/4" strip of white card stock from my scraps to adhere across the pattern paper layer. I stamped the sentiment on another scrap of white card stock and trimmed it. It fit just right in that space on the left of the heart die cut... yay!


Here's a quick list of the Copic Markers I used for this one:

Daisy ~ C00, C1, Y11, Y15, Y26
Leaf ~ YG11, YG91, YG95
Smaller Flower ~ Y000, Y11, Y15, Y26


Here's a look at the card kit! Be sure to check out the Whit Kit membership at Unity... I believe tomorrow is the last day to sign up for this kit!! If you already have the kit, I hope you share your creations in the Unity Show & Tell Facebook group! I'd love to see what you create! I'll be back tomorrow with one more card using this fantastic kit.


Thanks so much for stopping by!
See ya next time.

Inky Hugs,
Crystal


{Please note that comment moderation is ON. Your comment will appear shortly.}

Saturday, May 28, 2022

DIY Pattern Paper ~ De Fleur Daisy {Stamp & Stencil} ~ Unity Stamp Co.

 Hello there crafty friend!
I'm so excited to share my projects with you today!!! I had so much fun making my own DIY pattern paper using the wonderful De Fleur Daisy stencil from Unity Stamp Co.!! I have a lot of pictures to share so I'm going to keep my writing to a minimum. I hope you'll scroll through to the end to see all the pretty cards I made from one 9 x 12" piece of homemade pattern paper.


I die cut the DIY pattern paper with the Make a Tag {die set}. I also used some burlap ribbon that I think I got from Unity but I don't see it on the website anymore. I tied the ribbon with some white baker's twine.


I use the same sentiment for all 5 cards that I'm sharing today. I used a super cute birthday sentiment from the new Extended Celebration {May 2022 Sentiment Kit}. I love all the amazing sentiments in this kit!! The sentiments are all stamped with Sugar Cube Pigment ink from Taylored Expressions on True Black card stock from Papertrey Ink and then I heat embossed some Alabaster White embossing powder from Brutus Monroe.


I used the pretty stitched scalloped tag as a guide for me to cut my own tag card base. You can see my process in creating the pretty DIY pattern paper and I also share how I made the Make a Tag Card here... DIY Pattern Paper | De Fleur Daisy Stencil | Unity Stamp Co.


My next card is a mini slimline measuring 6-1/2 x 7"; scored at 3-1/2". And it uses a 6-1/4 x 3-1/4" piece of the DIY pattern paper.


I added a bit of black metallic thread underneath the sentiment by applying some Tombow Mono Permanent Adhesive and then twisting the thread to make circles. 


I secured it in place even more by popping up the sentiment with foam tape over the thread.


For my next card I die cut a piece of the DIY pattern paper with the largest scalloped stitched rectangle dies from the Scallops & Rectangles {nesting dies} from Unity.


I adhered it to a True Black card front measuring 5-1/2 x 4-1/4" that I then adhered to a white A2 card base measuring 11 x 4-1/4"; scored at 5-1/2".


The sentiment is trimmed and then adhered directly to the card with Tombow Mono Multi liquid glue.


For my fourth card I die cut a piece of the DIY pattern paper with the largest die from the Postage Stamp {nesting dies} from Unity.


I adhered it to a True Black card front measuring 4-1/4 x 5-1/2" that I adhered to a white A2 top fold card base measuring 4-1/4 x 11"; scored at 5-1/2".


I trimmed the sentiment fussy cutting a fishtail for the left side and popped it up on the card with foam tape.


My last card is pretty CAS {Clean and Simple}... I used the leftover piece from the other mini slimline card to make another mini slimline card. 


I adhered the 1-7/16 x 6-1/4" DIY pattern paper panel to a slightly larger True Black mat measuring 1-5/8 x 6-3/8" and then I adhered it to the mini slimline card base {same dimensions as the first mini slimline}.


I trimmed the sentiment. I adhered two scraps of card stock underneath the right side of the sentiment so that it would lay flat on the card and then I adhered the sentiment to the card. Not only does this trick help the sentiment lay flat, it also gives the card a bit of dimension.


Here's a pic of all 5 cards!! I just love how these turned out!!
Here are the supplies I used for the DIY pattern paper:
Canson XL Watercolor Paper 140lb
Squeezed Lemonade, Mustard Seed, Picked Raspberry, Spiced Marmalade, 
Twisted Citron, Mowed Lawn, and Tumbled Glass Distress Oxide inks
Linen Layering Stencil from Tim Holtz/Stampers Anonymous
Stitches Layering Stencil from Tim Holtz/Stampers Anonymous
TE Blender Brushes from Taylored Expressions Purple Tape and Pixie Tape from iCraft Apple Barrel Black Acrylic paint American Crafts Plastic Palette Kid's paint brush Mini Wagner Precision Heat tool
Small Water Spray bottle

I hope I've inspired you to pull out those stencils and get inky!!

Thanks so much for stopping by!
See ya next time.

Inky Hugs,
Crystal


{Please note that comment moderation is ON. Your lovely comment will appear shortly.}

Friday, May 27, 2022

{BYSHC} Sketch Challenge 22 ~ Let It Snow ~ Doodlebug Design Inc.

 Hello there crafty friend!
I'm back with my weekly Christmas card using the {BYSHC} Sketch 22 from the Build Your Stash Holiday Cardmakers Facebook groupI couldn't resist making another quick holiday card using the fantastic Let it Snow collection from Doodlebug Design Inc. I'm slowly using up the adorable paper pad as I keep reaching for this collection each month for my Christmas cards. I just can't help it! I love the adorable images and pretty designs of the papers! And it doesn't hurt that I can make quick cards using these products either!


I chose my focal piece first. The adorable Santa is from the Let it Snow Chit Chat die cut pack. 


I chose a couple of papers from the Let it Snow paper pad that complimented the cute little Santa die cut. I adhered the papers to a 6-1/2 x 3-1/2" piece of red card stock. I die cut a scrap of red card stock with the Ric Rac die from My Favorite Things. I cut the die cut ric rac in half and adhered it to the card front.

I covered up the space between the ric rac pieces by popping up the Santa over top. I adhered the card front to a white 7 x 6-1/2" card base that I scored at 3-1/2". I added a few Let it Snow Shape Sprinkles enamel shapes to the card to finish it off. 


Here's a look at the fun {BYSHC} Sketch 22 for the month of May!
There's just a few more days to play along with the sketch and enter the challenge! If you're interested in seeing more inspiration for this sketch, check out the beautiful inspiration from the {BYSHC} design team over on the  {BYSH} Cardmakers blog!


Thanks so much for stopping by!
See ya next time.

Inky hugs,
Crystal


{Please note that comment moderation is ON. Your lovely comment will appear shortly.}

Wednesday, May 25, 2022

Lets-A Party Birthday Card ~ Game On ~ Kindred Stamps

 Hello there crafty friend!
Today I'm sharing the birthday card that I made for my youngest son's 13th birthday... he loves video games and he loves it when the whole family plays Mario Party together!! I'll admit... it's not really my thing, but I love to watch them all play!! It's a lot of fun and a great way to spend time together.


The amazing Game On Limited Edition Box from Kindred Stamps {sadly, it's sold out} was just the thing to make the perfect card! To get all the characters together for a party I did a lot of stamping and masking. I stamped Bowser and Toad first on my card front and then again on a post-it note. I fussy cut the post-it note masks and placed them on the stamped images. And then I stamped Princess Peach. I stamped a mask for her too. Fussy cut it out and placed the mask on the card front. And then I stamped Waluigi and Princess Daisy. I also made post-it note masks for them too because I knew I was going to add some kind of color to the background. I stamped Wario on a scrap piece of white card stock so I could fussy cut him and pop him up on the card with foam tape.


There was quite a bit of coloring for these characters. I'm going to list the Copic Markers I used per character but I wanted to note that I colored Princess Peach as Rosalina because that character wasn't included in the stamp set and it's the one that my daughter usually plays. 
Here's the list of Copic Markers I used:

Toad ~ E000, E00, E11, E04, R20, R14, R27, C00, C2, N2, N4, N6, Y06, Y15, B05, B28, E35, E39
Bowser ~ E00, E30, E43, YR15, YR68, R17, YG11, YG13, G14, N2, N4, N6, C00, C2, YR21, YR27, Y11, Y06, Y15
Princess Peach {colored as Rosalina} ~ E000, E00, E11, E04, Y11, BG000, BG01, BG15, Y06, Y15, R20, R14, R27
Princess Daisy ~ E000, E00, E11, E04, R20, R14, N2, N4, N6, BG01, BG15, Y11, Y06, Y15, YR31, YR23, YR27
Waluigi ~ E000, E00, E11, E04, RV10, RV21, RV14, C00, C2, V12, V15, V17, Y06, N2, N4, N6
Wario ~ E000, E00, E11, E04, RV10, RV21, RV14, C00, C2, V12, V15, V17, YG11, YG13, G14, Y11, Y06, Y15


Once I was happy with the coloring, I die cut the panel with the largest stitched rectangle from the Scallops & Rectangles {nesting dies} from Unity Stamp Co. I put the masks back on the characters and also masked the bottom portion of the die cut panel with a large post-it note. I then blended Twisted Citron and Salvaged Patina Distress Oxide inks over the top portion of the panel. I removed the mask and covered the top portion of the panel this time with the large post-it note mask and blended Antique Linen and Vintage Photo Distress Oxide inks over the bottom portion of the panel. I cut a couple of pattern papers from the paper pad included in the Game On box. I chose the yellow paper for my background so that the yellows in the Wario character would pop. 


I finished off the card by doing a bit of stamping on the inside. Something that I don't do often enough. I ended up stamping the stars inside the card and on scrap white card stock. I used didn't want the alcohol ink to bleed through the back of my card. I inked the stars up with the yellows I used on a few of the characters ~ Y11, Y06 and Y15. I fussy cut them and colored around the edges with a Memento Tuxedo black marker which makes the edges nice and clean looking. I adhered the stars inside the card over the stars that I had stamped inside the card.


I stamped the sentiment with Sugar Cube White Pigment ink from Taylored Expressions and heat embossed some Alabaster White Embossing powder from Brutus Monroe with my Mini Wagner Precision Heat tool. I trimmed the sentiment and popped it up on the card with foam tape. Such a fun card to make and my son loved it!! So that's even better!


Thanks so much for stopping by!
See ya next time.

Inky Hugs,
Crystal


{Please note that comment moderation is ON. Your lovely comment will appear shortly.}

Monday, May 23, 2022

Copic Coloring on Kraft ~ Happy and Cozy Mini Slimline ~ Unity Stamp Co.

 Hello there crafty friend!
My Whit Kit has been delayed a bit so in lieu of a Membership Monday post, I have a mini slimline card using the adorable new release called Happy and Cozy. When I shared my card earlier this month with the awesome door from the May 2022 Kit of the Month, I had several people ask about my copic coloring on Kraft. I thought this cute stamp set would be perfect for sharing my technique.


I die cut the panel on Kraft card stock with the Scalloped Stitched Mini Slimline die from Gina Marie Designs. And then I got to coloring... 


Here's a list of the Copic Markers I used:

Cabin ~ E55, E57, E59
Windows ~ Y11, Y06, Y15
Grass ~ YG13, YG93, YG95, YG97, YG99
Trees ~ E55, E57, YG13, YG93
Stars / Moon ~ Y11, Y06
Chimney / Smoke / Steps ~ N1, N3
Sky ~ BV0000, BV000, BV01, BV34, BV25, BV29


One little note when you color on Kraft card stock... the ink appears very dark at first, but it does lighten when it dries. It's also a bit muted in color... I really love the technique!


I added some white acrylic paint splatters and since the splatters messed up the nice clean edges I was wanting, I trimmed the panel just inside the stitching. I adhered the layers and wrapped some {Ivory} burlap string around the panel tying a pretty little bow. I popped up the panel with foam tape adhering it to a 3-1/8 x 6-1/8" piece of Midnight Muse card stock and then I adhered the card front to a 7 x 6-1/2" mini slimline card base that I scored at 3-1/2". If you're interested in seeing my coloring and process you can check it out here... Copic Coloring on Kraft | Happy and Cozy Mini Slimline | Unity Stamp Co.


  Well that's it for me today! I sure had a blast coloring up this sweet scene card to share with you all. If you haven't checked out the sale over at Unity for the second round of the Birthday Sale, you really should!! Lots of amazing new releases too!! 


Thanks so much for stopping by!
See ya next time.

Inky Hugs,
Crystal


{Please note that comment moderation is ON. Your lovely comment will appear shortly.}

Friday, May 20, 2022

{BYSHC} Sketch Challenge 22 ~ Let It Snow ~ Doodlebug Design Inc.

 Hello there crafty friend!
I'm back with my weekly Christmas card using the {BYSHC} Sketch 22 from the Build Your Stash Holiday Cardmakers Facebook group and this week I was looking to make a quick card so I grabbed my Let It Snow collection from Doodlebug Design Inc. I have been slowly using up the adorable paper pad as I keep reaching for this collection it seems each month for my Christmas cards. I just can't help it! I love the adorable images and pretty designs of the papers!


This time I chose two pretty papers that were mostly blue. I thought they worked really well together and I could use the adorable polar bear die cut from the Let It Snow Odds & Ends die cuts (ephemera) pack. I also chose the cute red bird... I think they would be the best of friends!


The pattern papers measure 3 x 6" together and are adhered to a white mini slimline card base measuring 7 x 6-1/2"; scored at 3-1/2". I die cut a piece of white card stock with the Ric Rac die from My Favorite Things. I had to cut it in the middle and adhered it to either end of the pattern paper but that was fine because the polar bear covers up the space in between.


The punny sentiment is from the Let it Snow Chit Chat die cut pack. I adhered the little bird on top of the bear with a tiny bit of liquid glue on the tips of its feet and then I adhered the bear to the sentiment banner with a tiny bit of liquid glue on the tips of his feet. I then popped up the whole combined piece with foam tape. I added a few Let it Snow Shape Sprinkles enamel shapes to the card to finish it off.


Here's a look at the fun {BYSHC} Sketch 22 for the month of May!
If you're interested in seeing a bit more inspiration for this sketch, check out the amazing inspiration from the {BYSHC} design team over on the  {BYSH} Cardmakers blog! I hope you'll join us and play along! I'll be back next Friday with my regular weekly Christmas card using this fun sketch!


Thanks so much for stopping by!
See ya next time.

Inky hugs,
Crystal


{Please note that comment moderation is ON. Your lovely comment will appear shortly.}

Thursday, May 19, 2022

Simple Sympathy Card with Sepia Coloring on Kraft ~ Compassionate Daisies ~ Unity Stamp Co.

 Hello there crafty friend!
Today I'm sharing a card that us cardmakers don't necessarily like to make but sadly they are necessary. So I thought the beautiful new Compassionate Daisies stamp from Unity's new release would be perfect for a very simple and quick sepia colored sympathy card.


I kept the layers very simple with a 4-1/8 x 5-1/8" piece of Kraft card stock with the beautiful daisies and sentiment from the Compassionate Daisies stamped in an alcohol ink friendly ink.


For my sepia coloring I just used four Copic markers ~ E50, E53, E55, and E59.


I adhered the daisies panel to a 4-1/4 x 5-1/4" piece of True Black card stock from Papertrey Ink. I adhered the panel to a 4-1/4 x 11" Kraft card base; scored at 5-1/2". I left a bit of Kraft peeking out of the top and bottom of the base. 


Well that's it for me today! Do yourself a favor and go check out all the fab new releases at Unity for the second round of the Birthday Sale!! I'll be back tomorrow with my weekly Christmas card!


Thanks so much for stopping by!
See ya next time.

Inky Hugs,
Crystal


{Please note that comment moderation is ON. Your lovely comment will appear shortly.}

Wednesday, May 18, 2022

Funny Birthday Card ~ Full of Surprises ~ Unity Stamp Co.

 Hello there crafty friend!
The fabulous Birthday Sale at Unity is still on!! Today I'm sharing a cute new release using the new Full of Surprises stamp kit. This bird cracks me up!! I love it so much! And the sentiments are perfect for a funny card!!


It's seemed like a no-brainer to pair this fun bird with the Birthday Party {paper pack} from Unity. I used colors from the papers to coordinate for my coloring.


Here's a quick list of the Copic markers I used:
Bird ~ RV10, RV95, RV34, with a hint of B000 in the feathers on the head
Beak ~ Y11, Y06, Y15
Eyes ~ C00, C2
Ground ~ C00, C3


I die cut the bird with the largest stitched rectangle die from the Scallops & Rectangles {nesting dies} from Unity. I die cut the star pattern paper with the largest scalloped stitched die from the same nesting die set. I adhered those two layers together and then adhered them to a card front of Sweet Sugarplum card stock from Stampin' Up. I used a few scraps for my flags on the card. Adding a couple on both the top and the bottom... I think they're a fun touch to add to a card. And a great way to use those scraps of pattern paper!

Well that's it for me today! Go check out all the fab new releases at Unity for the second round of the Birthday Sale!! I'll be back tomorrow with a super quick and easy sympathy card using another new release from Unity!


Thanks so much for stopping by!
See ya next time.

Inky Hugs,
Crystal


{Please note that comment moderation is ON. Your lovely comment will appear shortly.}