Showing posts with label #stencil. Show all posts

Thursday, July 25, 2024

Christmas in July 2024 {BYSHC} Linky Party ~ Beautiful Poinsettia Stencil ~ A Colorful Life Designs

 Hello there crafty friend!
I couldn't help myself I'm back again today to share a couple more cards I made for the Christmas in July 2024 {BYSHC} Linky Party! I've been so inspired by the cards shared over at the Linky Party... I just HAD to get inky! 


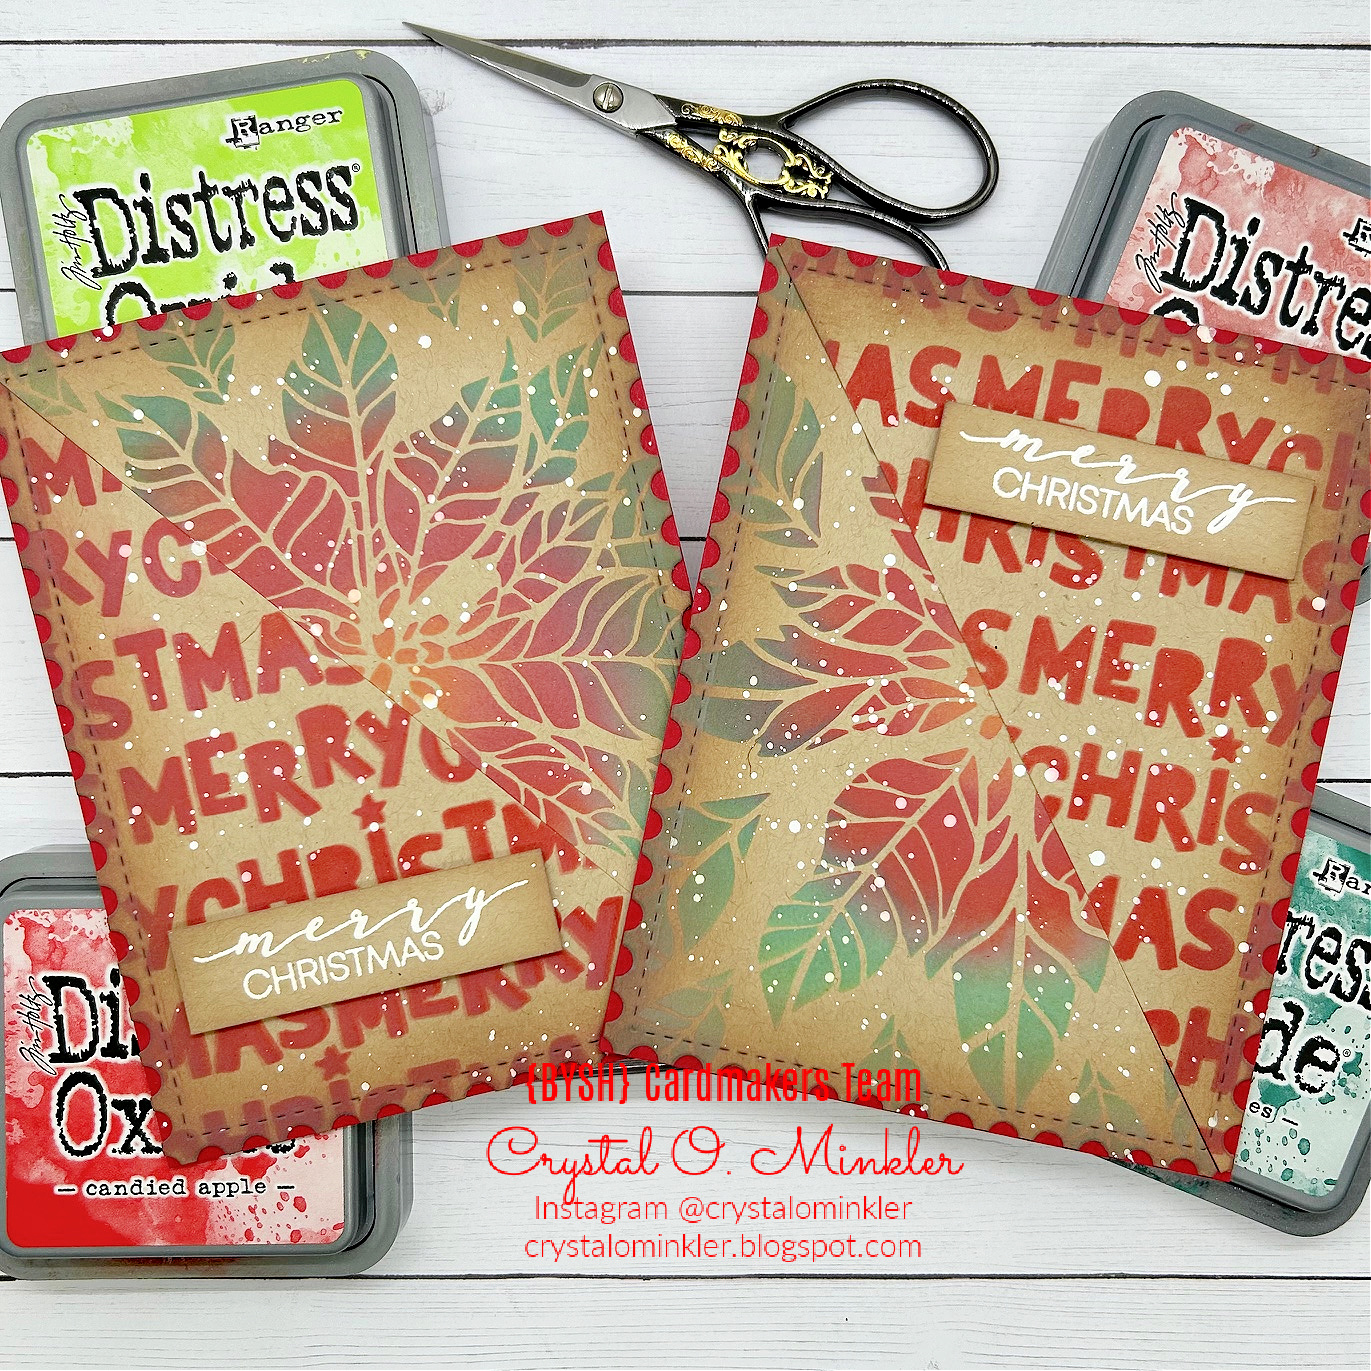
And my order from our amazing Sponsor A Colorful Life Designs did just arrive so I really wanted to play with a couple new stencils. Yay! I ended up inking up both the Beautiful Poinsettia Stencil and the Merry Christmas Stencil. I wanted to see what these beautiful stencils would look like on Kraft card stock from Papertrey Ink.


 I once again used the awesome 5.5 x 8.5" Grip Mat from Sponsor Waffle Flower. I placed my 4-1/4 x 5-1/2" piece of Kraft card stock in the center of the grip mat and placed the Beautiful Poinsettia Stencil over it. I blended Candied Apple, Fired Brick and Worn Lipstick Distress Oxide inks over the inner leaves of the poinsettia.


I blended Mustard Seed Distress Oxide ink over the center of the poinsettia. And then I blended Twisted Citron and then some Pine Needles Distress Oxide inks over the ends of the leaves. I replaced the panel with a new piece of Kraft card stock and then placed the Merry Christmas Stencil over the panel. For this second stencil I just blended Candied Apple and a bit of Fired Brick Distress Oxide inks.


I die cut both panels using the Postage Stamp {nesting dies} from Sponsor Unity Stamp Co. I cut the panels from corner to corner using my Tim Holtz Tonic Guillotine Comfort Paper Trimmer. I cut one panel first and then I laid the left corner piece on the other full panel as a guide. I made sure it was line up right on the edge and then I cut the second panel. I hope that makes sense. It really made it easy for the two panels to line up together on the card bases.


I distressed the outer edges using Vintage Photo Distress Oxide ink. I love the vintage vibe it gives the card stock. I placed the two triangle pieces {one Merry Christmas and the opposite poinsettia} back in the die and then adhered them together with a scrap of thin card stock. It was just a scrap maybe 2" wide that covered the center line from behind. I adhered the panels to a red A2 top fold card base of Pure Poppy Card Stock from Papertrey Ink. I adhered all my layers using iCraft UltraBond Adhesive from Therm O Web.


And then I splattered the cards using Apple Barrel White Acrylic paint that I spritzed with a tiny bit of water. I debated adding a strip of card stock across the card where the two triangles meet but I decided against it. I didn't want to take away from the stenciled backgrounds. What do you think? Should I have added a strip of card stock across?


 All that was left was the sentiments. I applied some anti static powder using the TE Anti-Static Powder Tool from Sponsor Taylored Expressions to a scrap piece of Kraft card stock. I stamped the beautiful sentiment from the Sketched Poinsettia Stamp Set from Waffle Flower using Sugar Cube White Pigment Ink from Taylored Expressions. I then added some Alabaster White Embossing Powder from Brutus Monroe. I melted the powder using a Wagner Precision Heat Tool. I used the fabulous Pressure Pal from our awesome Sponsor Twiddler's Nook when I stamped the sentiments. Once the sentiments had cooled I wiped off the anti static powder using a microfiber cloth. I distressed the edges of the sentiments with the Vintage Photo Distress Oxide ink. Trimmed the sentiments and then popped them up with iCraft 3D Foam Tape Jumbo Roll (white) from our lovely Sponsor Therm O Web.


I hope you'll stop by the Christmas in July 2024 {BYSHC} Linky Party to check out all the wonderful Holiday inspiration being shared! I've been inspired by so many of the cards! I sure hope you'll stop by and check it out! Have an ink-tastic day!


Thanks so much for stopping by!
See ya next time.

Inky Hugs,
Crystal


{Please note that comment moderation is ON. Your comment will appear shortly.}

Wednesday, July 24, 2024

Christmas in July 2024 {BYSHC} Linky Party ~ Sketched Poinsettia ~ Waffle Flower

 Hello there crafty friend!
I couldn't help myself I'm back again today to share another card I made for the Christmas in July 2024 {BYSHC} Linky Party! I've been so inspired by the cards shared over at the Linky Party... I just HAD to make another card! 


I stamped the beautiful poinsettia from the Sketched Poinsettia Stamp Set from our lovely Sponsor Waffle Flower. I used the awesome Sketched Poinsettia Coloring Stencil to color the beautiful poinsettia. I blended Candied Apple and Fired Brick for the leaves; Mustard Seed and Spiced Marmalade with a touch of Vintage Photo for the center of the flower; and Twisted Citron, Pine Needles and Crushed Olive Distress Oxide inks.


I'm also playing along with the Color Hues Challenge today! Red and Green are so perfect for a Christmas card! This fun challenge is open until July 29th, if you want to play along! 


 I die cut the poinsettia using the Sketched Poinsettia Matching Die and set it aside. I stamped the sentiment from the Sketched Poinsettia Stamp Set using Memento Tuxedo Black ink. And then die cut it using the coordinating die. I used the fabulous Pressure Pal from our awesome Sponsor Twiddler's Nook when I stamped the poinsettia and the sentiment in my mini misti.


The fun background was created with iCraft Easy-Tear 1/4" Tape and Deco Foil Color Harmony Transfer Foil Multi-Pack, Shades of Green from our awesome Sponsor Therm O Web. I laid stripes of the tape across a 4-1/4 x 5-1/2" piece of white card stock. And then I laid a piece of Electric Lime foil over the tape with the shiny green facing up. No need for a laminator for these fabulous foils! I just used my bone folder to press the foil into the tape. I went over the whole panel a couple of times from both directions and pulled up the foil. It was perfect! I love it! 


I die cut the foiled background using the Frayed Edge Stacklets dies from Sponsor Taylored Expressions. I adhered the poinsettia and sentiment to the foiled panel using iCraft UltraBond Adhesive from Therm O Web. And then I popped up the whole panel onto a white A2 top fold card base using iCraft 3D Foam Tape Jumbo Roll (white) also from Therm O Web. Such a quick and fun card to make!


I hope you'll stop by the Christmas in July 2024 {BYSHC} Linky Party to check out all the wonderful Holiday inspiration being shared! It's all been so awesome! I sure hope you'll stop by and check it out! Have an ink-tastic day!


Thanks so much for stopping by!
See ya next time.

Inky Hugs,
Crystal


{Please note that comment moderation is ON. Your comment will appear shortly.}

Christmas in July 2024 {BYSHC} Linky Party ~ November 2023 KOM Festive Flair ~ Unity Stamp Co.

 Hello there crafty friend!
I can't believe how fast the time is going by! We are nearing the end of the Christmas in July 2024 {BYSHC} Linky Party! It's always so sad to reach the end, but I'm super happy to be adding so many cards to my stash! I hope you've been inspired to play along with us. My card today features a couple of stamps from the November 2023 Kit of the Month called Festive Flair from our amazing Sponsor Unity Stamp Co. It's Membership Wednesday... a fun day to share inspiration for the awesome memberships over at Unity! I decided to play with an older KOM this time and make another holiday card for my stash!


I had a fun idea for a simple one layer card that kind of took a left turn. I blended over the cool Reindeer Games Stencil from our fabulous Sponsor A Colorful Life Designs using my red TE Blender Brush from another fab Sponsor, Taylored Expressions. I actually didn't add any ink to my brush but I'm pretty sure it has some Candied Apple Distress Ink on it. I kept it very light.


 And then I stamped the beautiful trees from the November 2023 KOM using Iced Spruce Distress Ink. I then applied some anti static powder using the TE Anti-Static Powder Tool from Taylored Expressions. I stamped the beautiful reindeer using Wow Clear Embossing Ink and then added some Raven Embossing Powder from Brutus Monroe. This is a fun black embossing powder with glitter in it. It's really beautiful in person. I melted the powder using a Wagner Precision Heat Tool. As always, I used the fabulous Pressure Pal from our awesome Sponsor Twiddler's Nook when I stamped the trees and the reindeer in my Stamp Platform. Love this tool!


 Once I had all the elements on the panel, it just didn't look right as a one layer card. I trimmed off the front panel of the card base and cut the panel down to 5-1/16 x 3-3/4". And then I die cut a piece of True Black card stock from Papertrey Ink using the largest die from the Postage Stamp {nesting dies} from Unity. I found a card front of Ocean Tides card stock from Papertrey Ink in my stash. I scored the 8-1/2 x 5-1/2" card stock at 4-1/4" for an A2 card. Stamped the sentiment on a scrap of white card stock, trimmed it and mat it with a scrap of black card stock. I adhered all of my layers using the iCraft UltraBond Adhesive from Sponsor Therm O Web. I finished off the card with two glittery red enamel dots from the Holiday Glitter Enamel Dots from Sponsor Gina Marie Designs. Unfortunately, I can't seem to find them on the website but these are a favorite of mine... Red & Green Foil Mirror Enamel Dots.


I hope you'll stop by the Christmas in July 2024 {BYSHC} Linky Party to check out all the wonderful Holiday inspiration being shared! I've been inspired by so many of the cards! I sure hope you'll stop by and check it out! Have an ink-redible day!


Thanks so much for stopping by!
See ya next time.

Inky Hugs,
Crystal


{Please note that comment moderation is ON. Your comment will appear shortly.}

Friday, July 12, 2024

{BYSHC} Sketch Challenge 47 ~ Create-in-Quads Snowflake Layering Stencil ~ Taylored Expressions

Hello there crafty friend!
I'm back with more inspiration for the {BYSHC} Sketch Challenge 47 over in the Build Your Stash Holiday Cardmakers Facebook group! Today I'm sharing a fun Christmas card featuring the awesome Create-in-Quads Snowflake Layering Stencil from our amazing sponsor, Taylored Expressions! Taylored Expressions has generously offered up a $25 gift card as a prize for the {BYSHC} Sketch Challenge 47 this month! So fabulous!!


The Create-in-Quads Snowflake Layering Stencil makes it so easy to ink up a whole 8-1/2 x 11" sheet of card stock that you can cut up and make four awesome cards out of it!! The set includes four layering stencils that line up so easily and all you have to do is pick your colors and blend away! It was so much fun! I decided to use my four card stock panels in a different way. I actually used two of the four panels to create the fun layers in the card.


I blended Tumbled Glass Distress Ink over the first stencil being sure to ink up the four squares on the edges of the stencil. Those four squares are the guides to lining up the next three stencils. I replaced the first stencil with the second stencil in the set and blended Chipped Sapphire Distress Ink over that stencil. I blended Black Soot Distress Ink over the third stencil and then more Tumbled Glass Distress Ink over the fourth stencil. You may remember this color combo from the card I shared earlier in the month.


I cut the 8-1/2 x 11" sheet into my four panels. I trimmed down the first panel to 3-7/8 x 5-1/8" and mat it with a 4 x 5-1/4" piece of True Black Card Stock from Papertrey Ink. I trimmed the fourth panel for my next layers. My first piece measures 2-3/8 x 3-7/8". I mat it with a 2-1/2 x 4" piece of black card stock and a 2-5/8 x 4-1/8" piece of Bashful Blue Card Stock from Stampin' Up. The top layer was die cut from the remaining piece of the fourth panel. I die cut it using a die from the Stitched Square Stacklets from Taylored Expressions. I mat this layer with a 2-5/8" square piece of black card stock and a 2-3/4" square piece of blue card stock. I die cut one of the snowflakes from the scrap leftover from the fourth panel using the Stitched Circle Stacklets from Taylored Expressions. I mat it with a die cut circle from black card stock. I used the Nesting Additional Circles Dies from Waffle Flower for that piece. I added a glitter white enamel dot from my stash to finish off the snowflake layers.


 I heat embossed the sentiment from the Fluffy Friends - Holiday stamp set from Taylored Expressions. I prepped my black card stock with the TE Anti Static Powder Tool. I stamped the cute sentiment using the Sugar Cube White Pigment ink and added Alabaster White Embossing powder from Brutus Monroe. I then melted the embossing powder using my Wagner Precision Heat Tool. After letting the melted powder cool a bit, I rubbed my card stock with a microfiber cloth to remove the anti static powder. I trimmed up the sentiment and added a bit of foam tape to the right side and then adhered the sentiment directly to the card using liquid glue on the left side. A great trick to adhere the sentiment flat for cards with lots of layers. 


Here's a look at {BYSHC} Sketch Challenge 47 for the month of July. Loving this sketch! I can't wait to see what everyone does with it. I hope you'll join us and play along with the sketch. If you're interested in seeing a bit more inspiration for this sketch, check out the amazing inspiration from the design team over on the {BYSH} Cardmakers blog! So many fabulous cards this month from the design team.


Thanks so much for stopping by!
See ya next time.

Inky hugs,
Crystal


{Please note that comment moderation is ON. Your lovely comment will appear shortly.}

Monday, July 8, 2024

Inky Paws Challenge #227 ~ Color Challenge

Hello there crafty friend!
It's time for a new Inky Paws Challenge... a beautiful Color Challenge
I sure hope that you'll join in the fun and play along with us with your Newton's Nook Designs products! You have until Friday, July 19th to get your entries in for the #227 Color Challenge and a chance to win a $20 store credit to Newton's Nook Designs!


Such an amazing color combo... Amethyst Purple, Fuchsia Pink, Sky Blue, and Sand Brown!! 


My first thought when I saw these beautiful colors was the Bokeh Stencil Set would make a beautiful background!! For the first stencil in the set, I blended Wilted Violet and a bit of Kitsch Flamingo Distress Oxide inks. And then I replaced the first stencil with the second one in the set and blended Tumbled Glass Distress Oxide ink. 


I trimmed up the panel to 3-3/4 x 5" and mat it with a 3-7/8 x 5-1/8" piece of Kraft card stock from Papertrey Ink. I then adhered the panel to a white A2 top fold card base measuring 4-1/4 x 11"; scored at 5-1/2".


I stamped the adorable kitty and the sentiment from the Newton's Birthday Balloons Stamp Set using Memento Tuxedo Black ink and colored up the kitty with a handful of Copic markers. I fussy cut the kitty leaving a white border. If you don't like fussy cutting there is a coordinating Newton's Birthday Ballons Die Set available (it's on my wishlist!). I trimmed up the sentiment and cut two small scraps of card stock. I adhered the scraps together and then adhered them on the back right edge of the sentiment allowing the sentiment to lay flat on the card when I adhered it. I added foam tape to the back of the kitty and popped him up on the card.

Here's a quick list of the Copic markers I used:
Kitty: R00, R20, YR000, YR21, YR15
Gift: E30, E33
Pink Balloon: RV10, RV11, RV02, RV13, RV63, RV14
Purple Balloon: V000, V12, V15
Blue Balloon: B000, B00, B02


Now it's your turn to get your paws inky with your Newton's Nook Designs products and create a project using the color combo of Amethyst Purple, Fuchsia Pink, Sky Blue, and Sand Brown. Be sure to link up to the Inky Paws Challenge! Can't wait to see your projects!


Thanks so much for stopping by!
See ya next time.

Inky Hugs,
Crystal


{Please note that comment moderation is on. Your lovely comment will appear once approved.}

Saturday, July 6, 2024

~ Friends of Unity July 2024 Blog Hop ~

Hello there crafty friend!
It's time for our Friends of Unity Blog Hop!! I've been so excited for this month's cue but time has not been on my side. It's been a very busy summer! I wish time would just slow down for a minute so we could enjoy it. It just seems to zip on by! Anywho, before we get to the cue and my cards, I wanted to welcome two super sweet new friends to our hop... Jenni Shamblin and Kari Buss are joining us on the Friends of Unity team! I am so excited to have these talented ladies join us! I hope you'll drop by their blogs and give them a super warm welcome! Now, onto our cue this month...  


This month's cue is Technique!! Woohoo!! Since my time was limited I didn't jump into a new technique as I had hoped to. BUT I did try something a little new with one of my favorite crafty supplies... Distress Crayons from Tim Holtz and Ranger. 


First up is a fun rainbow card!! I love making rainbows! They are so pretty! I used the sunray from the 3-in-1 Stencil from Unity as a guide for my coloring. I used a whole bunch of Distress Crayons: Picked Raspberry, Festive Berries, Spiced Marmalade, Mustard Seed, Twisted Citron, Mermaid Lagoon, Chipped Sapphire, Shaded Lilac, and Seedless Preserves.

You can check out the video for this fun technique here... Distress Crayon Technique | Rainbow Sunray Background.


This adorable stamp is called Born to Be Loved. As I've mentioned many times before, my daughter loves bunnies so I have a lot of bunny stamps. I like to use them when I make cards for her. I made this one for her just to let her know we love her very much.


I used a rectangle die from the BIG Scallops & Rectangles {nesting dies} to die cut the bunny and sentiment. Trimmed up the rainbow background to 4 x 5-1/4" and adhered it to a white A2 top fold card base. I added foam tape to the back of the bunny rectangle and popped it up on the card.

Here's a quick list of the Copic markers I used to color up the bunny:
Bunny: C00, C1, C3, R00, R20, Colorless Blender
Bow / Dress: RV10, RV13, RV14
Daisy: C00, C1, C3, Y11, Y15, Y35
Grass / Stem: YG11, YG23
Outline: B0000, B000


Next up, a sweet encouragement card for a friend. Another fun technique using a Brushed Pewter Distress Crayon with the Vintage Script Embossing Folder. I love the font on this one. Unfortunately, I believe this one is retired but you could use any script embossing folder. 


This beautiful stamp is called Being Yourself. Isn't she lovely!? I paired her up with a Cut Apart Sentiment Strip {I don't see the same ones on the website but here's another one} and die cut her using a die from the Dashes & Frills Hearts {die set}. I also die cut a piece of vellum card stock. I adhered her to the vellum and then just added glue behind her to adhere the vellum heart to the card.


I trimmed the embossed panel of True Black card stock from Papertrey Ink to 4 x 5-1/4" and adhered it to a 4-1/4 x 5-1/2" card front of Brushed Silver card stock from Stampin' Up. And then I adhered the panel to a white A2 top fold card base.

Here's a quick list of the Copic markers I used to color up this beauty:
Skin: E000, E00, E11, E04
Hair: E70, E71, E74
Shirt: RV10, RV13, RV14
Roses: Y11, Y15, RV10, RV13
Leaves / Stems: YG11, YG23, G24


I don't know about you, but I've about had enough of this hot summer weather! LOL! Is it too early to dream of Fall weather?! I don't think so! I used a pretty embossing folder from Love Nicole called Cable Knit. This time I used Mustard Seed, Spiced Marmalade, and Vintage Photo Distress Crayons.

You can check out the video for this fun technique here... Distress Crayon Technique | Add Color to Embossed Backgrounds.


This gorgeous stamp is from the September 2019 Kit of the Month called All Kinds of Holiday Love. She is an absolute favorite of mine! Once I saw the cable knit embossing folder in my stash I knew I had to ink this beauty up! 


I die cut the girl using a die from the Scallops & Circles {nesting dies}. Trimmed the cable knit panel to 4 x 5-1/4" and adhered it to a kraft A2 top fold card base. I cut an edge off the circle and adhered the heat embossed sentiment to the circle. Added foam tape to the back of both pieces and then popped them up on the card.

Here's a quick list of the Copic markers I used to color up this Fall beauty:
Skin: E000, E00, E11
Hair: E70, E71, E74, E77
Cowl: Y11, Y15, Y35, YR000, YR21, YR15, YR16, E53, E55, E57

Now before we get to the hopping, I chose a lucky winner from the comments on last month's hop to win a fun prize and the lucky winner is...


... Becca Yahrling!! Congratulations, Becca!!
Please email me at crystalominkler@gmail.com to claim your prize. 
Please claim the prize before July 31st, 2024. 

Well, that's it for me this time! Please hop along and enjoy some more inspiration from our friends! I can't wait to see how they were inspired by this month's cue. I wonder what other techniques will be shared. I'm doing another fun giveaway this month!! Be sure to hop along and comment on each of the blogs for a chance to win. {When you comment please leave your name just in case it posts as anonymous.} I'll announce the winner next month! 


Let's get to the hopping...

Crystal <--- you're here

up next ---> Amber


Thanks so very much for supporting our little hop!
We appreciate you so much!!

See ya next time.

Inky Hugs,
Crystal


{Please note that comment moderation is ON. Your comment will appear shortly.}


Wednesday, May 29, 2024

Membership Wednesday ~ May 2024 UU Wind in Your Hair ~ Unity Stamp Co.

  Hello there crafty friend!
Today I'm sharing a fun card featuring the girls stamp from the May 2024 Uniquely Unity membership called Wind in Your Hair from Unity. I absolutely adore this stamp! It reminds me of the bug my auntie had when I was a kid. I don't think it was a convertible like the one in the stamp but I loved going for rides in that car. 


I stamped the car and sentiment on scraps of Stampers Select White Card Stock from Papertrey Ink using Black Amalgam Ink from Gina K. Designs. I colored up the car using my Copic markers and die cut the image using a die from the Deckle & Stitches Nesting Die Set from Unity.

Here's a quick list of the Copic markers I used:
Car: R20, R14, R46, C00, C1, C3, Colorless Blender
Left Girl Hair: E70, E71, E74
Left Girl Shirt: BG11, BG23, BG45
Right Girl Hair: E51, E55, E57
Right Girl Shirt: V000, V12, V15
Outline: C00, C1


I set aside the car panel and grabbed a 4-1/4 x 11" piece of Stampers Select White Card Stock from Papertrey Ink. I scored the A2 top fold card base at 5-1/2" and then turned it on the side for a landscape card. I secured the card base to my table with purple tape. And then I laid the sunray of the 3-in-1 Stencil from Unity over top, also securing it to my table with purple tape. I blended Mustard Seed, Spiced Marmalade and Abandoned Coral Distress Oxide Inks using three of my TE Blender Brushes from Taylored Expressions.  


I fussy cut the sentiment and just adhered it directly to the car panel. I added foam tape to the back of the car panel and popped it up on the card base. I really love how this one turned out!
 

And here's a look at the awesome Uniquely Unity membership! I am seriously loving this month's stamp. Well, that's it for me today! I hope you've been inspired to play with your membership stamps!
Have an ink-redible day!


Thanks so much for stopping by!
See ya next time.

Inky Hugs,
Crystal


{Please note that comment moderation is on. Your lovely comment will appear once approved.}

Sunday, May 19, 2024

Masculine Birthday Card ~ Still Turning Heads ~ Unity Stamp Co.

Hello there crafty friend! 
I'm digging this awesome new mustang stamp called Still Turning Heads from Unity's new release. I absolutely love old cars! This was a fun one to color too. All the details in the stamp made it so easy to color up.


I stamped the car and sentiment from the amazing Still Turning Heads stamps using Black Amalgam ink from Gina K Designs onto Stampers Select White Card Stock from Papertrey Ink. I knew I wanted to make a slimline card for this one so I stamped the car on the far right side. 

Here's a quick list of the Copic markers I used:

Car: BG000, BG02, BG45, BG57
Wheel / Lights: C00, C1, Colorless Blender
Plate: Y35, YR15, YR16


I die cut the image using the Big and Little Chain Slimline dies from Gina Marie Designs. I also die cut another piece of white card stock. I blended over a stencil in my stash. I believe it's from one of the past Whit Kit's but I'm really not sure. I just blended using my yellow and orange blending brushes. I didn't add any more ink to the brushes just used what was on them.


I cut the car panel diagonally and then adhered the panel to the stenciled panel. I trimmed a piece of True Black Card Stock from Papertrey Ink to 7 x 8-1/2" and scored it at 3-1/2" making a slimline card base. I adhered the car panel to the base finishing this card off. That's it for me today.
Hope you have an ink-tastic day! 

Thanks so much for stopping by!
See ya next time.

Inky hugs,
Crystal

{Please note that comment moderation is on. Your lovely comment will appear shortly.}