Wednesday, May 31, 2023

Membership Wednesday ~ May 2023 KOM Bloom in Color ~ Unity Stamp Co.

 Hello there crafty friend!
I'm back for another Membership Wednesday and today I'm sharing a card using the gorgeous mountain and tree stamps in the May 2023 Kit of the Month called Bloom in Color. Love the fantastic mix of stamp in this month's kit! I thought the mountain and trees stamp would make a wonderful masculine card.


I really like the monochromatic vibe for this card. However, I really wish I hadn't added that ribbon on the right side. It throws off the balance of the card. I think I may redo this one and omit that ribbon. The background card front layer is a piece of pattern paper from the Let Your Soul Wander {paper pack}. It's trimmed down to 5-1/2 x 4-1/4" and adhered to a white A2 top fold card base that I've turned on the side. 


I stamped the lovely trees and mountain stamp using Walnut Stain Distress Ink. I then stamped it again adding a bit of Ground Espresso Distress Ink near the bottom of the stamp. I used a blending brush to soften the line of the ink on my stamp before stamping it. A great trick for avoiding those harsh lines when stamping with multiple inks.


I trimmed the stamped panel to 3" and adhered the ribbon around the edges securing it with tear tape. I then adhered the panel to a slightly larger piece of Early Espresso card stock from Stampin' Up. I roughed up the edges of the dark brown card stock using a Tim Holtz Paper Distresser. I stamped the sentiment using the Ground Espresso Distress Ink. Trimmed it up and adhered it over the a portion of the trees. This was such an easy and quick card. I think it's a great masculine card... and it could be for any occasion just by switching the sentiment. And minus the ribbon, of course. 


Here's a look at the whole Kit of the Month for May!! I wish I had had more time to play with this one! Can you believe that you get this full sheet of rubber for only $44.99. That includes shipping! You also get a $6.95 discount on every order from Unity over $45. And you can purchase any past kits for only $34 plus shipping. Such a great value!

I hope to see you next week for another Membership Wednesday blog post. I'll be sharing inspiration for the amazing new June 2023 Uniquely Unity membership... at least that's what I'm leaning towards.


Thanks so much for stopping by!
See ya next time.

Inky Hugs,
Crystal


{Please note that comment moderation is on. Your lovely comment will appear once approved.}

Monday, May 29, 2023

Inky Paws Challenge #199 ~ Rainbow Theme Challenge

  Hello there crafty friend!
It's time to get our paws inky with a super fun rainbow themed challenge! It's so fun to play with rainbow colors! You have until Friday, June 9th to get your entries in for the #199 Rainbow Theme Challenge and a chance to win a $20 store credit to Newton's Nook Designs!


I love love love rainbow colors!! It's a wonderful color combo to play with and I couldn't wait to get inky for this challenge!


This is a pretty simple card and it's a big one! It measures 10 x 7"; scored at 5" for an A7 card. I blended my clouds over the Clouds Stencil from Newton's Nook Designs onto a large piece of white card stock using Distress Oxide inks. I used Candied Apple, Carved Pumpkin, Mustard Seed, Mowed Lawn, Salty Ocean, and Wilted Violet Distress Oxide inks. I got a little heavy handy as I worked my way up the card but I love the dimension that it gives the clouds!


I die cut my large panel using the stitched scallop die from the A7 Frames & Banners Die Set. I was going to adhere my panel to a purple card front but decided to just go with the white background of the A7 card base.


I stamped the adorable kitty from the Newton's Umbrella Stamp Set with Memento Tuxedo Black ink and colored it up with the following Copic markers:

Kitty ~ C00, C1, N0, N2, N4, N8, YR15, RV10, RV21, Colorless Blender
Umbrella ~ V000, V12, V15, C00, C1, C3, N0, N2, N4, N8, Colorless Blender 

I die cut the kitty using the coordinating Newton's Umbrella Die Set. I stamped the sentiment using the Memento Tuxedo Black ink and die cut with a stitched circle die from the Circle Frames die set. I adhered the kitty directly to the card using liquid glue. To add a bit more dimension on the card, I used foam tape to pop up the sentiment.

You can check out my process video for this card here... You Lift Me Up Rainbow Clouds | Inky Paws Challenge 199 | Newton's Nook Designs.


Now it's your turn to get your paws inky with your Newton's Nook Designs products and create a project with a Rainbow theme. Be sure to link up to the Inky Paws Challenge! Can't wait to see your projects!


Thanks so much for stopping by!
See ya next time.

Inky Hugs,
Crystal


{Please note that comment moderation is on. Your lovely comment will appear once approved.}

Friday, May 26, 2023

{BYSHC} Sketch Challenge 33 ~ Sending You Tidings ~ Dreamerland Crafts

 Hello there crafty friend!
I'm sharing one last Christmas card for the {BYSHC} Sketch Challenge 33 for the Build Your Stash Holiday Cardmakers Facebook group. Today I'm featuring the super cute Sending You Tidings stamp set from Dreamerland Crafts. Adore this sweet girl and her teddy bear!! So cute!


I paired them up with the Amy Design Christmas Wishes paper pad that has been in my stash FOREVER. Or at least it seems like forever. I just felt like using gray-blues for this girl and these papers were a perfect pair up! Unfortunately, I don't think they are available anymore. I can't seem to find them online.


I stamped the sweet image using Memento Tuxedo black ink on Stampers Select White card stock from Papertrey Ink. My favorite ink when I'm stamping with clear photopolymer stamps because it cleans off really nicely. I used the following Copic markers to color up my image:

Skin ~ E000, E00, E11, E04, R00, RV10
Hair ~ E70, E71, E74
Clothes ~ C00, C1, BG70, BG72, BG75, R81, R83, R85
Present ~ R81, R83, R85, E81, E41, E43
Teddy Bear ~ E70, E71, E74, R00, RV10, BG70, BG72
Snow ~ C00, C1
Chimney ~ E21, E33, E17
Background / Sky ~ N0, N2, N4


I die cut the cute image using one of the Loopy Rectangle dies from Gina Marie Designs. The pattern paper layers are all adhered together and then adhered to a white A2 top fold card base. I used the TE Anti-Static Powder Tool to prep my black card stock before heat embossing the sentiment. Love this little tool!! I stamped the sentiment with Sugar Cube Pigment ink from Taylored Expressions on True Black card stock from Papertrey Ink. I added some Alabaster White Embossing powder from Brutus Monroe and melted the ep with my Wagner Precision heat tool. I trimmed the black card stock and adhered it to the main panel. I then added a bunch of foam tape to the back of the main panel and sentiment strip. 


I popped them up on the card and wanted something for that extra space on the right side of the sentiment so I went looking through my dies for a snowflake and found the Deck the Halls dies from Spellbinders. I die cut two snowflakes from white card stock and adhered them together and then I adhered them to the sentiment strip. It's actually floating off of the card on the top. Not sure how it'll do if I mail it. I might have to hand deliver this one so the snowflake doesn't get all bent.


Here's a look at {BYSHC} Sketch 33 for the month of May!
There's still a few days to play along with the sketch! The challenge ends on May 31st. I hope you'll join in the fun and start building  your stash of holiday cards. If you're interested in seeing a bit more inspiration for this sketch, check out the amazing inspiration from the design team over on the {BYSH} Cardmakers blog!


Thanks so much for stopping by!
See ya next time.

Inky hugs,
Crystal


{Please note that comment moderation is ON. Your lovely comment will appear shortly.}

Wednesday, May 24, 2023

Membership Wednesday ~ Die Cut Background ~ May 2023 Whit Kit ~ Unity Stamp Co.

 Hello there crafty friend!
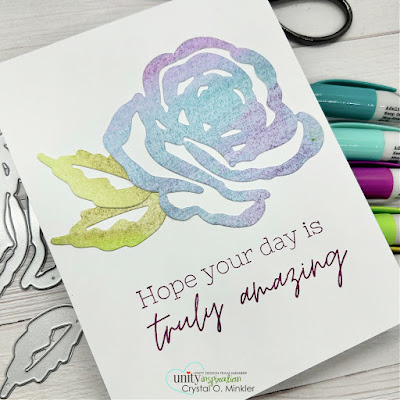
Today I'm sharing a no coloring card using just the lovely Petal Play dies from the wonderful May 2023 Whit Kit membership from Unity along with a cut-apart sentiment that I also got from Unity. 


I had a fun idea to make a background using the detailed die from the Petal Play dies and the Cotton Candy card stock sheets also from the kit. I think it made a lovely background for the focal piece.


I die cut the full rose from the Razzle Berry card stock included in the kit using the outline die. And I die cut another detailed rose from the Cotton Candy card stock. I adhered those together. I also die cut a few leaves using the green card stock from the kit. I adhered them together and then to the rose.


I'm thinking it's pretty safe to say that I'm obsessed with using vellum card stock for matting my focal pieces. I didn't want to cover up the pretty background that I created. It just made sense to use vellum again. I die cut a piece of vellum using a circle die from the Scallops & Circles {nesting dies}. The card front panel was wrapped with a white organdy ribbon before adhering it to a white A2 top fold card base. I trimmed the sentiment from the Cut Apart Sentiment Strips and adhered it to the card. I added a few scraps from the sentiment itself to pop up the right side so it would lay flat on the card.

You can check out my process video here {minus the addition of the sentiment... I couldn't decide on the sentiment in the moment but did add one just now}... Die Cut Background | May 2023 Whit Kit | Unity Stamp Co.


Here's a look at the wonderful Whit Kit for May!! Gorgeous! This wonderful card kit is available for only $42.99. That includes shipping! You also get a $6.95 discount on every order from Unity over $45. Members are also able to purchase past Whit Kit stamp sets for just $14 and past Whit Kit paper packs for $2 off!! So awesome!!! 

That's it for me today! I have another idea for a card using the May 2023 Whit Kit but I'm not sure if I'll share that next week or play a bit with a different membership!! So I'm thinking it'll be a surprise... for you and me! Hee hee!


Thanks so much for stopping by!
See ya next time.

Inky Hugs,
Crystal


{Please note that comment moderation is on. Your lovely comment will appear once approved.}

Tuesday, May 23, 2023

Masculine Birthday Card ~ Feline Funny ~ Unity Stamp Co.

 Hello there crafty friend!
I am loving the new kitty stamps that were just released over at Unity!! Have you seen them?! I created a fun card the other day using the new Kitten Kaleidoscope background stamp. I had a few leftover panels after die cutting the circles to make the fun eclipse card. Anywho, I used one of the leftover panel to create a punny masculine birthday card along with the super cute and punny Feline Funny!! Oh my gosh... do I LOVE this new cat!!


Now, you may be asking what makes this masculine? I think the classic black and white color combo is, for sure, masculine. But also the straight lines... rectangles and squares. Not to say that guys don't like other shapes. Just saying, particularly for my guy, he likes squares and straight lines.


Here's a quick list of the Copic markers I used for this card:

Fur ~ C00, C1, N0, N2, N4, Colorless Blender
Eyes ~ B000, B00
Nose / Ears / Pads ~ R00, R20, Colorless Blender
Outline ~ B000, B00
Grounding ~ C00, C1
Background Kitties ~ N2, N4


I used a black scrap card front along with the Kitten Kaleidoscope leftover for my card. Both of these panels dictated the design for my card. I shifted the Kitten Kaleidoscope background to the upper left side to cover the hole in my black card front. And I placed the Feline Funny kitty along the same left edge to cover the hole in the Kitten Kaleidoscope background panel. To balance the card I adhered the sentiment so that it went all the way over to the right edge of the card.

You can check out my process video here... Masculine Birthday Card | Feline Funny | Unity Stamp Co.


No enamel dots or ribbons or sequins for this one. I think omitting those embellishments also makes this a masculine card. If you haven't already, head over to Unity and check out the awesome new releases and the fabulous sale going on now! Lots of wonderful new red rubber in the shop!!


Thanks so much for stopping by!
See ya next time.

Inky hugs,
Crystal


{Please note that comment moderation is on. Your lovely comment will appear once approved.}

Monday, May 22, 2023

Inky Paws Challenge #198 ~ Sketch Challenge Reminder

 Hello there crafty friend!
 There's still time to play along with the Inky Paws Challenge #198!! You have until this coming Friday, May 26th to get your entries in for this fun sketch challenge and a chance to win a $20 store credit to Newton's Nook Designs!


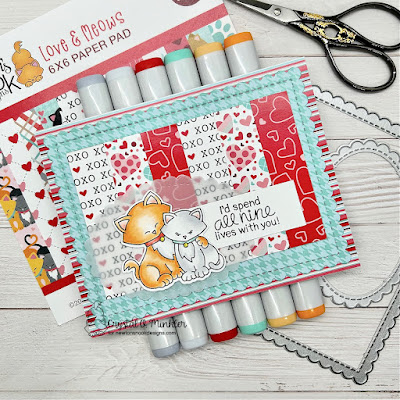
My husband and I are celebrating our 25th wedding anniversary next month and I thought I'd make a cute kitty card to give to him. I used the adorably sweet Newton's Sweetheart Stamp Set and the coordinating Newton's Sweetheart Die Set.


I stamped the kitties with Memento Tuxedo Black ink and colored them up with the following Copic markers:

Orange Kitty ~ YR0000, YR21, YR15, R00, R20, C00, C1, Colorless Blender
Gray/White Kitty ~ C00, C1, R00, R20, Colorless Blender
Red Collar ~ R20, R17, Y06, Y28
Blue Collar ~ BG10, BG32, Y06, Y28


I paired up this sweet kitty couple with the Love & Meows 6x6 Paper Pad. I love the mix of colors in these papers. Aqua/turquoise and red with white is one of my favorite color combos. I die cut the aqua  pattern paper using the largest die from the Frames & Flags Die Set. The vellum scallop oval behind the sweet kitties was die cut using a die from the Oval Frames Die Set.


Now it's your turn to get your paws inky with your Newton's Nook Designs products and create a project using the fun sketch. Be sure to link up to the Inky Paws Challenge! Can't wait to see your projects!


Thanks so much for stopping by!
See ya next time.

Inky Hugs,
Crystal


{Please note that comment moderation is on. Your lovely comment will appear once approved.}

Saturday, May 20, 2023

Eclipse Circles ~ Kitten Kaleidoscope ~ Unity Stamp Co.

 Hello there crafty friend!
Have you seen the new kitty background stamp that was just released over at Unity Stamp Co? It's called Kitten Kaleidoscope and it got it me thinking about kaleidoscopes. Kaleidoscopes have a continually changing pattern of shapes and colors. Well, I didn't want to get too crazy with my card design but I thought it would be fun to play with some circles and add some dimension to a card... like a kaleidoscope vibe.


I stamped the background five times using Black Amalgam ink on white card stock. I then die cut a circle from four of the stamped card fronts using the four smallest circle dies from the Scallops & Circles {nesting dies}. The three larger circles overlap a bit so that's why I stamped the background stamp five times so that I could die cut the three full circles. 


I adhered the three circles together using liquid glue so I could adjust them slightly to match the background on my main panel. I then added some foam tape to the back of the three circles and adhered them to the main panel. I also added foam tape to the smallest die cut circle and popped it up on the card.


The main panel is trimmed and adhered to a black card front measuring 4-1/4 x 5-1/2". I then adhered the card front to a white A2 top fold card base measuring 4-1/4 x 11"; scored at 5-1/2".


You can see more of the Eclipse Circle effect that I created in this photo. So fun! The sweet little sentiment is from the Windowsill stamps... another cute stamp with a kitty. I die cut the sentiment with a small circle die from my stash. I continued the circle design by partially popping up the sentiment with a mix of foam tape and liquid glue. It overlaps the larger bottom circle just a bit.

You can check out my process video here... Eclipse Circles | Kitten Kaleidoscope | Unity Stamp Co.


I finished off the card by adding a few black enamel dots to keep with the circle theme. This was such a fun card to make and I think it would be a great masculine card. If you haven't already, head over to Unity and check out the awesome new releases and the fabulous sale going on now!


Thanks so much for stopping by!
See ya next time.

Inky hugs,
Crystal


{Please note that comment moderation is on. Your lovely comment will appear once approved.}

Wednesday, May 17, 2023

Membership Wednesday ~ May 2023 Whit Kit ~ Unity Stamp Co.

 Hello there crafty friend!
Today I'm sharing a super CAS card using the lovely Petal Play dies from the wonderful May 2023 Whit Kit membership along with the sentiment from the Petal Play stamps, also included in this month's card kit from Unity. I just couldn't help but play a bit more with my Distress Crayons. They've been so fun!


I hadn't planned on going quite so CAS with this one, but sometimes the card just dictates the design and this one was very loud. LOL! 


I created the background for the die cut using a handful of Distress Crayons and then die cut it with the beautiful Petal Play dies. The sentiment is stamped with the Seedless Preserves Distress Oxide ink directly on a white A2 top fold card base.


I used liquid glue to adhere the die cuts so that I could lift the flower easily and adjust the leaves as I needed to get them how I wanted. Another option would be to add a double sided tape to the distress crayon background before die cutting the flower and leaves. You could then adhere the leaves to the back of the flower before adhering them both to the card.

You can check out my process video here... Distress Crayon CAS Card | May 2023 Whit Kit | Unity Stamp Co.


Here's a look at the wonderful Whit Kit for May!! Gorgeous! This wonderful card kit is available for only $42.99. That includes shipping! You also get a $6.95 discount on every order from Unity over $45. Members are also able to purchase past Whit Kit stamp sets for just $14 and past Whit Kit paper packs for $2 off!! So awesome!!! 

That's it for me today! I'll be back next week with another card {or two!} using the May 2023 Whit Kit!! Loving this month's card kit!


Thanks so much for stopping by!
See ya next time.

Inky Hugs,
Crystal


{Please note that comment moderation is on. Your lovely comment will appear once approved.}

Monday, May 15, 2023

Inky Paws Challenge #198 ~ Sketch Challenge

 Hello there crafty friend!
Who's up for a new challenge?! It's time to get our paws inky with a fun sketch challenge! I had so much fun with this one I made 3 cards! I hope you have a blast with it too! You have until Friday, May 26th to get your entries in for the #198 Sketch Challenge and a chance to win a $20 store credit to Newton's Nook Designs!


This sketch is perfect for those scraps of pattern paper!! And so fun... I couldn't help but grab my Christmas papers. I do love to make Christmas cards!


When I saw the new sketch challenge I instantly thought of the sweet Christmas Trimmings Stamp Set that's on the retiring list. I love these cute girls getting ready for Christmas! This sweet stamp set is only $5.99, by the way, and a little kitty told me {hee hee} there's only 5 left in the shop. Go snatch one up before they are all gone!


Rather than try to adhere all the strips in a line just right on my mat, I adhered them to a scrap of thin {80lb} card stock. This way I can adhere them all neat and straight and then adhere them to my mat. So much easier!


Here's a quick list of the Copic Markers I used for this stamp:

Skin ~ E000, E00, E11
Hair ~ Y02, Y21, Y26
Clothes / Hair Bow ~ YG11, G24, R20, R17, C00, C1
Gift ~ R20, R17, R27, C00, C1, C3
Scissors ~ C1, C3, Y15


I paired up the sweet Christmas Trimmings Stamp Set with the beautiful Meowy Christmas 6x6 Paper Pad. Such a great sketch for the paper strips I had left over in my paper pad. I did have to cut a couple extra pieces since I made three cards, but my mission this year while building my stash of holiday cards is to also use up those pretty pattern papers that I've been hoarding. 


Here's a quick list of the Copic Markers I used for this cute stamp:

Skin ~ E000, E00, E11
Hair ~ E70, E74, E77
Dress / Shoes ~ R20, R17, Y11, Y06, Y15
Hat ~ R20, R17, R27, C00, C1, C3
Tree ~ YG11, G24, G46, E70, E74, E77
Tree Stand ~ Y11, Y06, Y15
Baubles ~ R20, R17, R27, YG11, G24, Y11, Y06, Y15


All of the sweet girls are die cut using the coordinating dies {unfortunately, these are retired and no longer available}. Each of the girls are adhered to oval layers I die cut using the Oval Frames Die Set.


Here's a quick list of the Copic Markers I used for this stamp:

Skin ~ E000, E00, E11
Skirt ~ YG11, G24, G46
Shoes ~ YG11, G24
Box ~ R20, R17, R27
Christmas Decor ~ YG11, G24, G46, R20, R17, R27, Y11, Y06, Y15

I didn't record my copic coloring for the girls but I did record my process in making the card. You can check out my process video here... Trio of Christmas Cards | Inky Paws Challenge 198 | Newton's Nook Designs.


Now it's your turn to get your paws inky with your Newton's Nook Designs products and create a project using the sketch. Be sure to link up to the Inky Paws Challenge! Can't wait to see your projects!


Thanks so much for stopping by!
See ya next time.

Inky Hugs,
Crystal


{Please note that comment moderation is on. Your lovely comment will appear once approved.}

Friday, May 12, 2023

{BYSHC} Sketch Challenge 33 ~ Revisiting Let it Snow ~ Doodlebug Designs Inc.

 Hello there crafty friend!
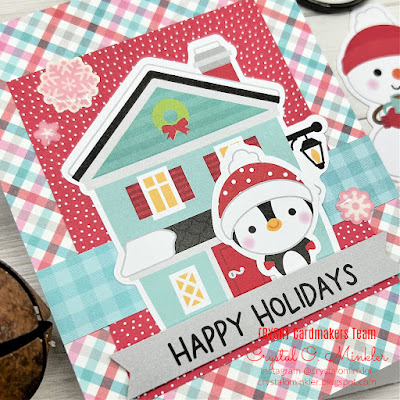
I'm sharing another Christmas card for the {BYSHC} Sketch Challenge 33 for the Build Your Stash Holiday Cardmakers Facebook group. And I've dug back into my Let it Snow goodies from Doodlebug Designs. I still have A LOT of die cuts/ephemera for this collection and really want to use it up.


I paired up the cute house and penguin die cuts/ephemera from the Let it Snow Odds & Ends pack with the Happy Holidays sentiment from the Let it Snow Chit Chat pack. And I used the Let it Snow 6x6 paper pad, as well. 


The red background is a bit bigger than the sketch calls for. It measures 3-1/4 x 4". And the blue gingham isn't a full strip across the card. My scrap was too small so I cut it in half and adhered it on either side... the house covers up the space in between.


All my layers, excluding the sentiment, are adhered directly to a white A2 top fold card base measuring 4-1/4 x 11"; scored at 5-1/2". The sentiment is popped up using a thin foam tape from Scrapbook Adhesives.


Here's a look at {BYSHC} Sketch 33 for the month of May!
I hope you'll join us and play along with the sketch! If you're interested in seeing a bit more inspiration for this sketch, check out the amazing inspiration from the design team over on the {BYSH} Cardmakers blog!


Thanks so much for stopping by!
See ya next time.

Inky hugs,
Crystal


{Please note that comment moderation is ON. Your lovely comment will appear shortly.}

Wednesday, May 10, 2023

Membership Wednesday ~ May 2023 Uniquely Unity and Background of the Month ~ Unity Stamp Co.

  Hello there crafty friend!
Today I'm sharing a mixed media card using the lovely stamp from the wonderful May 2023 Uniquely Unity membership along with the May 2023 Background of the Month membership from Unity. I just had to pair up these two membership kits.


So, yesterday I shared a couple of one layer CAS cards using the Distress Crayon Background technique. Well, I had so much fun with that technique I wanted to play a bit more.


This time I used Spiced Marmalade, Mustard Seed, Fossilized Amber, Wild Honey, and Dried Marigold Distress Crayons for my background. I stamped my background using VersaFine Onyx Black ink.


I added a bit of black acrylic paint splatter to the background. I die cut the background using the second largest die from the Postage Stamp {nesting dies}. These dies were just restocked over at Unity, too! I heat embossed the sentiment. I love how the white pops on the black card stock. 


Here's a look at the beautiful Uniquely Unity stamps for May!! So gorgeous! This membership is available for only $16.99. That includes shipping! 


And here's a look at the awesome Background of the Month stamp for May!! Love it! This membership is available for only $18.99. That includes shipping! Included with both of these memberships is a wonderful inspiration sheet with pictures and step-by-step instructions for two cards so you can easily recreate the cards yourself. And now when you sign up you have the ability to pause, skip or cancel your subscription within your Unity account. So awesome!!

That's it for me today! I'll be back next week with inspiration for the May 2023 Whit Kit!! Have you seen this month's card kit! I'm so excited to play!


Thanks so much for stopping by!
See ya next time.

Inky Hugs,
Crystal


{Please note that comment moderation is on. Your lovely comment will appear once approved.}