Showing posts with label penguin. Show all posts

Friday, June 26, 2026

{BYSHC} Sketch Challenge 70 ~ Cold Weather Penguins ~ Crafty Stamp Co.

Hello there crafty friend!
I'm sharing one last card for the {BYSHC} Sketch Challenge 70 hosted in the Build Your Stash Holiday Cardmakers Facebook group!


I inked up one of the adorable penguins from the Cold Weather Penguins 4x6 Stamp Set and fussy cut it leaving a white border. I also stamped the sentiment and trimmed it.


I paired up the penguin with the Merry Latte 6x6 Paper Pad. I used the measurements from the sketch for the two bottom layers. I die cut the red paper with a banner die from my stash. I also die cut a circle from the bottom green layer before I adhered the layers. A trick I like to do to stretch my stash of papers. I also die cut a scrap of white card stock and just trimmed off the top to look like a snowy hill. The penguin looked thirsty so I cut a coffee cup from behind the red banner {before adhering the layers, of course} and trimmed it on the black line.


I adhered all of my layers. Adhered the card front to a white A2 card base. And then popped up the circle and sentiment with foam tape finishing it off.


Here's a look at {BYSHC} Sketch Challenge 70 for the month of June. There's still time to enter the challenge! If you're interested in seeing a bit more inspiration for this sketch, check out the amazing inspiration from the design team over on the {BYSH} Cardmakers blog! I'm always blown away by the creations from the DT... they are amazingly talented cardmakers!

Thanks so much for stopping by!

Inky hugs,
Crystal

Tuesday, June 9, 2026

Tawny Owl Paperie Inky Inspiration Sketch 43 ~ Arctic Affection ~ Unity Stamp Co.

 Hello there crafty friend!
Today I'm sharing more inspiration for the Tawny Owl Paperie Inky Inspiration Sketch Challenge 43 in the Tawny Owl Paperie Inky Inspiration Facebook group. A sweet wintry friendship card!


I figured while I was at it, I might as well make a second card. I've been accumulating lots of new pattern papers from Unity. Like way too many! LOL! I don't have room for them so that means I have to use up my scraps. All I have left in my Brilliant Blizzard {paper pack} is scraps so it was the perfect pack to pair up with these cuties from the Arctic Affection stamps.


I die cut the cute penguins using a die from the Scallops & Circles {nesting dies}. I colored them pretty simply with some Copic markers.

Copic markers used:
Penguins: YR15, C0, C2, R00, R20
Hat / Scarf on Small Penguin: BG90, BG93, BG96, C0, C2
Tall Penguin Scarf: BG70, BG72
Ground: B000


Here's a look at the fun sketch for Tawny Owl Paperie Inky Inspiration Sketch Challenge 43. The sketch, as always, is meant to inspire not require. So let the sketch lead in your design, but don't feel limited by it. I had long strips of pattern papers probably 2 or 3" wide. I cut them diagonally to make the sun ray background and I had enough to make the second card.


I colored the penguins the same on this one. I just switched the colors for their scarves/hat. All of my layers are adhered directly to a white A2 top fold card base. I popped up the sentiment with foam tape to finish off the card. I sure hope you can find time to play along with the sketch challenge. Have an INKriffic day!

Thanks so much for stopping by!

Inky Hugs,
Crystal

Friday, October 24, 2025

{BYSHC} Falling for the Holidays 2025 Linky Party ~ A Little Something ~ Gina K. Designs

Hello there crafty friend!
I'm back with one more make for the {BYSHC} Falling for the Holidays 2025 Linky Party hosted on the {BYSHC} blog! Today I'm sharing a sweet holiday card featuring goodies from the recently released A Little Something Card Kit {no longer available, but it looks like some of the products from the kit are available separately} from our fabulous Sponsor Gina K. Designs.


It was really hard not to make several cards because this card kit is full of so many awesome goodies!! But I restrained myself... time is limited and the linky party is coming to an end today. I do hope to have at least one more card to share if time allows.


The tree stencil and die is so fun! It has so many layers... the possibilities are endless!! I used the residue ink from my green blending brush for my base layer and then used Mowed Lawn Distress Ink for the darker shading. The baubles and the star were foiled with Passionate Pink and Silver Sequins Fancy Foils from Gina K. Designs and our other fab Sponsor Therm O Web. I applied Deco Foil Transfer Gel to the stencils, let it dry and then ran it through my laminator with the foils. And then I die cut the star and the tree. Oh, I used Festive Berries and Lumberjack Plaid Distress Ink for the tree skirt.


I'm also playing along with the Jingle Belles - Dashing Through the Snow!


I stamped the cute penguins from the Festive Penguins stamp set included in the card kit. I colored them up with Copic markers and die cut them using the coordinating Festive Penguins die set. I popped them up with iCraft 3D Foam Tape Jumbo Roll (white) from our Sponsor Therm O Web. I used a hill mask that I cut myself and blended a bit of Sea Glass ink from Gina K. Designs to make a hill but it's pretty much covered up by the scene I created. LOL! I kept the mask in place and stamped the snowflakes from the Festive Penguins stamp set using the Sea Glass ink again. I stamped some directly and some I did second generation stamping {stamping them off on a scrap and then onto the background}. Doing this added some depth to the snowflakes in the background.

Here's a quick list of the Copic markers I used:
Penguins: C0
Pink: RV10, RV02, RV14
Blue: B000, B00
White: C0, C1
Feet: YR20, YR15


Here's a closeup of the shine from the fun foils!! Love it!


Have you stopped by to check out all the wonderful holiday inspiration being shared at the {BYSHC} Falling for the Holidays 2025 Linky Party?! I sure hope you'll stop by and check it out! The party ends today at midnight! Have a wonderful day!

Thanks so much for stopping by!

Inky hugs,
Crystal

Sunday, September 14, 2025

Release Day Blog Hop ~ Holiday Anya 13 with Amelia the Bunny ~ The Greeting Farm


The September 2025 New Release is now available for purchase in The Greeting Farm Store! This month we introduced 3 new stamp sets. Our first stamp set called WICKED ANYA 2 features a cute witch with wand ready to add a little hocus-pocus to your projects. Next, we have AMELIA THE BUNNY, a heartwarming set with three delightful bunny illustrations to remind you comfy days are here. Lastly, we introduced HOLIDAY ANYA 13, a festive holiday stamp set with Anya bundled up in a cozy coat with her adorable penguin friend. (PLEASE NOTE: one sentiment in this set contains a small typo so it is discounted. But no worries, you will receive the corrected version as a downloadable digital file!) 


I paired up the cute penguin from HOLIDAY ANYA 13 with one of the adorable bunnies from AMELIA THE BUNNY for a cute holiday card. 


I stamped all the images using Memento Tuxedo Black ink. I colored them up with Copic markers and then I fussy cut them all on the line and colored the edges with a black marker to make the fussy cutting nice and neat.

Here's a quick list of the Copic markers I used:
Bunny: C0, C2, R00, R20, BG000, BG01
Penguin: C0, C2, N2, N4, N6, R00, R20, YR20, YR15, B00, B02, B28
Ice: B000, B00
Tree: RV10, RV02, RV14, Y11, Y15, B000, B00, B28, B29, E21, E25, E18
Gifts: RV10, RV02, RV14, B000, B00, B02, B28, B29


I paired up the two friends with some fun papers in my stash. I used these fun colors as inspiration to color my images. I die cut the papers using the BIG Scallops & Rectangles {nesting dies} from Unity. I popped up the friends, sentiment and the tree with foam tape and then finished off the card with a few raindrop embellies.


To celebrate this release we are having a short BLOG HOP! One lucky fan will win a $50.00 Gift Certificate to The Greeting Farm Store!! You have until September 18th 12pm CST/1pm EST to leave your comments on each Designer's Blog. Then head back to The Greeting Farm Blog to let us know you completed the hop. **Remember to qualify for the prize you MUST leave a comment on each Designer's Blog AND The Greeting Farm Blog letting us know you completed the hop.

NOTE: Comments on The Greeting Farm Blog are admin approved so it may take a day for your comment to be visible. Please only comment once, and use the same name on all the blogs when leaving a comment. Do not pick the Anonymous option (otherwise we won't be able to verify that it's you). We will announce the random winner later in the week on the Blog and in our Facebook Group: The Greeting Farm Fan Page.

TGF Design Team:

This is a short hop, and definitely worth playing along! If you want to grab your favorites now, you can purchase the new stamps HERE. We will have more cards featuring the New Release from our Design Team Leaders starting on the 16th so be sure to stop by The Greeting Farm Blog to see more inspiration.

Happy Hopping!

Thanks for stopping by!

Inky hugs!
Crystal

Friday, August 1, 2025

{BYSHC} Sketch Challenge 60 ~ Arctic Joyride ~ Unity Stamp Co.

Hello there crafty friend!
It's time for a new sketch challenge over in the Build Your Stash Holiday Cardmakers Facebook group! Today I'm sharing a fun Christmas card featuring a super cute stamp and pretty papers from our fabulous Sponsor Unity! This month's prize is a $25 gift card to Unity!! Yay!


I inked up the adorable penguin from the Arctic Joyride stamps using Black Amalgam ink. This cutie doesn't take much to color up. 

Here's a quick list of the Copic markers I used:
Penguin: C0, C2, Y15, YR15, YR68
Scarf: R20, R14
Sled: E25
Red Present: R20, R14
Blue Present: BG000, BG10, BG01


I paired the cute penguin up with the Snowflake Elegance {paper pack}. I used a soft white pattern paper for my bottom layer measuring 4-1/4 x 5-1/2". The blue layer measures 4 x 5-1/4". I die cut the next layer using a die from the Scallops & Rectangles {nesting dies}. And then I cut strips from my scraps to 2-5/8 x 3/4".


I stamped, trimmed and popped up the sentiment on the card with foam tape. I fussy cut the penguin and then popped him up on the card too. I finished it off with a couple glitter white enamel dots from my stash.


Here's a look at {BYSHC} Sketch Challenge 60 for the month of August. If you're interested in seeing a bit more inspiration for this sketch, check out the amazing inspiration from the design team over on the {BYSH} Cardmakers blog!

Thanks so much for stopping by!

Inky hugs,
Crystal

Tuesday, January 21, 2025

January Scraps Cards ~ Penguin Hugs & Cozy Vibes Owl ~ Unity Stamp Co.

 Hello there crafty friend!
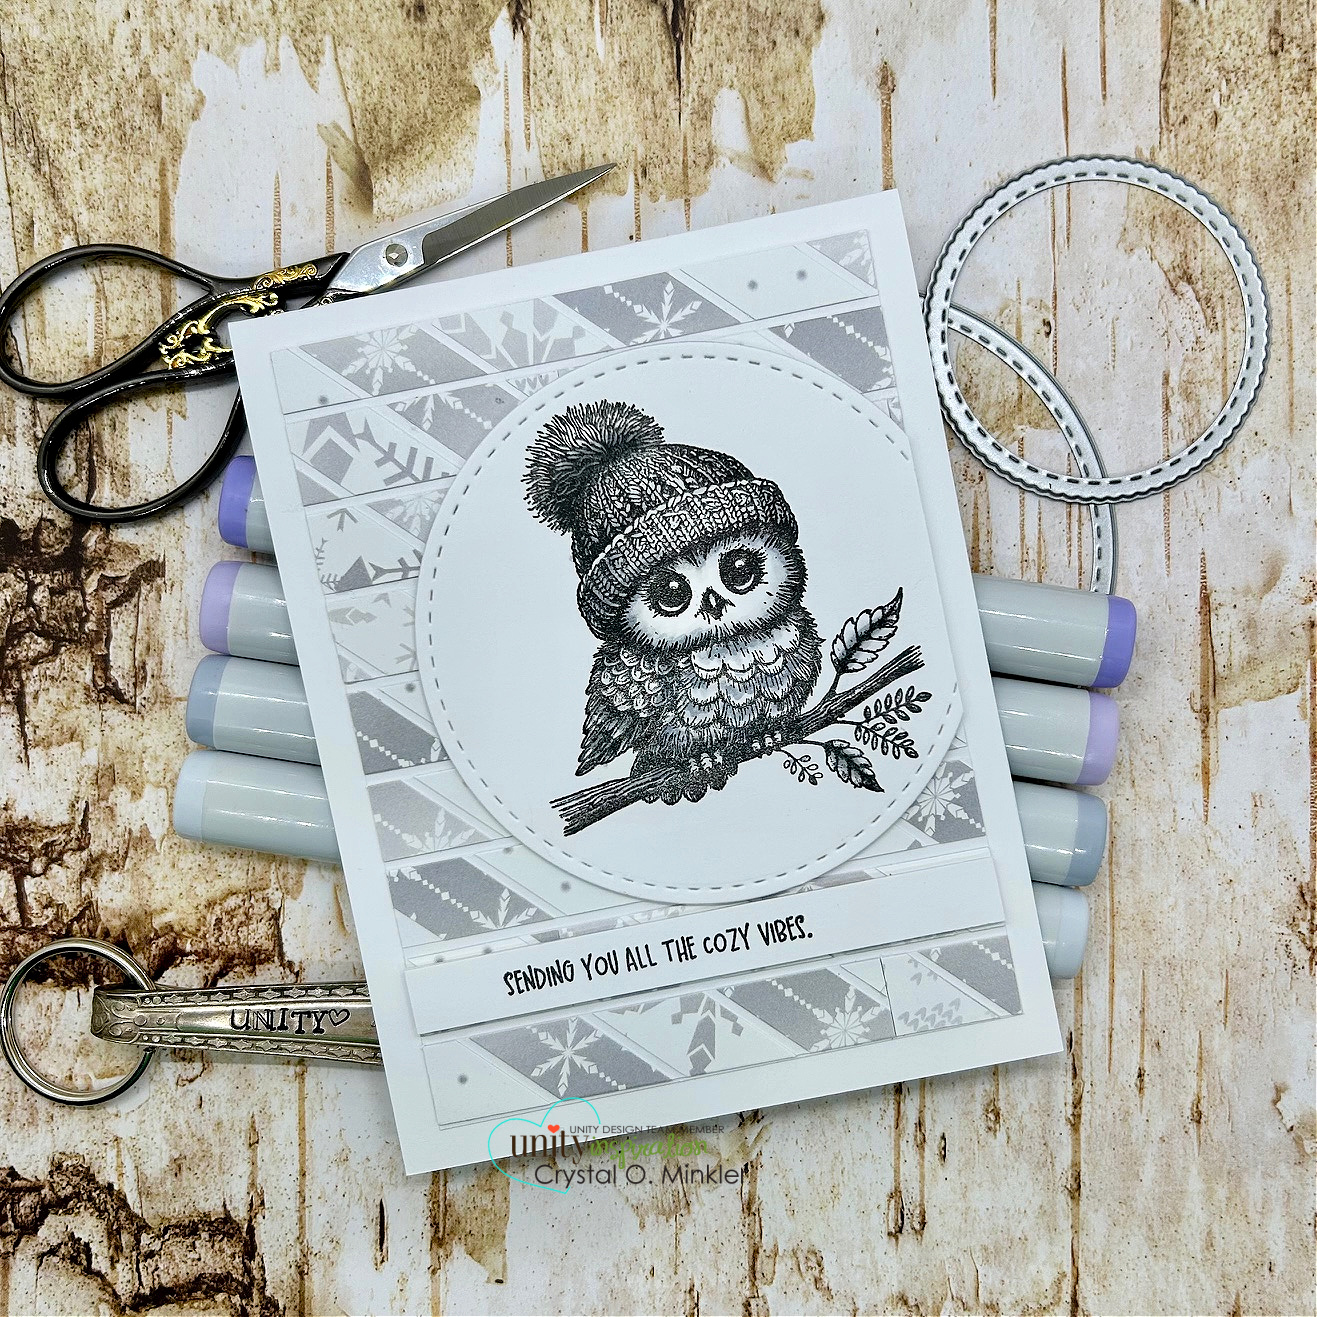
Today I'm sharing the last two cards I created using the leftover scraps I opened up way back in October 2024. Goodness! My plan to use up scraps each month has been going way too slow! I need to up my game a bit. BUT I am so happy to finally be finishing off these papers!


I've shared this fun technique before here and here. For these two cards I cut 1/2" strips of the pattern papers and adhered them to a thin white card stock panel {I recommend using copy paper if you plan on die cutting the panels} leaving a little bit of room. I didn't measure it or anything... just eyeballed it. I then cut these into 1/2" strips. These papers are from a company that's no longer in business, unfortunately. I love them! Now that these papers are finished up, I'll pick out another pack and share them next week for the new TOPII Sketch 29 that starts on January 28th.


For my first card, I adhered all of the pattern paper horizontally across the white card stock and then I cut 1/2" strips. I adhered those strips to another piece of white card stock with a bit of space in between them making a fun pattern. I trimmed the panel down to 4 x 5-1/4" and adhered it to a white A2 card base measuring 4-1/4 x 11"; scored at 5-1/2".


I stamped the adorable Penguin Hugs with Black Amalgam ink and colored it just a little bit with C00, C1, C3, BV0000, BV11. I die cut the sweet penguin using a die from the Scallops & Circles {nesting dies}.


I stamped the sentiment, trimmed it up and then adhered it to the scalloped circle. I added foam tape to the back of both and popped them up on the card.


For my second card I used the same 1/2" strips of the pattern paper, but I adhered them diagonally to a panel of white card stock. And then I cut the strips vertically. I then adhered the strips horizontally on another piece of white card stock leaving a little bit of space in between the strips. This panel was trimmed down to 3-3/4 x 5".


I stamped the adorable owl from the Cozy Vibes Owl stamps with Black Amalgam ink and die cut it with another circle die from the Scallops & Circles {nesting dies}. I colored the owl a little bit with C00, C1, and C3.


I stamped the sentiment and trimmed it. Added foam tape to the back of both and popped them up on the panel. I then trimmed off the excess hanging over the edges and adhered the panel to a white A2 top fold card base. Two cute cards for my wintry/holiday stash and another paper pack done!! Woohoo!

Thanks so much for stopping by!
See ya next time.

Inky Hugs,
Crystal


{Please note that comment moderation is on. Your lovely comment will appear once approved.}

Saturday, December 28, 2024

Snow Over It Card ~ Chilly and Grumpy ~ Unity Stamp Co.

Hello there crafty friend! 
Sharing a snarky CAS winter card featuring the adorable new penguin that just released over at Unity called Chilly and Grumpy. Isn't his grumpy little face just the cutest?!


I stamped him with Black Amalgam ink and colored him up really simply with some Copic markers: C00, C1, YR21, YR15, R20, R14.


I thought it would be fun to make a CAS card in all white since little guys 'snow over it'. Heehee! I used a dots embossing folder from my stash to emboss the front of a white card front.


I die cut the penguin using a die from the Deckle & Stitches Nesting Dies. Such a fun card to make and so easy peasy!!

Thanks so much for stopping by!
See ya next time.

Inky hugs,
Crystal

{Please note that comment moderation is on. Your lovely comment will appear shortly.}

Tuesday, December 10, 2024

Unity Advent Calendar 2024 Day 10 ~ Unity Stamp Co.

Hello there crafty friend!
It's Day 10 of the 2024 Advent Calendar from Unity!! I was inspired to make a shaker card today but chickened out. LOL! Me and shaker cards don't see eye to eye... I always make a mess with them.


So I decided to make a faux shaker card with a removable ornament. These are easier, but still a little messy. LOL! And the ornament is so fun. It's not just a card... it's a gift!

You can check out my video revealing the Advent Calendar Day 10 stamp and my process in making this card here... Unity Advent Calendar 2024 Day 10 | Unity Stamp Co.


There are 27 different sketches to pick from for this month's Tawny Owl Paperie Inky Inspiration ALL the Sketches Challenge! Here's a look at six of them. I was inspired by the last one... Sketch 18.


A closer look at Tawny Owl Paperie Inky Inspiration Sketch 18! This is a fun sketch! It's perfect for those scraps we all have in our stash. Stop by the Tawny Owl Paperie Inky Inspiration Facebook group to check out the challenge and see all the inspiration for each of the sketches. Maybe you'll be inspired to play along with us!


I die cut all the pieces to create the ornament using the Ornamental Greetings Ornament dies from Unity {looks like these aren't available right now}. You can see all the layers in the video above. I just had to ink up the Day 2 penguin again! I love this cutie! 

Here's a quick list of the Copic markers I used to color up the penguin: C00, C1, YR21, YR15


I adhered a bunch of the fun Christmas confetti mix around the bottom of the ornament and a few around the top. It took me a few tries but I also tied a pretty bow. I adhered the ribbon with a glue dot. The ornament is adhered to the card with removable glue dots from the iCraft Removable Pixie Dots Adhesive from Therm O Web. 


I paired up the ornament with the Watercolor Tidings {paper pack}. I finished up the card with a sweet sentiment from the Christmas cut apart sheet that I received as a freebie from my Brown Thursday order. So perfect with these papers!

I'll be back tomorrow for Day 11 of the 2024 Advent Calendar from Unity!
Have an ink-tastic day!


Thanks so much for stopping by!
See ya next time.
 
Inky Hugs,
Crystal


{Please note that comment moderation is on. Your lovely comment will appear once approved.}

Monday, December 2, 2024

Unity Advent Calendar 2024 Day 2 ~ Unity Stamp Co.

Hello there crafty friend!
It's Day 2 of the 2024 Advent Calendar from Unity!! I hope you had fun creating something using your Day 1 stamp yesterday. I'm excited to share my card for Day 2! I think it turned out pretty cute.


Today's stamp is a super cute and adorable penguin... eeep! I love it! Just darling! I colored it up with just a few Copic markers: C00, C1, YR21, and YR15.

You can check out my video revealing the Advent Calendar Day 2 stamp and my process in making this card here... Unity Advent Calendar 2024 Day 2 | Unity Stamp Co.


Inspiration for my card came from the {BYSHC} Sketch 19! This is a wonderful sketch for making quick cards with a simple pattern paper background.


I die cut the adorable penguin using a die from the Scallops & Circles {nesting dies}. And I die cut a mat from the pattern papers using a slightly larger die from the same set.


I paired up the pretty tree with the Snowflake Elegance {paper pack}. I finished up the card with a sweet sentiment from the Simple Little Wishes {itty bitty}. So perfect with this cutie pie penguin!

I'll be back tomorrow for Day 3 of the 2024 Advent Calendar from Unity!
Have an ink-tastic day!


Thanks so much for stopping by!
See ya next time.
 
Inky Hugs,
Crystal


{Please note that comment moderation is on. Your lovely comment will appear once approved.}

Thursday, November 28, 2024

Holiday Two-fer Cards ~ Little Love Deer and Penguin Hugs ~ Unity Stamp Co.

Hello there crafty friend! 
I'm back with two adorable cards featuring goodies from Unity!!! I had a fun idea for a two cards... a two-fer! What's that? Well, it's when you use a sketch that let's you use the papers for two cards. So fun and easy peasy!


So I cut two full 6x6 sheets of pattern paper and all I had left was two thin scraps. I cut the Minty Christmas {paper pack} and Holiday Script {paper pack} papers at 4-1/8 x 5-3/8" for card fronts. I set aside the 5/8 x 6" scraps. The 1-7/8 x 5-3/8" pieces I adhered to the bottom of the card fronts. And then I adhered the card fronts to two Kraft A2 card bases.


I did distress the edges of the Minty Christmas {paper pack} just a little bit to lighten the white in the background. I stamped the sweet deer from Little Love Deer and colored it up with Copic markers. I then die cut the deer using a die from Scallops & Circles {nesting dies} 


I mat the deer circle with a Kraft circle. I also distressed the edges of the sentiment and mat it with Kraft card stock. I added dots of white gel pen to the dots on the deer.

Here's a quick list of the Copic markers I used for the deer:
Deer: E51, E21, E23
Scarf: R00, R20, R14, R27
Ground: C00, C1, C3


I also stamped the adorable Penguin Hugs. Isn't this just the cutest penguin?! Love, love, love! I colored it with Copic markers, too. And distressed the edges just like the other card.

Here's a quick list of the Copic markers I used for the penguin:
Penguin: C00, C1, C3
Scarf: R20, R14, R27, YG11, G24, G46
Mug: R00, R20, R14, R27
Ground: C00, C1


I added foam tape to the back of the deer, penguin and both sentiments and popped them all up on the cards. Voila! Two holiday cards done!

Thanks so much for stopping by!
See ya next time.

Inky hugs,
Crystal

{Please note that comment moderation is on. Your lovely comment will appear shortly.}

Friday, May 12, 2023

{BYSHC} Sketch Challenge 33 ~ Revisiting Let it Snow ~ Doodlebug Designs Inc.

 Hello there crafty friend!
I'm sharing another Christmas card for the {BYSHC} Sketch Challenge 33 for the Build Your Stash Holiday Cardmakers Facebook group. And I've dug back into my Let it Snow goodies from Doodlebug Designs. I still have A LOT of die cuts/ephemera for this collection and really want to use it up.


I paired up the cute house and penguin die cuts/ephemera from the Let it Snow Odds & Ends pack with the Happy Holidays sentiment from the Let it Snow Chit Chat pack. And I used the Let it Snow 6x6 paper pad, as well. 


The red background is a bit bigger than the sketch calls for. It measures 3-1/4 x 4". And the blue gingham isn't a full strip across the card. My scrap was too small so I cut it in half and adhered it on either side... the house covers up the space in between.


All my layers, excluding the sentiment, are adhered directly to a white A2 top fold card base measuring 4-1/4 x 11"; scored at 5-1/2". The sentiment is popped up using a thin foam tape from Scrapbook Adhesives.


Here's a look at {BYSHC} Sketch 33 for the month of May!
I hope you'll join us and play along with the sketch! If you're interested in seeing a bit more inspiration for this sketch, check out the amazing inspiration from the design team over on the {BYSH} Cardmakers blog!


Thanks so much for stopping by!
See ya next time.

Inky hugs,
Crystal


{Please note that comment moderation is ON. Your lovely comment will appear shortly.}