Showing posts with label cas card. Show all posts

Wednesday, June 17, 2026

Membership Wednesday ~ June 2026 KOM The Art of Summering ~ Time for a Pause ~ Unity Stamp Co.

Hello there crafty friend!
Happy Membership Wednesday! It's been over a week since I've had any inky time. *GASP* I know! I hurt my back a couple weeks ago and it's being very temperamental when I sit for too long. So crafting hasn't been viable. But today I just HAD to get some crafty time in and I kept my card simple so I wouldn't be sitting for long.


I stamped the adorable pup on Kraft card stock using Black Amalgam ink from Gina K. Designs. I die cut the pup using a die from the Scallops & Squares {nesting dies}. And then I did some coloring with my Copic markers. I also added touches of white using a Prismacolor white pencil.

Copic markers used:
Tree Trunks: E11, E23, E25
Hammock: R20, R14, Y11, Y21
Pup: E11, E23, E57, C0, C2, N1, N3, N5
Sky: BG000, BG10
Grass: G00, G02


My color choices were actually inspired by the Timeworn Paws Anthology {paper pack}. I had every intention of using the papers on the card but decided for more of a CAS design. I actually had the die cut heart background in my scraps... seemed perfect for this card. I die cut it using the Fall Out Hearts Background Die. Unfortunately, I'm not seeing that die on the Unity website. 


I stamped the sentiment. Die cut it using a die from the Scalloped & Stitched Sentiment Nesting Dies and then adhered it directly to the A2 card. I popped up the puppy layer with foam tape finishing it off.


Here's a look at the Kit of the Month membership stamps. 


This cute stamp is also available separately in the Time for a Pause stamps.


That's it for me today! I hope you've been INKspired to play with your membership stamps! 
Have a fabulous day!


Thanks so much for stopping by!

Inky Hugs,
Crystal

Friday, February 27, 2026

{BYSHC} Sketch Challenge 66 ~ Snowy Hello ~ Creative Worship Stamps

Hello there crafty friend!
I'm sharing a little more inspiration for the {BYSHC} Sketch Challenge 66 hosted in the Build Your Stash Holiday Cardmakers Facebook group! I wanted to go for a CAS design {though I added a couple layers so it's not technically CAS}.


I stamped the adorable snowman and bunny from Snowy Hello Clear Stamp Set. Isn't it just the sweetest stamp?! I love it! I colored it up with Copic markers and fussy cut it.

Copics used:
Snowman: C0, C2
Hat: C0, C2, R20, R14
Scarf: R20, R14
Coat: YG11, G24, G46
Carrot: YR20, YR15, YG11, G24
Bunny: W0, W1, W3, W5, C0, C2, R00, R20


I created a simple scene with a die cut circle using a die from the Scallops & Circles {nesting dies} from Unity. I cut a couple layers for my snow layers and also die cut them with the same circle die. I heat embossed some snowflakes from the Snowy Hello Clear Stamp Set using white pigment ink and white embossing powder. I blended some blue ink... I just used the residual ink from my blue blending brush. And then I adhered the layers to the circle and trimmed off the left edge.


I ran a 4-1/4 x 5-1/2" piece of white card stock through my Big Shot with a snowflake embossing folder. And then I trimmed it down to 4 x 5-1/4". I adhered it to the white A2 card base. I stamped the sentiment, trimmed it and popped it up on the card. I also popped up the circle focal image on the card with foam tape.


Here's a look at {BYSHC} Sketch Challenge 66 for the month of February. Tomorrow is the last day to enter the challenge! If you're interested in seeing a bit more inspiration for this sketch, check out the amazing inspiration from the design team over on the {BYSH} Cardmakers blog! I'm always blown away by the creations from the DT... they are amazingly talented cardmakers!

Thanks so much for stopping by!

Inky hugs,
Crystal

Monday, October 13, 2025

Hot Cocoa Kisses ~ Preview Day 3 ~ The Greeting Farm

 Hello there crafty friend!
It's the final day of previews at The Greeting Farm for the October release! Today we're introducing HOT COCOA KISSES... today's super cute and adorable stamp set includes four sweet little snowmen with a cute hot cocoa stand and a bunch of accessory stamps! All so super cute and fun!


I stamped the adorable snowmen with Memento Tuxedo Black ink and colored them all with Copic markers. Fussy cut each of them on the line and then colored the edges with a Memento Tuxedo Black marker making the edges nice and neat.

Here's a quick list of the Copic markers I used:
Snowmen: C0, C1, C3, R00, R20
Brown Hat: E21, E23, E25
Ear Muffs: N2, N4, N6, R20, R14, R29
Green Scarf: YG11, G24, G46
Red Cup: C0, C1, R20, R14, R29
Black Cap: N2, N4, N6, E21, E23, E25, R14, R29
Red Scarf: R20, R14, R29
Book: YG11, G24, G46
Green Santa Hat: C0, C1, C3, YG11, G24, G46
Plaid Scarf: R20, R14, R29, G24, G46
Green Cup: YG11, G24, G46, C0, C1


I dry embossed a card front of white card stock measuring 4-1/4 x 5-1/2" using the Starry Snowfall Embossing Folder from Spellbinders. I used the embossing folder and dry embossed a scrap of white card stock. I trimmed the scraps to 2 x 1-1/4" and adhered them to a 2-1/4 x 4-1/4" piece of white card stock.


Inspiration for my card came from the Tawny Owl Paperie Inky Inspiration Sketch 36. Though this is a great sketch for scraps of pattern paper, I was curious to see how it would look as a CAS card with an all white background. I love it!


I stamped and trimmed the sentiment. Popped it up on the card with foam tape and then I also popped up the snowmen on the card to finish it off. I usually struggle with white on white for my card, but I think I nailed this one. Love it!


The release goes live in the store on Wednesday the 15th at 12am EST! Woohoo! Be sure to come back then for the release Blog Hop!! One lucky winner will receive a $50 gift card to The Greeting Farm. All you have to do is comment on every stop of the hop! Yay!

Thanks so much for stopping by!

Inky Hugs,
Crystal


Monday, May 12, 2025

Surf's Up Anya ~ Preview Day 2 ~ The Greeting Farm

 Hello there crafty friend!
It's Day 2 of previews at The Greeting Farm for the May release. So loving this adorable new Surf's Up Anya! Isn't she just darling?! I love her!


I made a fun CAS card with a simple square scene that I created using a couple stencils from my stash and a scalloped square die. For the sun rays I ink blended Squeezed Lemonade and Mustard Seed Distress Inks. For the waves I used Peacock Feathers Distress Ink. I also die cut a sun and blended the same yellows over the white card stock.


I stamped all the images with Memento Tuxedo black ink and colored them up with Copic Markers. I used a bunch of markers so the list is a bit long this time:
Skin: E000, E00, E11, E04
Hair: E41, E42, E43
Flower: Y11, Y15, YR23, YR04, white gel pen
Outfit: V000, V12, V15, RV10, RV02, RV04
Surf Board: V000, V12, V15, RV10, RV02, RV04, C00, C2
Rock: N2, N3, N4


I fussy cut all of the colored images and colored the edges with a Memento Tuxedo Black marker. I adhered all the images on my little square scene and then placed it on a white A2 top fold card base. Once I had it in position in my mini Misti, I was able to stamp the sentiment just where I wanted it.


This card was so much fun to make! Be sure to stop by the TGF blog to see all the makes from the design team. The release goes live in the store on the 15th at 12am EST.

Thanks so much for stopping by!
See ya next time.

Inky Hugs,
Crystal


{Please note that comment moderation is on. Your lovely comment will appear once approved.}


Sunday, March 23, 2025

Mother's Day Card ~ Ink & Bloom: Camellia ~ Unity Stamp Co.

Hello there crafty friend! 
Today I'm sharing a simple Mother's Day card featuring the gorgeous camellia stamp from the Ink & Bloom: Camellia stamps just released at Unity. Such a gorgeous flower!


 I stamped the gorgeous flowers and sentiment with Amalgam Black ink on white card stock and colored them with Copic markers.

Here's a quick list of the Copic markers I used:
Petals: B0000, B91, B23, B66
Stems / Leaves: G000, G24, G07


I die cut the flowers using the largest die from the Deckle & Stitches Nesting Die Set. This is such a huge stamp I actually cut off a bit of the bottom.


I kept it very simple and just adhered the panel to a black A2 top fold card base that I turned on the side for a landscape card. I adore that sentiment! 


Thanks so much for stopping by!
See ya next time.

Inky hugs,
Crystal

{Please note that comment moderation is on. Your lovely comment will appear shortly.}

Friday, March 14, 2025

Release Day Blog Hop ~ You Are My Sunshine ~ The Greeting Farm


The March 2025 New Release is now available for purchase in The Greeting Farm Store! This month we introduced 3 new stamp sets. Our first set called REGENCY COUPLE is full of elegance and romance and features a dapper Ian ready to court our beautiful Anya. Next, all the cute TGF animals have gathered outside to bask under the warm sun in our set called YOU ARE MY SUNSHINE. Lastly, we showcased ANYA'S CANDY SHOP which carries a wide assortment of delicious sweet treats.


I just adore this sweet bear from the super cute You Are My Sunshine stamp set and wanted to feature him on a CAS card so I pulled out a pretty embossing folder from my stash. I ran it through my big shot and trimmed it down to 4 x 5-1/4". I adhered it to a white A2 top fold card base. I then found a scrap of white card stock to adhere across the card base.


I die cut a piece of white card stock using a square die from my stash. I stamped the sweet bear and flowers on a scrap of white card stock and colored them up with Copic markers. I fussy cut the bear and the flowers and colored the edges with a black marker. I adhered the bear to the square and popped up the square on the card. I stamped, trimmed and popped up the sentiment on the card with foam tape.

Here's a quick list of the Copic markers I used:
Flower Crown: Y11, Y15, R11, R22, V000, V12, V15, B000, B00, YG11, YG03, YG63
Bear: E51, E33, E35, N2, N4, N6
Flowers: Y11, YR15, R00, R11, R22


To celebrate this release we are having a short BLOG HOP! One lucky fan will take home the entire release! You have until March 18th, 12pm CST/1pm EST to leave your comments on each Designer's Blog. Then head back to The Greeting Farm Blog to let us know you completed the hop. **Remember to qualify for the prize you MUST leave a comment on each Designer's Blog AND The Greeting Farm Blog letting us know you completed the hop.

NOTE: Comments on The Greeting Farm Blog are admin approved so it may take a day for your comment to be visible. Please only comment once, and use the same name on all the blogs when leaving a comment. Do not pick the Anonymous option (otherwise we won't be able to verify that it's you). We will announce the random winner later in the week on the Blog and in our Facebook Group: The Greeting Farm Fan Page.

TGF Design Team:

This is a short hop, and definitely worth playing along! If you want to grab your favorites now, you can purchase the new stamps HERE. We will have more cards featuring the New Release from our Design Team Leaders starting on the 19th so be sure to stop by The Greeting Farm Blog to see more inspiration.

Happy Hopping!


Thanks so much for stopping by!
See ya next time.

Inky Hugs,
Crystal


{Please note that comment moderation is on. Your lovely comment will appear once approved.}

Friday, February 28, 2025

Fun With Stencils ~ A Colorful Life Designs ~ Coffee Loving Papercrafters

 Hello there crafty friend! Crystal here from Tawny Owl Paperie and I'm sharing my last post as a guest designer for the Coffee Loving Papercrafters. I've had a lot of fun sharing with you all! I hope you've enjoyed the coffee inspiration I've shared.


 Today I'm sharing a fun stenciled card featuring three fabulous stencils from A Colorful Life Designs. I used the fab Fractured Beams Stencil for my background. I blended Squeezed Lemonade, Mustard Seed and Abandoned Coral Distress Inks over the sun rays once and then again after shifting the stencil.


I blended over the cute cup from the Love Language Stencil on a separate piece of white card stock using Peacock Feathers and Mermaid Lagoon Distress Ink. I fussy cut the cup and adhered it to the panel. I blended Abandoned Coral and Candied Apple Distress Inks over the cute little heart on a scrap of white card stock. I fussy cut that leaving a white border and adhered it to the cup.


I then ink blended Black Soot Distress Ink over a fun sentiment from the Snarky Coffee Stencil. I trimmed the panel and realized that I had messed up the bottom left corner at some point so I just chopped it off. I adhered the panel to a black A2 card base and added six confetti pieces from the Metallic Orange Card Bling pack, also from A Colorful Life Designs. 


The ideas starting revving once I got started so I made a couple more cards. I blended lightly with Vintage Photo Distress Ink over the Mmmm portion of the Mmm Coffee Stencil. And then I blended with Ground Espresso Distress Ink over the 'Coffee'. 


I added the little heart from the Coffee Pot Stencil using Candied Apple Distress Ink. A fun CAS card on Kraft card stock.


I had an idea for the Coffee Pot Stencil so I ran with it. I blended the coffee pot with Black Soot Distress Ink. And without adding ink to my blending brush, I blended the steam lightly with the same brush. I blended Vintage Photo Distress Ink for the coffee. I left the coffee pot stencil in place and laid the Mmm Coffee Stencil over top and blended Ground Espresso Distress Ink over the Mmmm. I removed the coffee pot stencil and masked the Mmm coffee stencil and then blended the 'Coffee'. And I just had to blend another heart with Candied Apple Distress Ink.


I trimmed up the panel and adhered it to a black A2 top fold card base. These were such fun cards to make! I hope you've enjoyed the cards I've shared today and throughout the month. Have a wonderful weekend crafty friends!

Thanks so much for stopping by!
See ya next time.

Inky hugs,
Crystal

{Please note comment moderation is on. Your lovely comment will appear once approved.}

Thursday, January 30, 2025

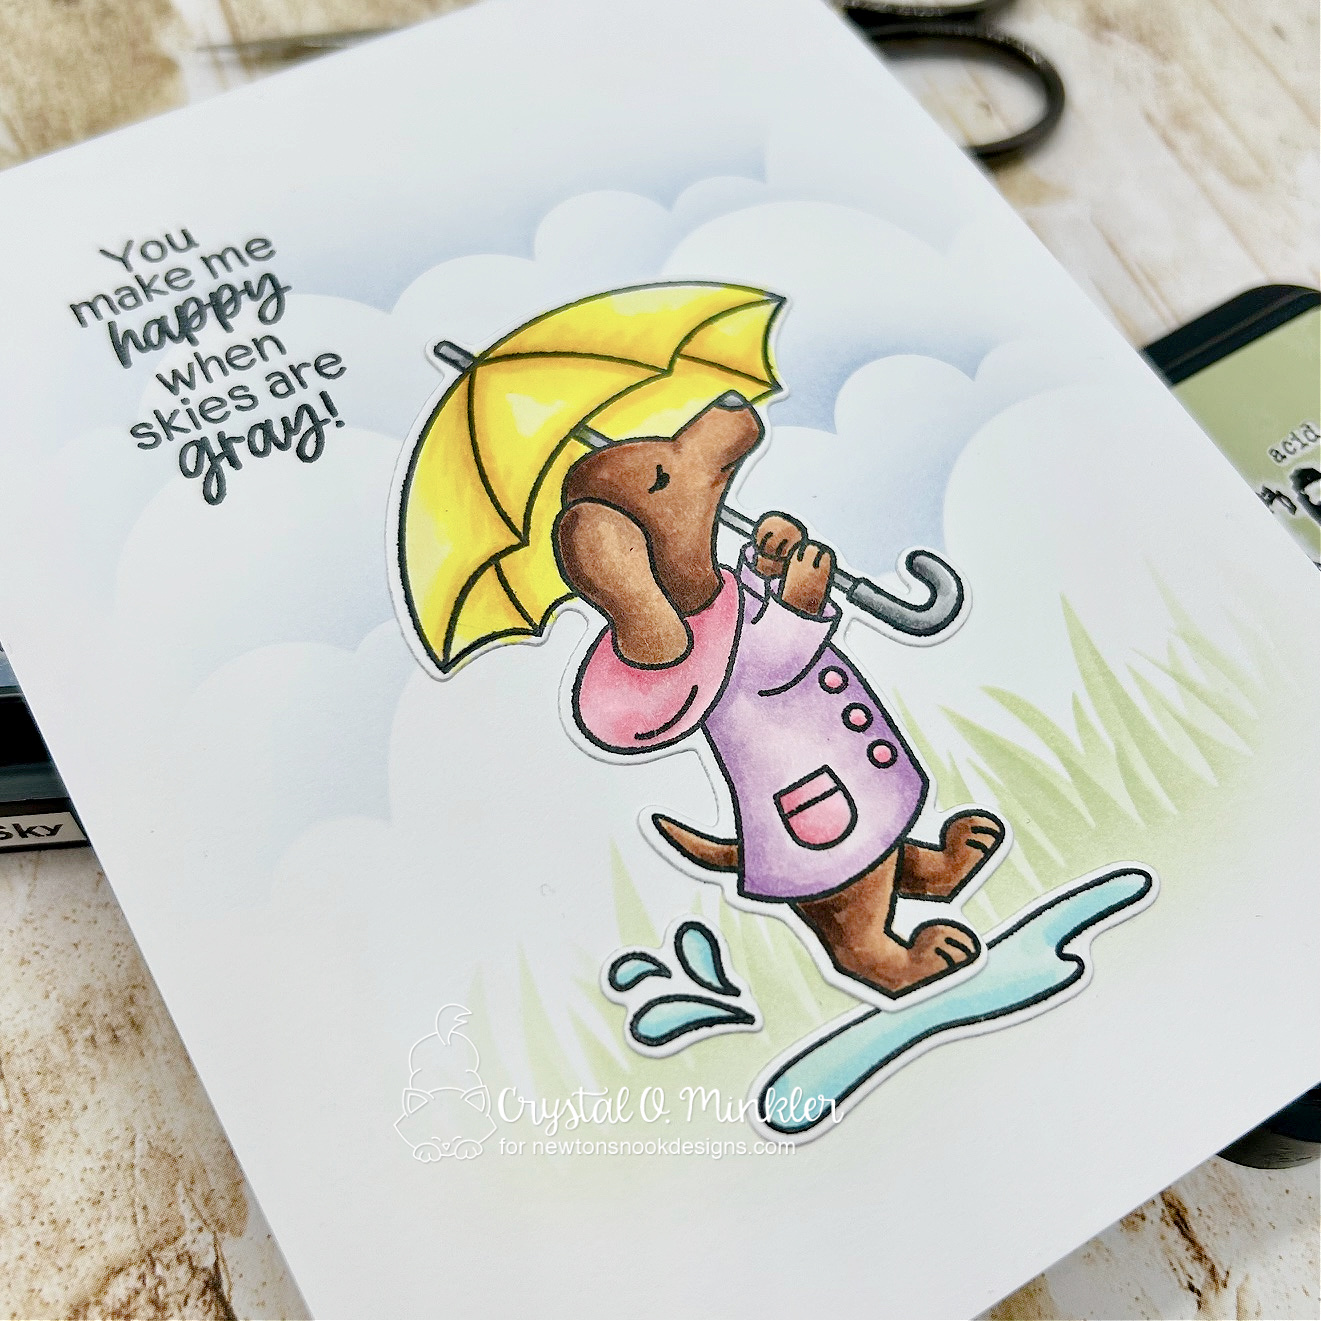
Clean & Simple One-Layer Card ~ Rainy Day Doxie ~ Newton's Nook Designs

Hello there crafty friend! 
Today I'm sharing a sweet rainy day Clean & Simple {CAS} card. It's so easy peasy to create a quick scene for a CAS card directly on the card base. I used the adorable Rainy Day Doxie Stamp Set from Newton's Nook Designs plus a couple of fun stencils.


I ink blended Stormy Sky Distress Ink over the Clouds Stencil directly on the front of a white A2 top fold card base. I ink blended Old Paper Distress Ink over the Hills & Grass Stencil underneath the clouds. The key to this technique was keeping the blending very light and lightening my touch on the edges of the card.


I stamped the adorable pup from the Rainy Day Doxie Stamp Set with Memento Tuxedo Black ink. Colored it up with my Copic markers and then I die cut it using the coordinating Rainy Day Doxie Die Set.

Here's a quick list of the Copic markers I used:
Umbrella: Y11, Y06, Y38, N2, N3, N6 Jacket: V000, V12, V15, RV10, RV11, RV14 Doxie: N2, N6, E21, E23, E27 Puddle / Splash: BG10, BG01


I adhered the puddle, splash and pup directly to the card base. 


I stamped the sentiment directly onto the card base to finish it off. So easy peasy and I think it turned out pretty cute!

Thanks so much for stopping by!
See ya next time.

Inky hugs,
Crystal

{Please note that comment moderation is on. Your lovely comment will appear shortly.}

Thursday, January 2, 2025

I Love Winter ~ Frosty Kisses Anya ~ The Greeting Farm

 Hello there crafty friend!
I am super excited and honored to be joining The Greeting Farm Design Team!! Woohoo! I can't wait to share my projects with you all. 


Today I'm sharing a sweet winter card featuring the adorable Frosty Kisses Anya. I just adore her sweet face and her cute snowman friend.


I stamped the adorable Anya with Memento Tuxedo black ink and colored her up with Copic Markers. Unfortunately, I can't seem to find Frosty Kisses Anya on the website. But if you'd like to have her you can check out the Farmers Market and submit a request via email... maybe she'll be available for the next Farmers Market. 

Here's a quick list of the Copic markers I used:
Skin: E000, E00, E11, E04, R00, R20
Hair: E43, E44, E47
Hat: C00, C2, Y11, Y15, Y38, R00, R20
Coat: C00, C2, Y11, Y15, Y38
Buttons: N0, N2, N4, N6
Gloves: C00, C2
Boots: N0, N2, N4, N6
Dress / Leggings / Bows: V000, V12, V15
Snowman: B000, B00, YR21, YR15


I ink smooshed the background with a bit of Tumbled Glass and Wilted Violet Distress Oxide inks. And then I heat embossed several snowflakes using the cute snowflake in the stamp set. I also heat embossed the sentiment on black card stock.


I fussy cut the snowman and Anya and colored the edges of my fussy cutting with a Memento Tuxedo Black marker so it looks nice and neat. Added a bunch of foam tape to the back of Anya and popped her up on the card. Love the dimension it gives to the card! I hope I've inspired you to get inky!


Thanks so much for stopping by!
See ya next time.

Inky Hugs,
Crystal

{Please note that comment moderation is on. Your lovely comment will appear once it's approved.}

Saturday, December 28, 2024

Snow Over It Card ~ Chilly and Grumpy ~ Unity Stamp Co.

Hello there crafty friend! 
Sharing a snarky CAS winter card featuring the adorable new penguin that just released over at Unity called Chilly and Grumpy. Isn't his grumpy little face just the cutest?!


I stamped him with Black Amalgam ink and colored him up really simply with some Copic markers: C00, C1, YR21, YR15, R20, R14.


I thought it would be fun to make a CAS card in all white since little guys 'snow over it'. Heehee! I used a dots embossing folder from my stash to emboss the front of a white card front.


I die cut the penguin using a die from the Deckle & Stitches Nesting Dies. Such a fun card to make and so easy peasy!!

Thanks so much for stopping by!
See ya next time.

Inky hugs,
Crystal

{Please note that comment moderation is on. Your lovely comment will appear shortly.}