Thursday, March 30, 2023

Sweet Easter Gnome ~ March Sketch Challenge ~ Unity Stamp Co.

 Hello there crafty friend!
Today I'm sharing my last bit of inspiration for the Unity March Sketch Challenge that I'm hosting in the Unity Show & Tell Facebook group. I'm sharing a cute Easter card using the super adorable Sweet Easter Gnome stamps. And I'm sharing another bonus card so be sure to read through to the end!


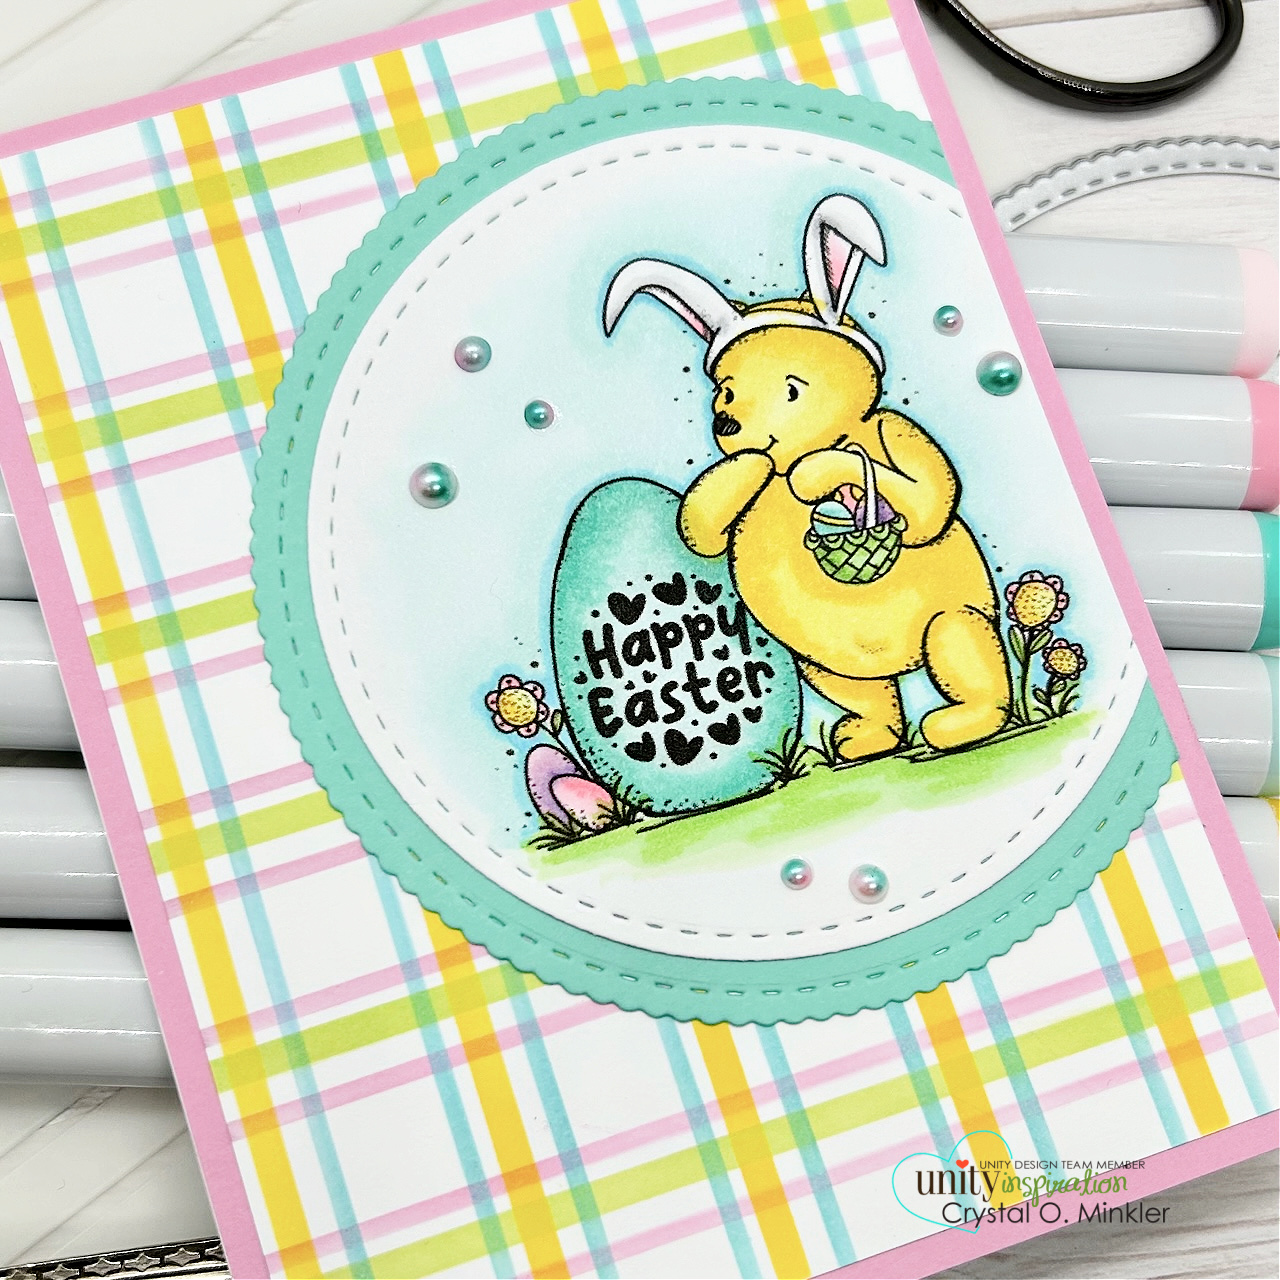
Eeep!! Isn't this Easter card just the cutest?! It turned out better than I hoped. Paired up the adorable Sweet Easter Gnome with the Hippity Hoppity paper pad from Doodlebug Design. I did consider using the new Plaid Builder {layering stencils} to make my own plaid but I'm afraid that time was not on my side so I went with the pattern paper.


The cute little clouds in the background are from the March 2023 Kit of the Month called A Good Man & Some Butterflies. I just adore the detail in these cute clouds!!


The Easter gnome and clouds were stamped with Black Amalgam ink and then colored up with Copic markers. Here's a quick list of the Copic markers I used to color up the adorable gnome:

Skin ~ E000, E00, E11, E04
Beard ~ C00, C1, C3
Hat ~ RV10, RV13
Ears / Feet ~ R000, R00, R20, C00, C1, C3
Easter Egg ~ YG11, G14, BG10, BG23, YR21, YR15, RV10, RV13


This time I decided not to use a die for my focal image. Just went with straight edges but I used a corner rounder punch for both of my focal image layers. The ground for my gnome was created by die cutting the green grass papers with the Land Borders Die Set from Newton's Nook Designs.

You can check out my process video here... Sweet Easter Gnome | March Sketch Challenge | Unity Stamp Co.


Also sharing a BONUS card!! Our family has been considering get a kitty and I am smitten with the tortoiseshell cats. Love the pretty mix of colors in their fur. 


I found a cute picture online and tried to replicate the coloring… it turned out okay. I do like how the eyes turned out though. Here’s a quick list of the Copic markers I used to color up the kitty:

Fur ~ YR21, YR15, YR16, N0, N2, N4, N6, C00, C1, C3
Nose ~ R00, R20, R14
Ears ~ R00, R20, N0, N2
Eyes ~ YG11, YR21, E00


 I die cut the Copic colored kitty with the third largest die from the Big and Little Pierced Chain Rectangle dies from Gina Marie Designs. Another paper pad of Spring papers made my background and my mat for the kitty layers. I used the Spring Market paper pad from Carta Bella. The sentiment was stamped, trimmed and then popped up on the card with thin foam tape. A few touches of white gel pen on the eyes, nose, and whiskers finish off my card.


Here's another look at the sketch! Today and tomorrow are the last days to play along with the sketch!! Please know that the sketch is meant to inspire and not require. Feel free to alter it to work for your creation just as I did for both of my cards! Most importantly have some inky fun! I can't wait to see what you create! Be sure to share your cards in the Unity Show & Tell group and also add them to the sketch challenge album in the group to be entered for a prize!! I have had so much fun hosting the challenges in the group for the last couple of months. Hope you all had fun too! Thank you all so much for playing along! 


Thanks so much for stopping by!
See ya next time.

Inky Hugs,
Crystal


{Please note that comment moderation is on. Your lovely comment will appear once approved.}

Monday, March 27, 2023

Inky Paws Challenge #194 ~ Color Challenge Reminder

 Hello there crafty friend!
 There's still time to play along with the Inky Paws Challenge #194 - Color Challenge!! You have until this coming Friday, March 31st to get your entries in for the #194 Color Challenge and a chance to win a $20 store credit to Newton's Nook Designs!

Here's another look at the fun colors... Bubblegum Pink, Lilac, Spring Green, and White.


Our family had unexpected visitors so I found myself in need of a quick card for this week's challenge post. I love a fun stencil for a quick background!! I decided to go with an ombre style background using Picked Raspberry, Kitsch Flamingo, and Spun Sugar Distress Oxide inks for the first stencil in the Butterflies Stencil Set. Once I was happy with my blends, I replaced the stencil with the second stencil in the set and blended Wilted Violet Distress Oxide ink over the stencil.


I wanted a bunch of layers using all the colors in the color challenge so I pulled out my Frames & Flags Die Set. I die cut a card front of Stampers Select White card stock from Papertrey Ink using the largest scalloped die in the die set. I then die cut the butterfly background with the curved edge rectangle die from the die set. I mat the butterfly layer onto a 3-3/8 x 4-5/8" piece of Hibiscus Burst card stock from Papertrey Ink. All my layers were then adhered to a card front of Green Galore card stock from Stampin' Up.


I found a sweet sentiment from the Garden Mice Stamp Set that worked perfectly with my card! I stamped it with Sugar Cube Pigment ink from Taylored Expressions. I then added some Alabaster White Embossing Powder from Brutus Monroe and melted it with my Wagner Precision Heat Tool. I trimmed the sentiment to a cute banner and thought it would be hun to also layer a few banners with the colors. I trimmed a scrap of white card stock into a banner. I then die cut some Hibiscus Burst card stock with the longest banner from the die set. I adhered all the layers together and then adhered them to the card. I added a few pink enamel dots to finish up the card. And then I adhered it to a white A2 top fold card base measuring 4-1/4 x 11"; scored at 5-1/2".


Now it's your turn to get your paws inky with your Newton's Nook Designs products and create a project with the color combo of Bubblegum Pink, Lilac, Spring Green and White. Be sure to link up to the Inky Paws Challenge! Can't wait to see your projects!


Thanks so much for stopping by!
See ya next time.

Inky Hugs,
Crystal


{Please note that comment moderation is on. Your lovely comment will appear once approved.}

Friday, March 24, 2023

{BYSHC} Sketch Challenge 31 ~ Dairy Christmas ~ Newton's Nook Designs

 Hello there crafty friend!
I'm sharing another Christmas card for the {BYSHC} Sketch Challenge 31 for the Build Your Stash Holiday Cardmakers Facebook group. Today I'm featuring the adorable Dairy Christmas stamp set from Newton's Nook Designs. I just adore this cute stack of farm animals!! And the best part is that it's on sale during their Retiring Sale so go order yours before they are all gone!


I paired the cute critters up with the Simple Vintage Country Christmas 6x8 paper pad from Simple Stories. I love the mix of papers in this paper pad and I think they work really well with these cute farm animals.


The critters were stamped on Stampers Select White card stock from Papertrey Ink using Memento Tuxedo Black ink. I used the following Copic markers to color up my image:

Rooster ~ YR21, YR24, YR27, YG03, YG63, YG97, R20, R14, R17
Pig ~ R00, R11, R02, R20, R17, YG03, YG63, YG97, C00, C1, C3
Cow ~ N0, N2, N4, N6, C00, C1, C3, E000, E00, R02, R11, R05, R17, YG03, YG63, YG97
Santa Hats ~ C00, C1, C3, R11, R05, R17


I die cut the cute farm critters with a stitched circle die from the Circle Frames Die Set from Newton's Nook Designs. Popped the main image up on the card with lots of foam tape. I stamped the sentiment and die cut it using the Banner Nesting Dies from Unity Stamp Co.


Here's a look at {BYSHC} Sketch 31 for the month of March!
There's still a few days to play along with the sketch! I hope you'll join in the fun and start building  your stash of holiday cards. If you're interested in seeing a bit more inspiration for this sketch, check out the amazing inspiration from the design team over on the {BYSH} Cardmakers blog!


Thanks so much for stopping by!
See ya next time.

Inky hugs,
Crystal


{Please note that comment moderation is ON. Your lovely comment will appear shortly.}

Thursday, March 23, 2023

Queen Girl Birthday ~ March Sketch Challenge ~ Unity Stamp Co.

 Hello there crafty friend!
Today I'm sharing more inspiration for the Unity March Sketch Challenge that I'm hosting in the Unity Show & Tell Facebook group. I'm sharing a sweet birthday card featuring another new release called Queen Girl. So excited for a new Angie Girl!!


I just had to pair up the beautiful Queen Girl with the pretty Birthday Party {paper pack}. They were made for each other and combined with the March Sketch this was a super easy card to create.


The background of balloons is a pretty pattern paper from the paper pack that I die cut with the largest rectangle die from the Scallops & Rectangles {nesting dies}. It's adhered to a pretty purple card front measuring 4-1/4 x 5-1/2".


Queen Girl was stamped with Black Amalgam ink and then colored up with Copic markers. Here's a quick list of the Copic markers I used to color up this beautiful new girl:

Skin ~ E000, E00, E11, E04
Hair ~ E21, E23, E27
Purple Balloon ~ V000, V12, V22
Pink Balloon ~ RV000, RV10, RV13, RV14, R81, R85
Shirt ~ Y000, Y11,Y06, C00, C1, C3


This time I used a square die for my focal image but it was way too big and would have covered most of the pretty balloon papers so I cut it. Pretty much making it a rectangle and keeping with the sketch. I did omit the rounded corners though since I used the Scallops & Squares {nesting dies} to die cut my panel layers.


Also sharing a BONUS card!! For this one I used the adorable new bunny stamp called Hoppy Notes and I paired it up with the beautiful Kindness is Magic {paper pack}. I also used the Scallops & Circles {nesting dies} to die cut my main panels. Rather than doing a sentiment strip across the card I just stamped my sentiment under the image. I think it turned out pretty cute. 


Here's another look at the sketch! Please know that the sketch is meant to inspire and not require. Feel free to alter it to work for your creation just as I did for mine today. Most importantly have some inky fun! I can't wait to see what you create! Be sure to share your cards in the Unity Show & Tell group and also add them to the sketch challenge album in the group to be entered for a prize!! I'll see you back here next Thursday with my last card for this month's sketch challenge.

Thanks so much for stopping by!
See ya next time.

Inky Hugs,
Crystal


{Please note that comment moderation is on. Your lovely comment will appear once approved.}

Wednesday, March 22, 2023

Trio of Quick Cards ~ Membership Wednesday ~ March 2023 Whit Kit ~ Unity Stamp Co.

 Hello there crafty friend!
It's time for another Membership Wednesday and today I'm sharing three quick cards that I created using the beautiful March 2023 Whit Kit from Unity Stamp Co. I decided to focus on the gorgeous papers in the card kit for my first two cards. My last card features the gorgeous Write a New Story stamps from the kit.


My first card features one of the pretty papers from the Write Your Story {paper pack} that's included in the card kit. I had planned on it being centered on the card front but it didn't work out quite right so it's offset in the bottom right corner and I actually like it more!


The front of the card is die cut with one of the circle dies from the Scallops & Circles {nesting dies}. That partial circle die cut of pattern paper is actually adhered inside the card so it's a fun twist on a peek-a-boo card. I finished off the card with a quick sentiment from the So Kind So Caring So You {Front & Center Stamps} stamped with Black Amalgam ink.


My second card features another beautiful pattern paper from the Write Your Story {paper pack}. I die cut it with the largest die from the Scallops & Rectangles {nesting dies}. And then I adhered it to an A2 card base of Vintage Cream card stock from Papertrey Ink.


I stamped the sentiment with Vintage Photo Distress Ink on the scrap of pattern paper from the first card. I then die cut it using one of the dies from the Banner Nesting dies included in the Whit Kit. It's adhered directly on the card with liquid glue.


My last card features another piece of beautiful pattern paper from the card kit AND the wonderful Write a New Story stamp set from the kit. The background paper was trimmed and torn along the edges. I distressed the edges with Ground Espresso Distress Ink. I used the Vintage Photo Distress ink to stamp the heart of books onto kraft card stock.


I die cut the heart of books with a scalloped heart die from the Dashes and Frills Hearts {die set}. I distressed the edges of the heart with Ground Espresso Distress Ink and then mat it with a die cut heart from Early Espresso card stock using the next largest die from the same set. I popped up the heart on the card with lots of foam tape. If you look closely along the left edge you can see I used one of the Lace Border stickers under the pattern paper. And I finished this one off with another sentiment from the So Kind So Caring So You {Front & Center Stamps} this time stamped with Ground Espresso Distress ink.

You can check out my process video here... Trio of Quick Cards | March 2023 Whit Kit | Unity Stamp Co.


I can't get enough of this beautiful card kit! Love love love it!


Here's a look at the wonderful Whit Kit for March!! Love it! This wonderful card kit is available for only $42.99. That includes shipping! You also get a $6.95 discount on every order from Unity over $45. Members are also able to purchase past Whit Kit stamp sets for just $14 and past Whit Kit paper packs for $2 off!! So awesome!!! 

I'll be back tomorrow with inspiration for the March Sketch Challenge that I'm hosting over in the Unity Show & Tell Facebook group.


Thanks so much for stopping by!
See ya next time.

Inky Hugs,
Crystal


{Please note that comment moderation is on. Your lovely comment will appear once approved.}

Monday, March 20, 2023

Inky Paws Challenge #194 ~ Color Challenge

Hello there crafty friend!
It's time for another fun Inky Paws Challenge... a Color Challenge! 
I sure hope that you'll join in the fun and play along with us with your Newton's Nook Designs products! You have until Friday, March 31st to get your entries in for the #194 Color Challenge and a chance to win a $20 store credit to Newton's Nook Designs!

How beautiful are these colors... Bubblegum Pink, Lilac, Spring Green and White


I do love the look of a Clean & Simple {CAS} card with a lot of white and even though this card has a lot of white I don't think it's considered a true CAS card because of all the layers. Still... it works for our current color challenge. 


A white A2 card base measuring 4-1/4 x 11"; scored at 5-1/2" for my bottom layer. Another white layer that was die cut with the largest postage stamp die from the Framework Die Set. My main white panel measures 3-1/4 x 4-1/2" and I die cut some white clouds with a die from the Sky Borders Die Set. Just a touch of the pink and purple and a pop of green with some die cut grass using the Land Borders Die Set


I stamped the sweet critters from the Spring Pile Up stamp set with Memento Tuxedo black ink. I colored them up very simply with my Copic Markers and then die cut them with the coordinating Spring Pile Up Die Set. Here's a quick list of the Copic Markers I used to color up the sweet critters:

Birdie ~ V000, V12, V17, YR15
Bunny ~ C00, C1, C3, RV000, RV10, RV13, RV14
Tulips ~ RV000, RV10, RV13, RV14, YG11, YG23
Sheep ~ C00, C1, C3, N0, N2, N4, RV000, RV10, RV13
Basket ~ E21, E23, E27
Eggs ~ RV000, RV10, RV13, RV14, V000, V12, V17, YG11, YG23

You can check out my process video here... Hippity Hoppity Easter | Spring Pile Up | Newton's Nook Designs.


Now it's your turn to get your paws inky with your Newton's Nook Designs products and create a project using the color combo of Bubblegum Pink, Lilac, Spring Green, and White. Be sure to link up to the Inky Paws Challenge! Can't wait to see your projects!


Thanks so much for stopping by!
See ya next time.

Inky Hugs,
Crystal


{Please note that comment moderation is on. Your lovely comment will appear once approved.}

Friday, March 17, 2023

Believe in Yourself Always ~ Joy in Your Dreams ~ Unity Stamp Co.

 Hello there crafty friend!
Before I even attempted to make a plaid background using the Plaid Builder {layering stencil} for the Winnie the Pooh Easter card I shared yesterday, I had actually used it for a fun striped background for the mini slimline card I'm sharing today.


My card features the gorgeous Joy in Your Dreams stamp that just released yesterday at Unity Stamp Co. along with the awesome Plaid Builder {layering stencil}. Of course, I was drawn to the mixed media vibe of this gorgeous daisy stamp!! I love it and I hope to play with it again soon.


I ink smooshed my background using Squeezed Lemonade, Twisted Citron, Mowed Lawn, and Mermaid Lagoon Distress Oxide inks. And then I stamped the beautiful daisy with Black Amalgam ink over the ink smooshed background. I die cut the panel with the second largest die from the Pleated Lace Mini Slimline dies from Gina Marie Designs.


I blended Mermaid Lagoon over the first stencil and Black Soot over the second stencil from the Plaid Builder {layering stencil} to create my striped background. I trimmed the panel to 2-7/8 x 5-7/8" and adhered it to a slimline card base measuring 6 x 6"; scored at 3". This lets a bit of the card base peek through and be a mat for the striped layer. The daisy panel was then popped up on the card with lots of foam tape. And I finished off the card by trimming up one of the cut apart sentiments from a past Whit Kit.

You can check out my process video for the card here... Mixed Media Daisy | Joy in Your Dreams | Unity Stamp Co.


Love this beautiful stamp! Well, that's it for me today! I sure hope you'll stop by Unity to check out all the new releases. There's a few new Winnie the Pooh stamps along with a bunch of other fun products!

Thanks so much for stopping by!
See ya next time.

Inky Hugs,
Crystal


{Please note that comment moderation is on. Your lovely comment will appear once approved.}

Thursday, March 16, 2023

Winnie the Pooh: Pooh's Bunny Hop ~ March Sketch Challenge ~ Unity Stamp Co.

 Hello there crafty friend!
Today I'm sharing more inspiration for the Unity March Sketch Challenge that I'm hosting in the Unity Show & Tell Facebook group. I'm sharing another Easter card but this time I'm featuring two new releases that will hit the Unity website later today!! Yay!!


First up... notice the plaid in my background?! Unity is releasing an awesome Plaid Builder {layering stencil}!! It's so easy to use and the possibilities are endless. So many color combinations!! And then, of course, a new adorable Winnie the Pooh stamp. This one is called Winne the Pooh: Pooh's Bunny Hop. Love it!


To create the plaid background I blended Kitsch Flamingo, Salvaged Patina, Twisted Citron and Mustard Seed Distress Oxide inks over the plaid stencils. I trimmed the background to 4 x 5-1/4" and adhered it to a pink card front. The panel was then adhered to a white A2 top fold card base.


Winnie the Pooh was stamped with Black Amalgam ink on white card stock. I also stamped the sentiment inside the egg with the same black ink. Here's a quick list of the Copic markers I used to color up this cute stamped image:

Pooh ~ Y11, Y15
Pooh's Ears ~ C00, C1, C3, RV000, RV10, RV13
Pooh's Basket ~ YG11, YG23
Eggs ~ Y11, Y15, RV000, RV10, RV13, V000, V12, V17, BG000, BG10, BG23
Flowers ~ RV10, RV13, Y11, Y15, YG11, YG23
Grass ~ YG11, YG23
Sky ~ BG000, BG10, BG01


The sketch calls for a rectangle but I thought a circle would be a fun change so I die cut Winnie the Pooh with the Scallops & Circles {nesting dies}. And then I die cut a piece of aqua card stock with the largest die from the same die set. Adhered the circle layers together and then cut the edge off. Next I adhered the circle layers to the plaid background. I finished off the card with a few pretty flatback pearls from my stash.


Here's another look at the sketch! Please know that the sketch is meant to inspire and not require. Feel free to alter it to work for your creation just as I did for mine today. Most importantly have some inky fun! I can't wait to see what you create! Be sure to share your cards in the Unity Show & Tell group and also add them to the sketch challenge album in the group to be entered for a prize!! I'll see you back here next Thursday with more inspiration for this month's sketch challenge.

Thanks so much for stopping by!
See ya next time.

Inky Hugs,
Crystal


{Please note that comment moderation is on. Your lovely comment will appear once approved.}

Wednesday, March 15, 2023

Membership Wednesday ~ March 2023 Uniquely Unity ~ Unity Stamp Co.

  Hello there crafty friend!
Today I'm sharing a quick card using the lovely stamp from the wonderful March 2023 Uniquely Unity membership stamp from Unity. This lovely stamp set includes a sweet giraffe and a fun sentiment. Giraffes are my absolute favorite animal {after the owl, of course!}. Whenever my family visits a zoo we always visit the giraffe exhibits. I just love them... so majestic and beautiful. 


I stamped the giraffe and sentiment with Black Amalgam ink on white card stock. And then I colored up the sweet giraffe with the following Copic markers:

Giraffe ~ YR000, YR21, YR15, YR24, YR27, E25 
Daisy ~ V12, V15, V17, YR21, YR15, YR24
Outline ~ W00, W1


Once I was happy with my coloring, I die cut my card front using a die from the Stitched Scallop Basic Edges dies from My Favorite Things.


The outline around the giraffe helps to give him a bit of dimension but the black card front in the back also helps to make the black ink of the stamped images pop on the card. Such a simple and quick card but I just love how it turned out.


Here's a look at the beautiful Uniquely Unity stamps for March!! I adore him so much! This membership is available for only $16.99. That includes shipping! You also get a wonderful inspiration sheet with pictures and step-by-step instructions so you can easily recreate the cards yourself. And now when you sign up you have the ability to pause, skip or cancel your subscription within your Unity account. So awesome!!

That's it for me today! I'll be back next week with inspiration for the March 2023 Whit Kit!! Ohhh... have you seen this month's card kit! I can't wait to play!


Thanks so much for stopping by!
See ya next time.

Inky Hugs,
Crystal


{Please note that comment moderation is on. Your lovely comment will appear once approved.}