Showing posts with label #inksmooshing. Show all posts

Wednesday, July 17, 2024

Membership Wednesday ~ July 2024 BOM Fiesta Flutters ~ Unity Stamp Co.

  Hello there crafty friend!
Today I'm sharing a lovely card featuring the gorgeous stamp from the July 2024 Background of the Month membership called Fiesta Flutters from Unity. I am seriously loving this gorgeous background stamp! Butterflies are my jam! Haha...


I once again ink smooshed a few Distress Inks on Kraft card stock from Papertrey Ink. I love how the colors look on Kraft card stock! I ink smooshed Carved Pumpkin, Cracked Pistachio, and Festive Berries Distress Inks. This was such a different combo for me... what do you think?! I am loving it! 


I dried the ink smooshed panel completely with a Wagner Precision Heat Tool. I then prepped the card stock using a TE Anti-Static Powder Tool from Taylored Expressions. I stamped the gorgeous butterfly background using Sugar Cube White Pigment Ink, also from Taylored Expressions, and added Alabaster White Embossing Powder from Brutus Monroe to the wet ink. I then melted the powder using my heat tool. 


I die cut the butterfly background using the largest die from the Deckle & Stitches Nesting Die Set. I then adhered the butterfly panel to a white A2 top fold card base. I stamped the sentiment from the Bitty Birthday Bash stamps on a long scrap of white card stock using the Festive Berries Distress Ink. I trimmed up the sentiment and adhered it to the card. To finish off the card, I added a few glittery white enamel dots from my stash. 
 

Here's a quick look at this month's Background of the Month membership! I love it so much!!

Well, that's it for me today! I hope you've been inspired to play with your membership stamps! 
Hope you have an ink-redible day!


Thanks so much for stopping by!
See ya next time.

Inky Hugs,
Crystal


{Please note that comment moderation is on. Your lovely comment will appear once approved.}

Wednesday, July 10, 2024

Membership Wednesday ~ July 2024 UU Winged Impressions ~ Unity Stamp Co.

  Hello there crafty friend!
Today I'm sharing a card featuring a gorgeous stamp from the July 2024 Uniquely Unity membership called Winged Impressions from Unity. I absolutely love butterfly stamps! And this awesome mix of butterfly and distressed text is amazing!!


I wanted to see what it would look like heat embossed on ink smooshed Kraft card stock. I love it! The distress inks smooshed on the Kraft card stock look so cool! I ink smooshed Twisted Citron, Peacock Feathers, and Tea Dye Distress Inks on Kraft card stock from Papertrey Ink.


I dried the ink smooshed panel completely with a Wagner Precision Heat Tool. I then prepped the card stock using a TE Anti-Static Powder Tool from Taylored Expressions. I stamped the gorgeous butterfly using Sugar Cube White Pigment Ink, also from Taylored Expressions, and added Alabaster White Embossing Powder from Brutus Monroe to the wet ink. I then melted the powder using my heat tool. 


I tore the edges of the panel and added foam tape to the back. To figure out placement for the sentiment, I laid the butterfly panel on top of a Kraft A2 card base. I heat embossed the sentiment from the Bitty Birthday Bash stamps using the same steps as the butterfly. I wrapped some white baker's twine around the front of the card base securing it with tape on the front. I removed the backing from the foam tape and popped up the butterfly panel. To finish off the card, I added three white enamel dots.
 

Here's a quick look at this month's Uniquely Unity membership! So freaking gorgeous!! I love it!

Well, that's it for me today! I hope you've been inspired to play with your membership stamps! 
Have an ink-redible day!


Thanks so much for stopping by!
See ya next time.

Inky Hugs,
Crystal


{Please note that comment moderation is on. Your lovely comment will appear once approved.}

Monday, July 1, 2024

{BYSHC} Sketch Challenge 47 ~ Do You Wanna Build a Snowman ~ Taylored Expressions

Hello there crafty friend!
It's time for a new sketch challenge over in the Build Your Stash Holiday Cardmakers Facebook group! Today I'm sharing a sweet Christmas card featuring the adorable Do You Wanna Build a Snowman die from our awesome sponsor, Taylored Expressions! Taylored Expressions has generously offered up a $25 gift card as a prize for the {BYSHC} Sketch Challenge 47 this month! So amazing!!


Lots of layers for this month's sketch! A great sketch for pattern papers though I went a different route this time using the Simple Snowflakes embossing folder from Tim Holtz for my background paper layers. I lightly rubbed the raised snowflakes of Night of Navy card stock from Stampin' Up with a bit of Sugar Cube White Pigment ink from Taylored Expressions. I mat them with Stampers Select White card stock from Papertrey Ink. And the layers are adhered to a 4-1/4 x 5-1/2" piece of True Black card stock from Papertrey Ink that's adhered to a white A2 top fold card base.


I started my focal image by ink smooshing Tumbled Glass, Chipped Sapphire and Black Soot Distress Inks on a medium piece of card stock. I left some white in the middle while I was ink smooshing and then blended Chipped Sapphire lightly over the panel giving the background a nice light middle to showcase the silhouettes. I dried the background with my heat tool and added some white acrylic paint splatters. The silhouettes are a fun retired die that I've had in my stash for quite awhile. So bummed it's not available anymore. I die cut the silhouette from a piece of True Black card stock. And then again from a scrap of Stampers Select White card stock. I offset the white behind the black die cut to give a shine to the silhouette. I love the effect! What do you think?


I die cut the ink smooshed background using the Stitched Bracket Stacklets dies from Taylored Expressions {these must be retired, I can't find them on the website}. I also die cut a scrap of black card stock for the bottom piece. I mat the focal image with a piece of white card stock that I die cut using the Stitched Square Stacklets dies. My sentiment from the Fluffy Friends - Holiday stamp set from Taylored Expressions is heat embossed. I prepped my black card stock with the TE Anti Static Powder Tool. I absolutely LOVE this tool! It was a Christmas gift from a crafty friend a couple of years ago and it has been a game changer for my heat embossing. I highly recommend it! Anywho, I stamped the cute sentiment using the Sugar Cube White Pigment ink and added Alabaster White Embossing powder from Brutus Monroe. I then melted the embossing powder using my Wagner Precision Heat Tool. After letting the melted powder cool a bit, I rubbed my card stock with a microfiber cloth to remove the anti static powder. I trimmed up the sentiment and adhered it directly to the card. Lots of layers for this card so I didn't use any foam tape.


Here's a look at {BYSHC} Sketch Challenge 47 for the month of July. Loving this sketch! I can't wait to see what everyone does with it. I hope you'll join us and play along with the sketch. If you're interested in seeing a bit more inspiration for this sketch, check out the amazing inspiration from the design team over on the {BYSH} Cardmakers blog! Lots of beautiful inspiration this month from the design team.


Thanks so much for stopping by!
See ya next time.

Inky hugs,
Crystal


{Please note that comment moderation is ON. Your lovely comment will appear shortly.}

Monday, June 17, 2024

Inky Paws Challenge #225 ~ Sketch Challenge Reminder

 Hello there crafty friend!
 There's still time to play along with the Inky Paws Challenge 225 - Sketch Challenge! You have until this coming Friday, June 21st to get your entries in for this fun challenge and a chance to win a $20 store credit to Newton's Nook Designs!


This is such a fun sketch to play with. I was excited to try a coffee themed card for my reminder card.


I recently added the beautiful Heartfelt Coffee Stamp Set to my collection and I've been really wanting to ink it up. I love it! I ink smooshed a piece of Stampers Select White Card Stock from Papertrey Ink using Vintage Photo and Ground Espresso Distress Inks. I dried it completely with the Wagner Precision Heat Tool. I applied TE Anti Static Powder to the background. And then I stamped the heart shaped coffee stamp onto the ink smooshed background using Sugar Cube White Pigment Ink from Taylored Expressions. I dusted the background with Alabaster White Embossing Powder from Brutus Monroe and then melted the powder using my heat tool. I followed the same steps again but only partially stamping the heart so I could die cut the circle with the cup as my focal image.


I die cut the center of the heart using the coordinating Heart Frames Die Set. And then I die cut the circle using the Circle Frames Die Set. I wanted a thin mat for the circle so I just fussy cut it. I heat embossed the sentiment using the same steps I used for the Heartfelt Coffee Stamp Set only on Early Espresso Card Stock from Stampin' Up. I die cut it using the same heart die and adhered it over the heart.


I ink smooshed another 4-1/4 x 5-1/2" panel of Stampers Select White Card Stock using the Vintage Photo and Ground Espresso Distress Inks again. I left a lot of white space this time for some contrast. I die cut the ink smooshed background using the largest die from the Framework Die Set. I also die cut a scrap of white card stock using the same die. I adhered the postage die cut pieces to a white A2 top fold card base. I adhered the circle to the heart and then added foam tape to the back of both. I removed the backing and popped them up on the card. To make the cup on the circle pop a bit more, I watercolored it with ZIG Clean Color Real Brush markers using Mid Brown, Dark Brown, Light Carmine and a water pen to blend them a bit. So happy to have another birthday card in my stash!


Now it's your turn to get your paws inky with your Newton's Nook Designs products and create a project using the sketch. Be sure to link up to the Inky Paws Challenge! Can't wait to see your projects!


Thanks so much for stopping by!
See ya next time.

Inky Hugs,
Crystal


{Please note that comment moderation is on. Your lovely comment will appear once approved.}

Friday, June 14, 2024

{BYSHC} Sketch Challenge 46 ~ Winter Skies ~ Lawn Fawn

Hello there crafty friend!
I'm back with more inspiration for the {BYSHC} Sketch 46 over in the Build Your Stash Holiday Cardmakers Facebook group! Today I'm sharing a sweet Christmas card featuring the adorable Winter Skies stamp from our awesome sponsor, Lawn Fawn! Lawn Fawn has generously offered up a $25 gift card as a prize for the {BYSHC} Sketch Challenge 46 this month! So amazing!!


This month's sketch is so simple! I think it makes for a pretty quick card. I couldn't help myself I had to ink smoosh again. It's just so therapeutic creating a background just by smooshing some ink. I used Tumbled Glass, Wilted Violet, Chipped Sapphire and Black Soot Distress Inks for a pretty winter sky. I then ink blended a bit of the Chipped Sapphire Distress Ink over the background and ink smooshed some more Wilted Violet Distress Ink. It pairs up perfectly with the adorable Winter Skies stamp from Lawn Fawn. I dried the background completely with a Wagner Precision Heat Tool and then splattered white acrylic paint on the panel.


I die cut my ink smooshed panel using the Forest Borders dies. And then I placed the die back in the negative space of the panel and die cut a card front of Stampers Select White Card Stock. By lining up those two pieces of card stock at the top, I was able to line up the card stock and background so they'll fit back together like a puzzle and make just one layer on the card. I hope that makes sense. I'm trying to keep my layers minimal for some cards so I don't have to worry about extra postage when I mail them. The other option would be to just die cut the white card stock piece and adhere it over the ink smooshed background. Super easy, but it adds that partial layer. Before adhering the pieces together onto a white A2 top fold card base, I ran the ink smooshed background through my Big Shot with the Stitched Windy Backdrop die. You can see some of the fun stitches on the left side of the card. It's kind of hard to see them in the photos though. It's such a fun touch in person though!


I stamped the adorable bears on a scrap of white card stock. I colored them up with my Copic markers. I then die cut them using the coordinating die from the Winter Skies Lawn Cuts. I set the bears aside and stamped the sentiment from the Winter Skies onto my card front. I used an acetate grid sheet over the card to check the position and adjusted until I was happy. I added foam tape to the back of the bears and popped them up on the card. I like to use a thin foam tape from Scrapbook Adhesive. It gives a bit of dimension but it's not too bulky to mail the card in a regular A2 envelope. 

Here's a quick list of the Copic markers I used:
Left Bear: E53, E55, E57, E59
Right Bear: E51, E53, E55, E57
Scarf: B000, B02, B04, V01, V05, V06


Here's a look at {BYSHC} Sketch Challenge 46 for the month of June. I am really loving this sketch! I am also loving all the entries for this month's challenge. I hope you'll join us and play along with the sketch. If you're interested in seeing a bit more inspiration for this sketch, check out the amazing inspiration from the design team over on the {BYSH} Cardmakers blog! Lots of creative and sweet inspiration this month from the design team.


Thanks so much for stopping by!
See ya next time.

Inky hugs,
Crystal


{Please note that comment moderation is ON. Your lovely comment will appear shortly.}

Wednesday, June 12, 2024

Membership Wednesday ~ June 2024 Whit Kit Hydrangea Love ~ Unity Stamp Co.

  Hello there crafty friend!
Today I'm sharing a pretty card featuring the gorgeous hydrangea stamp from the June 2024 Whit Kit membership called Hydrangea Love from Unity. This gorgeous stamp was an absolute dream to color! So beautiful!


I stamped the Hydrangea Love flowers and sentiment on a piece of Stampers Select White Card Stock from Papertrey Ink using Black Amalgam Ink from Gina K. Designs. I loosely fussy cut the flower separating it from the sentiment. Before I started coloring the flowers with my Copic markers, I ink smooshed the flowers and leaves with a bit of Antique Linen Distress Ink. I wanted to see how the 'underpainting' of Antique Linen ink would change the look of the Copic coloring and I love the effect. I dried the flowers with a Wagner Precision Heat Tool and then I colored them up using my Copic markers.

Here's a quick list of the Copic markers I used:
Hydrangeas: RV91, RV93, RV95, BV23
Flower Centers: YG00, Y06, Y15, Y28
Leaves / Stem: YG91, YG95, YG97


I fussy cut the flowers along the line. I even cut through the bottom left flower and the leaf so that I could cut off that enclosed piece and open it up. The trick to doing that while fussy cutting is to cut in the center of the line so both images get some of the black line. And then very carefully color the edges of the whole image with the edge of a black marker from behind. Always from behind just in case the marker slips. I used a Memento Tuxedo Black marker. Coloring the edge cleans up the cutting and when it's adhered back together no one knows how you did it - unless you tell them, of course! LOL!


The background panel of Stampers Select Card Stock from Papertrey Ink was ink smooshed with Ground Espresso and Antique Linen Distress Inks. I left just a bit of white on the panel around the edges. I dried it with the Wagner Precision Heat Tool and then die cut the panel using the largest big scallops die from the recently released BIG Scallops & Rectangles {nesting dies}. I trimmed the sentiment and just adhered it directly across the card. I also adhered the flowers directly to the card. No foam tape for this one. I added a few enamel dots from my stash to finish off the card. I just love how this turned out!
 

And here's a look at the awesome Whit Kit membership! I am seriously loving the stamps in this month's kit. Well, that's it for me today! I hope you've been inspired to play with your membership stamps! Have an ink-redible day!


Thanks so much for stopping by!
See ya next time.

Inky Hugs,
Crystal


{Please note that comment moderation is on. Your lovely comment will appear once approved.}

Wednesday, May 22, 2024

Membership Wednesday ~ May 2024 BOM Grandma's Rose ~ Unity Stamp Co.

  Hello there crafty friend!
Today I'm sharing a super quick vintage card featuring the awesome background stamp from the May 2024 Background of the Month membership from Unity. This background reminds me of my grandparents couch when I was a kid. I just had to do a reddish pink hue to capture the color of their couch.


I ink smooshed a 4-1/4 x 5-1/2" piece of Kraft card stock from Papertrey Ink using Festive Berries and Tattered Rose Distress Oxide Inks. I completely dried the background using a Wagner Precision heat tool. And then I stamped the Grandma's Rose Background stamp using Vintage Photo Distress Ink. 


I die cut the Grandma's Rose background stamp using the largest die from the Scallops & Rectangles {nesting dies}. Adhered it to a 4-1/4 x 5-1/2" piece of Early Espresso Card Stock from Stampin' Up that I then adhered to a Kraft A2 top fold card base. I stamped the sassy vintage gal from Queen of the Universe. Love her sass! She actually reminds me of my Granny!


I went ahead and used the Vintage Photo Distress Ink to stamp the Queen of the Universe and the sentiment onto scraps of Kraft card stock. I die cut the queen using a die from the Deckle & Stitches Nesting Dies. I mat both pieces using scraps of the Early Espresso card stock. I adhered the sentiment overlapping the queen just a bit and then added foam tape to the back of both pieces. I removed the backing and popped them up on the card. I felt like the card needed a little something so I tied a pretty bow of Dark Chocolate 1/2" Satin Solid Ribbon from Papertrey Ink and adhered it to the card using a glue dot.
 

And here's a look at the awesome Background of the Month membership! So nostalgic! I love it! Well, that's it for me today! I hope you've been inspired to play with your membership stamps!
Have an ink-redible day!


Thanks so much for stopping by!
See ya next time.

Inky Hugs,
Crystal


{Please note that comment moderation is on. Your lovely comment will appear once approved.}

Friday, April 26, 2024

Spring into Christmas 2024 {BYSHC} Linky Party ~ The List Guy ~ Unity Stamp Co.

 Hello there crafty friend!
I'm sneaking in another card for the Spring into Christmas 2024 {BYSHC} Linky Party! I had a fun idea using one of my favorite holiday stamps, The List Guy, from our wonderful Sponsor Unity Stamp Co. and I just HAD to make it!


I ink smooshed my background using Twisted Citron, Evergreen Bough, and Mowed Lawn Distress Inks on Stampers Select White card stock from Papertrey Ink. I let it dry completely overnight. I heat embossed the wonderful Christmas All Around Background stamp, also from Unity using Wow Clear Embossing ink and Glory Gold Embossing powder from Stampin' Up. I die cut the background using the largest die from the Scallops & Rectangles {nesting dies}. And then I just had to add some splatters. I used Apple Barrel White Acrylic paint and the Mowed Lawn Distress Ink for my splatters. I let it dry and then adhered it using iCraft UltraBond Adhesive from our wonderful Sponsor Therm O Web to a white A2 top fold card base.


I stamped The List Guy and colored him up with some Copic markers. I fussy cut him on the line except around the fuzzy white parts I left a bit of a white border around those. And then I cut the edges with my Tim Holtz Tonic Guillotine Comfort Paper Trimmer. I added a bunch of 3D Foam Squares from our wonderful Sponsor Therm O Web and popped Santa up on the card. 

Here's a list of the Copic markers I used:

Skin: E000, E00, E11, E04
Beard / Fuzzy Trim: C00, C1, C3
Hat / Suit: R20, R14, R46
Belt: N0, N1, N3, N5, Y11, Y15, Y28
 

It took me a while to decide on a sentiment that would compliment the background and not be too big. I decided to go with the 'Merry Christmas' from the Gotta Love Sentiments, also from Unity. I heat embossed it on Green Parakeet card stock from Papertrey Ink. I also popped it up using the 3D Foam Squares.


I have had SO much fun playing along with the Spring into Christmas 2024 {BYSHC} Linky Party! So much fun that I just had to make another card. And I might have one more... it's not quite done yet so I'm not sure if I'll make the deadline. I hope that you'll stop by the Linky Party and check out the cards that have been linked up. Lots of fabulous inspiration!! Don't forget the Linky Party ends at 11:59pm PST tonight. Get those entries in! Have an ink-tastic day!


Thanks so much for stopping by!
See ya next time.

Inky Hugs,
Crystal


{Please note that comment moderation is ON. Your comment will appear shortly.}

Wednesday, April 17, 2024

Membership Wednesday ~ April 2024 KOM & BOM ~ Unity Stamp Co.

  Hello there crafty friend!
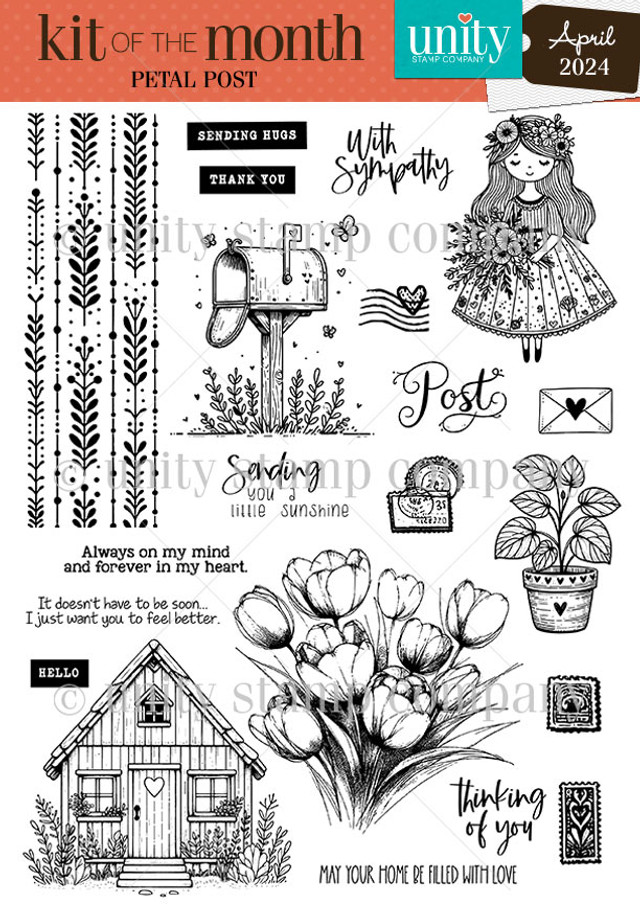
Today I'm sharing a sweet card featuring the beautiful house stamp from the April 2024 Kit of the Month membership along with the awesome April 2024 Background of the Month membership... both from Unity. I wasn't lying when I said I thought I'd play with this month's KOM again! Loving all the fab stamps in the kit!


I stamped the house on a large scrap of Stampers Select White Card Stock from Papertrey Ink using Black Amalgam Ink from Gina K. Designs. I also stamped the background on a card front measuring 4-1/4 x 5-1/2" and stamped the sentiment on a scrap of card stock. I colored up the house using my Copic markers. Fussy cut it on the line around the house and leaving a bit of a border around the plants.

Here's a quick list of the Copic markers I used:

House: BG000, BG02, BG05, E21, E23
Trim: E21, E23, E25, E27
Roof / Stairs: N1, N3, N5
Window: Y11, Y15
Plants / Grass: YG11, G23


I had planned on Copic coloring the houses in the background stamp, as well, but last minute decided to ink smoosh with similar colors to the house. I used Vintage Photo and Peacock Feathers Distress Ink. In retrospect, I kinda wish I had done a different color combo so the house would pop a bit more on the background. What do you think? I die cut the background using the largest stitched die from the Scallops & Rectangles {nesting dies}. I also die cut a scalloped and stitched rectangle from True Black card stock using the largest die from the same die set.


To help the house pop a bit, I die cut a stitched circle from Vellum card stock using a die from the Scallops & Circles {nesting dies}. Adhered it to the background just in the center of the circle using liquid glue. I die cut the sentiment and a black mat using dies from the Scalloped & Stitched Sentiment Nesting Dies. Adhered the sentiment to the bottom of the house and popped them up using a bunch of foam tape.
 

Here's a quick look at this month's Kit of the Month membership! LOVE!! So many fabulous stamps this month! I want to ink them all up!


And here's a look at the awesome Background of the Month membership! Such a fun stamp!

 Well, that's it for me today! I hope you've been inspired to play with your membership stamps!
Hope you have an ink-tastic day!


Thanks so much for stopping by!
See ya next time.

Inky Hugs,
Crystal


{Please note that comment moderation is on. Your lovely comment will appear once approved.}

Wednesday, March 27, 2024

Membership Wednesday ~ March 2024 BOM & UU ~ Unity Stamp Co.

  Hello there crafty friend!
Today I'm sharing a fun coffee card featuring the fabulous March 2024 Background of the Month membership along with the awesome coffee cup stamp from the March 2024 Uniquely Unity membership from Unity. These stamps were made for each other!!


I ink smooshed a 4-1/4 x 5-1/2" piece of Stampers Select White Card Stock from Papertrey Ink using Antique Linen and Vintage Photo Distress Oxide Inks. Once I was happy with my ink smooshed background, I stamped the awesome Global Brew background stamp using Ground Espresso Distress Oxide ink. I cleaned off my stamp and also inked it up with the Antique Linen oxide ink but just at a diagonal across the stamp. I love how it gives a distressed look to the background.


I die cut the background using the largest die from the Scallops & Rectangles {nesting dies}. I stamped the coffee ring and coffee bean a few times on the background using Vintage Photo Distress Oxide ink. I adhered the background to a white A2 top fold card base. 

I stamped the Thanks A Latte cup on white card stock using the Ground Espresso Distress Oxide ink. I smooshed the Salvaged Patina Distress Oxide ink pad on my round acrylic block and used my water pen to pull some ink and color the coffee cup. Since I stamped on white card stock and not watercolor paper, I didn't use a lot of water and I only went over the cup once with the ink. I then put my panel back in my stamp platform and stamped it again with the Ground Espresso Distress Oxide ink. This made any of the stamped areas that ran a bit with the water nice and crisp again. I fussy cut the cup and popped it up using a bunch of foam tape.


I die cut a scrap piece of white card stock using a die from the Scallops & Banners {nesting dies} and stamped the sentiment using the Ground Espresso oxide ink. I used an acetate grid to help me with placement. I had to shift the stamp a couple of times to get it just right. I adhered the sentiment directly to the card and trimmed off the excess from the top.


Here's a quick look at the Background of the Month membership this month! Love it! 


Here's a quick look at this month's Uniquely Unity membership! So amazing!

 Well, that's it for me today! Hope you have an ink-tastic day!


Thanks so much for stopping by!
See ya next time.

Inky Hugs,
Crystal


{Please note that comment moderation is on. Your lovely comment will appear once approved.}

Thursday, February 29, 2024

Unity Lovers ATC ~ Galentines ~ Unity Stamp Co.

Hello there crafty friend! 
I know that Galentines and Valentine's Day are well passed us but I just wanted to share the Galentines ATCs that I made for the Unity Lovers ATC swap. I used a whole bunch of Unity goodies to make these ATCs. It's always so much fun to turn on one of my audible e-books and get inky while I listen. Often times I can remember bits of the story that I listened to when I look at the projects I was working on. In fact, I remember I was listening to Divine Rivals by Rebecca Ross. I really enjoyed this book... a bit of romance, some fantasy and magic all during a time of war between gods. A really good read!


I started with two full sheets of Distress Watercolor Card Stock from Ranger measuring 8-1/2 x 11". I ink smooshed Lost Shadow, Spun Sugar, Picked Raspberry, Vintage Photo, and Speckled Egg Distress Oxide inks on each sheet. I dried the card stock completely with a heat tool. Stamped the cute hearts from Mousing Around: Hiya Pal all over the card stock using Speckled Egg, Ground Espresso, and Picked Raspberry. I wasn't thinking about the direction of the hearts and how I'd need to cut the card stock for the ATCs. So I ended up needing to ink smoosh another full sheet of card stock. Ooops! I splattered all three sheets using Tarnished Brass Mica Spray and Picket Fence Spray Stain and cut them up into ATCs. And then I distressed the edges with Vintage Photo Distress Oxide ink.


I stamped the distressed hearts from A Little Grunge Love using Picked Raspberry Distress Oxide ink and lightly blended some Kitsch Flamingo Distress Oxide ink over them. I also stamped the 'love' sentiment from Winter Cheer and Deer using the same Picked Raspberry ink. I fussy cut each of the hearts and the 'love' sentiments. Oy... that took some time! I think my eyes went a bit cross eyed once or twice! LOL!


And then I die cut Early Espresso card stock from Stampin' Up using the Unity {metal die}... I die cut 36 of those babies! {Sadly, I'm not seeing this die on the website right now... it must be out of stock}. Adhered two together using my new favorite Bearly Art Precision Craft Glue. I love this glue for die cut sentiments! The fine tip is amazing and I haven't had an issue with clogging. All that was left to do was adhere the sentiments to the ATCs and I popped up the hearts with foam tape. I did shift the placement of the popped up hearts depending on the ATC. I didn't want to cover up all the pretty hearts in the background. So the cards aren't quite identical but they are pretty close!

That's it for me today! Have an ink-tastic day!

Thanks so much for stopping by!
See ya next time.

Inky hugs,
Crystal

{Please note that comment moderation is on. Your lovely comment will appear shortly.}

Sunday, January 21, 2024

Over the Rainbow Background with Anna Girl ~ Unity Stamp Co.

Hello there crafty friend! 
I got inky again with some fun stamps that haven't seen ink! Love when I can do that! I played with the Over the Rainbow background stamp and Anna Girl for a fun rainbow filled love card.


I recorded most of my card making process for this one. I did forget to hit record when I stamped the background stamp on the ink smooshed background. Ooopsie! Anywho, the ink smooshed background was created with Candied Apple, Carved Pumpkin, Mustard Seed, Mowed Lawn, Salty Ocean and Wilted Violet Distress Oxide inks. I stamped the Over the Rainbow background over the dried ink smooshed background with Black Amalgam ink. And then I die cut the ink smooshed background with the largest stitched die from the Scallops & Rectangles {nesting dies}.


Anna Girl and the sentiment were also stamped with Black Amalgam ink. I did a mix of paper piecing and copic coloring for Anna Girl. The bottom portion of her dress is paper pieced and adhered using the Bearly Art Precision Craft Glue. Such a fun way to mix things up! I fussy cut Anna Girl leaving a skinny white border around her.

Here's a quick list of the Copic Markers I used:

Skin: E000, E00, E11, E04
Hair: Y21, YR27, E25
Top of Dress: V000, V12, B91, B93
Jeans: B91, B93, B95, B97
Shoes: E21, E25
Hearts: R00, R20, R14, R46


I adhered the rainbow background to a 4-1/4 x 5-1/2" card front of True Black card stock from Papertrey Ink that I adhered to an A2 top fold card base of Stampers Select White card stock also from Papertrey Ink. I adhered the trimmed sentiment to the bottom of the card and adhered Anna Girl grounding her with the sentiment. And then I finished off the card with a few black enamel dots from the Travelers Notebook Enamel Dots from Echo Park Paper Co.

You can check out my process for this card {or atleast most of it} here... Spread Love | Over the Rainbow Background with Anna Girl | Unity Stamp Co.


 That's it for me today! I hope you've found some inspiration for this wonderful combination of stamps. Have an ink-tastic day!

Thanks so much for stopping by!
See ya next time.

Inky hugs,
Crystal

{Please note that comment moderation is on. Your lovely comment will appear shortly.}