Showing posts with label houses. Show all posts

Wednesday, December 11, 2024

Membership Wednesday ~ December 2024 WK Joyous Village ~ Unity Stamp Co.

  Hello there crafty friend!
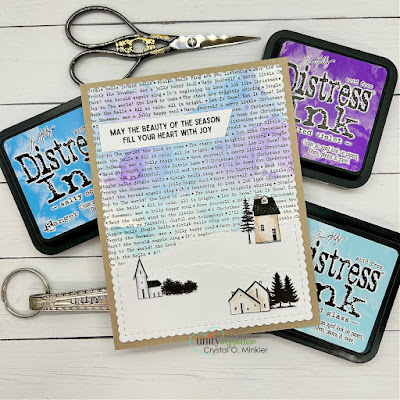
Today I'm sharing a sweet holiday card featuring the adorable little houses and church stamps from the December 2024 Whit Kit membership from Unity called Joyous Village. 


These adorable little houses and church are just TOO cute! I stamped them with Black Amalgam ink from Gina K. Designs and colored them very simply with Copic markers. I fussy cut the buildings on the line and cut the trees and bushes leaving a bit of a white border around them.  

Here's a quick list of the Copic markers I used:
House Top Right: E0000, E31
Church Mid Left: C00, C1
House Bottom Right: E40, E31


I ink smooshed a fun background over the A Little Christmas Carol Background stamp that I had stamped on Canson XL watercolor paper with Black Amalgam ink and dry set with a Wagner Precision Heat Tool. I ink smooshed with Tumbled Glass, Shaded Lilac, Wilted Violet and Salty Ocean Distress Inks.


I die cut the ink smooshed background using the largest die from the Scallops & Rectangles {nesting dies}. I also die cut a piece of white card stock. I tore the white layer in half and then stacked those pieces on the bottom to create my snowy hills. All the layers are adhered to a Kraft A2 top fold card base.


Here's a quick look at this month's Whit Kit membership! Isn't is glorious!

Well, that's it for me today! I hope you've been inspired to play with your membership stamps! 
Hope you have an inkcredible day!


Thanks so much for stopping by!
See ya next time.

Inky Hugs,
Crystal


{Please note that comment moderation is on. Your lovely comment will appear once approved.}

Saturday, November 2, 2024

~ Friends of Unity November 2024 Blog Hop ~

Hello there crafty friend!
It's time for our Friends of Unity Blog Hop!! This month's cue is perfect for this time of year. With Thanksgiving on the horizon, I find myself reflecting on the year and I'm very grateful for many things and for many people. Particularly, the fabulous ladies that are on the Friends of Unity team. They are all amazingly talented and beautiful ladies and friends. And speaking of our fabulous friends, we have a new friend joining us.... please stop by Toni Tessler's blog and be sure to give her a great big welcome! I am so excited to have Toni join our team! Now, onto our cue this month...


This month's cue is Gratitude, as I eluded to above. Isn't this graphic just so lovely?! I love all the elements!


First up is a fun Fall card with an adorable bunny. I used the super cute Hoppy Fall stamps. Such a cute bunny! I love it!


Inspiration for my card came from the Tawny Owl Paperie Inky Inspiration Sketch 27. This is from the brand new sketch challenge that just started in my Tawny Owl Paperie Inky Inspiration Facebook group. I think it's a fun one for those larger pieces of scrap pattern paper.


I used three scraps of pattern paper from the beautiful Enrich the Soul {paper pack}. They're just adhered directly to a Kraft A2 top fold card base.

Here's a quick list of the Copic markers I used to color up the bunny:
Bunny: E000, E30, E31, E23, R00, R20
Hat / Sweater: C00, C1, YR21, YR15, YR16
Leaves: E31, E23, YG61, YG63, YR21, YR15


The fun sentiment is heat embossed on Kraft card stock from Papertrey Ink with Sugar Cube Pigment Ink from Taylored Expressions and Alabaster White Embossing Powder from Brutus Monroe. I trimmed it up and popped it up with foam tape.


Next up, I really wanted to use one of the house stamps from the gorgeous Warm Wishes for Your Home stamps! I adore this beautiful stamp! I thought it would be lovely for a Fall card.

Here's a quick list of the Copic markers I used to color the house on Kraft card stock:
Roof: N2, N4, N6
House: E31, E53, E55, E57
Chimney: E53, E55, E57, N2, N4, N6
Shutters / Door: R20, R14, R27
Windows: YR21, C1
Wreath: YR21, YR15, YR16
Trees: YG61, YG63
Pots: BG70, BG72, BG75
Background: C00, C1, C3


I paired it up with a lovely pattern paper from the Thankful & Blessed Pumpkins {paper pack}. I love how the dark background makes the house pop! Both the house and the pattern papers are die cut using dies from the Deckle & Stitches Nesting Die Set.


It's kind of hard to see but I added some copper thread behind the house. I heat embossed the sentiment with Wow Clear Embossing Ink and Penny Embossing Powder from Brutus Monroe. The sentiment and house layer are adhered together and then popped up on the card with foam tape.


And for my last project this month, I made a tag. I received some beautiful tags in an order awhile ago. It was actually a cut apart sheet of tags. I can't remember when I got them but I've been wanting to use them. I cut one of the tags and tore off the top. I stamped a Kraft tag with Vintage Photo Distress Ink using the Rustic Foliage background stamp. I ink smooshed it with Mustard Seed Distress Ink and distressed the edges of the Kraft tag with Antique Linen Distress Ink.


Ooops... just realized I forgot ribbons! Ugh... that's the second time this week! Oh well. I distressed the edges of the cut apart tag using Vintage Photo Distress Ink. I stamped the beautiful pumpkin from Pumpkin Spice Please and colored it up with my Copic markers. 

Here's a quick list of the Copic markers I used:
Pumpkin: YR21, YR15, YR27, E53, E55, E57
Coffee Cup: C00, C1, Y11, Y15, Y17, R14
Brown Leaf: E53, E55, E57
Orange Leaf: YR21, YR15, YR16, R14
Green Leaves: YR61, YR63


I heat embossed the sentiment from the Bountiful Fall stamps {sadly, it looks like this is retired} using Sugar Cube White Pigment Ink from Taylored Expressions with Alabaster White Embossing Powder from Brutus Monroe and melted it with a Wagner Precision Heat Tool. The sentiment is trimmed and popped up on the tag with foam tape. I finished off the tag with three gold pieces of confetti from the Hologram Gold Card Bling from A Colorful Life Designs.

Now before we get to the hopping, I chose a lucky winner from the comments on last month's hop to win a fun prize and the lucky winner is...


... Vannessa Osbourn!! Congratulations, Vannessa!! Please email me at crystalominkler@gmail.com to claim your prize. Please claim the prize before December 4th, 2024. 

Well, that's it for me this time! Please hop along and enjoy some more inspiration from the Friends of Unity! I can't wait to see how our friends were inspired by this month's cue. I will be doing another fun giveaway this month!! Be sure to hop along and comment for a chance to win. {When you comment please leave your name just in case it posts as anonymous.} I'll announce the winner next month! 


Let's get to the hopping...

Crystal <--- you're here

up next ---> Kari


Thanks so very much for supporting our little hop!
We appreciate you so much!!

See ya next time.

Inky Hugs,
Crystal


{Please note that comment moderation is ON. Your comment will appear shortly.}


Wednesday, April 17, 2024

Membership Wednesday ~ April 2024 KOM & BOM ~ Unity Stamp Co.

  Hello there crafty friend!
Today I'm sharing a sweet card featuring the beautiful house stamp from the April 2024 Kit of the Month membership along with the awesome April 2024 Background of the Month membership... both from Unity. I wasn't lying when I said I thought I'd play with this month's KOM again! Loving all the fab stamps in the kit!


I stamped the house on a large scrap of Stampers Select White Card Stock from Papertrey Ink using Black Amalgam Ink from Gina K. Designs. I also stamped the background on a card front measuring 4-1/4 x 5-1/2" and stamped the sentiment on a scrap of card stock. I colored up the house using my Copic markers. Fussy cut it on the line around the house and leaving a bit of a border around the plants.

Here's a quick list of the Copic markers I used:

House: BG000, BG02, BG05, E21, E23
Trim: E21, E23, E25, E27
Roof / Stairs: N1, N3, N5
Window: Y11, Y15
Plants / Grass: YG11, G23


I had planned on Copic coloring the houses in the background stamp, as well, but last minute decided to ink smoosh with similar colors to the house. I used Vintage Photo and Peacock Feathers Distress Ink. In retrospect, I kinda wish I had done a different color combo so the house would pop a bit more on the background. What do you think? I die cut the background using the largest stitched die from the Scallops & Rectangles {nesting dies}. I also die cut a scalloped and stitched rectangle from True Black card stock using the largest die from the same die set.


To help the house pop a bit, I die cut a stitched circle from Vellum card stock using a die from the Scallops & Circles {nesting dies}. Adhered it to the background just in the center of the circle using liquid glue. I die cut the sentiment and a black mat using dies from the Scalloped & Stitched Sentiment Nesting Dies. Adhered the sentiment to the bottom of the house and popped them up using a bunch of foam tape.
 

Here's a quick look at this month's Kit of the Month membership! LOVE!! So many fabulous stamps this month! I want to ink them all up!


And here's a look at the awesome Background of the Month membership! Such a fun stamp!

 Well, that's it for me today! I hope you've been inspired to play with your membership stamps!
Hope you have an ink-tastic day!


Thanks so much for stopping by!
See ya next time.

Inky Hugs,
Crystal


{Please note that comment moderation is on. Your lovely comment will appear once approved.}

Wednesday, March 20, 2024

Membership Wednesday ~ March 2024 KOM Love & Good Vibes ~ Unity Stamp Co.

  Hello there crafty friend!
Today I'm sharing a super simple mini slimline card featuring the beautiful sweet home stamp from the March 2024 Kit of the Month membership from Unity. I've had this quick card idea in mind since I saw the stamp. This would be a sweet card for someone who just moved or bought a home. 


I stamped the sweet home stamp on Stampers Select White Card Stock from Papertrey Ink using Black Amalgam Ink from Gina K. Designs. I wanted to keep it simple so I just used a few colors of Copic markers to color it up.

Here's a quick list of the Copic markers I used:

Pink: RV10, RV13, RV04
Blue: B000, B00, B02
Leaves: YG11, YG23
Flower Centers: Y06, Y15, Y35


I die cut the colored panel using the Pleated Lace Mini Slimline Die from Gina Marie Designs. I also die cut the mat using the next largest die from Tempting Turquoise Card Stock from Stampin' Up. I considered doing another layer of maybe yellow... but I really like the simple Kraft in the background. It's a 6-1/2 x 7" mini slimline card base scored at 3-1/2" for a 6-1/2 x 3-1/2" mini slimline card.


I also considered using another sentiment to compliment the card but decided to keep it as is. I can add one later if I need to but I really think it's perfect as is. The die cut layers are adhered together and then I added a bunch of foam tape to the back and popped the panel up on the card base. Such a super quick and easy card!
 

Here's a quick look at this month's Kit of the Month membership! So amazing!

 Well, that's it for me today! Hope you have an ink-tastic day!


Thanks so much for stopping by!
See ya next time.

Inky Hugs,
Crystal


{Please note that comment moderation is on. Your lovely comment will appear once approved.}

Friday, September 15, 2023

{BYSHC} Sketch Challenge 37 ~ Candy Cane Lane ~ Doodlebug Design Inc.

Hello there crafty friend!
I'm back with another Christmas card for the {BYSHC} Sketch Challenge 37 for the Build Your Stash Holiday Cardmakers Facebook group. Today I'm sharing three quick cards for this month's challenge. My card today features papers and ephemera from Doodlebug Designs... this time I used the Candy Cane Lane Collection!


I found three pattern papers from the Candy Cane Lane 6x6 Paper Pad with very simple designs and basically just one color. I chose the red with the simple snow dots, the white snowflakes, and the pink hearts. I cut these to 5-1/2 x 4-1/4" and adhered each of them to a white A2 top fold card base.


These were such quick cards! I honestly spent more time trying to find my corner rounder punch... which is still missing! I finally settled on using the Slash Stitched Round Rectangle dies from Gina Marie Designs. I die cut the holly, snowflake and house pattern papers using two different dies from that set. I adhered them to the card bases.  


I also adhered the sentiments from the Candy Cane Lane Chit Chat Pack. I added foam tape to the back of each of the die cut (ephemera) pieces from the Candy Cane Lane Odds & Ends Pack (snowman and Santa) and the Candy Cane Lane Chit Chat Pack (house). I popped them each up on the cards.


And to finish them all off I added a couple Let It Snow Shape Sprinkles. Still trying to finish off that pack. I think I have 5 or maybe 6 left. Three cute cards and it was so fun to turn the sketch for the pink card. 


Here's another look at {BYSHC} Sketch Challenge 37 for the month of September. There's still a couple weeks to play along with this challenge! If you're interested in seeing a bit more inspiration for this sketch, check out the amazing inspiration from the design team over on the {BYSH} Cardmakers blog!


Thanks so much for stopping by!
See ya next time.

Inky hugs,
Crystal


{Please note that comment moderation is ON. Your lovely comment will appear shortly.}

Wednesday, March 1, 2023

Membership Wednesday ~ Rainbow Slimline ~ March 2023 Kit of the Month ~ Unity Stamp Co.

 Hello there crafty friend!
I'm back again today to share a rainbow slimline card using the amazing new March 2023 Kit of the Month from Unity Stamp Co. Ohhh... this kit is so awesome!! You are going to love it! I just couldn't wait to ink up the houses in the kit.


I stamped them twice with Black Amalgam ink for a fun slimline card! My rainbow inspiration is actually from one of our vacations. We visited a place that had these cool rainbow houses going down the street. I can't recall the vacation or the area now... lol. Oh my memory!! But I thought it would be fun to color up the houses in a rainbow. 


These houses have a lot of detail!! I just focused my Copic coloring to corners and tried to add dimension with darker shades of Copic markers where I thought portions of the house were in the background. I think it turned out pretty. I trimmed my slimline panel to 7-7/8 x 2-7/8" and adhered it to a kraft die cut from the Scalloped Stitched Slimline dies from Gina Marie Designs. The panel was then adhered to a white slimline card base measuring 8-1/2 x 7"; scored at 3-1/2".


The clouds are also in this kit and I adore them!! They have wonderful detail and the trio are perfect to use for a scene card. I added a bit of color to the bottoms with some cool grey markers. And I did fussy cut them and cleaned up the edges by coloring them with a Memento Tuxedo black marker. Here's a quick list of the Copic markers I used:

Red House ~ R20, R14, R27
Orange House ~ YR21, YR15, YR16
Yellow House ~ Y11, Y15, Y35
Green House ~ YG11, YG23, G14
Blue House ~ B000, B00, B02
Indigo-ish House ~ BG10, BG23, BG49
Violet House ~ V000, V01, V12, V15
Pink House ~ RV10, RV21, RV14
Yellow-Orange House ~ Y11, Y06, YR15
Blue-Green House ~ B000, BG10, BG23
Windows ~ Y06
Sky ~ B0000, B000, B00
Grass ~ YG11, YG23, G14


Here's a look at the whole Kit of the Month for March!! So perfect and wonderful! Can you believe that you get a full sheet of rubber for only $45. That includes shipping! You also get a $6.95 discount on every order from Unity over $45. And you can purchase any past kits for only $34 plus shipping. Such a great value! I can't wait to ink up those gorgeous butterflies!!

I hope to see you next week for another Membership Wednesday blog post. I'll be sharing inspiration for the amazing Background of the Month.


Thanks so much for stopping by!
See ya next time.

Inky Hugs,
Crystal


{Please note that comment moderation is on. Your lovely comment will appear once approved.}