Showing posts with label #slimline. Show all posts

Saturday, November 4, 2023

~ Friends of Unity November 2023 Blog Hop ~

Hello there crafty friend!
It's time for our Friends of Unity Blog Hop!! 
This month's cue is so much fun! I've been looking forward to it for some time. I hope you'll hop along with us and enjoy some wonderful inspiration from our friends!


Slimline is our cue this month! 
I've been making slimline cards for years and years... even before they became a huge trend. I love these big cards. There's just so much room to play.


So excited to play with the gorgeous new Poinsettia Poetry. I ink smooshed my 8-1/2 x 3-1/2" piece of Kraft card stock using Candied Apple and Lumberjack Plaid Distress Oxide inks. I didn't cover the whole panel so Kraft peeked out a bit here and there. I stamped the background several times with the postmark stamp. I also stamped the poinsettia in black on the panel.


I stamped the poinsettia three more times on Kraft card stock. I copic colored each of them using YG11, G24, and G46. I love the muted look of the green copics on the Kraft card stock. I fussy cut each of the poinsettias cutting different layers for each and then cleaned up the edges by coloring them with a Memento Tuxedo Black marker. I popped them up on each other using foam tape giving the poinsettia lots of dimension.


I adhered the poinsettia to the panel over top of the stamped poinsettia and did a bunch of white acrylic paint splatters. Trimmed the panel {approx. 1/8" off of each side} and mat it on a 8-1/2 x 3-1/2" piece of True Black card stock. And then adhered it to a Kraft card base measuring 8-1/2 x 7"; scored at 3-1/2". I stamped the sentiment, trimmed it and popped it up on the card with foam tape. Loving how this one turned out!


My second card is a mini slimline featuring the adorable Whisker Watch Silhouette. One of the adorable stamps just released for Brown Thursday!!! I stamped the sweet kitty silhouette on a 3-1/2 x 6-1/2" piece of white card stock using Black Amalgam ink. 


I blended a few fun Copic Markers on my background to create a pretty sunset. It looks kind of like a rainy sunset with the streaks I created with the colorless blender. I reminds me of our sweet Quinn watching the rain the other day. I used Y000, Y06, YR21, V0000, V000, V12, B0000, B02, BV34, BV17 {from bottom to top}.


The panel was die cut using the Wonky Stitched Mini Slimline die from Gina Marie Designs. The cute sentiment is from the awesome new Snarky Cat Thoughts. The sentiment was die cut using a die from the Scalloped & Stitched Sentiment Nesting Dies. I adhered the panel to a piece of True Black card stock measuring 3-1/4 x 6-1/4". The panel was then adhered to a white mini slimline card base measuring 7 x 6-1/2"; scored at 3-1/2". I finished off the card with a few black enamel dots.


I can't CAT even... LOL! These kitties crack me up!! Hahaha! I just love them so. This card didn't quite turn out how I imagined but the sentiment is just how I imagined and I LOVE IT!! LOL!! The sentiment is from the hilarious Snarky Cat Thoughts. I stamped out all the kitties from the Scaredy Cats using Black Amalgam ink {I didn't end up using one of the kitties}. I colored them pretty simply with my Copic Markers - W00, W1, W3, N0, N1, N3, C00, C1, C3, R00, and R20. I fussy cut them all and tidied up the edges by coloring them with my black marker.


This slimline is 8-1/2 x 3-1/2" so I decided to look through my 12 x 12" pattern papers. I never seem to use them and I have a TON so this was a great excuse to use some. This is the Tranquil Textures DSP from Stampin' Up. I also grabbed a slimline die called Slim Edgers from Pinkfresh. I die cut an edge in the pattern paper and in a piece of Tranquil Tide card stock. Adhered them together so the card stock peeked out of the top. I thought it would be a fun way to ground the kitties.


I adhered all the kitties like they're sitting on a couch cushion. I don't know. It didn't quite turn out how I envisioned but I think it's fun.

Now before we get to the hopping, I chose a lucky winner from the comments on last month's hop to win a fun prize and the lucky winner is...


... Denise Bryant!! Congratulations Denise!!
Please email me at crystalominkler@gmail.com to claim your prize. 
Please claim the prize before November 29th. 

Well, that's it for me this time! Please hop along and enjoy some more inspiration from the Friends of Unity! I'm so excited to hop and check out the slimline cards that our friends created. I will be doing another fun giveaway this month!! Be sure to hop along and comment for a chance to win. {When you comment please leave your name just in case it posts as anonymous.} I'll announce the winner next month! 


Let's get to the hopping...

Crystal <--- you're here

up next ---> Jane


Thanks so very much for supporting our little hop!
We appreciate you!!

See ya next time.

Inky Hugs,
Crystal


{Please note that comment moderation is ON. Your comment will appear shortly.}


Wednesday, March 1, 2023

Membership Wednesday ~ Rainbow Slimline ~ March 2023 Kit of the Month ~ Unity Stamp Co.

 Hello there crafty friend!
I'm back again today to share a rainbow slimline card using the amazing new March 2023 Kit of the Month from Unity Stamp Co. Ohhh... this kit is so awesome!! You are going to love it! I just couldn't wait to ink up the houses in the kit.


I stamped them twice with Black Amalgam ink for a fun slimline card! My rainbow inspiration is actually from one of our vacations. We visited a place that had these cool rainbow houses going down the street. I can't recall the vacation or the area now... lol. Oh my memory!! But I thought it would be fun to color up the houses in a rainbow. 


These houses have a lot of detail!! I just focused my Copic coloring to corners and tried to add dimension with darker shades of Copic markers where I thought portions of the house were in the background. I think it turned out pretty. I trimmed my slimline panel to 7-7/8 x 2-7/8" and adhered it to a kraft die cut from the Scalloped Stitched Slimline dies from Gina Marie Designs. The panel was then adhered to a white slimline card base measuring 8-1/2 x 7"; scored at 3-1/2".


The clouds are also in this kit and I adore them!! They have wonderful detail and the trio are perfect to use for a scene card. I added a bit of color to the bottoms with some cool grey markers. And I did fussy cut them and cleaned up the edges by coloring them with a Memento Tuxedo black marker. Here's a quick list of the Copic markers I used:

Red House ~ R20, R14, R27
Orange House ~ YR21, YR15, YR16
Yellow House ~ Y11, Y15, Y35
Green House ~ YG11, YG23, G14
Blue House ~ B000, B00, B02
Indigo-ish House ~ BG10, BG23, BG49
Violet House ~ V000, V01, V12, V15
Pink House ~ RV10, RV21, RV14
Yellow-Orange House ~ Y11, Y06, YR15
Blue-Green House ~ B000, BG10, BG23
Windows ~ Y06
Sky ~ B0000, B000, B00
Grass ~ YG11, YG23, G14


Here's a look at the whole Kit of the Month for March!! So perfect and wonderful! Can you believe that you get a full sheet of rubber for only $45. That includes shipping! You also get a $6.95 discount on every order from Unity over $45. And you can purchase any past kits for only $34 plus shipping. Such a great value! I can't wait to ink up those gorgeous butterflies!!

I hope to see you next week for another Membership Wednesday blog post. I'll be sharing inspiration for the amazing Background of the Month.


Thanks so much for stopping by!
See ya next time.

Inky Hugs,
Crystal


{Please note that comment moderation is on. Your lovely comment will appear once approved.}

Wednesday, December 21, 2022

Advent Calendar Day 19, 20 & 21 ~ Mini Slimline Card ~ Unity Stamp Co.

Hello there crafty friend!
I'm getting a bit caught up with the Unity 2022 Advent Calendar sharing a few mini slimline cards using the Day 19, Day 20, and Day 21 stamps. I've teamed up with Echo and Sandhya to do a little reveal and project on our YouTube channels using the fantastic Advent Calendar from Unity Stamp Co!! Please be sure to subscribe to our channels so you don't miss a day of this fun series!


Day 19 ~ pretty hanging herbs.

I've paired up these mini slimline cards with the The Secret of Change {paper pack} from Unity.


Day 20 ~ a pretty envelope

I also used the So Kind, So Caring, So You {July 2022 Sentiment Kit} for the sentiments. And colored up the stamped images with the following Copic markers: Y23, Y26, G12, G29, RV0000, RV32, RV34, C00, C2.


Day 21 ~ a beautiful butterfly

I also used the Scallops & Circles {nesting dies} from Unity. 
The cute die cut circles and the sentiments are popped up with crafty foam tape. A simple mini slimline design for these beautiful stamps!

You can check out my process video here... Unity Advent Calendar Days 19-21.


I'll be back tomorrow with inspiration for the All About Backgrounds challenge in the Unity Show & Tell and I've used the sweet Day 22 stamp from the Advent Calendar! Hope you'll come back to check out my cute card!


Thanks so much for stopping by!
See ya next time.


Inky Hugs,
Crystal


{Please note that comment moderation is ON. Your comment will appear shortly.}

Saturday, November 26, 2022

Bookmark Pocket Slimline Card ~ Winnie the Pooh: Enjoy the Day, Pooh ~ Unity Stamp Co.

 Hello there crafty friend!
Today is the last day for the Black Friday sale over at Unity Stamp Co!! I don't know about you but each addition to the Winnie the Pooh stamps has been a must have for me!! I couldn't wait to play with the new Enjoy the Day, Pooh!! Who doesn't love a cute picnic stamp!? 


This fun bookmark pocket slimline card would make a fun little gift for a book loving friend. I made the bookmark using a slimline die from Pinkfresh Studio called Slim Ornate Banner. I punched a hole on the top with a handy Crop-a-Dile... anyone else still have one of these in their stash? I added a couple pretty ribbons and tied them off with {Natural} May Arts Burlap string.


To make the pocket on the card I die cut two pieces of pattern paper from the Apple Pickin' {paper pack} from Unity using the . I trimmed them to fit on the 8-1/2 x 3-1/2" card base leaving a skinny border of Spring Moss card stock from Papertrey Ink. I adhered those layers together and then also die cut a piece of Vellum card stock, also from Papertrey Ink. I trimmed it to the same size as the light green pattern paper. I adhered it along the outer edges with Plus Vellum glue tape {not sure of the actual brand... this was a gift from a crafty friend}. 


How cute is this picnic stamp, though?! I believe this is another wonderful illustration by Angie Blom. I just love her stamps so much!


I tried to keep the Copic coloring for this pretty simple and just used two Copic markers for each image with exception to Piglet's sweater and the picnic blanket... I think I used three markers for those. I know some that are new to Copics get intimated by all the markers... I did when I was just starting out so I hope showing how easy it is with just a couple markers to achieve nice shading will help some of you take the leap and give Copics {or the other alcohol markers} a try. Here's a list of the Copic markers I used:

Skin ~ E00, E11
Hair ~ E30, E33
Pooh / Shirt ~ Y11, Y15
Shorts ~ B00, B12
Honey Pot ~ R20, R14
Piglet ~ RV10, RV21, RV14
Dishes ~ B000, B00
Cookies ~ E33, E35
Picnic Blanket ~ YG91, C00, YG95
Flowers ~ Y15, RV21
Grass ~ YG03, YG11
Rock ~ N1, N4
Book / Socks ~ C00, C2
Shoes ~ N4, N6


Head over to Unity and check out all the fab new releases... and the wonderful Black Friday deals!!! 


Thanks so much for stopping by!
See ya next time.

Inky hugs,
Crystal


{Please note that comment moderation is on. Your lovely comment will appear once approved.}

Thursday, June 30, 2022

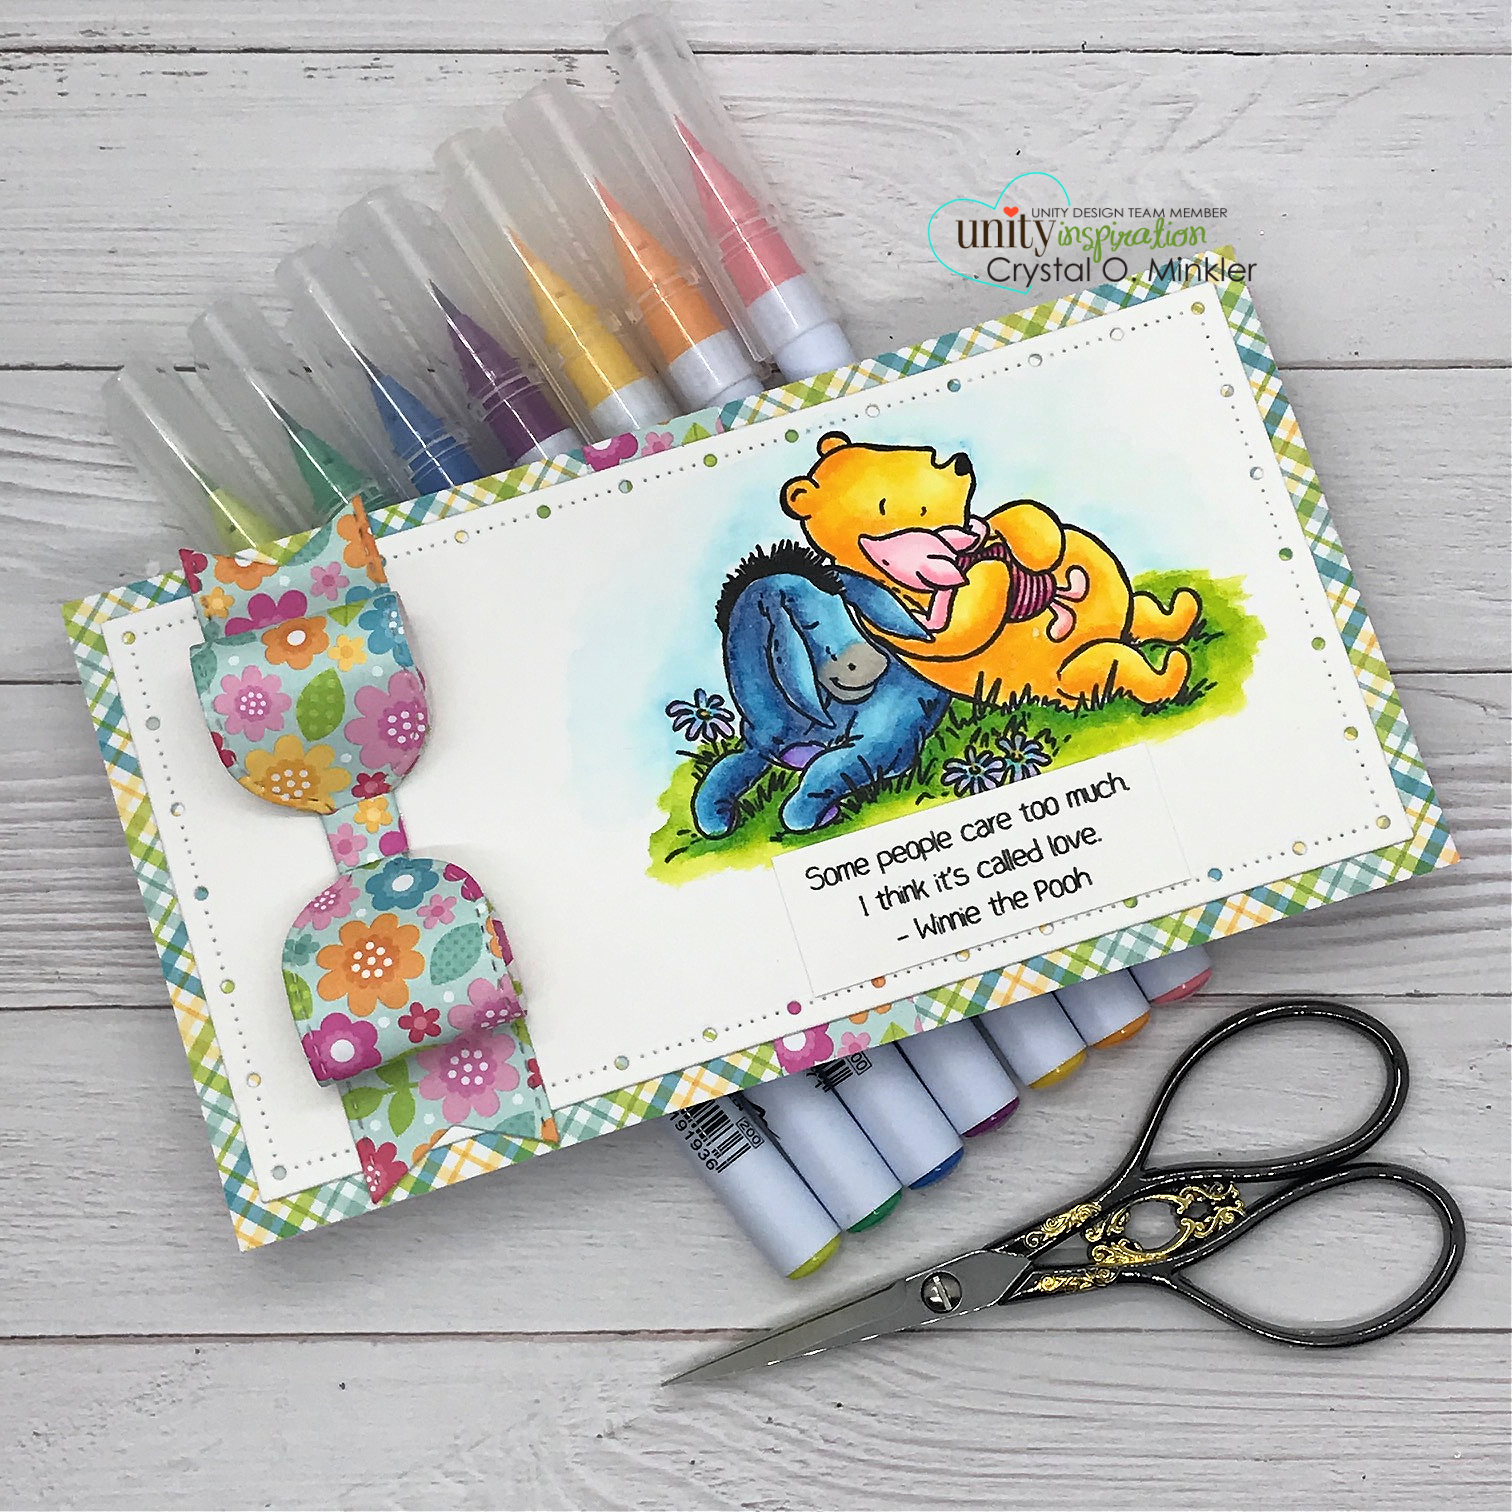
Sweet Mini Slimline ~ Winnie The Pooh: I Think It's Called Love ~ Unity Stamp Co.

 Hello there crafty friend!
Today I'm sharing a cute mini slimline card with an adorable new release from Unity Stamp Co. called Winnie the Pooh: I Think It's Called Love. I can't get enough of the Winnie the Pooh stamps from Unity! If you haven't already stopped by the Unity website to see the latest additions to the Winnie the Pooh line of stamps, you really should go and check them out!!


Isn't this adorable trio just the sweetest stamp ever!! I love them! And I thought rather than coloring them up with Copics I'd play with my ZIG Clean Color Real Brush watercolor markers. I forgot how fun they were to blend with!


I used the following ZIG Clean Color Real Brush markers to color up this adorable trio:

Pooh ~ 050 Yellow, 052 Bright Yellow
Piglet ~ 026 Light Pink, 021 Light Carmine, 025 Pink
Eeyore ~ 036 Light Blue, 034 Dull Blue, 082 Purple, 028 Pale Pink, 071 Flesh Colour
Grass ~ 053 Yellow Green, 041 Light Green, 047 May Green
Flowers ~ 083 Lilac, 031 Cobalt Blue, 052 Bright Yellow


I paired up this cute colored image with the Cute & Crafty paper pad from Doodlebug Design. The colors in the papers wee just perfect for this image... though my pictures don't do it justice. In person, they really do coordinate well. I went with a 6-1/2 x 3-1/2" mini slimline so my card base measures 6-1/2 x 7"; scored at 3-1/2".


I cut my plaid pattern paper to 6 x 3-1/2" and then cut it in half to use on either side of the card base for my background. I cut a strip of scrap card stock to adhere in the middle of those pieces and then I adhered my 3/4 x 3-1/2" piece of pretty floral paper on top. I die cut my colored trio with the Big Little Chain Mini Slimline die from Gina Marie Designs leaving lots of white space on the left side.


 I stamped and trimmed the sentiment and adhered it underneath the trio and then I sat looking at my card for a bit trying to decide what to do with the left side. LOL! I started looking through my dies and found the Stitched Beautiful Bows dies from My Favorite Things. How stinking cute is that bow!! It was so easy to make, too. I sure love how this card turned out! I hope you like it, too!


Thanks so much for stopping by!
See ya next time.

Inky Hugs,
Crystal


{Please note that comment moderation is ON. Your lovely comment will appear shortly.}

Saturday, June 11, 2022

Mini Slimline Card ~ Winnie the Pooh: Difficult Days ~ Unity Stamp Co.

 Hello there crafty friend!
Today I'm sharing a cute mini slimline card with an adorable new release from Unity Stamp Co. called Winnie the Pooh: Difficult Days. Loving the new additions to the Winnie the Pooh stamps from Unity. If you haven't already... stop by the Unity website and check them out!!


I paired up the cute stamps with the My Happy Place paper pack from Doodlebug Design. I thought it complimented the cute flowers in the stamp. Since it's only a 6 x 6" paper pack, I had to split up the paper to fit my card front and decided to use the striped paper in the middle. I think it adds a cute touch to the background.


I die cut the stamped image with the largest die from the Wonky Stitched Mini Slimline dies from Gina Marie Designs. I colored up the image very simply with the following Copic Markers:

Winnie the Pooh ~ Y11, Y15
Piglet ~ RV0000, RV10, RV21, RV14
Butterflies ~ RV21, B000, BG01, Y06, Y15
Flowers ~ Y06, Y15, RV10, RV21, BG10, BG01
Leaves ~ YG11, YG13
Grass ~ YG11, YG17
Outline ~ B0000, B000


I just can't get enough of these cute Winnie the Pooh stamps!! So cute! You can check out my process video here... Mini Slimline Card | Winnie the Pooh: Difficult Days | Unity Stamp Co.


 I sure love how this card turned out! I have gotten myself hooked on slimline cards again... but surprisingly the one I'm working on for Monday is not a slimline. I hope you'll drop by for another visit and check it out!

Thanks so much for stopping by!
See ya next time.

Inky Hugs,
Crystal


{Please note that comment moderation is ON. Your lovely comment will appear shortly.}

Thursday, June 9, 2022

Tri-fold Slimline Card ~ Laughs in Flowers ~ Unity Stamp Co.

 Hello there crafty friend!
It's time for another new release over at Unity Stamp Co. and I have a pretty Tri-Fold Slimline Card with an easy galaxy background to share using the gorgeous new Laughs in Flowers stamp created by Ann Corbiere-Scott! Absolutely love this gorgeous stamp and it's SO big!!


I started by coloring the stamped flowers with my copic markers. The possibilities are endless when picking colors for this beauty but I went with a pretty yellow and blue combo with a touch of red and purple.


The galaxy background is so simple... it's just a piece of black card stock with some white and yellow acrylic paint splatters. I cut my True Black card stock from Papertrey Ink to 8-1/2 x 3-1/2". Popped it in my splatter box and splattered away. I wanted a fine splatter so I didn't saturate my paint brush too much and I splattered each color separately drying the background between colors. So easy peasy!


Here's a quick list of the Copic Markers I used to color up this beautiful stamped image:

Blue/Purple Flowers ~ B000, B02, BV0000, BV01
Yellow Flower ~ R12, R14, R29, Y11, Y06, Y15, YR15
Red Dots ~ Y11, R12, R14, R29
Leaves ~ YG11, YG13, YG17
Flowers Sentiment ~ Y15


I fussy cut the copic colored flowers leaving a skinny white border and adhered it to the galaxy background.  I trimmed the sentiment and adhered it to a black mat and then popped it up on the card with foam tape.


Here's a peek inside the tri-fold slimline card... I copic colored another flower!! I fussy cut this one too and adhered it on this inside flap of the tri-fold slimline card. If you're interested in seeing how I made this card, you can check out my process video here... Tri-fold Slimline Card | Laughs in Flowers | Unity Stamp Co.


Unity has a bunch of new amazing releasing happening today!! Go check them out and, of course, there's a fab sale too!! I'll be back tomorrow with my weekly Christmas card!

Thanks so much for stopping by!
See ya next time.

Inky Hugs,
Crystal


{Please note that comment moderation is ON. Your lovely comment will appear shortly.}

Tuesday, August 17, 2021

Sunflower Slimline Card ~ You Make Me Happy ~ Polka Dot Orchard

 Hello there crafty friend!
I'm back with another fun slimline card using a beautiful digi stamp from Polka Dot Orchard called You Make Me Happy digi stamp set!! I love sunflowers! They are one of my favorite flowers and this one is so beautiful!! I just love it!


I kept this pretty card CAS with just a bit of copic coloring and a simple black mat. First I resized the images in a Word document and print them off on a piece of card stock. I then die cut the image with a Scalloped Stitched Slimline die from Gina Marie Design. 


And then I colored up this beautiful image with the following Copic markers:

Water ~ B000, B00
Jar ~ BV0000, BV00, BV11
Leaves ~ YG11, YG63, YG67
Sunflower ~ Y06, Y15, Y35, E21, E25
Grounding ~ N0, N2


I wrapped the top left and bottom right corners with some May Arts Black Burlap string. I adhered the die cut and colored image to a piece of True Black card stock measuring 3-1/2 x 8-1/2" and then adhered it to a white slimline card base measuring 7 x 8-1/2", scored at 3-1/2". I just love how this turned out... I really love how the jar turned out!


Here's a quick look at the beautiful You Make Me Happy digi stamp set! So beautiful!


Thanks so much for stopping by!
See ya next time.

Inky Hugs,
Crystal


{Please note that comment moderation is ON. Your lovely comment will appear shortly.}

Tuesday, August 10, 2021

Happy Camping Slimline Card ~ Happy Camper ~ Polka Dot Orchard

 Hello there crafty friend!
Today I'm sharing a super quick slimline card that I made using the sweet Happy Camper {Say It Slim} digi stamp set from Polka Dot Orchard! I just love the {Say It Slim} line of digital stamps that Polka Dot Orchard has to offer and even though I'm more of a glamper I thought it would be fun to play with the Happy Camper {Say It Slim} digi stamp set!


My favorite technique when wanting to ink blend a background for a digital stamp image is to actually do my ink blending first. For this card I ink blended just Salty Ocean and Mustard Seed over about 1/3 of a piece of card stock and then I dried it with my Mini Wagner heat tool.


I printed the Happy Camper {Say It Slim} digi stamp on my ink blended card stock and die cut it with the Stitched Slimline die from Gina Marie Designs. I also die cut a piece of Kraft card stock. I trimmed the two ends of the ink blended background and adhered it to the die cut Kraft card stock. I wrapped a little May Arts Black burlap string around each end and adhering the top string with tape and then tying a little bow for the bottom string.


I adhered my focal piece to a True Black card base measuring 7 x 6-1/2", scored at 3-1/2". Now, here is where I goofed up my card just a bit... I added some Nuvo Black Board Vintage drops and for some reason my drops spit on my card. I used my palette knife to get some of it up but it smudged the printer ink when I tried to wipe the rest up with a paper towel. I decided to go with it and redid my drop making it a bit bigger to cover up the smudge. I think it still looks nice. It was definitely a quick card to make though... I think this quick design would work great with any of the {Say It Slim} digi stamps!!


Here's a look at the cute Happy Camper {Say It Slim} digi stamp set... isn't it just perfect for slimline cards?! Plus it has all those little extra digi stamps! I love it!


Thanks so much for stopping by!
See ya next time.

Inky Hugs,
Crystal


{Please note that comment moderation is ON. Your lovely comment will appear shortly.}