Showing posts with label Girls. Show all posts

Wednesday, August 12, 2026

Membership Wednesday ~ August 2026 KOM First Days to Festive Nights ~ Heard There's a Party ~ Unity Stamp Co.

Hello there crafty friend!
Happy Membership Wednesday! Today I'm sharing a fun card with the brand new girls from the August 2026 Kit of the Month called First Days to Festive Nights. Loving these fab ladies!


These lovely ladies are also available separately in the Heard There's a Party?! stamps. I just had to make a fun card with a Christmas flair. I colored up the ladies with the following Copic markers:

Skin: E000, E00, E11, E04, RV10, RV02
Lips: RV10, RV34, RV66
Black Hair: C0, C2, C5, C7
Light Brown Hair: Y21, E43
Ivory Dress: E40, E81, E43
Burgundy Dress: RV10, RV02, RV34, RV66, RV69
Dark Pink Shoes: RV10, RV34, RV66
Pink Shoes: RV10, RV02
Wine Glass: RV02, RV34, EV66, RV69, C0, C2
Martini: RV10, E51, YG11, YG63
Present: E30, E33, E35, RV10, RV02


I paired up these fun ladies with the North Pole Collection {paper pack}. The striped papers measure 4-1/4 x 5-1/2". I die cut the scrap pieces of the other pattern papers for my wallpaper and floor using an oval die from the Scallops & Ovals {nesting dies}. I also die cut the larger oval mat from Kraft card stock using the largest die from the same die set.


I added a strip of kraft card stock as my baseboard to break up the wallpaper and floor. I fussy cut around the ladies and adhered them to the oval. I trimmed up the sentiment and adhered it to the oval and then I popped up the whole piece using a bunch of foam tape. I finished off the card with some touches of glitter on the ribbon and the pink band around the burgundy dress using a Sakura Gelly Roll Clear Stardust pen.


Here's a look at the Kit of the Month membership stamps. 


These lovely ladies are also available separately in the Heard There's a Party?! stamps.


That's it for me today! I hope you've been INKspired to play with your membership stamps! 
Have a fabulous day!


Thanks so much for stopping by!

Inky Hugs,
Crystal

Saturday, May 16, 2026

Off Your List Birthday Card ~ Dramatics ~ Unity Stamp Co.

Hello there crafty friend! 
Today I'm sharing a funny birthday card with a fabulous new stamp from Unity called Dramatics. The sentiments are amazing!! I am in love!


I inked up the gorgeous gal and the sentiment from the Dramatics stamps and colored her up with Copic markers. I then die cut her using the largest die from the Scallops & Rectangles {nesting dies}. I wanted more of a vintage look so I distressed the edges of the panel with some Vintage Photo Distress Ink.

Copic markers used:
Skin: E000, E00, E11
Lips: R14
Dress: BG70, BG01, BG72, R20, R14
Cake: Y15, Y38
Plate: R20, R14
Candles: BG72, Y15, Y38


I used some scraps from my Oh Hey! It's Your Day! {paper pack}. I used two larger scraps for the background layer and then a polka dot scrap for the edge. I die cut that piece and then tore the right side. Keeping with the vintage vibe, I distressed the papers to give them an aged look. 


I forgot to color her nails! Oh man... I'll do that now. Just imagine they are red! LOL! Isn't she just fabulous?! Love, love, love!

Thanks so much for stopping by!

Inky hugs,
Crystal

Tuesday, December 23, 2025

Advent Calendar 2025 Day 23 ~ Unity Stamp Co.

Hello there crafty friend!
It's Day 23 of the 2025 Advent Calendar from Unity!! I can't believe we are almost finished with the advent calendar AND it's almost Christmas Day!


Today we have a fun gal in a festive drink. I stamped her with Black Amalgam ink. I die cut my circle using a die from the Scallops & Circles {nesting dies}. 

You can check out my video revealing the Advent Calendar Day 23 stamp and my process in making this card here... Unity Advent Calendar 2025 Day 23 | Unity Stamp Co.


Inspiration for my card came from the Tawny Owl Paperie Inky Inspiration Sketch 15! This simple sketch is so fun!


So excited to add another holiday card to my stash for next year! I am loving this fun card!

Copic Markers:
Skin: E000, E00, E11
Skirt: R20, R14
Glass: YG11, YG23
Ground: C0, C2


I paired up the girl in the martini glass with the A Dash of Christmas {paper pack}. The sweet sentiment is from the Chilled to the Bone stamps. I finish this one off with a few enamel dots.

I'll be back tomorrow for the final Day 24 of the 2025 Advent Calendar from Unity!
Have an INKredible day!


Thanks so much for stopping by!
 
Inky Hugs,
Crystal

Tuesday, April 16, 2024

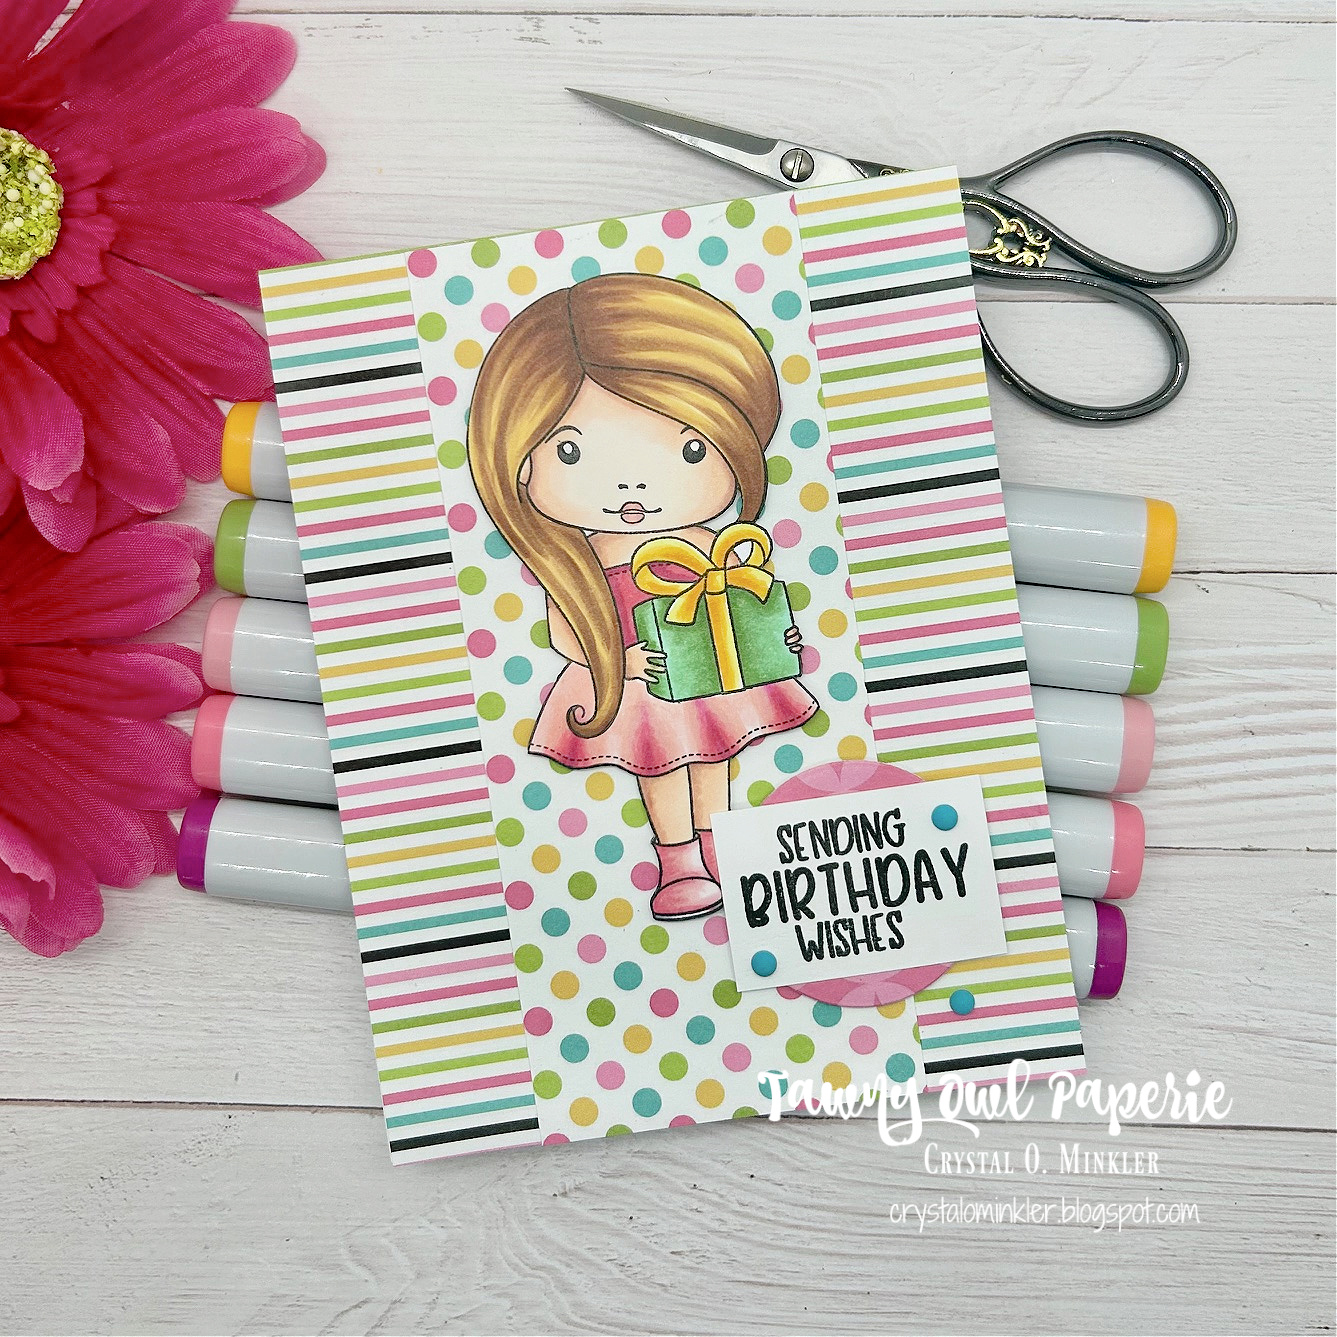
Tawny Owl Paperie Inky Inspiration Sketch 20 ~ Birthday Present Marci ~ La-La Land Crafts

 Hello there crafty friend!
I am back with inspiration for the Tawny Owl Paperie Inky Inspiration Sketch Challenge 20. I have picked out another paper pack leftover from my Scrapping for Less days. I absolutely love the colors in these papers!! I, again, don't know who made these papers or if they are still available. Sorry about that! I'm just so excited to be finishing up another paper pack!


Not only am I finishing up papers... I am also inking up stamps that haven't seen ink! A few years ago I was getting the La-La Land Crafts monthly kit and I haven't touched one of these kits. So I thought, why not grab one of those kits and see what we can make. Of course, I decided to go with a birthday themed kit because I'm still trying to build my birthday stash. But want to hear a secret?! I've been sending birthday cards!! For realz! So while I'm building my stash of birthday cards I'm also sending them out. So I need more!


Here's a look at the scraps I'm working with this time. I'm not sure if I'll officially include the tags as part of the leftovers. But I did use a few of the enamel dots from the leftover kit I opened up.


There was some fun products in this La-La Land Crafts monthly kit from August 2019... a couple sentiment dies and more stamps, but I chose this adorable girl and sentiment to play with. Trying to keep the cards I'm sending simple so the postage stays to the minimum. Of course, those enamel dots may call for extra postage, but we'll see. So for this card, I used the largest scrap {a 6x6" piece that I had already cut before taking the photo} for my background layer. I love the contrast of the stripes with the polka dots and the enamel dots play off of the dots in the paper.


I stamped the girl and sentiment using Black Amalgam ink from Gina K. Designs. I then colored up the girl using a bunch of Copic markers. I actually messed up the skirt while coloring. Did not like how it turned out! So I stamped the skirt on a scrap of white card stock and colored it up again. I fussy cut the skirt on the line and paper pieced it onto the girl. Easy peasy fix. Then I fussy cut the girl on the line and colored the edge of the fussy cutting using a Memento Tuxedo black marker {I also did that to the paper pieced skirt}. This makes the fussy cutting look much nicer! I trimmed up the sentiment and adhered it to the pink circle that I die cut using a 1-1/4" circle die from the Nesting Circles Die from Waffle Flower. I then adhered the sentiment to the girl and added foam tape to the back of both. Popped them up on the card and added those three enamel dots. I really like how this one turned out!

Here's a list of the Copic markers I used:

Skin: E000, E00, E11, E04
Hair: Y11, Y21, E23, E25
Lips: R20, RV11
Top: R20, RV11, RV14, RV06, RV19
Skirt: RV0000, R20, RV11, RV14, RV06, RV19 
Shoes: RV0000, R20, RV11, RV14, RV06, C00, C3
Present: Y11, Y15, Y35, G000, G12, G24


Here's a look at the fun new sketch for Tawny Owl Paperie Inky Inspiration Sketch 20. This sketch does call for larger pieces so if you have a fun paper pad you've been wanting to cut into... now's the time! The sketch, as always, is meant to inspire not require. So let the sketch lead in your design, but don't feel limited by it. My card is another good example of altering the sketch but still keeping within the sketch.


I'm so happy with how this card turned out! I hope you're inspired to play along with the sketch... and maybe even pull out some papers and stamps that you haven't played with yet! Have a wonderful week!

Thanks so much for stopping by!
See ya next time.

Inky Hugs,
Crystal


{Please note that comment moderation is on. Your lovely comment will appear once approved.}

Wednesday, April 10, 2024

Membership Wednesday ~ April 2024 KOM Petal Post ~ Unity Stamp Co.

  Hello there crafty friend!
Today I'm sharing a simple but sweet card featuring the adorable little girl stamp from the April 2024 Kit of the Month membership from Unity. This card didn't quite turn out how I envisioned it but I like it. I am loving all the beautiful stamps in this month's kit! I have a feeling that I'll be playing with it again. 


I stamped the little girl stamp on Stampers Select White Card Stock from Papertrey Ink using Black Amalgam Ink from Gina K. Designs. I used a good amount of Copic markers to color her up.

Here's a quick list of the Copic markers I used:

Skin: E000, E00, E11
Hair: Y11, Y21, E23, E27
Blouse: Y11, Y15, Y35
Skirt: R20, R14
Flowers: Y11, Y15, Y35, R20, R14, V000, V12, V05
Leaves: YG03, YG95


I stamped the pretty pattern stamp on the side of my white card front using Rich Razzleberry ink from Stampin' Up. I also used Rich Razzleberry card stock for my card front base and the strip across the card.


I trimmed up the sentiment, cut a fishtail on the right side and adhered it on top of the strip across the card. I fussy cut the cute girl leaving a bit of a white border around her. I added some foam tape to the back of her and popped her up on the card.
 

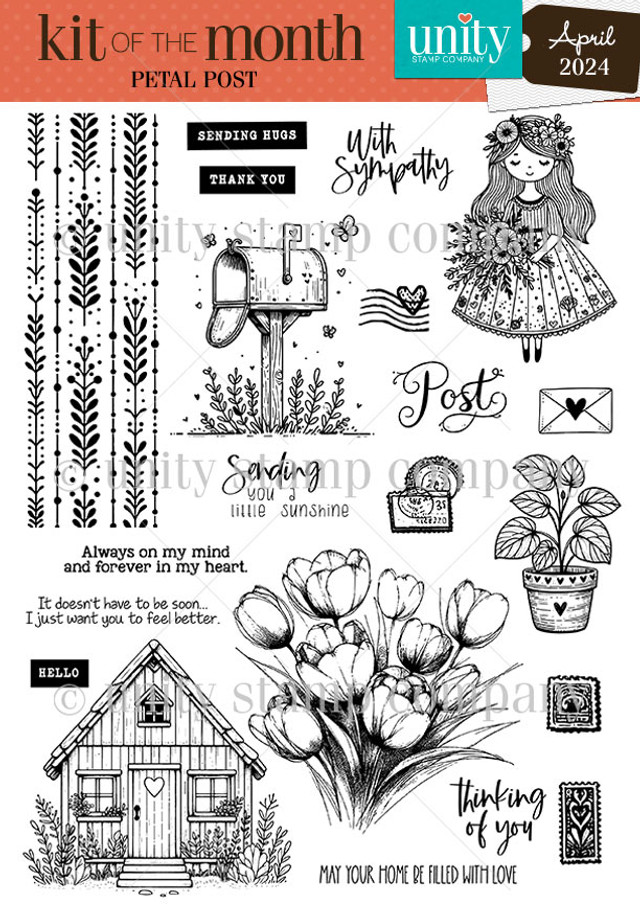
Here's a quick look at this month's Kit of the Month membership! LOVE!! So many fabulous stamps this month! I want to ink them all up!

 Well, that's it for me today! Hope you have an ink-tastic day!


Thanks so much for stopping by!
See ya next time.

Inky Hugs,
Crystal


{Please note that comment moderation is on. Your lovely comment will appear once approved.}

Monday, July 17, 2023

Inky Paws Challenge #202 ~ Summer Lovin' Challenge Reminder

 Hello there crafty friend!
 There's still time to play along with the Inky Paws Challenge #202 - Summer Lovin' Challenge!! You have until this coming Friday, July 21st to get your entries in for this fun challenge and a chance to win a $20 store credit to Newton's Nook Designs!


I'm still loving that cute pineapple!! I wish I had a pineapple stamp... does NND have a pineapple stamp I wonder? Hmmm. I'll have to look. Yes! There's a few pineapple goodies in the shop! That cool stencil is going on my wishlist!! Anywho, I decided to go with flowers again for my card. I love all the flowers in stores right now and in people's yards during the summer. So beautiful!


I wanted to do a CAS {Clean and Simple} design but also use some pattern papers. This was a fun card to make. I stamped the sweet girl holding tulips from the Loads of Blooms Stamp Set using Memento Tuxedo Black ink. I colored her up with a handful of Copic markers. And then I die cut her using the coordinating die from the Loads of Blooms Die Set. I also die cut a second girl and cut off the bottom portion. I adhered the top portion to the die cut so that she'd lay flat on the card.

Here's a quick list of the Copic markers I used:

Skin ~ E000, E00, E11
Dress / Shoes ~ R00, R01, R22, R05
Flowers ~ Y06, Y15, Y38, R00, R01, R22
Leaves / Stems ~ YG11, YG23


The pretty pattern papers from the Springtime 6x6 Paper Pad were die cut using the scalloped stitched square die from the Frames Squared Die Set. The scallops on this die are a little shorter than the scallops on the scalloped and stitched rectangle die in the Frames & Flags Die Set. But either one would work for this design. I cut the cloud pattern paper to be a bit shorter than the scalloped square die. It's just another way of using the dies to make your design.


I die cut my piece of green striped pattern paper using the bottom portion of the scalloped stitched square die and then I used the grass die from the Land Borders Die Set to die cut the grass layers from the one piece of green pattern paper. I was then able to adhere the layers all together creating my background scene. I finished off the card by stamping the sentiment underneath the scene I created. I used my grid transparency in my mini misti to get the sentiment just right before stamping. I didn't want to take any chances that it would stamp crooked. 


Now it's your turn to get your paws inky with your Newton's Nook Designs products and create a project with a Summer Lovin' theme. Be sure to link up to the Inky Paws Challenge! Can't wait to see your projects!


Thanks so much for stopping by!
See ya next time.

Inky Hugs,
Crystal


{Please note that comment moderation is on. Your lovely comment will appear once approved.}

Monday, May 15, 2023

Inky Paws Challenge #198 ~ Sketch Challenge

 Hello there crafty friend!
Who's up for a new challenge?! It's time to get our paws inky with a fun sketch challenge! I had so much fun with this one I made 3 cards! I hope you have a blast with it too! You have until Friday, May 26th to get your entries in for the #198 Sketch Challenge and a chance to win a $20 store credit to Newton's Nook Designs!


This sketch is perfect for those scraps of pattern paper!! And so fun... I couldn't help but grab my Christmas papers. I do love to make Christmas cards!


When I saw the new sketch challenge I instantly thought of the sweet Christmas Trimmings Stamp Set that's on the retiring list. I love these cute girls getting ready for Christmas! This sweet stamp set is only $5.99, by the way, and a little kitty told me {hee hee} there's only 5 left in the shop. Go snatch one up before they are all gone!


Rather than try to adhere all the strips in a line just right on my mat, I adhered them to a scrap of thin {80lb} card stock. This way I can adhere them all neat and straight and then adhere them to my mat. So much easier!


Here's a quick list of the Copic Markers I used for this stamp:

Skin ~ E000, E00, E11
Hair ~ Y02, Y21, Y26
Clothes / Hair Bow ~ YG11, G24, R20, R17, C00, C1
Gift ~ R20, R17, R27, C00, C1, C3
Scissors ~ C1, C3, Y15


I paired up the sweet Christmas Trimmings Stamp Set with the beautiful Meowy Christmas 6x6 Paper Pad. Such a great sketch for the paper strips I had left over in my paper pad. I did have to cut a couple extra pieces since I made three cards, but my mission this year while building my stash of holiday cards is to also use up those pretty pattern papers that I've been hoarding. 


Here's a quick list of the Copic Markers I used for this cute stamp:

Skin ~ E000, E00, E11
Hair ~ E70, E74, E77
Dress / Shoes ~ R20, R17, Y11, Y06, Y15
Hat ~ R20, R17, R27, C00, C1, C3
Tree ~ YG11, G24, G46, E70, E74, E77
Tree Stand ~ Y11, Y06, Y15
Baubles ~ R20, R17, R27, YG11, G24, Y11, Y06, Y15


All of the sweet girls are die cut using the coordinating dies {unfortunately, these are retired and no longer available}. Each of the girls are adhered to oval layers I die cut using the Oval Frames Die Set.


Here's a quick list of the Copic Markers I used for this stamp:

Skin ~ E000, E00, E11
Skirt ~ YG11, G24, G46
Shoes ~ YG11, G24
Box ~ R20, R17, R27
Christmas Decor ~ YG11, G24, G46, R20, R17, R27, Y11, Y06, Y15

I didn't record my copic coloring for the girls but I did record my process in making the card. You can check out my process video here... Trio of Christmas Cards | Inky Paws Challenge 198 | Newton's Nook Designs.


Now it's your turn to get your paws inky with your Newton's Nook Designs products and create a project using the sketch. Be sure to link up to the Inky Paws Challenge! Can't wait to see your projects!


Thanks so much for stopping by!
See ya next time.

Inky Hugs,
Crystal


{Please note that comment moderation is on. Your lovely comment will appear once approved.}

Saturday, March 21, 2020

Scrapping for Less ~ Flavor of the Month Card Kit ~ Glass Slippers Collection!

Hello there crafty friend!
Today I'm sharing more inspiration using the Glass Slippers Collection from the It's All About the Girls card kit from Scrapping for Less! This is just one of the four fabulous collections included in this card kit and there are just a handful of card kits left so be sure to snatch yours up before they are gone!! I had so much fun with the pretty papers and the beautiful ephemera in this collection! Let's get to the cards, shall we?!


My first card uses a cut-a-part from the Glass Slippers patterned papers in the collection for the sentiment with a fun quote from Walt Disney. I thought it paired beautifully with the castle papers and the castle ephemera. I die cut a square window from the yellow leaf papers and also die cut the square scalloped window from the green paper. I trimmed down a piece of the castle paper just big enough to fit the scalloped window and adhered it to a 4-1/8 x 5-3/8" piece of Nightshift Blue card stock. I then adhered the patterned papers to the panel and tied some pretty white organdy ribbon from my stash around the panel and tied it off cutting the ends like a faux bow. I then adhered my panel to a white card base. I popped up the cut-a-part piece and the ephemera castle with foam squares. I really love the dimension that the window gives the card!


My second card was a very quick way to finish off those scraps of pretty patterned paper. I pretty much finished off the Banana Split card stock with this one, too. I used the yellow card stock for my card front that I adhered to a white card base. I adhered a 4-1/8 x 5-3/8" piece of Nightshift Blue card stock to the card and then mat my patterned papers to some of the Banana Split card stock. I adhered those to the card and cut my flag (or banner) piece. I adhered the flag piece and realized I had forgotten to stamp the sentiment after popping up the flower ephemera piece with foam squares so I decided to stamp the sentiment onto a scrap of white card stock, trimmed it and adhered it on the flag. To finish off the card, I added a few of the clear enamel dots. I really love the beautiful floral papers on this dark background... makes for a very striking card!


I have to admit I dug into my stash for this card... I had run out of Nightshift Blue card stock with that bottom strip across the card. I had a 4-1/4 x 5-1/2" piece of the Nightshift Blue card stock left over from a previous card kit so I used it. Again, I love the striking contrast with the dark background and the pretty blues, yellow and gold! So beautiful! I used another cut-a-part piece for my sentiment and the matching ephemera piece. These beautiful princess ephemera pieces are so gorgeous... I just love them!! And I was super excited to see that they are offered in the A La Carte section of the SFL shop ---> Glass Slipper Ephemera!!


I just love how my last card turned out!! For this card I used product exclusive to the Banana Split subscription... I love the extra goodies included in this month's kit!! I used the beautiful Flourish stencil to create my background. Since I wanted more of a dreamy background... kinda magical... I just used purple tape to secure the Flourish stencil over the Distress Watercolor card stock from my stash, rather than using Pixie Spray to secure it down which would have given clean crisp lines to the background. I sprayed the card stock lightly with water and then watercolor washed some Picked Raspberry Distress ink over the top left corner and the bottom right corner. I dabbed up the excess water and watercolor washed some Scattered Straw Distress ink (from my stash) that I watered down to get a lighter yellow color. I pulled up the stencil and dried the background with my heat tool.


I trimmed the background down to 4 x 5-1/4" and adhered it to a white card base. I popped up the princess ephemera piece with foam squares and adhered a few sequins from the collection around the card. I then die cut the Beautiful Word die {exclusive to the Banana Split subscription of the card kit} several times from my last scrap of Banana Split card stock. I adhered three layers of the Beautiful Word die together and then adhered three more layers of the Beautiful Word die together. I decided I'd adhere the Beautiful Word die across the bottom of the princesses dress so I cut one of the layers of die cuts just after the letter 'e' giving me three layers of the word 'be'. I adhered those layers to the bottom of my other die cut of the Beautiful Word die and then adhered the entire die cut piece to the card. The extra layers under the 'be' portion of the die cut were perfect to keep the whole piece level with the height given to the princess ephemera piece from the foam squares. Love it!!

So, I've pretty much finished up this collection in my stash but I saw that the consumable products in the collections are available to purchase in the A La Carte section of the shop... the card stock, the pretty patterned papers, the ephemera, and the enamel dots!! I can restock my stash and make more pretty cards! Woohoo!

Thanks so much for stopping by!
See ya next time.

Inky Hugs,
Crystal

Friday, March 20, 2020

Scrapping for Less ~ Tea Party Collection ~ More Tea-rrific Inspiration!

Hello there crafty friend!
Today I have more tea-rrific inspiration using the sweet Tea Party Collection from the It's All About the Girls card kit! This collection is especially endearing for me because my Mom was a tea drinker and her favorite color was purple. So while I created with this collection she was in the forefront of my mind.


With that said, it's no surprise that a couple of the cards I made are cards that could be for Mother's Day. I know it's a couple months away but it sure doesn't hurt to have those in your stash, right?!


I used up almost every last scrap of the patterned papers on these four cards. I had a lot of fun mix matching the patterned papers for each of the cards. I even paper pieced for this first card. Isn't that tea pot just the cutest with those pink polka dots! Love it! And it works well with all the polka dots in the patterned papers and even the enamel dots play into that design!


I had a couple more of the wood icons left over in my collection so I stamped the cup and saucer with Memento Tuxedo black ink and colored it with the following copic markers ~ R81, R83, R85, E51. I kept the tea a light milky color because my Mom liked her tea with a lot of milk. I then fussy cut the cup/saucer and cleaned up the edges of the image with my Memento Tuxedo black marker. I adhered the cup/saucer to the wood icon with Ranger Multi Medium Matte. I then adhered the wood icon piece to a Grape Jelly die cut scalloped circle.


My third card is really very simple in the design... I adhered all of the layers on a card front measuring 4-1/4 x 5-1/2" of Pink Lemonade card stock and then adhered it to a white card base from my stash. I just adhered the sweet little wood icon tea pot to this card, along with the sentiment and was done. Very simple but sweet... I like it!


My last card is my favorite... I love the cute papers and the white embossed sentiment on the Plum Punch card stock. I colored this cup with the same copics as the other cup, but made it a bit darker. I also used BV0000, BV000, BV01 for the saucer. I used N0 and N2 to add some steam and for the ground. A similar design to the first two cards but I really love the way this one turned out!

I sure hope you've enjoyed more inspiration for the It's All About the Girls card kit!! I'll be back tomorrow with even more inspiration using the gorgeous Glass Slippers Collection!!

Thanks so much for stopping by!
See ya next time.

Inky hugs,
Crystal

Friday, March 13, 2020

Scrapping for Less ~ More Inspiration with the Be-You-tiful Collection!

Hello there crafty friend!
I'm here with more inspiration from Collection One of the It's All About the Girls card kit... I can't get enough of this kit and Collection One has been one of my most favorite collections! I have three cards to share today... I was able to use up most of my patterned paper and a few more of the awesome Sentiment Stickers included in the collection.


For my first card, I die cut the polka dot paper with the Loopy Rectangle die from Gina Marie Designs and then I stamped the cluster of stars included in the Be-You-tiful stamp set multiple times on the polka dot paper with Ranger Archival Jet black ink. I used my heat tool to dry the ink and popped it up on pink patterned paper with foam squares. I then adhered the entire panel to a white card base. I added the sentiment sticker and finished off the card with a few of the enamel dots included in the collection. I love how simple but beautiful this card is!


Another pretty simple card using up the patterned papers in the collection along with some ribbon from my stash and another fabulous sentiment sticker. It's not often that I make a card without some kind of stamping but this card came together so fast... I love it!


My last card for the Be-You-tiful collection just may be my favorite of all the cards I created using this collection. I wanted to use the Life sentiment sticker and thought it would be fun to incorporate the heart shape of the sentiment by die cutting the stamped face image with a stitched heart die. I happened to have a few more pieces of patterned paper that worked perfectly with the heart theme of the card, but they didn't quite fit a card base. So I adhered them together and then adhered them to the center of a white card base. I popped up the stitched heart die cut and adhered the Life sentiment, along with the last of my enamel dots in the collection. It felt really good to finish off some of my enamel dot collection.. lol! I just love this card! 

That's it for me! I hope you've been inspired by my cards today using the Be-You-tiful collection from the It's All About the Girls card kit. And if you haven't purchased this fabulous kit, there are still some in the shop!! Check it out here ---> It's All About the Girls card kit!


Thanks so much for stopping by!
See ya next time.

Inky hugs,
Crystal