Showing posts with label #diecuts. Show all posts

Friday, July 28, 2023

Christmas in July 2023 {BYSHC} Linky Party ~ Snowflake Net Stencil ~ A Colorful Life Designs

 Hello there crafty friend!
I'm back with my last card for the Christmas in July 2023 {BYSHC} Linky Party! It's also my last card for the {BYSHC} Sketch Challenge 35. My card for today features a mix of products from a few of our wonderful Linky Party Sponsors again.


I wanted a simple plaid background using the Plaid Cover Dies Bundle from Sponsor Pink & Main. I love how combining these two A2 sized dies with different card stock colors makes for such an easy background. I die cut the Plaid Cover Die Panel A from Cool Caribbean card stock from Stampin' Up. I die cut the Plaid Cover Die Panel B from Orchid Opulence card stock, also from SU.


Next, I ink blended Seedless Preserves and Broken China Distress Oxides over the fabulous Snowflake Net Stencil from Sponsor A Colorful Life Designs onto a 6 x 6" piece of white card stock. I die cut a portion of it with the second largest die from the Pleated Lace Mini Slimline die from Sponsor Gina Marie Designs. Not sure yet what I'll do with the other portion. I also die cut a scrap of white card stock that I trimmed and adhered to the stenciled panel. 
 

Here's a look at this month's {BYSHC} Sketch 35. I turned the sketch for my card... mostly for the sentiment to sit at the bottom of the focal panel. There's still a bit of time to play along with the sketch!! Entries must be submitted prior to July 31st at 11:59pm PST in the Build Your Stash Holiday Cardmakers Facebook group.


The sentiment from the Wishing You Mini Stamp Set from Sponsor Gina K. Designs was then stamped on the bottom white portion of the panel with Seedless Preserves Distress Oxide ink. I stamped two snowflakes from the Wishing You Mini Stamp Set... one with the Seedless Preserves and the other with Broken China Distress Oxide ink. I fussy cut them leaving a tiny bit of a white border and then adhered them together using the iCraft UltraBond Adhesive from our wonderful Sponsor Therm O Web. I adhered the snowflakes to the stenciled panel and then I popped up the panel and snowflakes on the card using 3D Foam Squares from Sponsor Therm O Web. I finished off the card by adding a few white rhinestones from the Frosty Rhinestones from our Sponsor Gina Marie Designs to the centers of the snowflakes. 


I have had SO much fun playing along with the Christmas in July 2023 {BYSHC} Linky Party! I hope that you've been inspired to make a few Christmas cards to relieve some of the holiday stress. I know that I am feeling great about the 8 cards and 3 tags that I made. If you missed the tags I shared on my Instagram you can check them out here... 3 Holiday Tags. Thank you ALL so much for stopping by my blog and commenting on my cards. I've truly enjoyed each of the comments. And I hope that you'll stop by the Linky Party and check out the cards that have been linked up. So many amazing and wonderful cards!! And if you have a bit of time today you could still enter into the Linky Party... it ends at 11:59pm PST tonight.

Thanks so much for stopping by!
See ya next time.

Inky hugs,
Crystal


{Please note that comment moderation is on. Your lovely comment will appear once approved.}

Thursday, July 27, 2023

Christmas in July 2023 {BYSHC} Linky Party ~ Pinecone Dies ~ Jaded Blossom

 Hello there crafty friend!
I'm back for Day 7 of the Christmas in July 2023 {BYSHC} Linky Party! I can't believe that we're nearing the end of the linky party already. My card today features another mix of products from a few of our linky party Sponsors. Can't help myself! But this just may be my favorite card from the linky party... at least, that I made!! I have a whole bunch of favorites that have been entered into the linky party. How about you?! Any specific cards caught your eye?


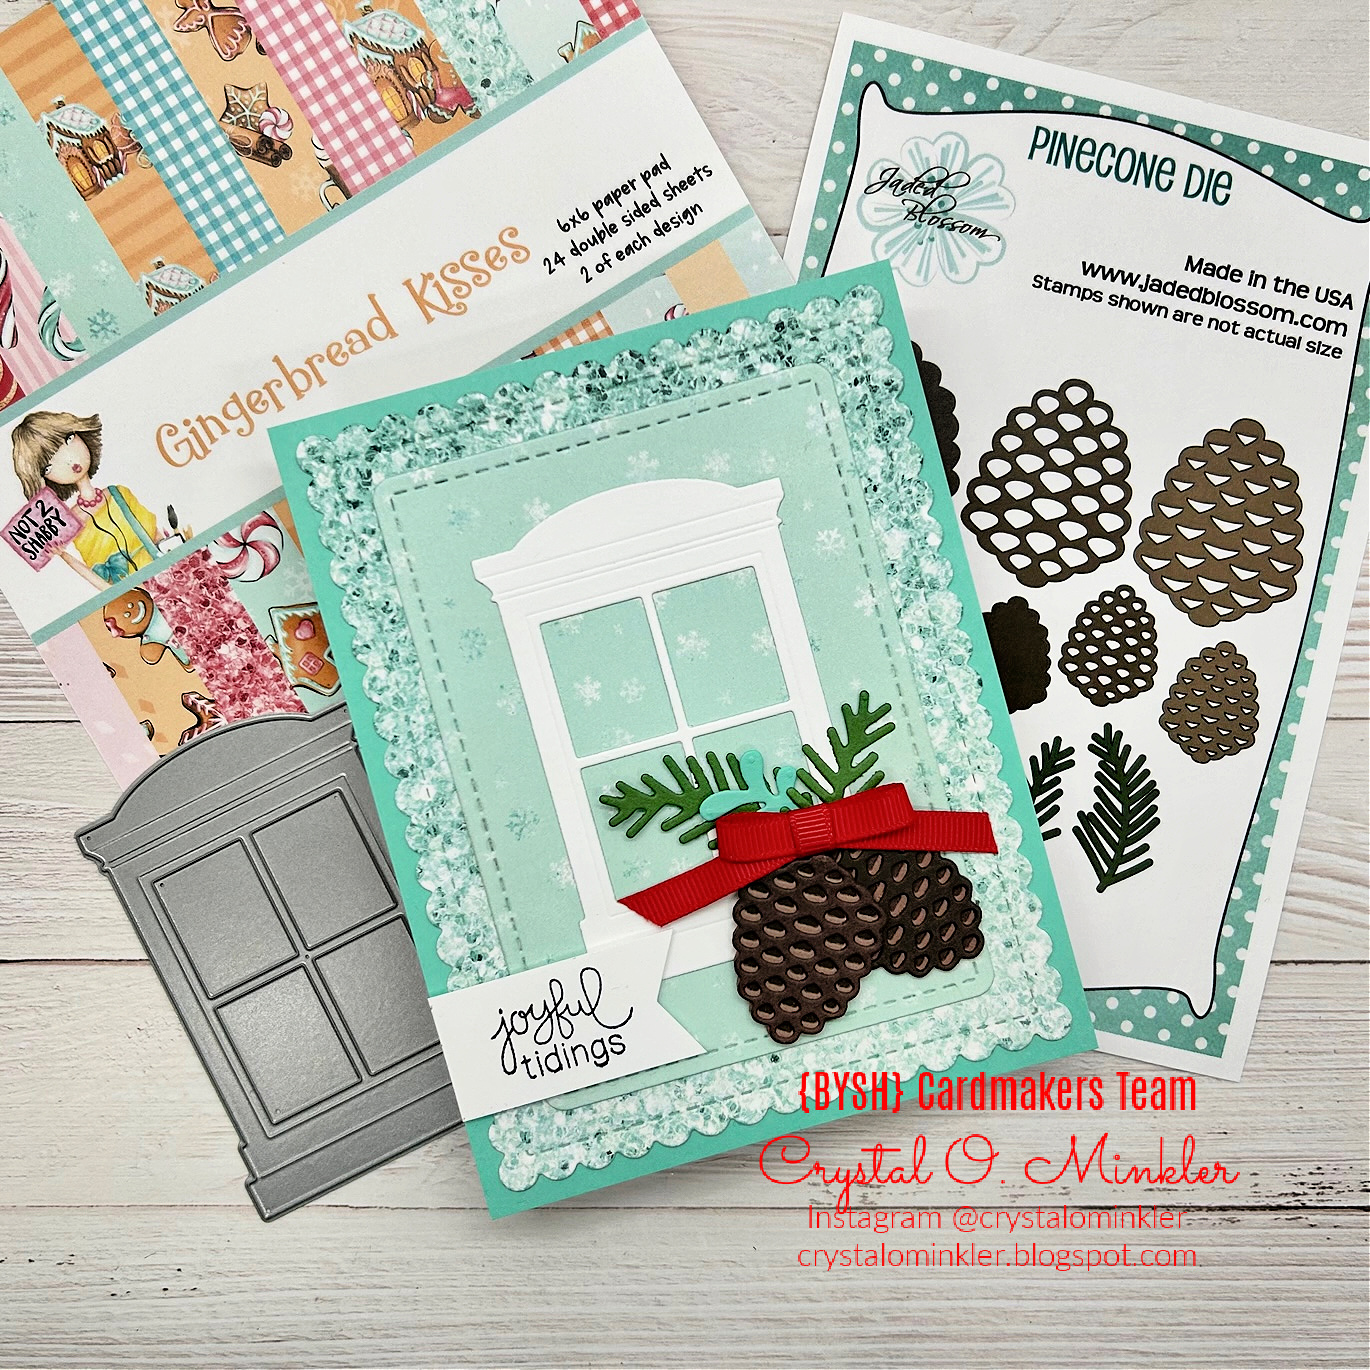
For my card today, I used the gorgeous Gingerbread Kisses 6x6 Paper Pad from Sponsor Not 2 Shabby. I die cut my pattern paper layers using the Frames and Flags Die Set from Sponsor Newton's Nook Designs. I then adhered my layers together using the iCraft UltraBond Adhesive from our wonderful Sponsor Therm O Web. My pattern paper layers were then adhered to a Coastal Cabana card front  measuring 4-1/4 x 5-1/2" from Stampin' Up.


The beautiful window is the Arched Window die from Taylored Expressions. Unfortunately, I think it's retired. The gorgeous Pinecone Dies are from Sponsor Jaded Blossom. These were so fun to play with. I mix matched a few different colors for the pinecones using Close to Cocoa, Early Espresso and Chocolate Chip card stock from Stampin' Up. So fun! I also die cut a few greeneries from the set using Garden Green and Coastal Cabana card stock. And I used Real Red Grosgrain ribbon from SU for the little bow.


I stamped the sentiment from the retired Christmas Delivery Stamp Set from Sponsor Newton's Nook Designs. I trimmed it up and popped it up on the card using 3D Foam Squares from Sponsor Therm O Web. I adhered the card front to a white A2 top fold card base.


Be sure to stop by Jaded Blossom and check out all their fabulous Christmas goodies!! SO many amazing dies!! Have you stopped by the Christmas in July 2023 {BYSHC} Linky Party yet?! I sure hope you will! Check out all the wonderful Holiday inspiration being shared friends... you won't regret it!!


Thanks so much for stopping by!
See ya next time.

Inky Hugs,
Crystal


{Please note that comment moderation is ON. Your comment will appear shortly.}

Wednesday, May 24, 2023

Membership Wednesday ~ Die Cut Background ~ May 2023 Whit Kit ~ Unity Stamp Co.

 Hello there crafty friend!
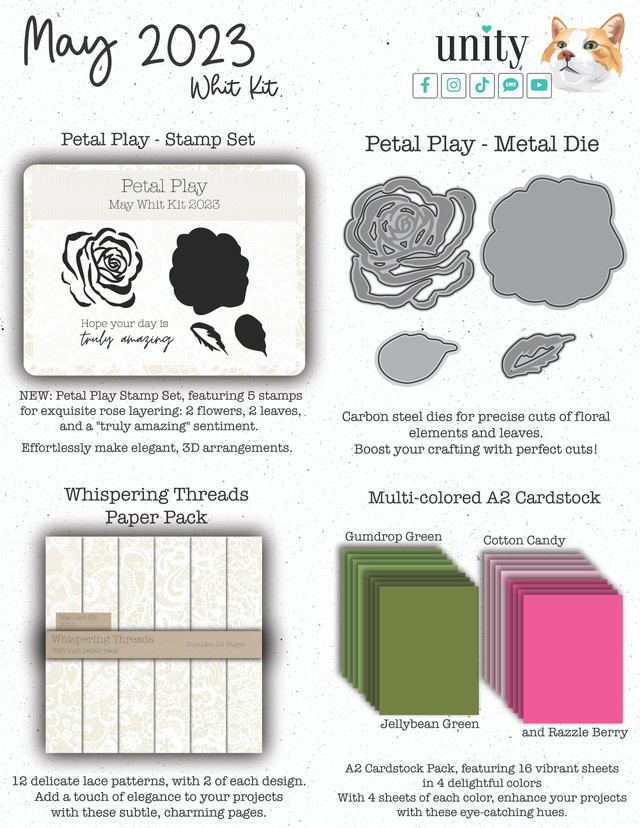
Today I'm sharing a no coloring card using just the lovely Petal Play dies from the wonderful May 2023 Whit Kit membership from Unity along with a cut-apart sentiment that I also got from Unity. 


I had a fun idea to make a background using the detailed die from the Petal Play dies and the Cotton Candy card stock sheets also from the kit. I think it made a lovely background for the focal piece.


I die cut the full rose from the Razzle Berry card stock included in the kit using the outline die. And I die cut another detailed rose from the Cotton Candy card stock. I adhered those together. I also die cut a few leaves using the green card stock from the kit. I adhered them together and then to the rose.


I'm thinking it's pretty safe to say that I'm obsessed with using vellum card stock for matting my focal pieces. I didn't want to cover up the pretty background that I created. It just made sense to use vellum again. I die cut a piece of vellum using a circle die from the Scallops & Circles {nesting dies}. The card front panel was wrapped with a white organdy ribbon before adhering it to a white A2 top fold card base. I trimmed the sentiment from the Cut Apart Sentiment Strips and adhered it to the card. I added a few scraps from the sentiment itself to pop up the right side so it would lay flat on the card.

You can check out my process video here {minus the addition of the sentiment... I couldn't decide on the sentiment in the moment but did add one just now}... Die Cut Background | May 2023 Whit Kit | Unity Stamp Co.


Here's a look at the wonderful Whit Kit for May!! Gorgeous! This wonderful card kit is available for only $42.99. That includes shipping! You also get a $6.95 discount on every order from Unity over $45. Members are also able to purchase past Whit Kit stamp sets for just $14 and past Whit Kit paper packs for $2 off!! So awesome!!! 

That's it for me today! I have another idea for a card using the May 2023 Whit Kit but I'm not sure if I'll share that next week or play a bit with a different membership!! So I'm thinking it'll be a surprise... for you and me! Hee hee!


Thanks so much for stopping by!
See ya next time.

Inky Hugs,
Crystal


{Please note that comment moderation is on. Your lovely comment will appear once approved.}
Friday, May 6, 2022

{BYSHC} Sketch Challenge 22 ~ Christmas Cookies ~ Tim Holtz

 Hello there crafty friend!
I'm back with my weekly Christmas card using the current sketch over at the Build Your Stash Holiday Cardmakers Facebook group and this time I'm using some very neglected Tim Holtz products in my stash. As I've mentioned here and there, I'm still slowly unpacking my studio and I reorganized my pattern papers last week. Woohoo!! Now I know what is where and can find what I need more easily! YAY! I was also tickled pink to find my Tim Holtz Christmas papers! I set them aside to make a future card... while I was cleaning off my desk I found the super cute Christmas Cookies dies from Tim Holtz that my sweet and awesome friend, Robyn, gave me for Christmas. Thanks, Robyn!! It was just natural to use these adorable dies with the papers I had set aside.


First I decided I wanted to use the cute snowflake cookie... so I looked through all the pretty papers in the Tim Holtz 8x8" Christmas Paper Stash paper pad and chose two papers. There's just something about plaid for Christmas!! Love the pretty colors in this plaid paper!! I also chose the snowflakes to kinda coordinate with the snowflake cookie.


I cut my pattern papers and adhered them to a True Black card front measuring 6-1/2 x 3-1/2". I also cut a 1/8" strip of True Black card stock from Papertrey Ink and adhered it over the spot where the two pattern papers meet. I adhered the card front to a 6-1/2 x 7" white card base scored at 3-1/2".


I set the card aside and die cut the snowflake cookie. I die cut the cookie base two times from Crumb Cake card stock from Stampin' Up. I colored around the edge of the cookie base with E35 and then blended it with E51. It made the edge a bit darker than I had wanted but I still used it. I die cut the light blue frosting three times from Soft Sky card stock from Stampin' Up. I colored around the edge with BG000 and BG0000. I die cut the snowflake from Stampers Select white card stock from Papertrey Ink four times. I wanted the snowflake to be raised even more than the frosting. I colored the edge of the snowflake with just a tiny bit of C00 and C2. I ended up adding back some white with a Sakura white gelly roll pen.


I adhered all the layers of the cookie together... it's so cute and looks just like a yummy cookie! LOL!
Now I did plan to add some Glossy Accents to the frosting but totally forgot to do that before I took photos so just imagine it's all glossy and shiny and delicious looking!! The sentiment is a Tim Holtz Idea-ology Christmas Remnant Rubs that I applied over a scrap of True Black card stock. This was basically a sentiment sticker that you peel the back off of and use the little stick and rub it on. I've had these in my stash forever and just now finally used one. It's very easy to use and super cute! I trimmed the sentiment and adhered the left side to the bottom of the snowflake cookie and then popped up both the sentiment and cookie with foam tape. Cute!!


Here's a look at the fun {BYSHC} Sketch 22 for the month of May!
I hope you'll join us and play along with the sketch! If you're interested in seeing a bit more inspiration for this sketch, check out the amazing inspiration from the design team over on the  {BYSH} Cardmakers blog! I'll be back next Friday with my regular weekly Christmas card using this fun sketch!


Thanks so much for stopping by!
See ya next time.

Inky hugs,
Crystal


{Please note that comment moderation is ON. Your lovely comment will appear shortly.}

Thursday, April 28, 2022

Spring into Christmas 2022 {BYSHC} Linky Party ~ Coffee Therapy and Pine Needle Sprig ~ Gina K. Designs and Gina Marie Designs

 Hello there crafty friend!
Today I'm sharing a card that has been in my mind from the start of the Spring into Christmas 2022 {BYSHC} Linky Party!! I love when a card idea comes to fruition!! And it's even better when it turns out pretty! LOL! I used products today from a few of our wonderful Sponsors of the Spring into Christmas Linky Party... Gina Marie Designs, Gina K. Designs, and Twiddler's Nook!!!


The wonderful pine sprigs from the Pine Needle Sprigs dies from Gina Marie Designs really started off the whole card. My coffee cup ornaments are from the Coffee Therapy stamp set from Gina K. Designs... so cute!


The beautiful sentiment is also a die - the Cursive Merry Christmas dies from Gina Marie Designs. You may remember this die from my Framed Silhouette card that I shared a few days ago. My kraft background is embossed with the Snowflake Swirl embossing folder by Darice and I lightly rubbed the raised snowflakes with my Picket Fence Distress Ink pad. I die cut my snowflake embossed background with a large stitched rectangle die from My Favorite Things called Blueprints #15.


My sweet little coffee cup ornaments are stamped with Pure Poppy ink from Papertrey Ink. I fussy cut them leaving a very skinny white border. I used my 1/8" hole punch for just under the handles and adhered the pretty twine just behind the cups with some tear tape. Each of the ornaments are popped up on the card with foam tape.


I added sweet tiny red rhinestones from Twiddler's Nook to each of the coffee cup ornaments. And also added a few green rhinestones in the centers of some snowflakes. Here you can see some of the dimension of the card. The sentiment is raised by die cutting it three times from red card stock and then I adhered them all together. The coffee cups and the snowflake background are all popped up with lots of foam tape.


I adhered the bottom layer of pine needle sprigs directly to the snowflake background but all the other sprigs are just adhered at the very top... under the kraft scalloped strip. This allows some of the sprigs to give dimension to the card. The ornament strings are adhered behind the snowflake background with tear tape. I die cut a piece of red card stock and a piece of kraft card stock with the stitched scalloped die from Stitched Scalloped Basic Edges dies from My Favorite Things. I adhered them together and then adhered them on top of the sprigs with liquid glue.


We're nearing the end of the Spring into Christmas 2022 {BYSHC} Linky Party! I hope you'll try to play along with us... there's some lovely prizes up for grabs!! Even if you're not able to play along, I hope you'll stop by and check out all the sweet inspiration being shared! So many beautiful cards!! I'll see you tomorrow with my last card for the Linky Party!


Thanks so much for stopping by!
See ya next time.

Inky Hugs,
Crystal


{Please note that comment moderation is ON. Your comment will appear shortly.}

Monday, April 25, 2022

Spring into Christmas 2022 {BYSHC} Linky Party ~ Do You Wanna Build a Snowman ~ Taylored Expressions

 Hello there crafty friend!
I can't believe that it's already Day 4 of the Spring into Christmas 2022 {BYSHC} Linky Party!! This party is just zipping by... I hope that you've stopped by the {BYSHC} blog to see all the wonderful inspiration being shared! I've been so inspired by all the wonderful cards! Today, I have a card using the Do You Wanna Build a Snowman die from new Sponsor Taylored Expressions. Unfortunately, I believe this die is retired since I couldn't find it on the website, but I did see a few other silhouette style dies over in the shop if you're interested in doing a bit of shopping. *wink*wink* 


I paired up the sweet silhouette die with the Cursive Merry Christmas Word die from Sponsor Gina Marie Designs and I also used the Frames: Scalloped Stitched Rectangles die from Sponsor Gina Marie Designs. Sometimes it's fun to just play with all those die cuts and not stamp!


I ink smooshed my background on Tim Holtz/Ranger Distress Watercolor card stock with Iced Spruce, Chipped Sapphire and Black Soot Distress Oxide inks. I focused the lighter ink where the lamp is and then used the darker Chipped Sapphire in the middle. And the Black Soot on the other side... giving the illusion of light. 


I did a bit of water splatter - which is basically just spritzing some water in your hands and clapping over your ink smooshed background. I used a paper towel to dab up the extra water and dried my background with my Mini Wagner heat tool. And then I added some Apple Barrel white acrylic paint splatter for my snowy background. I adhered the silhouette die cut to the back of the scalloped frame die cut before adhering it to the card as one piece. I thought it was an easier way to place the silhouette die exactly where I wanted it.


I die cut the sentiment three times and adhered the sentiments all together for some nice dimension. I adhered my layers to a white A2 top fold card base. Now rather than adding another layer like a black card front... I decided to use my Memento Tuxedo black marker and I colored around the edge of the white card base. It actually worked really well! Can you tell I colored the edges?


I sure hope I've inspired you to get inky and get a jump on those holiday cards! I was so relieved last year during the holidays that I didn't have to stress over making a bunch. I actually had extras left over! Head on over to the  Spring into Christmas 2022 {BYSHC} Linky Party to see all the fabulous inspiration being shared so far! Even if you're not able to play along, I hope that you'll stop by and check out all the sweet inspiration being shared! So many beautiful cards!!


Thanks so much for stopping by!
See ya next time.

Inky Hugs,
Crystal


{Please note that comment moderation is ON. Your comment will appear shortly.}