Showing posts with label #topiisketch23. Show all posts

Tuesday, July 23, 2024

Christmas in July 2024 {BYSHC} Linky Party ~ TOP Inky Inspiration Sketch 23 ~ Santa's Workshop ~ Jaded Blossom

 Hello there crafty friend!
It's day 5 of the Christmas in July 2024 {BYSHC} Linky Party!! I'm adding another sweet card to my Christmas stash! This time I played with the super cute Christmas Village: Santa's Workshop stamp set from Sponsor Jaded Blossom. I'm also sharing inspiration for the Tawny Owl Paperie Inky Inspiration Sketch Challenge 23 in the Tawny Owl Paperie Inky Inspiration Facebook group. In my continuing effort to finish off some paper scraps I did use a few scraps of pattern paper from one of my Christmas paper pads. Every little bit counts!


I paired up the cute Christmas Village: Santa's Workshop with the Brewing It Up 6x6 Paper Pad from our Sponsor Not 2 Shabby! Love these pretty papers! I adhered all of my background layers using the iCraft UltraBond Adhesive from Sponsor Therm O Web. I die cut a panel of white card stock using the Wonky Stitched Rectangle Die from Sponsor Gina Marie Designs and adhered the two smaller rectangles to the panel. I then added foam tape called iCraft 3D Foam Tape Jumbo Roll (white), also from Therm O Web, to the back of the whole combined panel and popped it up on the card.


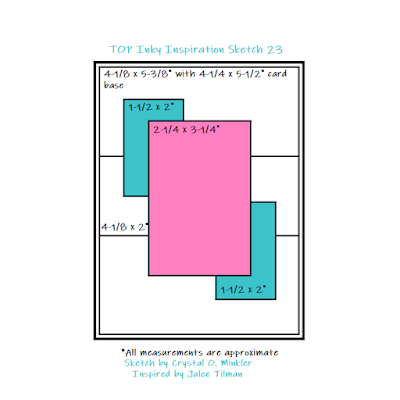
Here's a look at the fun sketch for Tawny Owl Paperie Inky Inspiration Sketch Challenge 23. The sketch, as always, is meant to inspire not require. So let the sketch lead in your design, but don't feel limited by it. A great example is how I turned the sketch for a landscape card. This fun sketch challenge ends July 29th!!


I wanted to add a bit of snow to my panel so I die cut a scrap of white card stock using the hill die from the Land Borders Die Set from Sponsor Newton's Nook Designs. I trimmed it and adhered it to the bottom of the panel. I then fussy cut Santa's Workshop. Boy was that a task! About halfway through my third or fourth Christmas light, I was wishing I had left a nice white border around the image. Hahaha... anywho, I colored the edge of the fussy cutting using a Memento Tuxedo Black marker making it all nice and neat and then I adhered it to the panel. Next I stamped a sentiment from the Big & Bold Santa's Sleigh Slimline stamp set from Sponsor Colorado Craft Company.


To finish off the card I added a bunch of cute little clay snowflakes from the Christmas Confetti Clay Embellishment Mix from Sponsor Twiddler's Nook. I love how this card turned out! And I think I used products from 7 of our amazing Sponsors. Woohoo! That may be a record!! 

Here's a quick list of the Copic markers I used: 
Workshop / Chimney: E53, E55, E57
Windows: Y11, Y15
Doorknob: Y11, Y15, Y28
Snow: C00, C1, C3
Wreath: YG11, G24, G46, R20, R14
Santa's Workshop Sign: R20, R14
Christmas Lights: R20, R14, B0000, B00, YG11, G14, Y11, Y15
Flags: R20, R14, YG11, G14
North Pole Sign: YG11, G24, G46
Pole: R20, R14, C00, C1, C3, E53, E55, E57


If you haven't already, stop by the Christmas in July 2024 {BYSHC} Linky Party to check out all the wonderful Holiday inspiration being shared!! So much amazing inspiration! You can't help but be inspired to make a card or two! Have an ink-tastic week!

Thanks so much for stopping by!
See ya next time.

Inky Hugs,
Crystal


{Please note that comment moderation is on. Your lovely comment will appear once approved.}

Tuesday, July 9, 2024

Tawny Owl Paperie Inky Inspiration Sketch 23 ~ Sammy Girl ~ Unity Stamp Co.

 Hello there crafty friend!
Today I'm sharing a another card for the Tawny Owl Paperie Inky Inspiration Sketch Challenge 23 in the Tawny Owl Paperie Inky Inspiration Facebook group. I'm still using up some of my leftover papers from old card kits from my Scrapping for Less days a few years ago. I made another mermaid card! The papers kind of dictated the theme of this card.


And the papers actually dictated a landscape card rather than a portrait card because of the direction of the images in my scraps. My bottom layer is a little smaller than the sketch calls for but I made it work. I cut mats for the small rectangle pieces because they seemed to get lost in the background papers. I used Tempting Turquoise card stock from Stampin' Up for my mat and card front layers. 


Here's a look at the fun sketch for Tawny Owl Paperie Inky Inspiration Sketch Challenge 23. The sketch, as always, is meant to inspire not require. So let the sketch lead in your design, but don't feel limited by it. A great example is how I turned the sketch for a landscape card.


Sammy Girl is stamped with Black Amalgam ink from Gina K. Designs. I also stamped the sentiment on a scrap of white card stock. I colored up Sammy Girl with my Copic markers and fussy cut her on the line. I used a Memento Tuxedo Black marker to color the edges of the fussy cutting. This helps to make the fussy cutting look nice and neat. I added some texture to my coloring by adding dots of Copic marker and then I added some Sakura White Gelly Roll pen dots too.  

Here's a quick list of the Copic markers I used: 
Skin: E000, E00, E11
Hair: Y21, YR23, E97, E99
Mermaid: B000, B00, B02, B04, V12, V15, Y11, Y15
Shell Necklace: B000, B00, B02, B04


I die cut a circle of vellum card stock using a die from the Scallop & Circles {nesting dies}. All of my layers are adhered directly to the card front. No foam tape for this one. My card front is adhered to a white A2 top fold card base. I finished off the card with a few glitter enamel dots from my stash. I hope you all have fun with this sketch! Have an ink-tastic week!

Thanks so much for stopping by!
See ya next time.

Inky Hugs,
Crystal


{Please note that comment moderation is on. Your lovely comment will appear once approved.}

Tuesday, July 2, 2024

Tawny Owl Paperie Inky Inspiration Sketch 23 ~ Sea Babies ~ Avery Elle

 Hello there crafty friend!
Today I'm sharing a couple more cards for the Tawny Owl Paperie Inky Inspiration Sketch Challenge 23 in the Tawny Owl Paperie Inky Inspiration Facebook group.  I had a look through my old card kits from my Scrapping for Less days a few years ago. These are the kits I've been pulling my leftover papers from and I grabbed a cute kit that had a decent amount of paper. But what I was really drawn to was the adorable mermaid. I didn't create anything for Mer-May so I'm late but I'm excited I finally made a mermaid card... actually two! 


I cut my papers to the measurements on the sketch except for the small rectangles on the pink mermaid card {right side}. Those rectangles were scraps and I just went with them. I adhered my background papers together and then adhered them to a 4-1/4 x 5-1/2" card front of Island Indigo card stock from Stampin' Up. After copic coloring the mermaids and fish. I fussy cut the fish on the line and cleaned up my cutting by coloring the edges of the fish with a Memento Tuxedo Black marker. I adhered the fish to the focal panel and adhered the focal panel to the small rectangles. And then I added foam tape to the back of the whole thing, including little pieces for the fish tails.


Here's a look at the fun sketch for Tawny Owl Paperie Inky Inspiration Sketch Challenge 23. The sketch, as always, is meant to inspire not require. So let the sketch lead in your design, but don't feel limited by it. 


I adhered the fish to the focal panel and adhered the focal panel to the small rectangles. And then I added foam tape to the back of the whole thing, including little pieces for the fish tails. I removed the backing from the foam tape and popped them up on the card. 

Here's a quick list of the Copic markers I used: 
Skin: E000, E00, E11
Hair: Y21, E95, E97
Purple Mermaid: V000, V12, V05, RV0000, RV10, RV11
Pink Mermaid: RV0000, RV10, RV11, V000, V12, V05
Yellow/Orange Fish: Y11, Y06, Y15, YR21, YR15, YR16
Orange Fish: YR21, YR15, YR16


I added a couple flat back pearls to the cards to finish them up. These were in the kits so I'm not really sure where they are from. My card fronts are adhered to a white A2 top fold card base. I hope you all have fun with this sketch! I can't wait to see what you create with it. Have an ink-tastic week!

Thanks so much for stopping by!
See ya next time.

Inky Hugs,
Crystal


{Please note that comment moderation is on. Your lovely comment will appear once approved.}
Tuesday, June 25, 2024

Tawny Owl Paperie Inky Inspiration Sketch 23 ~ Coffee is Not Enough ~ Unity Stamp Co.

 Hello there crafty friend!
Today I'm sharing my first card for the Tawny Owl Paperie Inky Inspiration Sketch Challenge 23 in the Tawny Owl Paperie Inky Inspiration Facebook group.  I couldn't resist playing with this fabulous new release from Unity called Coffee is Not Enough.


I definitely take this sentiment to heart! Hahaha... a new fave, for sure! And she was so much fun to color up! I knew the background was going to be all neutral so I wanted her to pop with lots of color. Speaking of the background... I paired her up with the awesome Perk Me Up {paper pack} from Unity. Love all the fabulous patterns in these papers! It was hard to pick and choose what I wanted to use for the card.


Here's a look at the fun sketch for Tawny Owl Paperie Inky Inspiration Sketch Challenge 23. The sketch, as always, is meant to inspire not require. So let the sketch lead in your design, but don't feel limited by it. I added dimensions as a guide, but my focal image is larger than the one on the sketch. A good example of letting the sketch lead, but not limiting the design.


 I found a stitched rectangle on my desk for a kind of backdrop for the girl and kitty. It was die cut using the smallest die from the Scallops & Rectangles {nesting dies}. I probably could of softened the white with a bit of Antique Linen Distress ink but in the moment I was liking the pop of white. I colored up the girl and kitty using my Copic markers. Fussy cut them leaving a bit of a white border around the images.

Here's a quick list of the Copic markers I used: 
Skin: E000, E00, E11, E04
Hair: E70, E71, E74, E77
Pajamas: R20
Robe: BV20, BV11, BV34
Mug: BG000, BG01, BG45
Coffee: E51, E23, E25
Slippers: Y11, Y15, Y38
Kitty: R00, R20, C00, C1, C3


I adhered the stitched rectangle to the smaller pattern paper rectangles and then I added foam tape to the back of the whole panel. Popped them up on the card for some fun dimension. I trimmed up the sentiment and added a small piece of foam tape on the far right side so it would lay flat on the card. All of my layers are adhered to a white A2 top fold card base. I hope you all have fun with this sketch! I can't wait to see what you create with it. Have an ink-tastic week!

Thanks so much for stopping by!
See ya next time.

Inky Hugs,
Crystal


{Please note that comment moderation is on. Your lovely comment will appear once approved.}