Friday, August 30, 2024

{BYSHC} Sketch Challenge 48 ~ Winnie the Pooh: Snowone More Wonderful ~ Unity Stamp Co.

Hello there crafty friend!
I'm back with more inspiration for the Build Your Stash Holiday Cardmakers Facebook group! Today I'm sharing a sweet holiday card featuring the adorably sweet Winnie the Pooh: Snowone More Wonderful stamps from our fabulous sponsor, Unity Stamp Co.! Unity has generously offered up a $25 gift card as a prize for the {BYSHC} Sketch Challenge 48 this month! So awesome!!


I'm super excited to be sharing another holiday card featuring this adorable stamp from Unity! I love Winnie the Pooh and I hadn't inked up this sweet stamp until now. I stamped it with Black Amalgam ink and Copic colored Pooh bear and the snowman with the following Copic markers:

Winnie the Pooh: Y11, Y15, Y35
Gloves / Scarf: YG11, G24, G46, G29
Snowman: C00, C1, C3, YR000, YR15, YR16, N0, N2
Hat: N0, N2, N4, N6
Snowman Scarf: R20, R14, R46
Branches: E55, YR11, G24


I then die cut them using a die from the Scallops & Circles {nesting dies}. I also die cut a mat of True Black card stock from Papertrey Ink using the largest circle die from the set. Unfortunately the whole image was a little too big so I had to trim off the tree and a bit of the snowman's other arm but I think it's still nice. You can see a tiny bit of the star and an ornament from the tree on the edge. I adhered the circles together and then trimmed off the excess from the black mat. I set those aside and found another one of my favorite holiday paper pack from Unity called Cozy Christmas {paper pack}. I had several scraps in this paper pack so I knew it would be perfect for this sketch. I adhered them to a thin piece of card stock and then I trimmed off the excess.


I trimmed the background panel down to 3-7/8 x 5-1/8". I adhered it to a mat of Pure Poppy card stock from Papertrey Ink measuring 4 x 5-1/4". I then scored an A2 card base of True Black card stock measuring 4-1/4 x 11 at 5-1/2". And then I adhered the panel to the card base. I heat embossed the sentiment using my go to favorite products... I prepped the card stock with the TE Anti-Static Powder Tool, stamped the sentiment with Sugar Cube White Pigment ink from Taylored Expressions, dusted the wet ink with Alabaster White Embossing Powder from Brutus Monroe and then melted the powder with a Wagner Precision Heat Tool. I trimmed up the sentiment and adhered it to the partial circle and then I added foam tape to the back of both and popped it up on the card.  Love how this one turned out!


Here's a look at {BYSHC} Sketch Challenge 48 for the month of August. I love this month's sketch! It's definitely become a favorite! The stripes in the background can be just striped paper or can be created using papers from a paper pack or even just random complimentary papers from a paper stash! If you're interested in seeing a bit more inspiration for this sketch, check out the amazing inspiration from the design team over on the {BYSH} Cardmakers blog! We'd love for you to play along with us but remember tomorrow is the last day to enter this challenge!!


Thanks so much for stopping by!
See ya next time.

Inky hugs,
Crystal


{Please note that comment moderation is ON. Your lovely comment will appear shortly.}

Wednesday, August 28, 2024

Membership Wednesday ~ Halloween Card ~ August 2024 KOM Thanks in All the Things ~ Unity Stamp Co.

  Hello there crafty friend!
Today I'm sharing a fun no-layer ink blended Halloween card featuring the cool moon and bats stamp from the August 2024 Kit of the Month membership from Unity called Thanks in All the Things. I think this is my third or fourth card using this awesome kit. It's safe to say that this has been my MOST favorite kit! I love it! I'm just bummed I didn't get to the sweet fawn or the flowers!


I started by ink blending Squeezed Lemonade Distress Oxide ink in a circular motion near the top center of my card base. And then I blended a little Mustard Seed Distress Oxide ink in a circular motion around the lighter yellow. Once I was happy with that blend, I went back over the center a tiny bit more with the Squeezed Lemonade Distress Oxide ink. And then I blended Carved Pumpkin Distress Oxide ink around the rest of the front of the card base. I blended around the yellow just a smidge with Mustard Seed to give it a nice blend with the orange.


I'm playing along with the Color Hues Challenge today! Orange and Yellow are so perfect for a Halloween card! This fun challenge is open until August 29th, if you want to play along! 


I probably should have dried the oxide ink, but I was already late making dinner so I just decided to go for it! I stamped the moon and bat stamp and the sentiment with Black Amalgam ink. I did use an acetate grid to double check my placement for the bats and the sentiment. I quick cut two post-it notes to place over the bats and sentiment and then I went a little nuts with the black acrylic paint splatters.


That was it! A super quick Halloween card... I think it took me 10 minutes tops! AND I still had dinner ready by 6pm. LOL! 
 

Here's a quick look at this month's Kit of the Month membership! LOVE it SO MUCH!!

Well, that's it for me today! I hope you've been inspired to play with your membership stamps! 
Hope you have an inkredible day!


Thanks so much for stopping by!
See ya next time.

Inky Hugs,
Crystal


{Please note that comment moderation is on. Your lovely comment will appear once approved.}

Tuesday, August 27, 2024

Tawny Owl Paperie Inky Inspiration Sketch 25 ~ Speedy ~ Unity Stamp Co.

 Hello there crafty friend!
It's time for a new sketch challenge! Today I'm sharing my first card for the Tawny Owl Paperie Inky Inspiration Sketch Challenge 25 in the Tawny Owl Paperie Inky Inspiration Facebook group.  I pulled out this adorable stamp the other day but didn't get around to using it so I thought it would be fun for this new sketch.


I didn't pick a pack of papers {say that 3 times fast!} yet to finish up. Still hoping to find a Fall themed paper pack. So I went looking through my Unity papers for papers that would go well with this little cutie. And, of course, the By The Sea {paper pack} is just perfect!


Here's a look at the fun sketch for Tawny Owl Paperie Inky Inspiration Sketch Challenge 25. The sketch, as always, is meant to inspire not require. So let the sketch lead in your design, but don't feel limited by it.


 I stamped the adorable Speedy turtle using Black Amalgam ink from Gina K. Designs. I also stamped the sentiment using the same ink except that I masked the heart. After stamping the sentiment a few times in my Stamp Platform, I stamped the little heart. For this I used the Pink Zig Clean Color Real Brush marker. I colored up the turtle using my Copic markers. Fussy cut him on the line and then cleaned up the fussy cutting by coloring the edges with a Memento Tuxedo Black marker.

Here's a quick list of the Copic markers I used: 
Turtle: BG000, BG10, BG70, BG72
Shell: BG70, BG72, BG75
Hearts: R81, R83, R85


I die cut a circle of white card stock using a die from the Scallops & Circles {nesting dies}. All my layers are adhered directly to a white A2 top fold card base turned on its side for a landscape card. I added a scrap of paper under the top of the sentiment so it would lay flat. I added foam tape to the back of the turtle and popped him up on the circle. And then I finished off the card with three pink enamel dots from my stash. Still trying to make a dent in my enamel dots stash. Yikes! Do I have a lot!!

 I hope you all have fun with this sketch! I can't wait to see what you create with it. 
Have an ink-tastic week!

Thanks so much for stopping by!
See ya next time.

Inky Hugs,
Crystal


{Please note that comment moderation is on. Your lovely comment will appear once approved.}

Monday, August 26, 2024

Inky Paws Challenge #230 ~ Color Challenge Reminder

 Hello there crafty friend!
 There's still time to play along with the Inky Paws Challenge #230 - Color Challenge! You have until this coming Friday, August 30th to get your entries in for the challenge and a chance to win a $20 store credit to Newton's Nook Designs!


Here's another look at the fun colors... Eggplant, Raspberry, Apricot, and Jade Green.


I decided to go with a simple design for today. I can't wait for Fall to arrive and maybe a cozy Fall card will help it get here quicker...?! Maybe?! A girl can dream! I was so happy to discover that the Autumn 6x6 Paper Pad have some of the colors for this challenge. I love the green polka dot paper! I made it my background and cut it to 5-1/2 x 4-1/4". I then die cut the fun plaid papers using a die from the Basic Frames Die Set


I stamped the cute kitty, chair and blanket from the Cozy Home Stamp Set using Memento Tuxedo Black Ink and colored them up with my Copic markers. I then die cut each of them using the coordinating Cozy Home Die Set

Here's a quick list of the Copic markers I used:
Kitty: N0, N2, R00, R20
Chair: RV10, RV52, RV55, E51, 55, E57
Blanket: RV66, RV69, RV99


I mat the plaid papers with a simple 3-1/2 x 2-3/4" piece of Kraft card stock from Papertrey Ink. I stamped the sentiment on a scrap of white card stock, trimmed it, and popped it up on the card with foam tape.


Now it's your turn to get your paws inky with your Newton's Nook Designs products and create a project with the color combo of Eggplant, Raspberry, Apricot, and Jade Green. Be sure to link up to the Inky Paws Challenge! Can't wait to see your projects!


Thanks so much for stopping by!
See ya next time.

Inky Hugs,
Crystal


{Please note that comment moderation is on. Your lovely comment will appear once approved.}

Saturday, August 24, 2024

Happy Birthday To You ~ Chunky Chevron Stencil ~ A Colorful Life Designs

 Hello there crafty friend!
We just celebrated our eldest son's 25th birthday and I wanted to quick share the card I made for him. I used the awesome Chunky Chevron Stencil from A Colorful Life Designs. I am a huge fan of their stencils! All so awesome and unique!


I started this card with a 4-1/4 x 5-1/2" card front of Lemon Lime Twist card stock from Stampin' Up. I laid the fun Chunky Chevron Stencil over the top of the card stock and secured it in place with some washi tape. I then blended Crushed Olive and Mowed Lawn Distress Inks over the stencil.


I shifted the stencil to fill the empty spaces and blended Black Soot Distress Ink over the stencil. I die cut the panel using the Deckle & Stitches Nesting Dies from Unity. I then adhered the panel to a black A2 top fold card base turned on its side for a landscape card. I didn't actually plan to make a landscape card. When I went looking through my Lawn Fawn dies, I realized I didn't have the giant happy birthday die. I just have the Giant Happy Birthday To You die which is too big for a portrait card. 


I die cut Lemon Lime Twist card stock twice using the Giant Happy Birthday To You die and I die cut it one more time from True Black card stock from Papertrey Ink. I adhered the Lemon Lime Twist die cuts together and then adhered them offset to the black die cut. I love the dimension this gives to the sentiment. Hope you're having a wonderfully inky weekend friends!

Thanks so much for stopping by!
See ya next time.

Inky hugs,
Crystal


{Please note that comment moderation is on. Your lovely comment will appear once approved.}

Friday, August 23, 2024

August Scraps Cards {Take Two} ~ Queen Girl & Some Other Stamps ~ Unity Stamp Co.

 Hello there crafty friend!
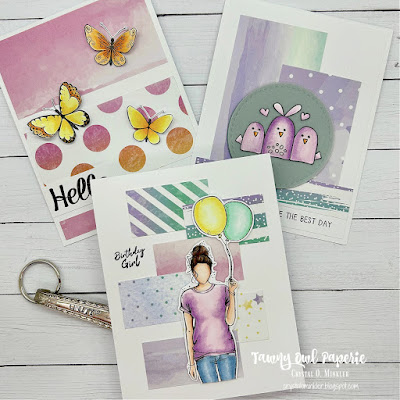
Today I'm sharing a trio of cards I created using up the rest of the leftover scraps I've been trying to finish up this month. SO excited to be done with another pack of scraps! Woohoo!! I also inked up some very neglected and untouched stamps from Unity Stamp Co. including the gorgeous Queen Girl.


Here's a look at the three cards all together. All so sweet and fun! I'd love to know if you have a favorite of the three... mine is probably Queen Girl, but I do love how they all turned out.


I went with a simple background for my first card. I had two larger panels and a small strip of pattern paper so I adhered them as shown leaving some white space of my white card base showing. Such a fun and simple card design. The beautiful butterflies are from a retired set of stamps called 3 Little Butterflies. I got these a long time ago and finally inked them up! So sad to discover that they are no longer available at Unity. They are so pretty!


 I stamped them with Black Amalgam ink and colored them up with the following Copic markers: Y11, Y15, Y38, YR21, YR15, YR16. I fussy cut the butterflies and colored the edges using a Memento Tuxedo Black marker. I bent the wings up a bit and adhered the butterflies to the card just at the base of the their little bodies. I love the dimension this gives to the card! They look like they are just stopping by for a quick visit. I stamped the sentiment from the same set, trimmed it up and adhered it directly to the card.


My second card uses up three more pieces of pattern paper. They all had similar colors so it just made sense to pair these ones up. I also found a circle scrap that was die cut from Ocean Tide card stock from Papertrey Ink. It's the perfect shade for the greeny-blues in the pattern paper. I did die cut another circle from Vellum card stock also from Papertrey Ink to adhere over it just to soften the color a little bit. The pattern papers are adhered to 4 x 5-1/4" piece of Stampers Select White card stock from Papertrey Ink. And then I adhered the panel to a white A2 top fold card base. All of my white papers are almost always Stampers Select White card stock.


Inspiration for this card came from the Tawny Owl Paperie Inky Inspiration Sketch 22. Such a great sketch for these random pieces of pattern paper! It was perfect for these three pieces!


I stamped the adorable birds from the Many Happy Birdies... which is also retired. So sad! Just like the butterflies, I had never inked these cuties up so I'm glad I finally did. I colored up the birdies... OH MY. I just realized I didn't color the middle birdies dots! LOL!! Well, imagine they are white because that's what I planned on coloring them... anywho, I colored up the birdies with the following Copic markers: V0000, V000, V01, V12, V15, YR21, YR15, RV52. Also just like the butterflies, I fussy cut the birdies and colored the edges with a black marker. I adhered them to the vellum circle and then added glue to the vellum just behind the birdies. I popped up the circle layer with foam tape and stamped the sentiment. So easy peasy and cute!


My third and last card today uses up the last of my scraps. All of these six little rectangles are about the same size. I thought it would be fun to do a wonky stairs design with them. I really love how it turned out. And I think having the girl touch all six pieces of the pattern paper really brings the whole design together. All six pattern papers are just adhered to a white A2 top fold card base. No extra layers here.


I stamped the gorgeous Queen Girl and colored her with my Copic markers. I fussy cut her leaving a white border around the edges. Before I popped her up on the card with foam tape, I stamped the sentiment directly onto the card base. I am really loving this card and the fun design. I think I might turn it into a sketch... whatcha think?

I used the following Copic markers for Queen Girl:
Skin: E000, E00, E11
Hair: E33, E35, E37
Shirt: V0000, V000, V01, V12, V15
Jeans: B91, B93, B95
Balloons: Y000, Y11, Y13, G000, G00, G02


 I am so ecstatic to have another paper pack totally done! I'm going to look through my papers and see if there's a Fall themed one maybe for next month. There's just a few more days left to play along with the Tawny Owl Paperie Inky Inspiration Sketch Challenge 24. I'll be back on Tuesday of next week with a brand spanking new sketch challenge!! Woohoo! I hope you have a wonderfully inky weekend!

Thanks so much for stopping by!
See ya next time.

Inky Hugs,
Crystal


{Please note that comment moderation is on. Your lovely comment will appear once approved.}

Thursday, August 22, 2024

Best Chick in Town ~ Witty Chick Whimsy ~ Unity Stamp Co.

Hello there crafty friend! 
I'm back with another fun chicken card for Unity's latest release. I can't get enough of all the awesome chicken stamps!! The Witty Chick Whimsy stamp is just so beautiful with the flowers and the glasses!! Love it!! This beautiful stamp is also available in photopolymer... {Clearly Unity} Witty Chick Whimsy. I love the options of either red rubber or clear photopolymer!!


I stamped the sweet chicken and sentiment using Black Amalgam ink from Gina K. Designs and then I colored up the chicken with my Copic markers. I then die cut the chicken using a die from the Scallops & Circles {nesting dies}.

Here's a quick list of the Copic markers I used:
Chicken: YR000, YR12, YR07, Y21, Y15, Y26, BG70, BG72, BG75
Flowers: Y21, Y15, Y26, YR000, YR07, YG91, YG03
Ground: C00, C1


Even though the {BYSHC} Sketch Challenge 48 is for Christmas cards, it doesn't mean it can't be used for other occasions! {Please just remember if you do use the sketch, you can't share it in the BYSHC Facebook group unless it's Christmas or winter themed.} But I'd love for you to share in my Tawny Owl Paperie Inky Inspiration group! As with all of my sketches, it's meant to inspire not require! So as I often do, I altered the design just a bit by adding another layer.


This sketch is fantastic for paper scraps but since this is a new paper pack that I just added to my stash, I cut random strips from all of the papers. I think I just did 1/4" and 1/2" strips and then made a fun pattern with them on a 4 x 5-1/4" piece of thin white card stock. I cut off the excess from the edges and die cut the papers using the stitched rectangle die from Scallops & Rectangles {nesting dies}. I then die cut the grid pattern paper using the largest die from the same die set. I think it's a wonderful contrast to the different patterns! I adhered my layers together on an A2 top fold card base of Kraft card stock from Papertrey Ink.


I placed the circle on the top layer and used a pencil to mark where I wanted to cut the edge. I used the Tim Holtz Tonic Guillotine Comfort Paper Trimmer to cut that edge. I trimmed up the sentiment and adhered both pieces to the card. To finish this one off, I added some Ranger Glossy Accents to the glasses for some fun shine. Love how this turned out! I hope you have an inkredible day! 

Thanks so much for stopping by!
See ya next time.

Inky hugs,
Crystal

{Please note that comment moderation is on. Your lovely comment will appear shortly.}

Wednesday, August 21, 2024

Membership Wednesday ~ August 2024 KOM Thanks in All the Things ~ Unity Stamp Co.

  Hello there crafty friend!
Today I'm sharing a fun ink smooshed card featuring the awesome owl stamp from the August 2024 Kit of the Month membership from Unity called Thanks in All the Things. I love to use ink smooshing around an image to create clouds and in this case it also creates depth.


I started by ink smooshing a bit of Tumbled Glass and Antique Linen in the center of a card front of Kraft card stock from Papertrey Ink. The Kraft card stock makes the inks a bit muted and maybe a touch spooky, too. I love it! I wanted the center to stay lighter so I ink smooshed Tumbled Glass, Stormy Sky, and Chipped Sapphire Distress Inks around the outer edges of the card front. 


I heat embossed the owl being sure the owl was in the center of the lighter ink smooshes. I dried the ink smooshed panel completely with a Wagner Precision Heat Tool and then I prepped the card stock using a TE Anti-Static Powder Tool from Taylored Expressions. I stamped the owl with Black Amalgam ink from Gina K. Designs and then dusted the wet ink with Hero Arts Fine Clear Embossing Powder. I melted the powder with the heat tool. I then die cut the panel using the largest die from the Deckle & Stitches Nesting Dies from Unity. 


Since I heat embossed the owl, I decided to watercolor the owl. I just added a touch of brown ZIG Clean Color Real Brush marker to the branch and then for the owl I used beige. I blended it out with a bit of water using a water pen. I used a Sakura White Gelly Roll pen to add some white accents and highlights to the owl. I softened it using the water pen. I adhered the die cut panel to an A2 top fold card base of True Black card stock from Papertrey Ink. I masked and then stamped the sentiment from the August 2024 Uniquely Unity membership called Soulful Owl. To mask I lay post it notes over both ends of the sentiment and then ink up the stamp. I then remove the post it note masks and stamp. I recommend doing this in a misti or Stamp Platform so you can stamp it a few times for good coverage. I forgot to take a photo but I die cut a piece of white card stock using the same die from the Deckle & Stitches Nesting Dies. Without adding any ink to my blending brush I blended Black Soot Distress Ink over the white panel. It was very light though so I can still write a note inside the card. I then adhered the panel inside the card to finish this one off.
 

Here's a quick look at this month's Kit of the Month membership! LOVE everything about it!! So many amazing stamps!

Well, that's it for me today! I hope you've been inspired to play with your membership stamps! 
Hope you have an inkredible day!


Thanks so much for stopping by!
See ya next time.

Inky Hugs,
Crystal


{Please note that comment moderation is on. Your lovely comment will appear once approved.}

Tuesday, August 20, 2024

Tawny Owl Paperie Inky Inspiration Sketch 24 ~ Incredibly Grateful ~ Unity Stamp Co.

 Hello there crafty friend!
Today I'm sharing inspiration for the Tawny Owl Paperie Inky Inspiration Sketch Challenge 24 in the Tawny Owl Paperie Inky Inspiration Facebook group. I'll be honest, not totally sure I'm loving how this card ended up. I love this stamp though and had to use it for my card! But not sure it's balanced or maybe it's just that I didn't ground the pumpkins. Not sure. 


Anywho, I really do love the Incredibly Grateful stamp that was just released over at Unity last week! This is the perfect stamp for Fall! I think I've mentioned before that I love to color pumpkins. They are one of my most favorite images to color. 

Here's a quick list of the Copic markers I used to color this stamp up:
Oak Leaves: Y11, Y06, Y15, YR15, E55, R14
White Pumpkin: C00, C1, C3, E51, E55, E57
Orange Pumpkin: YR21, YR15, YR68, YR27, E51, E55, E57
Sunflower: Y11, Y06, Y15, Y38, E51, E55, E57, YG11, YG61, YG63
Berries: R20, R14, R35, R59
Branch: E51, E55, E57
Frond: YG11, E55


Here's a look at the fun sketch for Tawny Owl Paperie Inky Inspiration Sketch Challenge 24. The sketch, as always, is meant to inspire not require. So let the sketch lead in your design, but don't feel limited by it. I like to think my inspiration is usually a good example of this since I'm always adjusting the sketch. Today is no different since I turned the sketch for a landscape card and added the vellum layer to soften the background just a bit.


 My background layer is a beautiful piece of pattern paper from the Falling Leaves {paper pack}. I love the yellows and oranges in these papers! So perfect for Fall! I just used a scrap from my paper pack and adhered it to a Kraft A2 top fold card base turned on its side for a landscape card. The vellum was also a scrap that I trimmed down just a tad to make it a rectangle. Still using those scraps! 


I fussy cut the Incredibly Grateful stamp on the line and then I fussy cut the sentiment leaving a white border. I adhered them both to the vellum and then I added glue behind the pumpkins and sentiment and adhered the vellum to the card. I needed something on the left side to help adhere that side of the vellum so I added three enamel dots. Ugh... I was in a hurry to take the photos and get my blog post done so PLEASE ignore that the glue is visible around the enamel dots in my closeup photos. LOL! I know it'll dry clear and be just find. It is what it is. There's still time to play along with the TOPII Sketch 24! It ends on Monday, August 26th. I hope you can play along! Have an inktastic week!

Thanks so much for stopping by!
See ya next time.

Inky Hugs,
Crystal


{Please note that comment moderation is on. Your lovely comment will appear once approved.}

Monday, August 19, 2024

Inky Paws Challenge #230 ~ Color Challenge

Hello there crafty friend!
It's time for a new Inky Paws Challenge... a beautiful Color Challenge
I sure hope that you'll join in the fun and play along with us with your Newton's Nook Designs products! You have until Friday, August 30th to get your entries in for the #230 Color Challenge and a chance to win a $20 store credit to Newton's Nook Designs!


Such an amazing color combo... Eggplant, Raspberry, Apricot, and Jade Green!! 


I had a fun idea using paper scraps and the adorable Cluck Stamp Set. It's a bit of a twist on a classic card design. I have a few die cut scraps leftover from a card I created earlier this month using the awesome Fractured Card Layout Die. And the cute chickens were still sitting on my desk so... here we are! I was surprised to find some fun papers in the Halloween Meows 6x6 Paper Pad that work really well with the colors in the color challenge.


I die cut the plaid papers from the Halloween Meows 6x6 Paper Pad using the largest die from the Frames & Flags Die Set. I adhered the papers to a white A2 top fold card base and then adhered the striped green papers along the left side as shown. I then adhered the fun triangle shape onto the card. I stamped the adorable chicken from the Cluck Stamp Set on a scrap of white card stock and colored it up with Copic markers that coordinated with the colors in the challenge.

Here's a quick list of the Copic markers I used for the chicken: E51, E21, E23, E25, YR21, YR12, RV10, RV52, RV55.


I die cut the cute chicken using the coordinating die from the Cluck Die Set. And then I heat embossed the sentiments on Elegant Eggplant card stock from Stampin' Up. I used my favorite combination of products for white heat embossing... I prepped the card stock with the TE Anti Static Powder Tool and stamped the sentiments with Sugar Cube White Pigment ink, both from Taylored Expressions. I dusted the ink with Alabaster White Embossing Powder and then melted the powder with a Wagner Precision Heat Tool. I trimmed up the sentiments fussy cutting a fishtail on one end and then popped them up on the card using Scrapbook Adhesive Crafty Foam Tape. I also popped up the chicken using the same foam tape to finish off the card.


Now it's your turn to get your paws inky with your Newton's Nook Designs products and create a project using the color combo of Eggplant, Raspberry, Apricot, and Jade Green. Be sure to link up to the Inky Paws Challenge! Can't wait to see your projects!


Thanks so much for stopping by!
See ya next time.

Inky Hugs,
Crystal


{Please note that comment moderation is on. Your lovely comment will appear once approved.}

Saturday, August 17, 2024

Happy Halloween Trio ~ Eerie Enchantment ~ Unity Stamp Co.

Hello there crafty friend! 
I'm back with a few fun Halloween cards! So excited to add three more Halloween cards to my stash! Woohoo! These three cards were SO super quick to make - it's bananas! All three cards feature stamps from the brand new Eerie Enchantment stamps from Unity! 


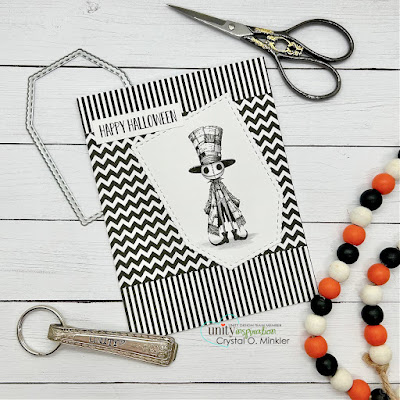
I stamped the scarecrow, witch and grim using Black Amalgam ink from Gina K. Designs and then I colored them up very simply with the following Copic markers: C00, C1, C3. I then die cut the witch using a die from the Scallops & Circles {nesting dies}. And I die cut the scarecrow and grim using a die from the Make A Tag {die set}.


Inspiration for my card today comes from the Tawny Owl Paperie Inky Inspiration Sketch 24. Such a versatile sketch! I love how quickly these cards came together! The sketch, as always, is meant to inspire not require. So let the sketch lead in your design, but don't feel limited by it. I hope you'll join us in the Tawny Owl Paperie Inky Inspiration Facebook group and play along with the sketch!


I wanted to keep the cards simple and easy to duplicate. So a black and white palette was perfect! I went looking through my pattern papers and was surprised to find the perfect papers in the Mousin' Mix Up {paper pack}. Yay! Luckily I had two paper packs so I could make the backgrounds all the same.


I think this last card just may be my favorite! I love the tag turned upside down. I stamped the sentiment three times and trimmed them up and then adhered them to the cards. So much fun and again SO super quick! I hope you have an inkredible day! 

Thanks so much for stopping by!
See ya next time.

Inky hugs,
Crystal

{Please note that comment moderation is on. Your lovely comment will appear shortly.}