Thursday, March 9, 2023

Luck To Go + No Bunny Compares ~ March Sketch Challenge ~ Unity Stamp Co.

 Hello there crafty friend!
Today I'm sharing more inspiration for the Unity March Sketch Challenge that I'm hosting in the Unity Show & Tell Facebook group. And I have two cards to share!! A fun St. Patrick's Day card and a sweet Easter card.


I've altered the measurements of the sketch for both of these cards so the images would work.


First up is the St. Paddy's Day card. I found some fun papers in my stash called Pot o' Gold from Doodlebug Designs. The plaid background is 4 x 5-1/4". Now the Luck to Go stamp is a bit taller and skinnier than the sketch calls for so my main panel measures 2-1/4 x 3-1/2" and the shamrock mat measures 2-1/2 x 4".


I centered the stamp on my main panel and stamped it with Black Amalgam ink. And then I colored it up with the following Copic markers ~ YG11, YG23, G14, G05, C00, C1, C3.


I adhered all my layers together also adhering them to a white A2 top fold card base. Stamped the sentiment on a scrap of white card stock with the same black ink. Trimmed it up and adhered it directly to the card with liquid glue.


Next up is a sweet Easter card using the adorable No Bunny Compares. I found another fun pack of papers in my stash with an Easter theme called Hoppy Easter from Doodlebug Designs. I cut my pink background paper to 4 x 5-1/4". The sweet girl and her bunny are a tad bigger than the sketch so for this one the main panel measures 3-1/4 x 3-1/4". The Easter egg paper mat measures 3-1/2 x 3-3/4".


I centered the sweet image on my main panel and stamped it with the same black ink. And then I colored up this one with the following Copic markers:

Skin ~ E000, E00, E11, E04
Hair ~ E21, E23, E25, E29
Shirt / Bow RV000, RV10, RV13
Bunny ~ C00, C1, C3, RV000, RV10, RV13


The sentiment for this one is from the Pretty Easter Find itty bitty. It's trimmed up and popped up on the card with some thin foam tape.


Here's another look at the sketch! Please know that the sketch is meant to inspire and not require. Feel free to alter it to work for your creation just as I did for mine today. Most importantly have some inky fun! I can't wait to see what you create! Be sure to share your cards in the Unity Show & Tell group and also add them to the sketch challenge album in the group to be entered for a prize!! I'll see you back here next Thursday with more inspiration for this month's sketch challenge.

Thanks so much for stopping by!
See ya next time.

Inky Hugs,
Crystal


{Please note that comment moderation is on. Your lovely comment will appear once approved.}

Wednesday, March 8, 2023

Membership Wednesday ~ March 2023 Background of the Month ~ Unity Stamp Co.

 Hello there crafty friend!
I'm back with another Membership Wednesday blog post featuring the gorgeous March 2023 Background of the Month called Rectified Poppies from Unity Stamp Co. Love love love this gorgeous background stamp. I just couldn't wait to ink it up!


And I couldn't help but give it a try on my three favorite colors of card stock... Kraft, black and white.


I love how the white pops on the Kraft. I do wish I had done a bit of ink blending around the edges on this one. Just thinking it could use some Vintage Photo Distress ink.


But I think it's lovely how it is. The detail is so awesome!


I used Classic Kraft dye ink from Papertrey Ink to stamp the sentiment from the So Kind, So Caring, So You {Front and Center stamps}.


The white embossing on black card stock really pops!! It's so pretty in person. 


Each of the backgrounds were inked up with Sugar Cube Pigment ink from Taylored Expressions and then I used Alabaster White Embossing powder from Brutus Monroe and melted it with my Wagner Precision heat tool.


Each of the backgrounds were trimmed down to 4 x 5-1/4" using the Deckle Torn Edge Trimmer from Tim Holtz/Tonic. And each card front was adhered to a white A2 top fold card base measuring 4-1/4 x 11", scored at 5-1/2".


The white embossing on white card stock needed some ink. We lived in California on and off for several years and I just love California poppies so I used a mix of yellows and oranges.


I ink smooshed some Mustard Seed, Wild Honey, and Ripe Persimmon Distress Oxide inks. There was still some white so I blended some of the yellows over the background with a blending brush. And then I did a bit of water splatter.


The two black sentiments were stamped with VersaFine Onyx Black ink. I trimmed them up leaving a bit of a white border. And I popped each of them up with thin foam tape.


A trio of birthday cards with no coloring for my stash! Woohoo!! I love how quick these were! What do you think? Which one is your favorite?


Here's a look at the beautiful Background of the Month for March from Unity!! Love it! Please note that NEW signups for the memberships has been temporarily turned off while transitioning to a new software. But it'll be back up soon and you can get your hands on this gorgeous background stamp.

I hope to see you next week for another Membership Wednesday blog post. I'll be sharing inspiration for the awesome Uniquely Unity membership.


Thanks so much for stopping by!
See ya next time.

Inky Hugs,
Crystal


{Please note that comment moderation is on. Your lovely comment will appear once approved.}

Monday, March 6, 2023

Inky Paws Challenge #193 ~ Spring Theme Challenge

 Hello there crafty friend!
It's time to get our paws inky with a fun Spring themed challenge! I don't know about you, but I am ready for Spring! I took inspiration for my Spring themed card from the beautiful challenge badge below. You have until Friday, March 17th to get your entries in for the #193 Spring Theme Challenge and a chance to win a $20 store credit to Newton's Nook Designs!


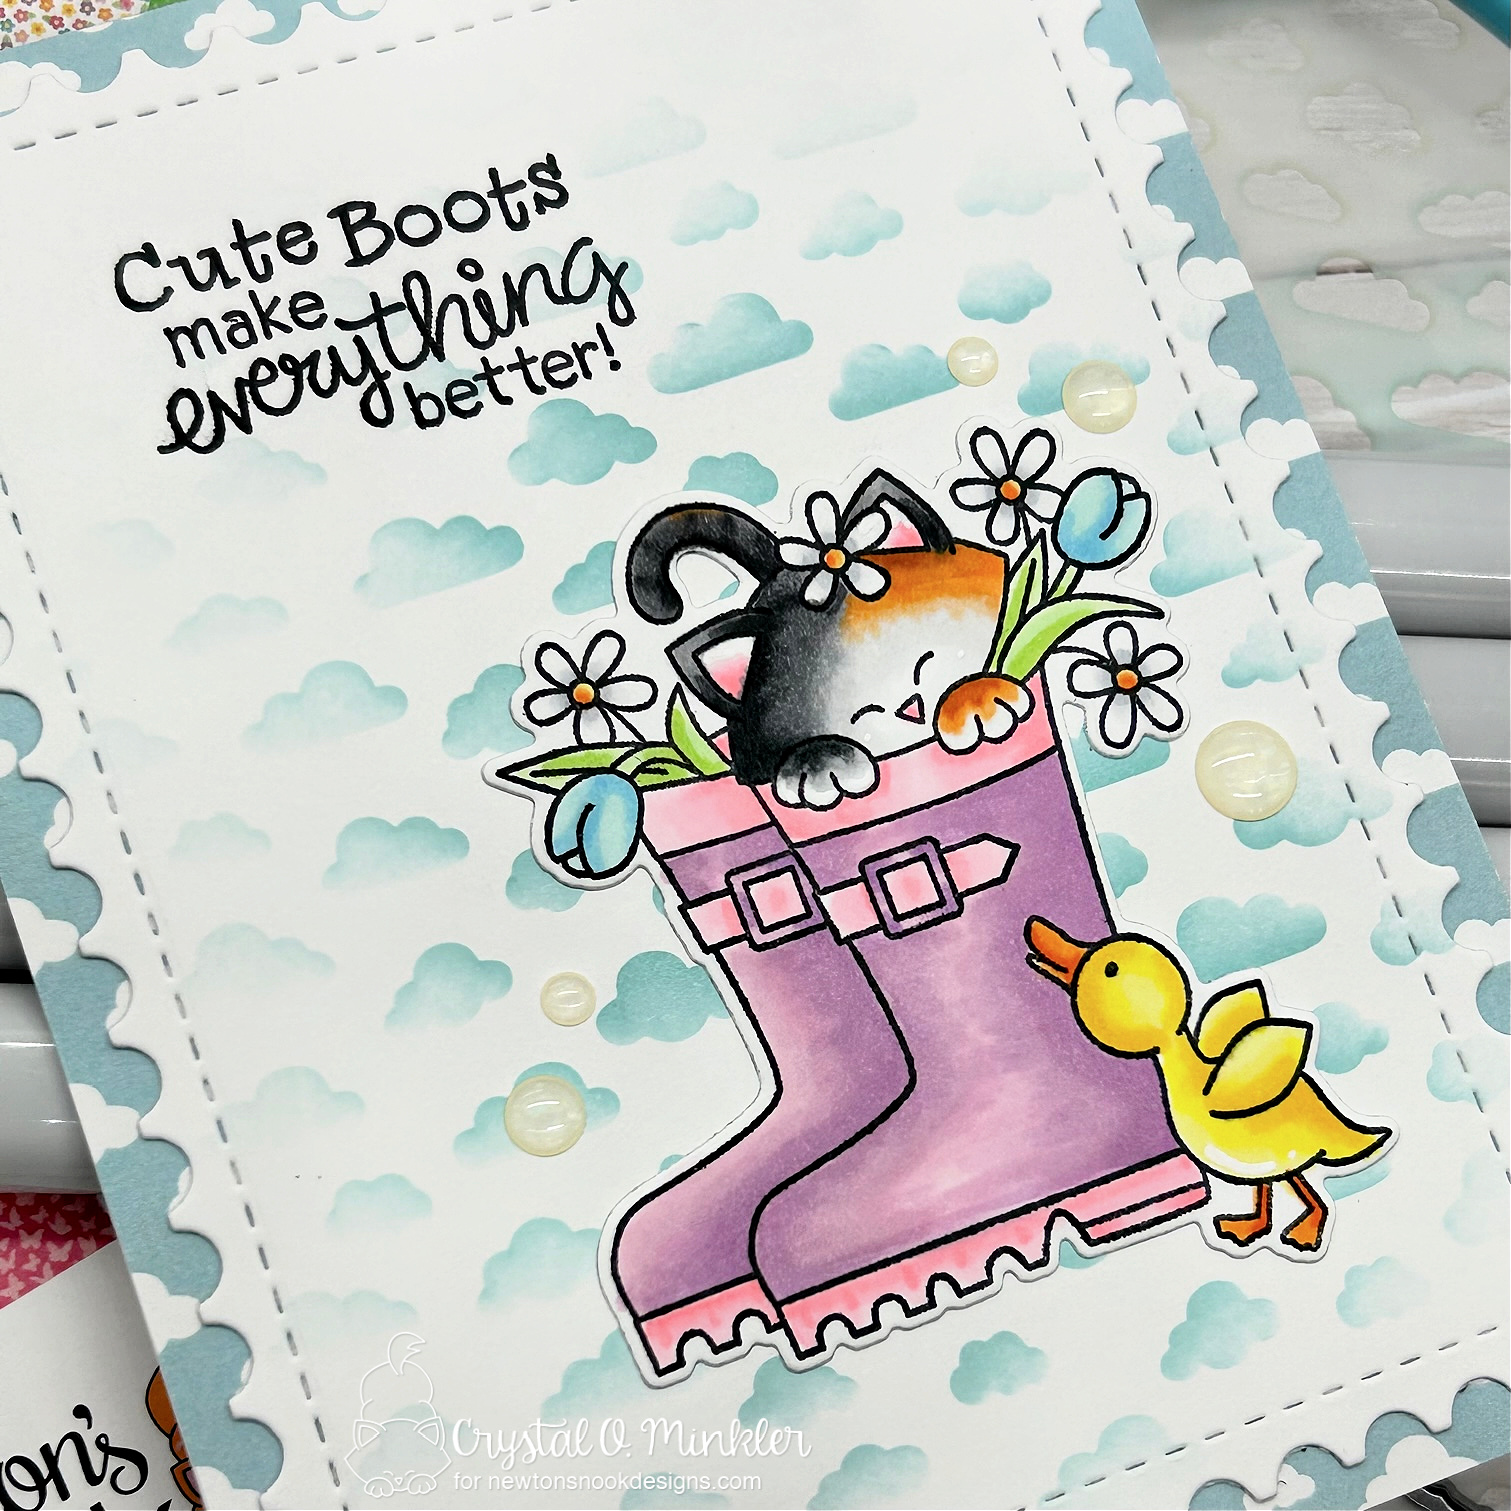
I love rain boots!! They are so cute. 
I just had to use the Newton's Rain Boots stamp set for my first card for this challenge.


How sweet is this stamp?! And the sentiment is so perfect. These boots remind me of a pair my daughter had when she was little. I chose a cute Spring inspired palette for my colors with mostly pastel colors. I think the cute calico kitty is a nice contrast to all the pastel.


I ink blended Tumbled Glass Oxide ink over the Petite Clouds Stencil leaving white space around the edges. The card front was then die cut with the largest die from the Framework Die Set. I adhered the die cut background to a card front of pattern paper from the sweet Springtime Paper Pad


I stamped the sweet kitty from the Newton's Rain Boots Stamp Set with Memento Tuxedo black ink and die cut it with the coordinating Newton's Rain Boots Die Set. And then I colored it up with the following Copic markers:

Calico Kitty ~ RV10, RV21, YR15, YR27, N0, N2, N4, N8, C00
Boots ~ V000, V01, V12, V15, RV10, RV21
Duck ~ Y06, Y11, Y15, YR15, YR68
Daisy ~ YR15, YR68, Y11, C00, C1, C3
Tulips ~ B0000, B00, B02, BG10
Leaves / Stems ~ YG11, YG23

You can check out my process video here... Spring CAS Card | Inky Paws Challenge 193 | Newton's Nook Design.


Now it's your turn to get your paws inky with your Newton's Nook Designs products and create a project with a Spring theme. Be sure to link up to the Inky Paws Challenge! Can't wait to see your projects!


Thanks so much for stopping by!
See ya next time.

Inky Hugs,
Crystal


{Please note that comment moderation is on. Your lovely comment will appear once approved.}

Saturday, March 4, 2023

~ Friends of Unity March 2023 Blog Hop ~

 Hello there crafty friend!
It's the first Saturday of March which means it's time for our Friends of Unity Blog Hop!! I've been so excited for this month's cue... 


because it's Winnie the Pooh!! I love Pooh Bear and can't wait to see what our friends created to share with us all. So fun! I had a fun idea to share all four seasons of Pooh Bear so I actually have four cards to share. There's a bunch of photos so I'll try to keep the chatter down to a minimum. :)


First up is Spring with the adorable Winnie the Pooh: How Do You Spell Love?
I paired this cute stamp up with a pretty paper pad filled with Spring colors... called Spring Fling by Echo Park Paper Co. 


Here's a quick list of the Copic Markers I used:

Pooh Bear ~ Y11, Y15, Y35
Piglet ~ RV10, RV21, RV14
Dandelions ~ C00, C2, YG11, G14
Grass ~ YG11, G14


I trimmed all my papers and adhered them to a white A2 top fold card base that I turned on its side. I trimmed two 1/8" strips of white card stock to adhere on either side of the daisy papers. The main panel was die cut with the smallest die from the Scallops & Rectangles {nesting dies}. I heat embossed the sentiment on one of the pattern papers with white pigment ink and white embossing powder. I trimmed and adhered the sentiment to the bottom of the main panel and then added foam tape to both and popped them up on the card.


Up next is Summer with the sweet Winnie the Pooh: Pooh Just Knew.
I went with a CAS design for this one. I stamped my sentiment on a card front measuring 4-1/4 x 5-1/2". And then I ink blended a bit of Wilted Violet Distress Oxide inks over the Cloud and Wave stencil being careful not to ink over the sentiment. I die cut the card front with the largest die from the Scallops & Rectangles {nesting dies} and adhered it to a Kraft A2 top fold card base.


I stamped Pooh and Piglet on a piece of white card stock and colored them up with Copic Markers. I then die cut the colored image with the Pooh Just Knew die set and adhered it directly to the card.


Here's a quick list of the Copic Markers I used for this card:

Pooh Bear ~ Y11, Y15, Y35
Piglet ~ RV10, RV21, RV14
Balloon ~ R000, R20, R14, R27
Butterfly ~ B000, B91, B93, Y15


For my Fall card I chose the sweet Winnie the Pooh: A Splendid Place.
And I just had to go with Kraft card stock for this one. I love copic coloring on Kraft for Fall images... the muted colors just scream Fall!


Here's a quick list of the Copic Markers I used for this card:

Pooh Bear ~ Y11, Y15, Y35
Pooh's Scarf ~ R20, R14, R27
Piglet ~ RV10, RV21, RV14
Piglet's Scarf ~ B91, B93, B97
Tree ~ E21, E23, E25
Leaves ~ Y06, YR15, YR68, YR27
Bees ~ Y15
Bee Hive ~ Y11, Y18, Y38
Grass ~ YG91, YG93, YG97
Sky ~ B000


Similar to my second card I did a bit of ink blending with the Cloud and Wave stencil. This time using the Tumbled Glass Distress Oxide ink. I didn't mask anything. I was just careful not to ink over the tree, Pooh or Piglet. I did get a bit on the tree... but it's barely noticeable. I trimmed my colored panel with the Tim Holtz Deckle Torn Edge Trimmer. Adhered it to a mat of Chocolate Chip card stock from Stampin Up. I then die cut a card front of Kraft card stock with the largest die from the Postage Stamp {nesting dies}. I adhered all my layers to a Kraft A2 top fold card base. The sentiment was heat embossed with white pigment ink and white embossing powder on Chocolate Chip card stock. I trimmed it and adhered it to the card.


Last but not least... it's actually my favorite of them all... Winter with the Winnie the Pooh: Feel the Merry. I stamped all of the WTP stamps using Black Amalgam ink from Gina K Designs. I fussy cut this one leaving a bit of a border around and the edges. I adhered the heat embossed sentiment over the image and popped it up on the card with a thin foam tape.


Here's a quick list of the Copic Markers I used for this card:

Pooh Bear ~ Y11, Y15, Y35
Pooh's Scarf ~ G40, G14
Pooh's Honey Pot ~ R20, R14, R27, Y11, Y18, Y38
Boy's Skin ~ E000, E00, E11, E04
Boy's Hair ~ E21, E23, E25
Boy's Jacket ~ R20, R14, R27, B91, B93, B97, B99
Boy's Scarf ~ N2, N4
Jeans ~ B91, B93, B97
Shoes ~ N2, N4, N6, N8
Book ~ C00, C2
Tree ~ YG11, G24, G46
Bench ~ E21, E23, E25
Grass ~ YG91, YG93, YG97


My card design was inspired by the {BYSHC} Sketch 1... I did alter the sketch a bit to make it work with this large image but I really love how this turned out. I paired up this sweet stamp with the My Favorite Christmas 6x6 papers from Echo Park Paper Co. My red card front is Pure Poppy card stock from Papertrey Ink.


All four Seasons of Winnie the Pooh. 
I had so much fun making these cards!! I hope you enjoyed them too. And I hope you're inspired to ink up your Winnie the Pooh stamps. If you do be sure to share your creations in the Unity Show & Tell. We would love to see what you create! And if you don't have any Winnie the Pooh in your collection yet now is the time to shop over at Unity Stamp Co. because all of the WTP stamps are on sale!! Woohoo! I love a good sale!

Now before we get to the hopping, I chose a lucky winner from the comments on last month's hop to win a fun prize and the lucky winner is...


... Meg Crawford!! Congratulations Meg!!
Please email me at crystalominkler@gmail.com to claim your prize. 
Prize must be claimed within two weeks. 

Well, that's it for me this time! Please hop along and enjoy some more inspiration from the Friends of Unity! I'm so excited to see all the creations from our friends!! I will be doing another fun giveaway this month!! Be sure to hop along and comment for a chance to win. {When you comment please leave your name just in case it posts as anonymous.} I'll announce the winner next month! 


Let's get to the hopping...


Crystal <--- you're here

up next ---> Amber


Thanks so very much for supporting our little hop!
We appreciate you!!

See ya next time.

Inky Hugs,
Crystal


{Please note that comment moderation is ON. Your comment will appear shortly.}


Thursday, March 2, 2023

Winter Birdie Swag ~ March Sketch Challenge ~ Unity Stamp Co.

 Hello there crafty friend!
I'm back with a new challenge for the month of March in the Unity Show & Tell group... another fun sketch challenge! Sketches are a wonderful starting point for a card design. They have often helped me get out of a rut.


Another sketch with some fun layers. The main panel is a bit smaller this time so I'm thinking this one will be great with all those Itty Bitty stamps we have in our stash. Or any smaller stamps, really. The measurements included are for an A2 size card, but this sketch could be easily altered for a mini slimline or an A7 card. Keep in mind that the measurements are approximate and they are really just a guide. The sketch is really meant to inspire creativity so have fun with it!


The beautiful Watercolor Stripes {paper pack} makes a wonderful background for the sweet Winter Birdie Swag stamp. Do you see the texture in the background? I used the recently released Vintage Script Embossing Folder... it's not just for vintage cards friends! I just love the texture it adds to this pattern paper.


I chose a monochromatic color palette for my card with just white and purple really being the focus. There is just a touch of brown for the branch. And then I added a bit of red to the berries which actually look similar to the little crabapples that we have in our crabapple tree. The birds have pretty much picked our tree clean but there's still a few left. Here's a quick list of the Copic markers I used:

Birdie ~ C00, C1, C3
Hat ~ V01, V12, V15, V28
Branch ~ E51, E55, E57
Crabapples ~ R20, R27, R59


I used a corner rounder on my main birdie panel and the purple mat. Adhered them together. Heat embossed my sentiment on the same purple card stock with a white pigment ink and some white embossing powder. I trimmed the sentiment and adhered it to the main panel and then I covered the backs of both with foam tape so I could pop them up on the card.

You can check out my process video here... Winter Birdie Swag | March Sketch Challenge | Unity Stamp Co.


Here's another look at the sketch! Feel free to alter it to work for your creation and most importantly have some inky fun! I can't wait to see what you create! Be sure to share your cards in the Unity Show & Tell group and also add them to the sketch challenge album in the group to be entered for a prize! I'll see you back here next Thursday with more inspiration for this month's sketch challenge.

Thanks so much for stopping by!
See ya next time.

Inky Hugs,
Crystal


{Please note that comment moderation is on. Your lovely comment will appear once approved.}

Wednesday, March 1, 2023

Membership Wednesday ~ Rainbow Slimline ~ March 2023 Kit of the Month ~ Unity Stamp Co.

 Hello there crafty friend!
I'm back again today to share a rainbow slimline card using the amazing new March 2023 Kit of the Month from Unity Stamp Co. Ohhh... this kit is so awesome!! You are going to love it! I just couldn't wait to ink up the houses in the kit.


I stamped them twice with Black Amalgam ink for a fun slimline card! My rainbow inspiration is actually from one of our vacations. We visited a place that had these cool rainbow houses going down the street. I can't recall the vacation or the area now... lol. Oh my memory!! But I thought it would be fun to color up the houses in a rainbow. 


These houses have a lot of detail!! I just focused my Copic coloring to corners and tried to add dimension with darker shades of Copic markers where I thought portions of the house were in the background. I think it turned out pretty. I trimmed my slimline panel to 7-7/8 x 2-7/8" and adhered it to a kraft die cut from the Scalloped Stitched Slimline dies from Gina Marie Designs. The panel was then adhered to a white slimline card base measuring 8-1/2 x 7"; scored at 3-1/2".


The clouds are also in this kit and I adore them!! They have wonderful detail and the trio are perfect to use for a scene card. I added a bit of color to the bottoms with some cool grey markers. And I did fussy cut them and cleaned up the edges by coloring them with a Memento Tuxedo black marker. Here's a quick list of the Copic markers I used:

Red House ~ R20, R14, R27
Orange House ~ YR21, YR15, YR16
Yellow House ~ Y11, Y15, Y35
Green House ~ YG11, YG23, G14
Blue House ~ B000, B00, B02
Indigo-ish House ~ BG10, BG23, BG49
Violet House ~ V000, V01, V12, V15
Pink House ~ RV10, RV21, RV14
Yellow-Orange House ~ Y11, Y06, YR15
Blue-Green House ~ B000, BG10, BG23
Windows ~ Y06
Sky ~ B0000, B000, B00
Grass ~ YG11, YG23, G14


Here's a look at the whole Kit of the Month for March!! So perfect and wonderful! Can you believe that you get a full sheet of rubber for only $45. That includes shipping! You also get a $6.95 discount on every order from Unity over $45. And you can purchase any past kits for only $34 plus shipping. Such a great value! I can't wait to ink up those gorgeous butterflies!!

I hope to see you next week for another Membership Wednesday blog post. I'll be sharing inspiration for the amazing Background of the Month.


Thanks so much for stopping by!
See ya next time.

Inky Hugs,
Crystal


{Please note that comment moderation is on. Your lovely comment will appear once approved.}

{BYSHC} Sketch Challenge 31 ~ Let it Snow ~ Doodlebug Design

 Hello there crafty friend!
It's time for a new sketch challenge over in the Build Your Stash Holiday Cardmakers! Today I'm sharing a sweet Christmas card using my favorite Doodlebug Design collection called Let it Snow.


I used a fun mix of pattern papers from the Let it Snow 6x6 paper pad to create my background and layers for my card.


And then I searched through my Let it Snow Chit Chat and Let it Snow Odds & Ends die cut pieces. I had a few different die cuts laid out on my desk including the cute Santas in my photo. But once I saw the sentiment... I just HAD to use the Yeti with this sentiment. Too cute!


I do have a bit of a tip for the the layers in the sketch. I cut a scrap piece of card stock to 3-3/8 x 4-3/8" and adhered my two pattern papers to it {the rainbow polka dots and snowflakes paper}. This was way easier than trying to adhere those two papers to the gingham layer separately and get them centered on the card front.  


Here's a look at {BYSHC} Sketch 31 for the month of March!
I hope you'll join us and play along with the sketch! If you're interested in seeing a bit more inspiration for this sketch, check out the amazing inspiration from the design team over on the {BYSH} Cardmakers blog!


Thanks so much for stopping by!
See ya next time.

Inky hugs,
Crystal


{Please note that comment moderation is ON. Your lovely comment will appear shortly.}