Tuesday, July 2, 2024

Tawny Owl Paperie Inky Inspiration Sketch 23 ~ Sea Babies ~ Avery Elle

 Hello there crafty friend!
Today I'm sharing a couple more cards for the Tawny Owl Paperie Inky Inspiration Sketch Challenge 23 in the Tawny Owl Paperie Inky Inspiration Facebook group.  I had a look through my old card kits from my Scrapping for Less days a few years ago. These are the kits I've been pulling my leftover papers from and I grabbed a cute kit that had a decent amount of paper. But what I was really drawn to was the adorable mermaid. I didn't create anything for Mer-May so I'm late but I'm excited I finally made a mermaid card... actually two! 


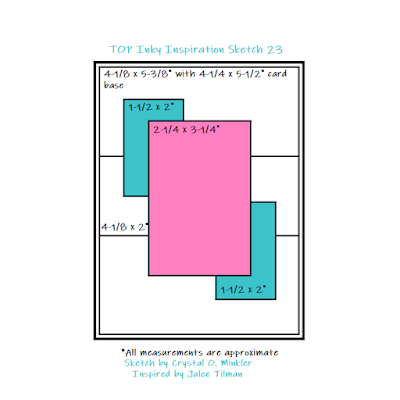
I cut my papers to the measurements on the sketch except for the small rectangles on the pink mermaid card {right side}. Those rectangles were scraps and I just went with them. I adhered my background papers together and then adhered them to a 4-1/4 x 5-1/2" card front of Island Indigo card stock from Stampin' Up. After copic coloring the mermaids and fish. I fussy cut the fish on the line and cleaned up my cutting by coloring the edges of the fish with a Memento Tuxedo Black marker. I adhered the fish to the focal panel and adhered the focal panel to the small rectangles. And then I added foam tape to the back of the whole thing, including little pieces for the fish tails.


Here's a look at the fun sketch for Tawny Owl Paperie Inky Inspiration Sketch Challenge 23. The sketch, as always, is meant to inspire not require. So let the sketch lead in your design, but don't feel limited by it. 


I adhered the fish to the focal panel and adhered the focal panel to the small rectangles. And then I added foam tape to the back of the whole thing, including little pieces for the fish tails. I removed the backing from the foam tape and popped them up on the card. 

Here's a quick list of the Copic markers I used: 
Skin: E000, E00, E11
Hair: Y21, E95, E97
Purple Mermaid: V000, V12, V05, RV0000, RV10, RV11
Pink Mermaid: RV0000, RV10, RV11, V000, V12, V05
Yellow/Orange Fish: Y11, Y06, Y15, YR21, YR15, YR16
Orange Fish: YR21, YR15, YR16


I added a couple flat back pearls to the cards to finish them up. These were in the kits so I'm not really sure where they are from. My card fronts are adhered to a white A2 top fold card base. I hope you all have fun with this sketch! I can't wait to see what you create with it. Have an ink-tastic week!

Thanks so much for stopping by!
See ya next time.

Inky Hugs,
Crystal


{Please note that comment moderation is on. Your lovely comment will appear once approved.}

Monday, July 1, 2024

{BYSHC} Sketch Challenge 47 ~ Do You Wanna Build a Snowman ~ Taylored Expressions

Hello there crafty friend!
It's time for a new sketch challenge over in the Build Your Stash Holiday Cardmakers Facebook group! Today I'm sharing a sweet Christmas card featuring the adorable Do You Wanna Build a Snowman die from our awesome sponsor, Taylored Expressions! Taylored Expressions has generously offered up a $25 gift card as a prize for the {BYSHC} Sketch Challenge 47 this month! So amazing!!


Lots of layers for this month's sketch! A great sketch for pattern papers though I went a different route this time using the Simple Snowflakes embossing folder from Tim Holtz for my background paper layers. I lightly rubbed the raised snowflakes of Night of Navy card stock from Stampin' Up with a bit of Sugar Cube White Pigment ink from Taylored Expressions. I mat them with Stampers Select White card stock from Papertrey Ink. And the layers are adhered to a 4-1/4 x 5-1/2" piece of True Black card stock from Papertrey Ink that's adhered to a white A2 top fold card base.


I started my focal image by ink smooshing Tumbled Glass, Chipped Sapphire and Black Soot Distress Inks on a medium piece of card stock. I left some white in the middle while I was ink smooshing and then blended Chipped Sapphire lightly over the panel giving the background a nice light middle to showcase the silhouettes. I dried the background with my heat tool and added some white acrylic paint splatters. The silhouettes are a fun retired die that I've had in my stash for quite awhile. So bummed it's not available anymore. I die cut the silhouette from a piece of True Black card stock. And then again from a scrap of Stampers Select White card stock. I offset the white behind the black die cut to give a shine to the silhouette. I love the effect! What do you think?


I die cut the ink smooshed background using the Stitched Bracket Stacklets dies from Taylored Expressions {these must be retired, I can't find them on the website}. I also die cut a scrap of black card stock for the bottom piece. I mat the focal image with a piece of white card stock that I die cut using the Stitched Square Stacklets dies. My sentiment from the Fluffy Friends - Holiday stamp set from Taylored Expressions is heat embossed. I prepped my black card stock with the TE Anti Static Powder Tool. I absolutely LOVE this tool! It was a Christmas gift from a crafty friend a couple of years ago and it has been a game changer for my heat embossing. I highly recommend it! Anywho, I stamped the cute sentiment using the Sugar Cube White Pigment ink and added Alabaster White Embossing powder from Brutus Monroe. I then melted the embossing powder using my Wagner Precision Heat Tool. After letting the melted powder cool a bit, I rubbed my card stock with a microfiber cloth to remove the anti static powder. I trimmed up the sentiment and adhered it directly to the card. Lots of layers for this card so I didn't use any foam tape.


Here's a look at {BYSHC} Sketch Challenge 47 for the month of July. Loving this sketch! I can't wait to see what everyone does with it. I hope you'll join us and play along with the sketch. If you're interested in seeing a bit more inspiration for this sketch, check out the amazing inspiration from the design team over on the {BYSH} Cardmakers blog! Lots of beautiful inspiration this month from the design team.


Thanks so much for stopping by!
See ya next time.

Inky hugs,
Crystal


{Please note that comment moderation is ON. Your lovely comment will appear shortly.}

Inky Paws Challenge #226 ~ Summer Theme Challenge Reminder

Hello there crafty friend!
There's still time to play along with the Inky Paws Challenge #226 - Summer Theme Challenge! You have until this coming Friday, July 5th to get your entries in for this fun challenge and a chance to win a $20 store credit to Newton's Nook Designs!


I am loving this theme! I prefer Fall and Winter myself, but I do love beach stamps! And beach stamps are perfect for Summer!


I stamped the cute car from the Beach Bound Stamp Set using Memento Tuxedo Black ink. And then I had a blast coloring it up with Copic markers. I went with a classic red. I tried to coordinate it with the red in the papers. I think it works pretty well! Once I was happy with my coloring I die cut the car using the coordinating Beach Bound Die Set.

Here's the list of the Copic markers I used:
Car: R20, R14, R37
Windows: B0000, B000, B00
Bumpers / Door Handle / Roof Rack: N0, N1
Tires: N1, N2, N4, N6
Surfboard: YG11, YG23


I paired up the Beach Bound car with the awesome Summertime 6x6 Paper Pad. I had so much fun mixing and matching the papers that I die cut using the die from the A2 Card Layout Die Set. I also die cut the frame from Stampers Select White Card Stock from Papertrey Ink. That left me with extra white pieces so I made a little sandy hill for the car using the center white piece. I die cut it using the Land Borders Die Set and then I blended a bit of brown ink on the top without actually adding any ink to my blending brush because I didn't want it to be dark.


 All of my layers are centered on a 5-1/2 x 4-1/4" card front of Tempting Turquoise Card Stock from Stampin' Up and then adhered to a white A2 top fold card base turned on its side for a landscape card. I stamped the sentiment on a scrap of white card stock and mat it with a scrap of the same turquoise card stock. No foam tape for this one... just adhered all the layers directly on the card.


Now it's your turn to get your paws inky with your Newton's Nook Designs products and create a project with a Summer theme. Be sure to link up to the Inky Paws Challenge! Can't wait to see your projects!


Thanks so much for stopping by!
See ya next time.

Inky Hugs,
Crystal


{Please note that comment moderation is on. Your lovely comment will appear once approved.}