Hello there crafty friend!
I love how fast these cards came together! I'm not usually one for using stickers on cards but they sure made for quick cards. I just need to add sentiments to cards with the stickers and they'll be all done.
Here's another look at the scraps I chose for September. Not Fall like I hoped, but Fall-ish colors and I do love the farm vibe. This is a photo from when I started with the leftover papers. I have just a few scraps left. I'm hoping to finish them up this month. We'll see!
I trimmed the floral paper for the
chicken card I shared a couple weeks ago. I also trimmed the green paper and the ruler paper. I used the leftover pieces from that card plus a couple of the longer strips for my three cards today. I adhered the pattern papers to a 4 x 5-1/4" piece of thin white card stock. This was way easier than trying to adhere the pattern papers directly to the Kraft card base and eyeball to make sure I had them evenly spaced.
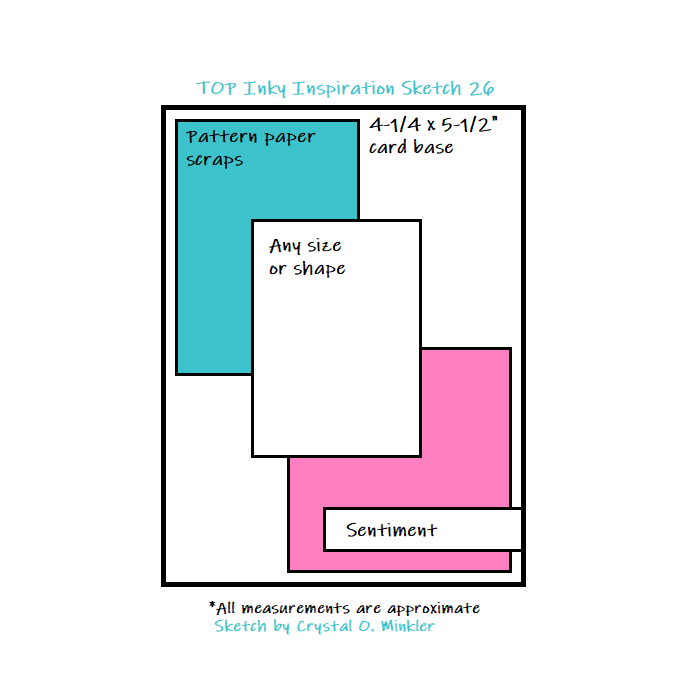
Here's a look at the fun sketch for
Tawny Owl Paperie Inky Inspiration Sketch Challenge 25. The sketch, as always, is meant to inspire not require. So let the sketch lead in your design, but don't feel limited by it. I moved the sentiment for my card today. It just fit better under the ruler paper.

I stamped
Bobbie Sue Girl and the sentiment using Memento Tuxedo Black ink. Yup, I used a different ink. It was on top of the stack and I was lazy! LOL! Anywho, I die cut the image using a circle die from the
Scallops & Circles {nesting dies}. I colored up the image with a bunch of Copic markers and then I blended my brown blending brush around the image. The white was too bright for the papers and the kraft base. It just didn't look right. I also blended or distressed the edges of the sentiment with the same brush. TIP: if you want to add just a tad bit of color, don't add ink to your blending brush. If you are like me, you leave your blending brushes unwashed and inky and they are perfect for just a little bit of color.
Here's a list of the Copic Markers I used:
Skin: E000, E00, E11
Hair: E70, E71, E74
Dress: BG000, BG02, BG72
Apron: Y11, Y32
Chicken: R20, R14, E11, E13, E08
I popped up the circle and the sentiment using a bunch of foam tape. I love the dimension it gives to the card! This was such a fun and quick card! I hope you've been inspired to pull out those scraps and use them up! Have an inktastic week!
Thanks so much for stopping by!
See ya next time.
Inky Hugs,
Crystal
{Please note that comment moderation is on. Your lovely comment will appear once approved.}