Monday, July 22, 2024

Inky Paws Challenge #228 ~ Sketch Challenge ~ Christmas in July 2024 {BYSHC} Linky Party

 Hello there crafty friend!
Who's up for a new challenge?! It's time to get our paws inky with a fun sketch challenge! I love a good sketch! You have until Friday, August 2nd to get your entries in for the #228 Sketch Challenge and a chance to win a $20 store credit to Newton's Nook Designs!


Another fun sketch! I can't wait to see what you create with it!


For my card today, I started with my paper layers. I knew that I wanted to make a holiday card so I grabbed my Christmas Time 6x6 Paper Pad and picked out a few pieces for my layers. I chose pattern papers that would contrast each other when layered. Doing that means I didn't need to add mats to the layers. I adhered all my layers using iCraft UltraBond Adhesive from Therm O Web.


I'm playing along with the Christmas in July 2024 {BYSHC} Linky Party. I invite you to stop by the linky party to check out all the wonderful Holiday inspiration being shared!! I have really been enjoying the cards being shared so far! If you have time, come join in the fun and build your stash of holiday cards for a chance to win a prize. Newton's Nook Designs is one of our amazing sponsors. So you could use the new Inky Paws Challenge sketch with a Christmas theme and enter both challenges. It's a fun twofer!!


I stamped the adorable kitties from the Cat Christmas Tree Stamp Set using Memento Tuxedo Black ink. I colored the image up with my Copic markers and then die cut it using the coordinating Cat Christmas Tree Die Set. I die cut an oval from vellum card stock using the Oval Frames Die Set to mat my focal image. Adhered the kitties to the vellum and then applied glue behind the kitties only. Securing the vellum to the card without the glue being visible.

Here's a quick list of the Copic markers I used:
White Cats: R00, R20, C00, C1, C3
Orange Cats: R00, R20, YR000, YR21, YR15, YR68
White Belly: C00, C1, C3
Light Gray Cat: R00, R20, N0, N1, N3
Dark Gray Cat: R00, R20, N0, N2, N4, N6, C00, C1
Star: Y11, Y15
Christmas Lights: R20, R14, YG11, G14, B0000, B00, Y11, Y15, N0, N2, N4, N6 
Red Ornament: R20, R14, R46, N0, N2, N4
Green Ornament: YG11, G14, N0, N2, N4


I heat embossed the sentiment using Sugar Cube Pigment White ink from Taylored Expressions on Real Red Card Stock from Stampin' Up. Before stamping I did use the TE Anti-Static Powder Tool, also from Taylored Expressions. I added some Alabaster White Embossing Powder from Brutus Monroe to the wet ink and melted the powder using a Wagner Precision Heat Tool. Once the embossed sentiment cooled I rubbed the card stock with a microfiber cloth to remove the excess powder. I trimmed the sentiment and adhered it to the card. So happy to have another card for my stash! 


Now it's your turn to get your paws inky with your Newton's Nook Designs products and create a project using this super fun sketch. Be sure to link up to the Inky Paws Challenge! Can't wait to see your projects!


Thanks so much for stopping by!
See ya next time.

Inky Hugs,
Crystal


{Please note that comment moderation is on. Your lovely comment will appear once approved.}

Sunday, July 21, 2024

Christmas in July 2024 {BYSHC} Linky Party ~ Snowglobe Christmas ~ RAM Stamps

 Hello there crafty friend!
It's day 3 of the Christmas in July 2024 {BYSHC} Linky Party!! I'm excited to share another sweet card that I've made to add to my Christmas stash! This time I played with the adorable Snowglobe Christmas Digital Stamp from our fabulous Sponsor RAM Stamps. Such a sweet and adorable digital stamp!


I really enjoyed coloring the adorable Snowglobe Christmas Digital Stamp up with my Copic markers. I used neutrals and blues to coordinate with my blue and silver background. If you visited yesterday and saw my Day 2 card, this is one of the other digital images I printed off. I like to have three or four digital images on a sheet before I print it off. This way I'm less likely to waste card stock. Once I was happy with my coloring, I die cut the panel using a die from the Deckle & Stitches Nesting Die Set from our lovely Sponsor Unity Stamp Co.

Here's a quick list of the Copic markers I used:
Skin: E000, E00, E11
Hair: E70, E71, E74, E77
Hair Clip / Ribbon: R20, R14
Scarf / Tights: B000, B00, B02, B04, B28
Coat: C00, C1, C3, N0, N1, N2, N3, N4, N6
Gloves: R20, R14, B000, B02
Shoes: N0, N2, N4, N6
Snowglobe: C00, C1, C3, B0000, B000, G24, E51, E55, E57
Snow: N0, N1, N3
Snowflakes: B0000, B000
Outline: B0000, B000, B00


I used a retired Deco Foil Toner Card Front called Snow Many Flakes by Unity and Therm O Web for my snowflake layer. I trimmed a piece of Silver Shattered Glass Deco Foil Transfer Sheet and laid it on top of the card front foil facing up. I ran it through my laminator after it was heated up a few minutes after the green light came on. I've found my laminator does better if it has those extra couple of minutes. Such a quick and easy background it created! And beautiful! Love these foils! For my blue layer I wanted to try something a little different. I wanted some texture on my foil so I die cut a piece of white card stock using the slightly larger die from the one I used for the main panel. And then I applied some Deco Foil Transfer Gel Duo with a palette knife along the edges of the die cut card stock. I didn't apply it evenly. I left bumps and layers in the transfer medium to give texture to the foils. I let the transfer medium dry and placed a piece of Deep Blue Deco Foil Transfer Sheet over the tacky panel and ran it through my laminator since it was on. I could have ran it through my Big Shot to apply the foil since the Deco Foil Transfer Gel Duo works both ways.


All of my layers and the die cut snowflakes are adhered using iCraft UltraBond Adhesive from Sponsor Therm O Web. I used the Sizzix Sidekick Side-Order Winter Set from Tim Holtz for the snowflakes. They were in my stash of precut die pieces... so handy! I added foam tape called iCraft 3D Foam Tape Jumbo Roll (white), also from Therm O Web, to the back of the main panel and popped it up on the card. I stamped the Happy Holiday sentiment from the Wishing You Mini stamp set from our wonderful Sponsor Gina K. Designs. I inked it up using Chipped Sapphire Distress Ink on white card stock. Trimmed up the sentiment, added a small piece of foam tape to the left end and then glued the rest of the sentiment to the card. For one final touch on the card, I added some glittery goodness to the snowglobe using a Nuvo Glitter Gloss Aqua Shimmer pen. I wish it showed up in the photos... it's really pretty in person!


If you haven't already, stop by the Christmas in July 2024 {BYSHC} Linky Party to check out all the wonderful Holiday inspiration being shared!! I have so many wonderful ideas for future cards! So inspiring! I hope you have an ink-redible day!


Thanks so much for stopping by!
See ya next time.

Inky Hugs,
Crystal


{Please note that comment moderation is ON. Your comment will appear shortly.}

Saturday, July 20, 2024

Christmas in July 2024 {BYSHC} Linky Party ~ Merry & Bright Mug ~ Angie Blom Digital Designs

 Hello there crafty friend!
I'm back for Day 2 of the Christmas in July 2024 {BYSHC} Linky Party with another cute holiday card! It was so much fun checking out the inspiration shared yesterday for the start of the Linky Party. So many wonderful cards! Today I'm sharing a card using a sweet digital stamp from our sweet return Sponsor Angie Blom Digital Designs called Merry & Bright Mug.


I started by inserting the Merry & Bright Mug printout sheet into a Word Document and then I cropped the mug. I combined it with a couple more images {you'll see them later this week} and printed the document. I colored up the beautiful mug with my Copic markers and fussy cut the mug. I used a Memento Tuxedo Black marker to color the edges of fussy cutting. This technique helps the fussy cutting look all nice and neat. I added foam tape from our awesome Sponsor Therm O Web called iCraft 3D Foam Tape Jumbo Roll (white) to the back of the mug and set it aside.

Here's a quick list of the Copic markers I used to color up this cute mug:
Mug: R20, R14, R46
Holly: R20, R14, R46, YG11, G24, G46
Whipped Cream: C00, C1, C3
Candy Cane: R00, R20, R46, C00, C1, C3
Leaf: YG11, G24, G46


I'm also playing along with the Color Hues Challenge today! Red and Green are so perfect for a Christmas card! This fun challenge is open until July 29th, if you want to play along! 


To create my background I used the awesome A2 Card Layout Die Set from our wonderful Sponsor Newton's Nook Designs. I trimmed four pieces of pattern paper from the beautiful Christmas Time 6x6 Paper Pad, also from Newton's Nook Designs. I secured them two at a time to the back of the die using washi tape. The washi tape was also cut by the die but that's ok. I have so much washi tape. I don't mind using it.


I adhered all my layers together using iCraft UltraBond Adhesive from Sponsor Therm O WebI adhered the card front of Real Red card stock from Stampin' Up to a white A2 top fold card base turned on its side for a landscape card. I removed the backing from the foam tape on the back of the mug and popped up the mug on the card. I then added three green enamel dots from the Red & Green Foil Mirror Enamel Dots from our lovely Sponsor Gina Marie Designs to finish off the card. 


Love Newton's Nook Designs products as much as I do? Be sure to check out the current Inky Paws Challenge for details on how to win a $20 store credit to add some NND products to your stash!


 Woohoo!! I'm so excited to have another card done for my stash! If you haven't already, stop by the Christmas in July 2024 {BYSHC} Linky Party to check out all the wonderful Holiday inspiration being shared!! Have a fantastic day!


Thanks so much for stopping by!
See ya next time.

Inky Hugs,
Crystal


{Please note that comment moderation is ON. Your comment will appear shortly.}

Friday, July 19, 2024

Christmas in July 2024 {BYSHC} Linky Party ~ Winter Sparrows ~ Lawn Fawn

Hello there crafty friend!
I'm so excited to share my first card for the Christmas in July 2024 {BYSHC} Linky Party hosted by the Build Your Stash Holiday Cardmakers Facebook group! It's hard to believe that this is our fifth annual Christmas in July Linky Party. Even though were in the middle of Summer the linky party is focused on Christmas and wintry holiday cards. It's a great way to get ahead on those holiday cards to relieve some of the stress later on in the year during the holidays. I am super excited to add a few more holiday cards to my Christmas card stash and I sure hope that you'll join in the fun!


For my first card I'm featuring the super sweet Winter Sparrows from our awesome Sponsor Lawn Fawn. I stamped the branch and cute birds using Memento Tuxedo Black ink. Colored them up with Copic markers. And then I die cut the birds using a circle die from the Large Cross-Stitched Circle Stackables dies from Lawn Fawn. 

Here's a quick list of the Copic Markers I used to color up the sweet birds
Birds ~ Y11, Y15, Y35, YR15, YR16
Hat ~ R20, R14, R46, C00, C1, C3
Ear Muffs ~ YG11, G24, G46
Background ~ B0000, B000


I paired up the cute Winter Sparrows with the sweet Knit Picky 6x6 Paper Pack. These papers are retired but Lawn Fawn does have the beautiful Knit Picky Winter 6x6 Paper Pack. I adhered the simple layer of pattern paper to a white A2 top fold card base turned on its side using the iCraft UltraBond Adhesive from our wonderful Sponsor Therm O Web


I stamped the tweet sentiment using Candied Apple Distress Ink. And then I popped up the birdies using iCraft 3D Foam Tape Jumbo Roll (white) from our awesome Sponsor Therm O Web. A quick and cute card to start off the Linky Party!


My card was inspired by the {BYSHC} Sketch 46 from last month! Have you visited the Build Your Stash Holiday Cardmakers Facebook group? We host a fun sketch challenge each month to inspire our holiday cardmaking all year long. I love using sketches for my cards... makes designing the cards so easy! I'll definitely be sharing a few past sketches during the Linky Party.


I'm also a Sponsor for the Christmas in July 2024 {BYSHC} Linky Party!! I have a wonderful prize set aside for one lucky winner. I'm leaving it as a fun surprise, so no photo this time. For a chance to win my fun prize make a Christmas card and link it up to the linky party blog post on the Build Your Stash Holiday Cardmakers blog. The winner will be announced on the {BYSHC} blog on Tuesday, July 30th.


Before you leave, be sure to stop by the Christmas in July 2024 {BYSHC} Linky Party to check out all the wonderful Holiday inspiration from our Sponsors and the {BYSHC} Design Team!! I'm so excited to continue building my stash of holiday cards for 2024... I hope you'll join in the fun and play along!


Thanks so much for stopping by!
See ya next time.

Inky Hugs,
Crystal


{Please note that comment moderation is ON. Your comment will appear shortly.}

Wednesday, July 17, 2024

Membership Wednesday ~ July 2024 BOM Fiesta Flutters ~ Unity Stamp Co.

  Hello there crafty friend!
Today I'm sharing a lovely card featuring the gorgeous stamp from the July 2024 Background of the Month membership called Fiesta Flutters from Unity. I am seriously loving this gorgeous background stamp! Butterflies are my jam! Haha...


I once again ink smooshed a few Distress Inks on Kraft card stock from Papertrey Ink. I love how the colors look on Kraft card stock! I ink smooshed Carved Pumpkin, Cracked Pistachio, and Festive Berries Distress Inks. This was such a different combo for me... what do you think?! I am loving it! 


I dried the ink smooshed panel completely with a Wagner Precision Heat Tool. I then prepped the card stock using a TE Anti-Static Powder Tool from Taylored Expressions. I stamped the gorgeous butterfly background using Sugar Cube White Pigment Ink, also from Taylored Expressions, and added Alabaster White Embossing Powder from Brutus Monroe to the wet ink. I then melted the powder using my heat tool. 


I die cut the butterfly background using the largest die from the Deckle & Stitches Nesting Die Set. I then adhered the butterfly panel to a white A2 top fold card base. I stamped the sentiment from the Bitty Birthday Bash stamps on a long scrap of white card stock using the Festive Berries Distress Ink. I trimmed up the sentiment and adhered it to the card. To finish off the card, I added a few glittery white enamel dots from my stash. 
 

Here's a quick look at this month's Background of the Month membership! I love it so much!!

Well, that's it for me today! I hope you've been inspired to play with your membership stamps! 
Hope you have an ink-redible day!


Thanks so much for stopping by!
See ya next time.

Inky Hugs,
Crystal


{Please note that comment moderation is on. Your lovely comment will appear once approved.}

Tuesday, July 16, 2024

July Scraps Cards ~ Just Keep Swimming plus More ~ Unity Stamp Co.

 Hello there crafty friend!
I finished up my latest batch of leftover scraps and turned them into four pretty simple cards. Yay! I also played with some stamps that hadn't seen ink yet which is always a great bonus! It feels so good to have some more papers done!


Here's a look at the four cards all together. All very different! I'd love to know if you have a favorite of the batch. If you have a moment, comment below and let me know.


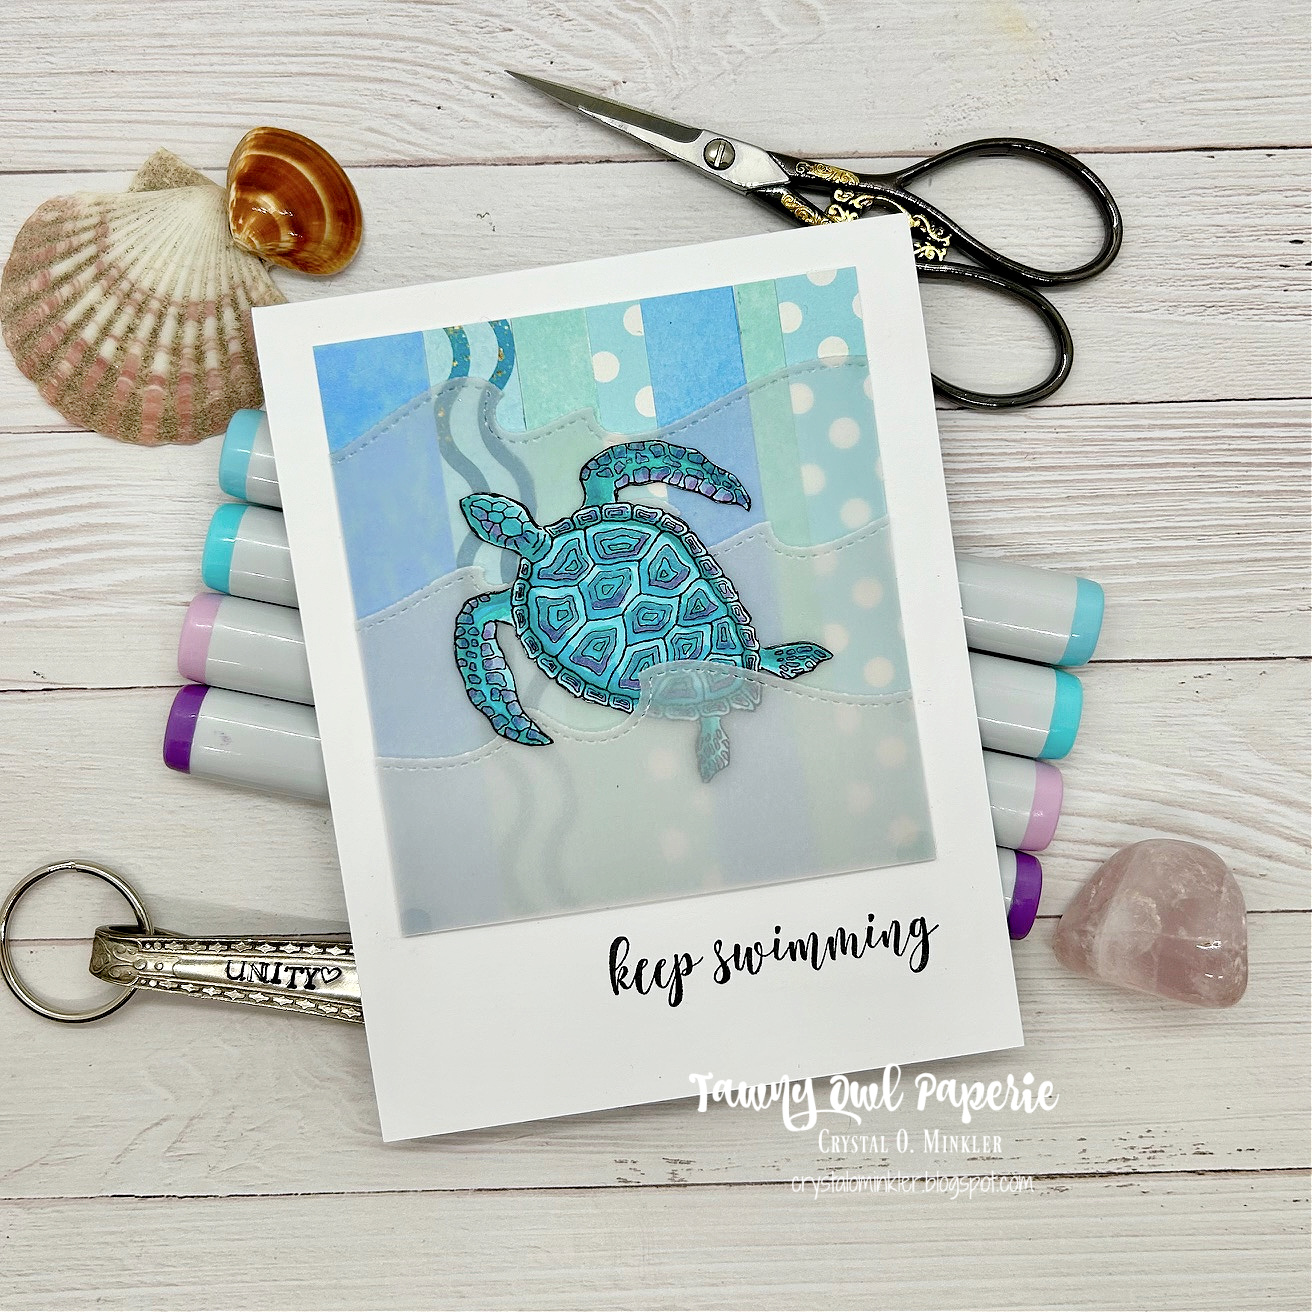
My first card features the beautiful turtle from the Just Keep Swimming stamps. I love this turtle! It's always so much fun to color too. As far as the scraps for this card, I had a bunch of paper strips that were different lengths and widths. I decided to combine them for a fun background. I adhered them all to a 3-1/2 x 3-7/8" piece of thin card stock. I trimmed off the excess paper strips and adhered the panel to a white A2 top fold card base. I die cut some Vellum Card Stock from Papertrey Ink using the Stitched Wave Borders dies from Lawn Fawn for a fun wave background for the turtle. 


I stamped the turtle with Black Amalgam ink from Gina K. Designs. I colored up the turtle using my Copic markers and then I fussy cut it on the line. I colored the edges of the fussy cutting using a Memento Tuxedo Black marker from behind the turtle just in case my marker slipped. I secured the vellum waves together using washi tape and then I trimmed the excess so they would fit over the 3-1/2 x 3-7/8" panel. I adhered the turtle tucking his bottom behind the last vellum wave. I adhered the vellum to the card by adding glue to the back of the turtle. Once it was a little dry and wouldn't shift anymore, I added a drop of liquid glue to the bottom corners of the vellum to secure it a tiny bit more. I also added tiny dots of glue under the stitches on the very edge of each layer. The stitches covered the glue pretty well. You can see the glue a tiny bit on those bottom corners but it's hardly noticeable in person. I finished this card by stamping the sentiment.

Copic Markers: BG000, BG01, BG15, BG05, BG57, V0000, V12, V15


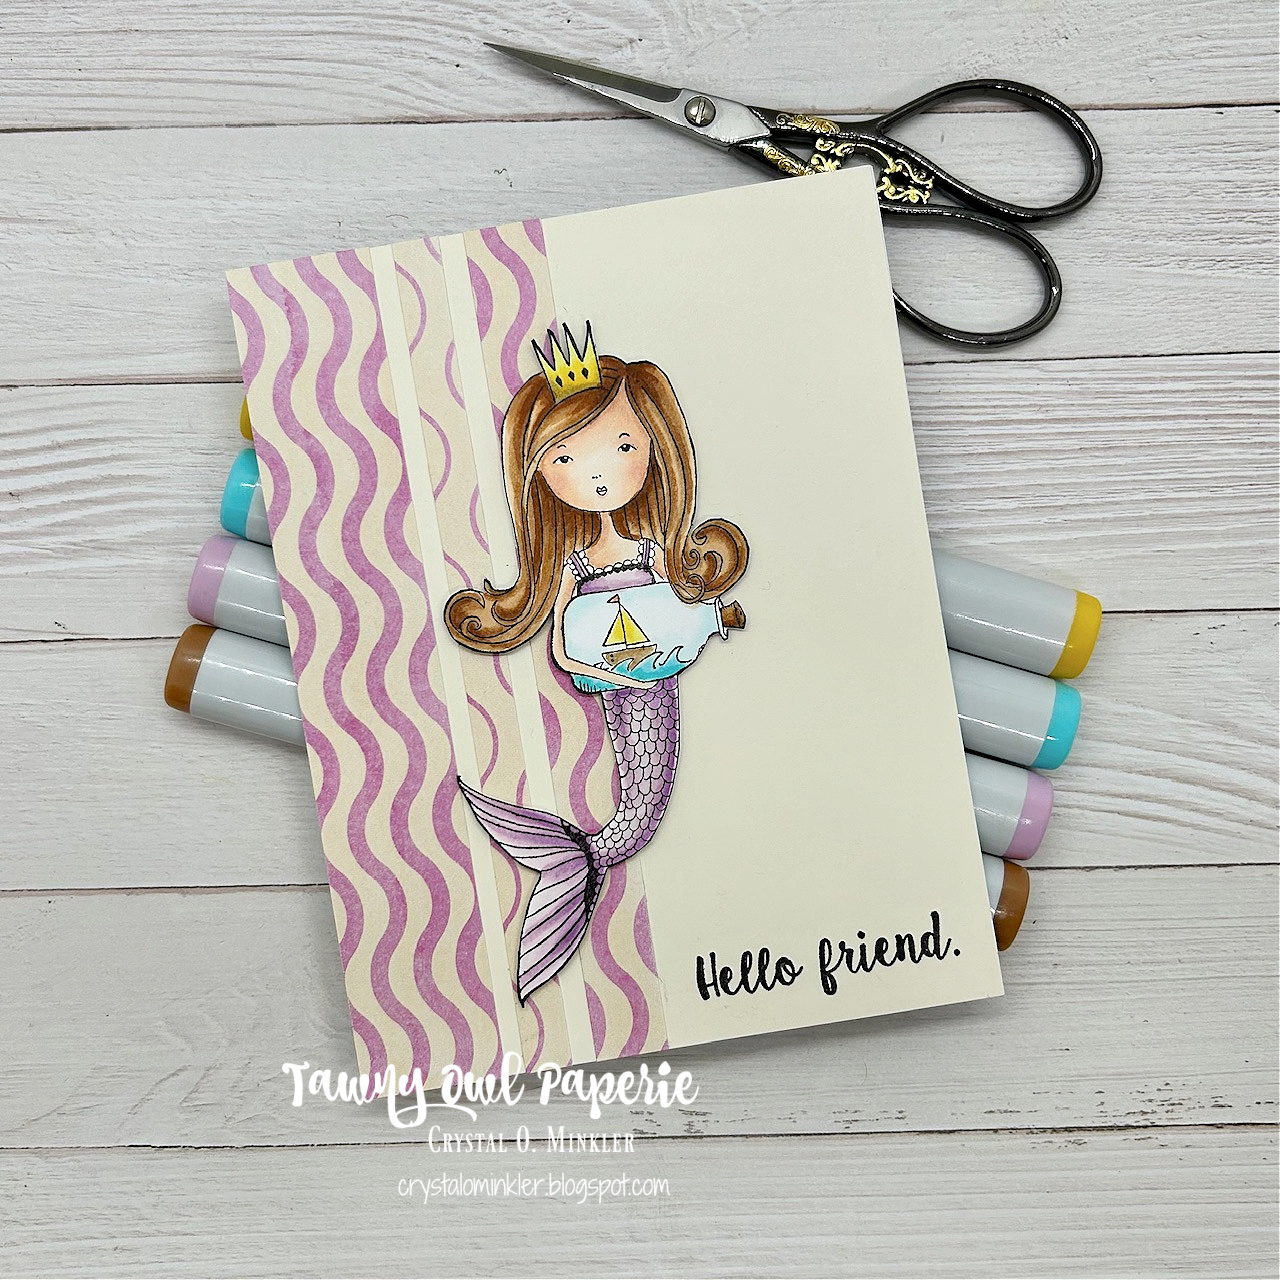
My second card uses three similar strips of pattern paper for a quick card design. I adhered them to a 4-1/4 x 5-1/2" piece of Vintage Cream Card Stock from Papertrey Ink. And then I adhered the card front to a white A2 top fold card base of Stampers Select White Card Stock, also from Papertrey Ink. I stamped the adorable mermaid from the Spirit of a Mermaid stamps using Black Amalgam Ink and I also stamped the sentiment on the card. Sadly, this is one of the retired stamp sets from Unity. I colored up this beauty with my Copic markers and fussy cut her just like I did with the turtle. I added a touch of Sakura White Gelly Roll pen to the whites of her eyes and the frill on her top. And I popped her up on the card using foam tape.

Here's a quick list of the Copic markers I used for the mermaid:
Skin: E000, E00, E11, R00, R20
Hair: E50, E30, E35, E37
Crown: Y11, Y15, Y28
Body / Tail: V0000, V000, V12, V15
Sailboat: Y11, Y15, R12, R05, E30, E35
Waves: BG000, BG01, BG15
Bottle: BG000
Cork: E30, E35, E37


My third card uses four rectangle scraps for an interesting background. I overlapped them just a bit and adhered them all to a white A2 top fold card base. I stamped the fish from the retiring Fishy Philosophy stamps with Black Amalgam ink and fussy cut them. The sentiment I stamped with Peacock Feathers Distress Ink. I added foam tape to the back of these fish and popped them up on the card. And I finished off the card with a few clear drops from my stash.

Copic Markers: Y11, Y15, YR15


My last card also features the cute fish from the Fishy Philosophy stamps. I love this cute stamp set! I had one last large piece of scrap pattern paper from these papers so I just adhered it directly to white A2 top fold card base that I turned on it's side for a landscape card. This was such a simple card! I stamped the fish and the sentiment using the Black Amalgam ink. I fussy cut the fish just like the others and popped it up on the card, too.

Copic Markers: Y11, Y15, R12, R05


I'm so excited to have another paper pack done! Woohoo! What do you think of the card designs this time? Do you have a favorite? I love the simple designs of all of them so it's hard for me to choose a favorite. Well, I'm excited to pick out another pattern paper pack to finish off. I'll definitely pick one out to use with the upcoming Tawny Owl Paperie Inky Inspiration Sketch 24 that will start in a couple of weeks. Have a wonderfully inky week!

Thanks so much for stopping by!
See ya next time.

Inky Hugs,
Crystal


{Please note that comment moderation is on. Your lovely comment will appear once approved.}

Monday, July 15, 2024

Inky Paws Challenge #227 ~ Color Challenge Reminder

 Hello there crafty friend!
 There's still time to play along with the Inky Paws Challenge #227 - Color Challenge! You have until this coming Friday, July 19th to get your entries in for the challenge and a chance to win a $20 store credit to Newton's Nook Designs!


Here's another look at the fun colors... Amethyst Purple, Fuchsia Pink, Sky Blue, and Sand Brown.


I had a fun idea for a sunset card using the Hills & Grass Stencil to create my sunset background. I blended Tumbled Glass and Picked Raspberry Distress Inks over the top of the stencil. I then cut a mask to cover those colors up and blended Vintage Photo Distress Ink for my ground leaving some white at the bottom of the panel. Next I die cut the panel using the largest die from the Frames & Flags Die Set and adhered it to a white A2 top fold card base that I turned on its side for a landscape card.

You can check out my short video sharing how I created the sunset here: Sunset Distress Ink Blend | Inky Paws Challenge 227 | Newton's Nook Designs


I stamped the pretty truck from the Spring Haul Stamp Set using Memento Tuxedo Black Ink and colored it up with my Copic markers. I then die cut the truck using the coordinating Spring Haul Die Set. I added foam tape to the back of the truck and popped it up on the card.

Here's a quick list of the Copic markers I used:
Truck: B000, B00, B02, E30, E33
Lights / Bumper / Mirror: C00, C1, C3
Tires: N0, N2, N4, N6
Watering Can: N0, N2, N4
Tulips: V000, V12, V15
Daffodils: RV10, RV13, RV14
Daisies: C00, C1, Y11, Y15
Leaves / Stem: YG03
Pots: E30, E33
Blanket: C00, C1, C3, V000, V12, V15


Before popping up the truck on the card, I placed my card in my misti and stamped the sentiment from the Dainty Daisies Stamp Set. I added three pretty clear enamel drops to finish off the card.


Now it's your turn to get your paws inky with your Newton's Nook Designs products and create a project with the color combo of Amethyst Purple, Fuchsia Pink, Sky Blue, and Sand Brown. Be sure to link up to the Inky Paws Challenge! Can't wait to see your projects!


Thanks so much for stopping by!
See ya next time.

Inky Hugs,
Crystal


{Please note that comment moderation is on. Your lovely comment will appear once approved.}