Tuesday, June 25, 2024

Tawny Owl Paperie Inky Inspiration Sketch 23 ~ Coffee is Not Enough ~ Unity Stamp Co.

 Hello there crafty friend!
Today I'm sharing my first card for the Tawny Owl Paperie Inky Inspiration Sketch Challenge 23 in the Tawny Owl Paperie Inky Inspiration Facebook group.  I couldn't resist playing with this fabulous new release from Unity called Coffee is Not Enough.


I definitely take this sentiment to heart! Hahaha... a new fave, for sure! And she was so much fun to color up! I knew the background was going to be all neutral so I wanted her to pop with lots of color. Speaking of the background... I paired her up with the awesome Perk Me Up {paper pack} from Unity. Love all the fabulous patterns in these papers! It was hard to pick and choose what I wanted to use for the card.


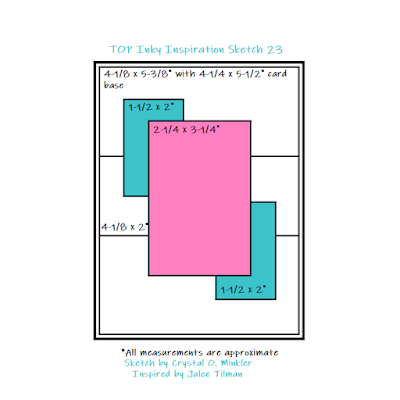
Here's a look at the fun sketch for Tawny Owl Paperie Inky Inspiration Sketch Challenge 23. The sketch, as always, is meant to inspire not require. So let the sketch lead in your design, but don't feel limited by it. I added dimensions as a guide, but my focal image is larger than the one on the sketch. A good example of letting the sketch lead, but not limiting the design.


 I found a stitched rectangle on my desk for a kind of backdrop for the girl and kitty. It was die cut using the smallest die from the Scallops & Rectangles {nesting dies}. I probably could of softened the white with a bit of Antique Linen Distress ink but in the moment I was liking the pop of white. I colored up the girl and kitty using my Copic markers. Fussy cut them leaving a bit of a white border around the images.

Here's a quick list of the Copic markers I used: 
Skin: E000, E00, E11, E04
Hair: E70, E71, E74, E77
Pajamas: R20
Robe: BV20, BV11, BV34
Mug: BG000, BG01, BG45
Coffee: E51, E23, E25
Slippers: Y11, Y15, Y38
Kitty: R00, R20, C00, C1, C3


I adhered the stitched rectangle to the smaller pattern paper rectangles and then I added foam tape to the back of the whole panel. Popped them up on the card for some fun dimension. I trimmed up the sentiment and added a small piece of foam tape on the far right side so it would lay flat on the card. All of my layers are adhered to a white A2 top fold card base. I hope you all have fun with this sketch! I can't wait to see what you create with it. Have an ink-tastic week!

Thanks so much for stopping by!
See ya next time.

Inky Hugs,
Crystal


{Please note that comment moderation is on. Your lovely comment will appear once approved.}

Monday, June 24, 2024

Inky Paws Challenge #226 ~ Summer Theme Challenge

Hello there crafty friend!
It's time for a new Inky Paws Challenge... a super fun Summer Theme Challenge! I sure hope that you'll play along with us using your Newton's Nook Designs products! You have until Friday, July 5th to get your entries in for the #226 Summer Theme Challenge and a chance to win a $20 store credit to Newton's Nook Designs!


Such a broad and fun theme! I'm excited to see the entries for this one!


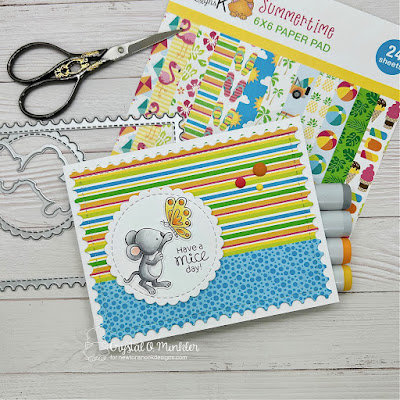
I thought the Garden Mice Stamp Set was perfect for the Summer theme! Especially the mouse with the butterfly. Butterflies come to mind when I think of Summer. I stamped the adorable mouse and butterfly with Memento Tuxedo Black Ink and colored them up with my Copic markers. I then die cut the mouse and butterfly using the coordinating Garden Mice Die Set

Here's a quick list of the Copic markers I used:
Mouse: N0, N1, N2, N4, N6, R00, R20
Butterfly: Y11, Y15, YR15, YR16, N0, N1


I cut two pieces of pattern paper from the beautiful Summertime 6x6 Paper Pad. And then I die cut them together using the postage stamp die from the Framework Die Set. I ended up also die cutting a piece of thin card stock using the same postage stamp die and I adhered the pattern papers to the card stock. It was just easier to have them together on one piece of card stock when I adhered them to the white A2 card base. 


I die cut a circle of white card stock using a die from the Circle Frames Die Set. I laid the mouse and butterfly on the circle die cut so I could figure out where I wanted to stamp the sentiment. Once I had stamped the sentiment, I adhered the mouse and butterfly on the circle. Added foam tape to the back of the circle and popped it up on the card. To finish up the card, I added three enamel dots from my stash.


Now it's your turn to get your paws inky with your Newton's Nook Designs products and create a project with a Summer theme. Be sure to link up to the Inky Paws Challenge! Can't wait to see your projects!


Thanks so much for stopping by!
See ya next time.

Inky Hugs,
Crystal


{Please note that comment moderation is on. Your lovely comment will appear once approved.}

Friday, June 21, 2024

Unity Get Together Make & Take ~ Butterfly Breeze Meadow ~ Unity Stamp Co.

Hello there crafty friend! 
A couple of weeks ago I went to a fun Unity get together with crafty friends from Missouri and Kansas {and a sneaky friend from Florida! Hi Doreen!} in Deepwater, Missouri at the awesome crafty store called The Craft Lab. I shared a few tips & tricks for Copic Coloring with the ladies that attended. Sadly, not everyone was able to participate. Mostly because Copic coloring can take so long and we ran out of time!


My card features the beautiful Butterfly Breeze Meadow background stamp and the Paper Wings stamp from Unity. I can't get enough of the butterfly stamps at Unity. Paper Wings is one of my absolute favorites though. And Butterfly Breeze Meadow is definitely my favorite background stamp. It makes such a pretty card!


Check out this fab group of ladies! Each one is a sweetheart and oh, so talented!
Anywho, I offered to do a video to share with the group and figured I'd just share it here on my blog as well. This isn't my typical video as you'll notice it's much longer. It's also not fast forwarded as much. A 1hr. 15min. video plus editing time - definitely a labor of crafty love. I'd love to hear your thoughts on the video - please only constructive criticism. I love to share what I do as a cardmaker and colorist and hope that you enjoy the video. If you have any questions about the video or Copic coloring, ask in the comments. I'll answer as soon as possible.


I also used a cut apart sentiment {I'm not seeing it on the website, but here's a different one... Cut Apart Sentiment Strips} and the awesome Deckle & Stitches Nesting Die Set. I die cut a white panel for the inside of the card too. You can see that in the video but I didn't take a photo.

Speaking of the video! You can check it out here... Copic Color with Me: Tips & Tricks | Butterfly Breeze Meadow | Unity Stamp Co.


Here's a quick list of the Copic Markers I used:
Flower Petals: Y11, Y15, Y38
Flower Centers: YR21, YR15, YR14
Leaf / Greenery: YG11, YG23, YG45
Paper Wings Butterfly: BG000, BG15, BG45, BV20, BV11, BV34, C00, C1, C3
Background Butterflies: BG000, BG15, BG45, Y11, Y15, Y38, BV20, BV11, BV34
Background: B0000 


I had so much fun coloring and chatting with the ladies. It's a wonderful time of crafty fellowship and it rejuvenates my crafty soul each year. Thanks so much for stopping by! I hope you have an ink-tastic day! 


See ya next time.

Inky hugs,
Crystal

{Please note that comment moderation is on. Your lovely comment will appear shortly.}

Wednesday, June 19, 2024

Membership Wednesday ~ June 2024 KOM and BOM ~ Unity Stamp Co.

  Hello there crafty friend!
Today I'm sharing a pretty card featuring a gorgeous stamp from the June 2024 Kit of the Month membership called Whisper of Summer from Unity. And I paired it up with the awesome June 2024 Background of the Month membership called Starry Splendor. These awesome stamps were meant for each other!


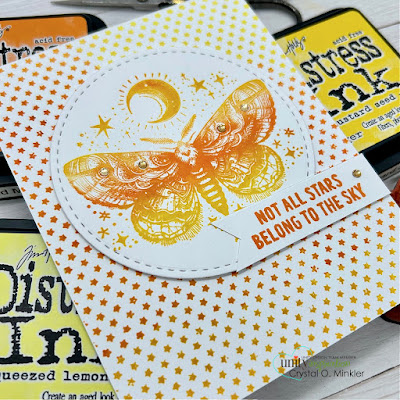
I stamped the butterfly {or is it a moth?} on a piece of Stampers Select White Card Stock from Papertrey Ink using Squeezed Lemonade, Mustard Seed and Spiced Marmalade Distress Inks. I softened the lines of the ink using a blending brush.


I die cut the butterfly {or moth} using a die from the Scallops & Circles {nesting dies} and set it aside. I stamped the background using the same three inks only this time I worked diagonally. I stamped directly on the front of a white A2 top fold card base. 


I stamped the sentiment using the Spiced Marmalade Distress Ink and trimmed it up fussy cutting a tail on the one end. I adhered it to the circle and then added foam tape on the back of both pieces. I removed the backing and popped them up on the card. I finished off the card with a few rhinestones from the Spring Bling rhinestones from Gina Marie Designs.
 

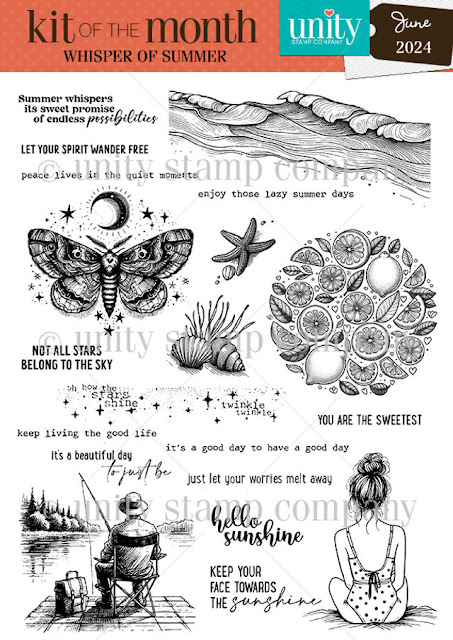
Here's a quick look at this month's Kit of the Month membership! LOVE it!! So many wonderful stamps!


And here's a look at the awesome Background of the Month membership! I love it! 

Well, that's it for me today! I hope you've been inspired to play with your membership stamps! 
Have an ink-redible day!


Thanks so much for stopping by!
See ya next time.

Inky Hugs,
Crystal


{Please note that comment moderation is on. Your lovely comment will appear once approved.}

Tuesday, June 18, 2024

More 'Scraps' Cards ~ Pissy Party Plus a Few More Stamps ~ Unity Stamp Co.

 Hello there crafty friend!
I found some time to finish up the latest batch of 'scraps' cards I've been mentioning. Yay! I had enough scraps to make three cards and a tag. It feels so good to finish up another pattern paper pack. These are the papers I've been using for some of my TOP Inky Inspiration Sketch 21 and 22 cards. It was starting to feel like these papers would never get finished up!


Here's a look at the three cards and the tag. All very different! I'd love to know if you have a favorite of the batch. If you have a moment, comment below and let me know.


My first card features the adorable Pissy Party kitty. I'm making an effort to once again do a bit of watercoloring each month so this month I watercolored this fun cat. I used a bunch of ZIG Clean Color Real Brush Markers. Here's the list: Light Gray, Mid Gray, Yellow Green, Light Green, Yellow, Pink, Light Carmine, Light Blue, Cobalt Blue and Beige. Oh, and I also used my water pen. I fussy cut the kitty leaving a bit of a white border around him. I added foam tape to the back of the kitty and popped him up on the card. I used two scrap papers for this card. These were my largest pieces. I die cut a scrap of white card stock with a die from the Make a Tag {die set}. I didn't want to leave a lot of white space above the kitty so I used a couple of the tiny scraps and stapled them to the card. To finish off the card, I stamped the sentiment with Black Amalgam ink and die cut it with a die from the Scalloped & Stitched Sentiment Nesting Dies.


My second card features the adorable Planner Gal: Simply Perfect Birthday. This card was actually inspired by the Tawny Owl Paperie Inky Inspiration Sketch 22. It has some elements from the sketch, but it definitely took a left turn at some point! LOL! I really liked the three pattern papers clustered together but I wanted a touch of black behind them so I die cut a piece of True Black card stock from Papertrey Ink using a circle die from the Scallops & Circles {nesting dies} from Unity. Not completely sure I love how that turned out. I do like the contrast of the rectangles with the circle. Here's a quick list of the Copic markers I used to color up the sweet birthday girl:

Skin: E000, E00, E11
Hair: E51, E55, E57
Dress: RV10, RV11
Crown: Y11, Y15, Y28
Flower: Y11, RV10, RV11, YG11, YG23
Cake: C00, C1, C3
Candle: Y11, Y15, B000, B00, B02
Cake Stand: B000, B00, B02


Here's a look at the Tawny Owl Paperie Inky Inspiration Sketch 22. This challenge ends next Monday June 24th!! So get your entries in! I'd love to see what you do with this sketch.


My last card is super CAS and simple! I had one long strip of pattern paper. This is always an easy card design for a quick CAS card. This card features the You're Better itty bitty. I thought this would be a fun birthday card. I'm thinking I need to color in the heart though. What do you think?


My tag features the Hooray it's your Birthday itty bitty stamp. My last couple of scraps really had me stuck for a bit. I just couldn't figure out a card design that I liked and then I saw this tag on my desk. I think the pattern papers look so nice with this tag and then the black circles really make the pile of gifts pop! The black circles were also scraps in my True Black card stock folder so that was a bonus. I found a few enamel dots from my stash to compliment the blues in the papers and to finish off the tag I added a bit of white organdy ribbon. Here's a quick list of the Copic markers I used for the gifts: Y11, Y15, Y28, C00, C1, C3, RV10, RV11, B000, B00, YG11, and YG23. 


So excited to add three more cards and a cute tag to my stash! I'm even more excited to have another paper pack done! Woohoo! What do you think of the card designs this time? Do you have a favorite? I'm leaning towards the kitty card. Well, I'm excited to pick out another paper pack to finish off. I think I'll pick one out to use with the upcoming Tawny Owl Paperie Inky Inspiration Sketch 23 that will start next Tuesday. Have a wonderfully inky week!

Thanks so much for stopping by!
See ya next time.

Inky Hugs,
Crystal


{Please note that comment moderation is on. Your lovely comment will appear once approved.}

Monday, June 17, 2024

Inky Paws Challenge #225 ~ Sketch Challenge Reminder

 Hello there crafty friend!
 There's still time to play along with the Inky Paws Challenge 225 - Sketch Challenge! You have until this coming Friday, June 21st to get your entries in for this fun challenge and a chance to win a $20 store credit to Newton's Nook Designs!


This is such a fun sketch to play with. I was excited to try a coffee themed card for my reminder card.


I recently added the beautiful Heartfelt Coffee Stamp Set to my collection and I've been really wanting to ink it up. I love it! I ink smooshed a piece of Stampers Select White Card Stock from Papertrey Ink using Vintage Photo and Ground Espresso Distress Inks. I dried it completely with the Wagner Precision Heat Tool. I applied TE Anti Static Powder to the background. And then I stamped the heart shaped coffee stamp onto the ink smooshed background using Sugar Cube White Pigment Ink from Taylored Expressions. I dusted the background with Alabaster White Embossing Powder from Brutus Monroe and then melted the powder using my heat tool. I followed the same steps again but only partially stamping the heart so I could die cut the circle with the cup as my focal image.


I die cut the center of the heart using the coordinating Heart Frames Die Set. And then I die cut the circle using the Circle Frames Die Set. I wanted a thin mat for the circle so I just fussy cut it. I heat embossed the sentiment using the same steps I used for the Heartfelt Coffee Stamp Set only on Early Espresso Card Stock from Stampin' Up. I die cut it using the same heart die and adhered it over the heart.


I ink smooshed another 4-1/4 x 5-1/2" panel of Stampers Select White Card Stock using the Vintage Photo and Ground Espresso Distress Inks again. I left a lot of white space this time for some contrast. I die cut the ink smooshed background using the largest die from the Framework Die Set. I also die cut a scrap of white card stock using the same die. I adhered the postage die cut pieces to a white A2 top fold card base. I adhered the circle to the heart and then added foam tape to the back of both. I removed the backing and popped them up on the card. To make the cup on the circle pop a bit more, I watercolored it with ZIG Clean Color Real Brush markers using Mid Brown, Dark Brown, Light Carmine and a water pen to blend them a bit. So happy to have another birthday card in my stash!


Now it's your turn to get your paws inky with your Newton's Nook Designs products and create a project using the sketch. Be sure to link up to the Inky Paws Challenge! Can't wait to see your projects!


Thanks so much for stopping by!
See ya next time.

Inky Hugs,
Crystal


{Please note that comment moderation is on. Your lovely comment will appear once approved.}

Saturday, June 15, 2024

Happy 4th of July ~ Patriotic Gnome ~ Unity Stamp Co.

Hello there crafty friend! 
Sharing one more card for Unity's latest release. I just had to play with the awesome new Patriotic Gnome! How stinkin' cute is this guy?! And he was so fun to color up, too!


I've had these patriotic papers in my stash for awhile. Not sure where they came from but I really thought they would be fun to use with the awesome new Tab Fold {Fun Fold Die}. So I die cut the inside striped papers and the firecracker papers and then I didn't want to use either of those again for the tab and then I remembered Unity released a patriotic paper pack with an old Whit Kit. I went searching through my stash and found it! Actually, it wasn't much of a search it's called Americana Vibes {paper pack} so it was first in my Unity paper pack box since it's organized alphabetically. LOL


Here's a quick list of the Copic markers I used for Patriotic Gnome:
Skin: E000, E00, E11
Hair / Mustache / Beard: C00, C1, C3
Hat / Clothes / Sneakers: B91, B93, B95, C00, C1, C3, R20, R14, R46
Flowers: C1, Y15, YG11, YG23, R14, R46
Grass: YG11, YG23


I didn't want the tab to cover up the gnome so I used a ruler and pencil to draw a line where I wanted to cut an opening. I laid my card open and flat on my mat and used a Fiskars Fingertip Control Craft Knife along my ruler to cut out the line. I ended up having to extend the cut a tiny bit on either end but it fits perfectly. Super easy too.


Here you can see the tab pulled out.
The sentiment was stamped with Black Amalgam ink and then die cut using the smallest die from the Postage Stamp {nesting dies}. I added foam tape to the back and popped it up on the card.


Here you can see the inside of the card. I think I may die cut a panel of white card stock to insert here. Maybe I'll use the Postage Stamp {nesting dies} to coordinate with the sentiment on the front of the card. Oh, and maybe I'll stamp another Patriotic Gnome and add him inside the card too.


So the firecracker papers were a little too busy... I didn't just want to adhere the Patriotic Gnome over top and him get lost in the firecrackers so I die cut a circle from vellum card stock using a die from the Scallops & Circles {nesting dies}. Such a fun card to make. Hope you have an ink-tastic day! 

Thanks so much for stopping by!
See ya next time.

Inky hugs,
Crystal

{Please note that comment moderation is on. Your lovely comment will appear shortly.}

Friday, June 14, 2024

{BYSHC} Sketch Challenge 46 ~ Winter Skies ~ Lawn Fawn

Hello there crafty friend!
I'm back with more inspiration for the {BYSHC} Sketch 46 over in the Build Your Stash Holiday Cardmakers Facebook group! Today I'm sharing a sweet Christmas card featuring the adorable Winter Skies stamp from our awesome sponsor, Lawn Fawn! Lawn Fawn has generously offered up a $25 gift card as a prize for the {BYSHC} Sketch Challenge 46 this month! So amazing!!


This month's sketch is so simple! I think it makes for a pretty quick card. I couldn't help myself I had to ink smoosh again. It's just so therapeutic creating a background just by smooshing some ink. I used Tumbled Glass, Wilted Violet, Chipped Sapphire and Black Soot Distress Inks for a pretty winter sky. I then ink blended a bit of the Chipped Sapphire Distress Ink over the background and ink smooshed some more Wilted Violet Distress Ink. It pairs up perfectly with the adorable Winter Skies stamp from Lawn Fawn. I dried the background completely with a Wagner Precision Heat Tool and then splattered white acrylic paint on the panel.


I die cut my ink smooshed panel using the Forest Borders dies. And then I placed the die back in the negative space of the panel and die cut a card front of Stampers Select White Card Stock. By lining up those two pieces of card stock at the top, I was able to line up the card stock and background so they'll fit back together like a puzzle and make just one layer on the card. I hope that makes sense. I'm trying to keep my layers minimal for some cards so I don't have to worry about extra postage when I mail them. The other option would be to just die cut the white card stock piece and adhere it over the ink smooshed background. Super easy, but it adds that partial layer. Before adhering the pieces together onto a white A2 top fold card base, I ran the ink smooshed background through my Big Shot with the Stitched Windy Backdrop die. You can see some of the fun stitches on the left side of the card. It's kind of hard to see them in the photos though. It's such a fun touch in person though!


I stamped the adorable bears on a scrap of white card stock. I colored them up with my Copic markers. I then die cut them using the coordinating die from the Winter Skies Lawn Cuts. I set the bears aside and stamped the sentiment from the Winter Skies onto my card front. I used an acetate grid sheet over the card to check the position and adjusted until I was happy. I added foam tape to the back of the bears and popped them up on the card. I like to use a thin foam tape from Scrapbook Adhesive. It gives a bit of dimension but it's not too bulky to mail the card in a regular A2 envelope. 

Here's a quick list of the Copic markers I used:
Left Bear: E53, E55, E57, E59
Right Bear: E51, E53, E55, E57
Scarf: B000, B02, B04, V01, V05, V06


Here's a look at {BYSHC} Sketch Challenge 46 for the month of June. I am really loving this sketch! I am also loving all the entries for this month's challenge. I hope you'll join us and play along with the sketch. If you're interested in seeing a bit more inspiration for this sketch, check out the amazing inspiration from the design team over on the {BYSH} Cardmakers blog! Lots of creative and sweet inspiration this month from the design team.


Thanks so much for stopping by!
See ya next time.

Inky hugs,
Crystal


{Please note that comment moderation is ON. Your lovely comment will appear shortly.}

Thursday, June 13, 2024

One in a Million Friend Card ~ A Hedgie Hello ~ Unity Stamp Co.

Hello there crafty friend! 
Popping in today with a sweet card featuring the adorable A Hedgie Hello from Unity!! It's time for Unity's June release and there are so many adorably sweet new stamps! It was so hard to pick one to play with, but the super cute hedgehog won out! It's just too sweet!


I stamped the A Hedgie Hello stamp and sentiment using Black Amalgam ink from Gina K Designs onto Stampers Select White Card Stock from Papertrey Ink. I colored up the hedgehog with my Copic markers. Fussy cut the hedgehog using my EK Success Cutter Bee Scissors and leaving a bit of a white border around the image. I die cut a stitched rectangle of white card stock using the middle die from the BIG Scallops & Rectangles {nesting dies}.

Here's a quick list of the Copic markers I used:
Hedgie: W00, W0, W2, W3, W5, R00, R20
Hedgie Nose: C00, C3
Flowers: B000, B02, B04, V01, V05, V06, Y06, Y15
Leaves / Stems: YG11, YG23, YG06


My paper layers are from the beautiful Penelope Collection from Bo Bunny. I colored before looking through my papers... ooopsies!... and was happy to find these papers have at least the blue and green to coordinate nicely. Lots of layers on this one. The bottom blue layer is a card front of 4-1/4 x 5-1/2". On top of that is the brown with hearts that measures 4 x 5-1/4". Next layer is the striped papers that I die cut using the middle scalloped die from the BIG Scallops & Rectangles {nesting dies}. I die cut a piece of dark brown pattern paper using the middle stitched rectangle die {same die I cut out the white card stock}. I trimmed the brown pattern paper and adhered it to the bottom of the white rectangle.


I adhered all of those layers together and then adhered them to a white A2 top fold card base. I trimmed the sentiment and adhered it across the card. I trimmed off the excess hanging off the edges. I added foam tape to the back of the hedgehog and popped it up on the card. I think this one turned out pretty cute. Hope you have an ink-tastic day! 

Thanks so much for stopping by!
See ya next time.

Inky hugs,
Crystal

{Please note that comment moderation is on. Your lovely comment will appear shortly.}

Wednesday, June 12, 2024

Membership Wednesday ~ June 2024 Whit Kit Hydrangea Love ~ Unity Stamp Co.

  Hello there crafty friend!
Today I'm sharing a pretty card featuring the gorgeous hydrangea stamp from the June 2024 Whit Kit membership called Hydrangea Love from Unity. This gorgeous stamp was an absolute dream to color! So beautiful!


I stamped the Hydrangea Love flowers and sentiment on a piece of Stampers Select White Card Stock from Papertrey Ink using Black Amalgam Ink from Gina K. Designs. I loosely fussy cut the flower separating it from the sentiment. Before I started coloring the flowers with my Copic markers, I ink smooshed the flowers and leaves with a bit of Antique Linen Distress Ink. I wanted to see how the 'underpainting' of Antique Linen ink would change the look of the Copic coloring and I love the effect. I dried the flowers with a Wagner Precision Heat Tool and then I colored them up using my Copic markers.

Here's a quick list of the Copic markers I used:
Hydrangeas: RV91, RV93, RV95, BV23
Flower Centers: YG00, Y06, Y15, Y28
Leaves / Stem: YG91, YG95, YG97


I fussy cut the flowers along the line. I even cut through the bottom left flower and the leaf so that I could cut off that enclosed piece and open it up. The trick to doing that while fussy cutting is to cut in the center of the line so both images get some of the black line. And then very carefully color the edges of the whole image with the edge of a black marker from behind. Always from behind just in case the marker slips. I used a Memento Tuxedo Black marker. Coloring the edge cleans up the cutting and when it's adhered back together no one knows how you did it - unless you tell them, of course! LOL!


The background panel of Stampers Select Card Stock from Papertrey Ink was ink smooshed with Ground Espresso and Antique Linen Distress Inks. I left just a bit of white on the panel around the edges. I dried it with the Wagner Precision Heat Tool and then die cut the panel using the largest big scallops die from the recently released BIG Scallops & Rectangles {nesting dies}. I trimmed the sentiment and just adhered it directly across the card. I also adhered the flowers directly to the card. No foam tape for this one. I added a few enamel dots from my stash to finish off the card. I just love how this turned out!
 

And here's a look at the awesome Whit Kit membership! I am seriously loving the stamps in this month's kit. Well, that's it for me today! I hope you've been inspired to play with your membership stamps! Have an ink-redible day!


Thanks so much for stopping by!
See ya next time.

Inky Hugs,
Crystal


{Please note that comment moderation is on. Your lovely comment will appear once approved.}

Tuesday, June 11, 2024

Tawny Owl Paperie Inky Inspiration Sketch 22 ~ No Fun ~ Unity Stamp Co.

 Hello there crafty friend!
 Today I'm sharing a sweet card for the Tawny Owl Paperie Inky Inspiration Sketch Challenge 22. I just got back from the Missouri / Kansas Unity Friends get together and I was inspired by to color up this adorable boy from the No. Fun. stamps from Unity. An adorable Phyllis Harris stamp! I love her stamps! Doesn't his face just say it all!? Too cute!


 I'm still working to finish off those leftover papers I found in my stash in April. I am seriously anxious to get these papers done so I can move on to another leftover pack. This time I only used 2 leftover pieces of pattern paper. I adhered the pattern paper pieces to a 4 x 5-1/4" panel of turquoise card stock from my stash. And then adhered the panel to a white A2 top fold card base. 


I colored up the No. Fun. boy with my Copic markers. Fussy cut him leaving a bit of a white border. That little bit of border helps him pop on the card with the busy stripes and dots behind him.

Here's a quick list of the Copic markers I used: 
Skin: E000, E00, E11
Hair: E53, E55, E57
T-Shirt: BG000, BG10, BG02, BG05
Shorts: E30, E31, E33
Sneakers: Y11, Y15, C00, C1, C3


Here's a look at the fun sketch for Tawny Owl Paperie Inky Inspiration Sketch Challenge 22 in the Tawny Owl Paperie Inky Inspiration Facebook group. The sketch, as always, is meant to inspire not require. So let the sketch lead in your design, but don't feel limited by it. I didn't add measurements for the pattern paper scraps as I'm sure we all have different sized scraps in our stash. For my card today, I flipped the pattern papers. I thought the longer piece worked better with the foot that pointed down. Like it's directing the eye down towards the sentiment.


I trimmed a piece of yellow card stock from my stash to 3/4" and then adhered it to the card. Trimmed off the excess off the edges. I added foam tape to the back of the sentiment and the sweet boy and popped them both up on the card. I'm still loving this sketch! I may have enough leftover pieces to make one more card with this sketch. Otherwise, I plan on making some 'scraps' cards very soon with the last bits of the pattern paper. Have an ink-tastic week!

Thanks so much for stopping by!
See ya next time.

Inky Hugs,
Crystal


{Please note that comment moderation is on. Your lovely comment will appear once approved.}