Monday, March 20, 2023

Inky Paws Challenge #194 ~ Color Challenge

Hello there crafty friend!
It's time for another fun Inky Paws Challenge... a Color Challenge! 
I sure hope that you'll join in the fun and play along with us with your Newton's Nook Designs products! You have until Friday, March 31st to get your entries in for the #194 Color Challenge and a chance to win a $20 store credit to Newton's Nook Designs!

How beautiful are these colors... Bubblegum Pink, Lilac, Spring Green and White


I do love the look of a Clean & Simple {CAS} card with a lot of white and even though this card has a lot of white I don't think it's considered a true CAS card because of all the layers. Still... it works for our current color challenge. 


A white A2 card base measuring 4-1/4 x 11"; scored at 5-1/2" for my bottom layer. Another white layer that was die cut with the largest postage stamp die from the Framework Die Set. My main white panel measures 3-1/4 x 4-1/2" and I die cut some white clouds with a die from the Sky Borders Die Set. Just a touch of the pink and purple and a pop of green with some die cut grass using the Land Borders Die Set


I stamped the sweet critters from the Spring Pile Up stamp set with Memento Tuxedo black ink. I colored them up very simply with my Copic Markers and then die cut them with the coordinating Spring Pile Up Die Set. Here's a quick list of the Copic Markers I used to color up the sweet critters:

Birdie ~ V000, V12, V17, YR15
Bunny ~ C00, C1, C3, RV000, RV10, RV13, RV14
Tulips ~ RV000, RV10, RV13, RV14, YG11, YG23
Sheep ~ C00, C1, C3, N0, N2, N4, RV000, RV10, RV13
Basket ~ E21, E23, E27
Eggs ~ RV000, RV10, RV13, RV14, V000, V12, V17, YG11, YG23

You can check out my process video here... Hippity Hoppity Easter | Spring Pile Up | Newton's Nook Designs.


Now it's your turn to get your paws inky with your Newton's Nook Designs products and create a project using the color combo of Bubblegum Pink, Lilac, Spring Green, and White. Be sure to link up to the Inky Paws Challenge! Can't wait to see your projects!


Thanks so much for stopping by!
See ya next time.

Inky Hugs,
Crystal


{Please note that comment moderation is on. Your lovely comment will appear once approved.}

Friday, March 17, 2023

Believe in Yourself Always ~ Joy in Your Dreams ~ Unity Stamp Co.

 Hello there crafty friend!
Before I even attempted to make a plaid background using the Plaid Builder {layering stencil} for the Winnie the Pooh Easter card I shared yesterday, I had actually used it for a fun striped background for the mini slimline card I'm sharing today.


My card features the gorgeous Joy in Your Dreams stamp that just released yesterday at Unity Stamp Co. along with the awesome Plaid Builder {layering stencil}. Of course, I was drawn to the mixed media vibe of this gorgeous daisy stamp!! I love it and I hope to play with it again soon.


I ink smooshed my background using Squeezed Lemonade, Twisted Citron, Mowed Lawn, and Mermaid Lagoon Distress Oxide inks. And then I stamped the beautiful daisy with Black Amalgam ink over the ink smooshed background. I die cut the panel with the second largest die from the Pleated Lace Mini Slimline dies from Gina Marie Designs.


I blended Mermaid Lagoon over the first stencil and Black Soot over the second stencil from the Plaid Builder {layering stencil} to create my striped background. I trimmed the panel to 2-7/8 x 5-7/8" and adhered it to a slimline card base measuring 6 x 6"; scored at 3". This lets a bit of the card base peek through and be a mat for the striped layer. The daisy panel was then popped up on the card with lots of foam tape. And I finished off the card by trimming up one of the cut apart sentiments from a past Whit Kit.

You can check out my process video for the card here... Mixed Media Daisy | Joy in Your Dreams | Unity Stamp Co.


Love this beautiful stamp! Well, that's it for me today! I sure hope you'll stop by Unity to check out all the new releases. There's a few new Winnie the Pooh stamps along with a bunch of other fun products!

Thanks so much for stopping by!
See ya next time.

Inky Hugs,
Crystal


{Please note that comment moderation is on. Your lovely comment will appear once approved.}

Thursday, March 16, 2023

Winnie the Pooh: Pooh's Bunny Hop ~ March Sketch Challenge ~ Unity Stamp Co.

 Hello there crafty friend!
Today I'm sharing more inspiration for the Unity March Sketch Challenge that I'm hosting in the Unity Show & Tell Facebook group. I'm sharing another Easter card but this time I'm featuring two new releases that will hit the Unity website later today!! Yay!!


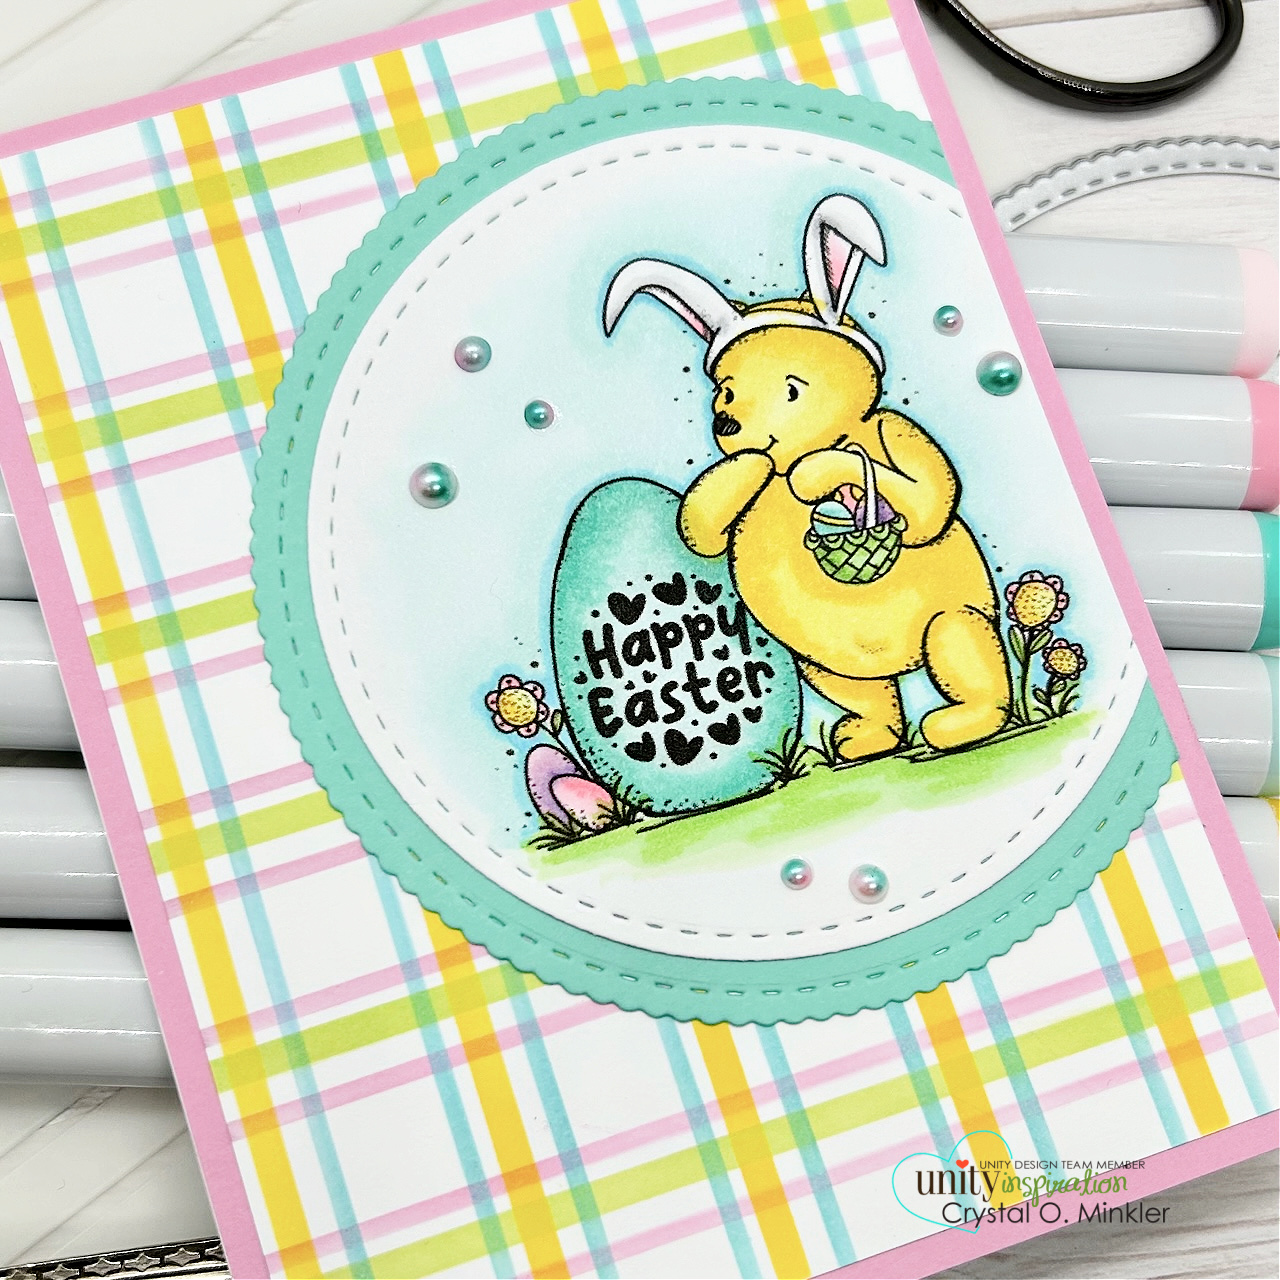
First up... notice the plaid in my background?! Unity is releasing an awesome Plaid Builder {layering stencil}!! It's so easy to use and the possibilities are endless. So many color combinations!! And then, of course, a new adorable Winnie the Pooh stamp. This one is called Winne the Pooh: Pooh's Bunny Hop. Love it!


To create the plaid background I blended Kitsch Flamingo, Salvaged Patina, Twisted Citron and Mustard Seed Distress Oxide inks over the plaid stencils. I trimmed the background to 4 x 5-1/4" and adhered it to a pink card front. The panel was then adhered to a white A2 top fold card base.


Winnie the Pooh was stamped with Black Amalgam ink on white card stock. I also stamped the sentiment inside the egg with the same black ink. Here's a quick list of the Copic markers I used to color up this cute stamped image:

Pooh ~ Y11, Y15
Pooh's Ears ~ C00, C1, C3, RV000, RV10, RV13
Pooh's Basket ~ YG11, YG23
Eggs ~ Y11, Y15, RV000, RV10, RV13, V000, V12, V17, BG000, BG10, BG23
Flowers ~ RV10, RV13, Y11, Y15, YG11, YG23
Grass ~ YG11, YG23
Sky ~ BG000, BG10, BG01


The sketch calls for a rectangle but I thought a circle would be a fun change so I die cut Winnie the Pooh with the Scallops & Circles {nesting dies}. And then I die cut a piece of aqua card stock with the largest die from the same die set. Adhered the circle layers together and then cut the edge off. Next I adhered the circle layers to the plaid background. I finished off the card with a few pretty flatback pearls from my stash.


Here's another look at the sketch! Please know that the sketch is meant to inspire and not require. Feel free to alter it to work for your creation just as I did for mine today. Most importantly have some inky fun! I can't wait to see what you create! Be sure to share your cards in the Unity Show & Tell group and also add them to the sketch challenge album in the group to be entered for a prize!! I'll see you back here next Thursday with more inspiration for this month's sketch challenge.

Thanks so much for stopping by!
See ya next time.

Inky Hugs,
Crystal


{Please note that comment moderation is on. Your lovely comment will appear once approved.}

Wednesday, March 15, 2023

Membership Wednesday ~ March 2023 Uniquely Unity ~ Unity Stamp Co.

  Hello there crafty friend!
Today I'm sharing a quick card using the lovely stamp from the wonderful March 2023 Uniquely Unity membership stamp from Unity. This lovely stamp set includes a sweet giraffe and a fun sentiment. Giraffes are my absolute favorite animal {after the owl, of course!}. Whenever my family visits a zoo we always visit the giraffe exhibits. I just love them... so majestic and beautiful. 


I stamped the giraffe and sentiment with Black Amalgam ink on white card stock. And then I colored up the sweet giraffe with the following Copic markers:

Giraffe ~ YR000, YR21, YR15, YR24, YR27, E25 
Daisy ~ V12, V15, V17, YR21, YR15, YR24
Outline ~ W00, W1


Once I was happy with my coloring, I die cut my card front using a die from the Stitched Scallop Basic Edges dies from My Favorite Things.


The outline around the giraffe helps to give him a bit of dimension but the black card front in the back also helps to make the black ink of the stamped images pop on the card. Such a simple and quick card but I just love how it turned out.


Here's a look at the beautiful Uniquely Unity stamps for March!! I adore him so much! This membership is available for only $16.99. That includes shipping! You also get a wonderful inspiration sheet with pictures and step-by-step instructions so you can easily recreate the cards yourself. And now when you sign up you have the ability to pause, skip or cancel your subscription within your Unity account. So awesome!!

That's it for me today! I'll be back next week with inspiration for the March 2023 Whit Kit!! Ohhh... have you seen this month's card kit! I can't wait to play!


Thanks so much for stopping by!
See ya next time.

Inky Hugs,
Crystal


{Please note that comment moderation is on. Your lovely comment will appear once approved.}

Tuesday, March 14, 2023

Double Twisted Ribbon Technique ~ Technique Tuesday ~ Unity Stamp Co.

  Hello there crafty friend!
I'm back with another Technique Tuesday! On the 2nd Tuesday of each month I'll be sharing a bit of inspiration and a video featuring a fun technique. I hope that you'll be inspired to get inky and play along with some of the techniques that I share.


Today's technique actually isn't an inky one. It's a fun one to use with pattern papers. Perfect for those scraps of pattern paper all of us cardmakers have in our stash... the Double Twisted Ribbon Technique!! Have you seen it?! I saw a card last month using this technique and I just HAD to try it.


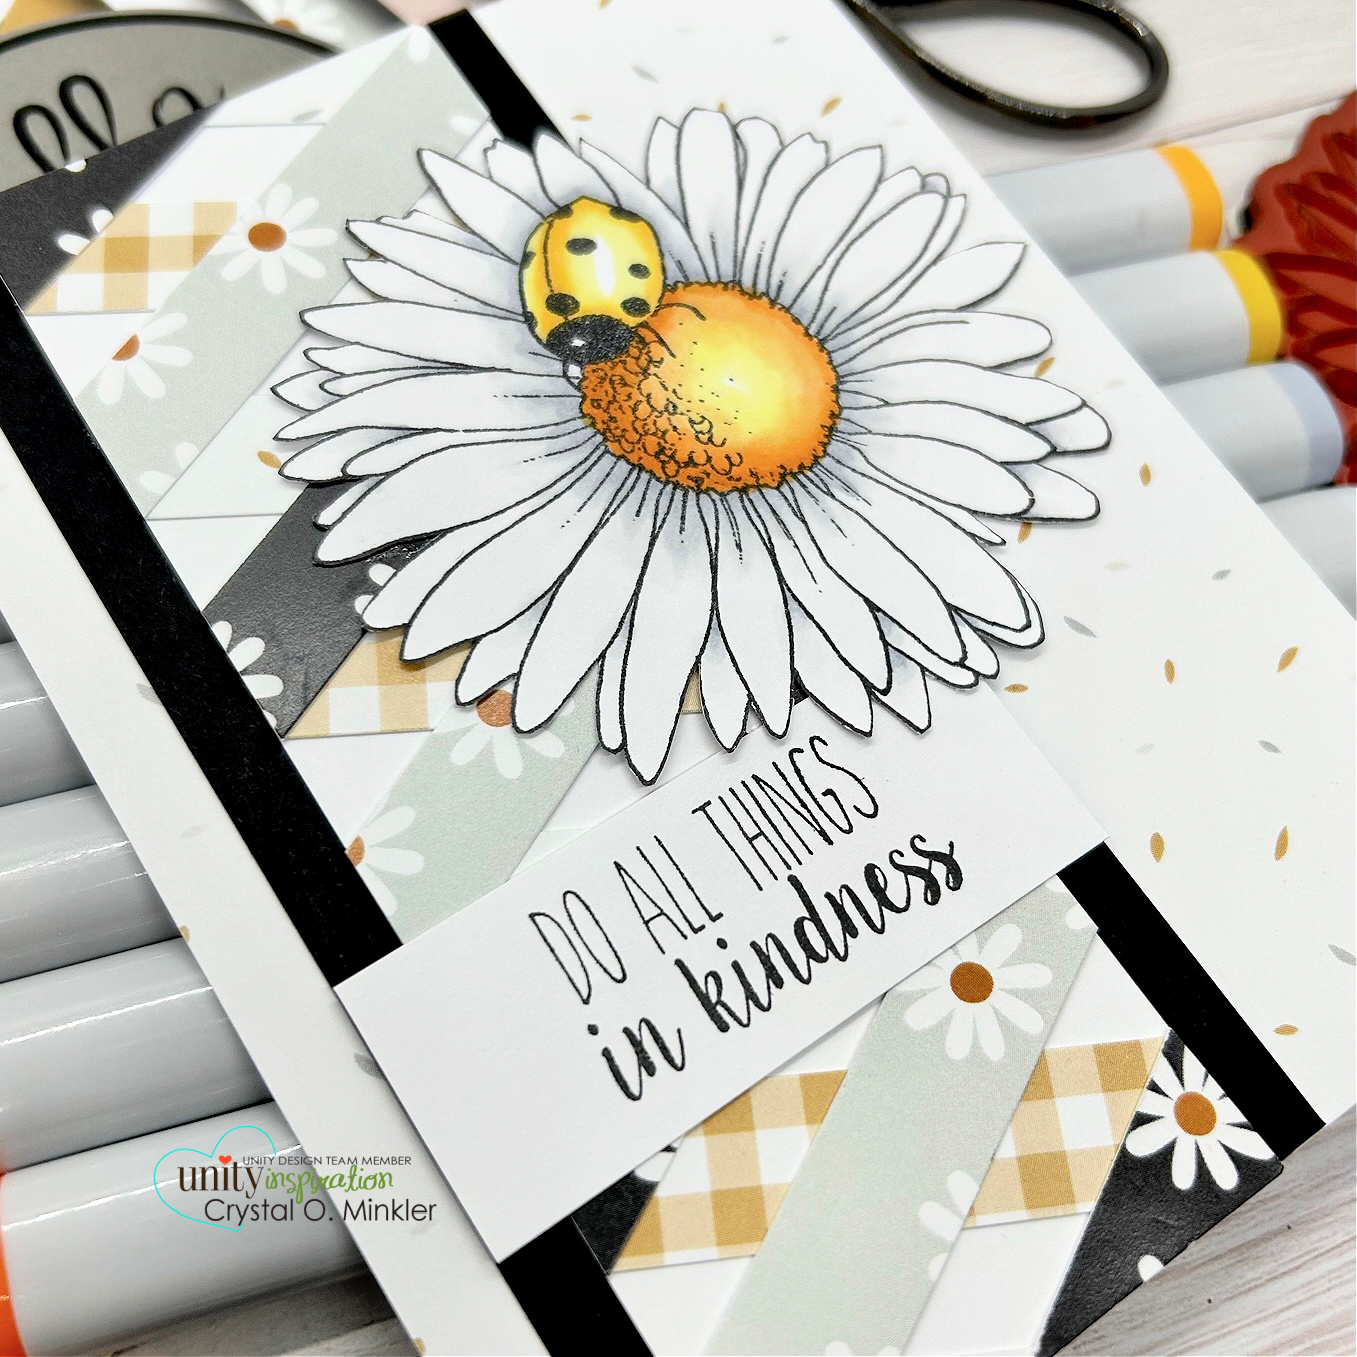
For my first card I used the beautiful Hello Daisy {paper pack}. I paired it up with the super sweet A Daisy & A Lady stamps from Unity. One of my absolute favorites!! So cute with these papers.


The technique is really pretty easy. And it can be used with any pattern paper. I cut 1/2" strips from four different pattern papers from the paper pack. The paper strips are adhered to a 2 x 5-1/2" piece of white card stock that I scored at 1" intervals. I then trimmed off all the excess pieces off the edge and mat it with a 2-1/2 x 5-1/2" piece of black card stock.


The daisy panel was adhered to a 4-1/4 x 5-1/2" piece of pattern paper adhered to a white A2 top fold card base. I stamped the daisy and colored it with the following Copic Markers:

Daisy ~ C00, C1, C3
Daisy Center ~ YR21, YR15, YR16, YR24
Ladybug ~ Y11, Y15, Y35


Fussy cut the daisy on the line. I adhered a little scrap of card stock on the back right side of the daisy so it would lay flat on the card. Stamped the sentiment on white card stock, trimmed and adhered on the black panel. I did trim the excess off of this before I adhered it to the card.


For my second card I've paired up Magnolia Dreams {paper pack} with the beautiful Magnolia Flowers stamps, also from Unity. For this one I actually used a larger panel for the technique measuring 4 x 5-1/2".


I used 1/2" strips for this one too. The strips were all adhered to the panel and I trimmed off the excess. And then I adhered the panel to a mat of pink pattern paper from the paper pack. The card front was then adhered to a white A2 top fold card base.


Here's a quick list of the Copic Markers I used to color up the magnolia:

Magnolia ~ RV000, RV10, RV14, RV17, RV09
Flower Center ~ YR21, YR15, YR16


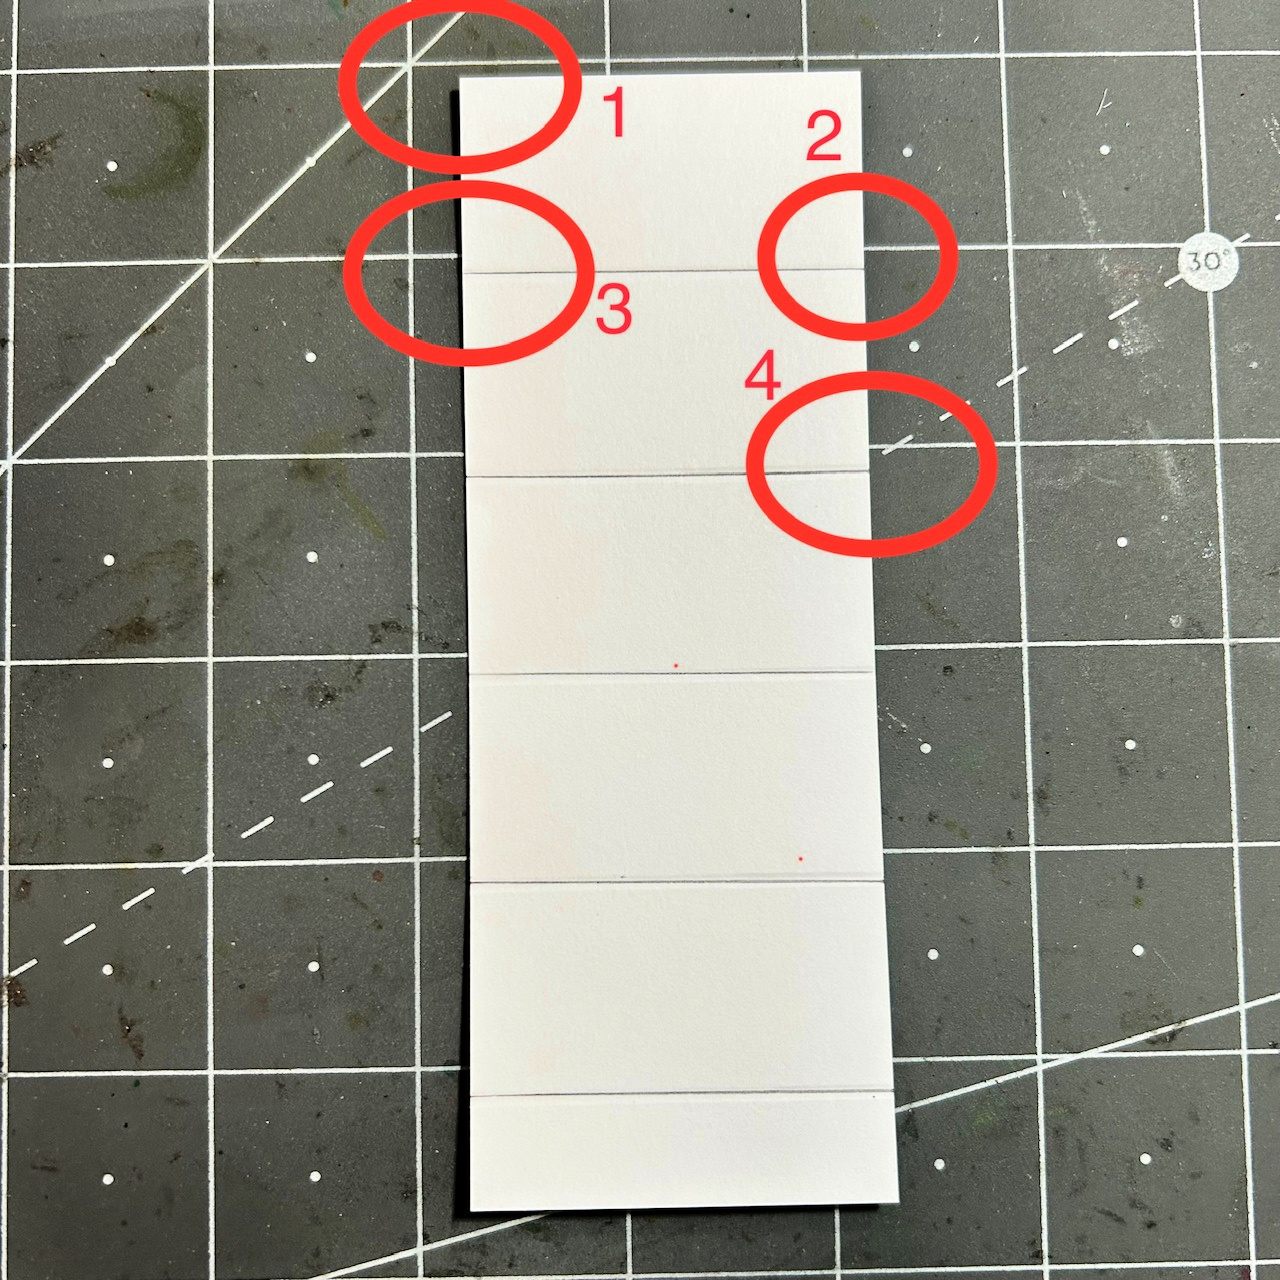
Please excuse my stained and messy mat but I've had a couple questions about the score lines on the white card stock panel so I thought I'd add a visual to help explain. The score lines are used to line up the top edge of the 1/2" pattern paper strips. So the first strip goes diagonal from the top left corner (1) to the first score line on the right (2). The second strip goes on the first score line on the left (3) to the second score line on the right (4) and so on until you've filled up the panel. And then you'd switch your pattern papers and work diagonally the other direction (criss crossing the papers). Hope this is a bit more clear.


The Double Twisted Ribbon Technique is so amazing and beautiful! A very versatile technique depending on the size of paper panel that's used. If you give this fun technique a try, I'd love to see what you create so please share your cards in the Unity Show & Tell group and tag me.

Thanks so much for stopping by!
See ya next time.

Inky Hugs,
Crystal


{Please note that comment moderation is on. Your lovely comment will appear once approved.}

Monday, March 13, 2023

Inky Paws Challenge #193 ~ Spring Theme Challenge Reminder

  Hello there crafty friend!
There's still time to play along with the Inky Paws Challenge #193 - a Spring theme challenge! You have until this coming Friday, March 17th to get your entries in for the #193 Spring Theme Challenge and a chance to win a $20 store credit to Newton's Nook Designs!

Changing things up today with a flower stamp! Daisies are my favorite flower.


I just adore these sweet daisies from the Dainty Daisies stamp set from Newton's Nook Designs. I am also in love with the detail in the coordinating Dainty Daisies die set... oh my gosh! It even cuts out those itty bitty spots between the flowers. Love! Here's a quick list of the Copic markers I used to color up the daisies:

Pink Daisy ~ RV000, RV10, RV13
Purple Daisy ~ V01, V12, V15
White Daisies ~ C00, C1, C3
Daisy Centers ~ Y11, Y15, Y35
Leaves & Stems ~ YG11, YG13


I was so excited to see Spring colors in the Love & Chocolate Paper Pad. I hadn't played with these papers yet so I was happy to finally use a few for my card. I also used the wonderful Frames Squared Die Set to die cut all my pattern paper layers. The sentiment was also die cut using the largest circle die in the Frames Squared Die Set.


All my paper layers are adhered together and then adhered to a 5 x 10" card base scored at 5" for a 5" square card base. I adhered the two white daisies on the left to the sentiment circle and then I added foam tape to both pieces. I then popped them both up on the card.


Now it's your turn to get your paws inky with your Newton's Nook Designs products and create a project with a Spring theme. Be sure to link up to the Inky Paws Challenge! Can't wait to see your projects!


Thanks so much for stopping by!
See ya next time.

Inky Hugs,
Crystal


{Please note that comment moderation is on. Your lovely comment will appear once approved.}
Friday, March 10, 2023

{BYSHC} Sketch Challenge 31 ~ Owl Bundle Up ~ Unity Stamp Co.

 Hello there crafty friend!
I'm sharing another Christmas card for the {BYSHC} Sketch Challenge 31 for the Build Your Stash Holiday Cardmakers Facebook group. I just adore the sweet owls illustrated by Lisa Arana for Unity Stamp Co. The adorably sweet owl from the Owl Bundle Up stamps was just perfect for my card today.


I paired him up with the Snowy Winter Greetings {paper pack} also from Unity. The snowflakes in the pattern paper compliment the snowflakes on the sweet owl's sweater.


The owl was stamped on Stampers Select White card stock from Papertrey Ink {my go-to white card stock!} using Black Amalgam ink from Gina K Designs. I used the following Copic markers to color up my image:

Owl ~ E21, E23, E25, C00, C1, C3, YR21, YR15, YR27
Sweater ~ B000, B91, B95
Ground ~ C00, C1, C3


My main panel was die cut with a stitched circle die from the Scallops & Circles {nesting dies}. I popped it up on my card with foam tape. The sentiment is trimmed up and just adhered to the card. And I finished up the card with a few enamel dots from my stash... I'm really just trying to use these up!! I have SO many. It's ridiculous.


Here's a look at {BYSHC} Sketch 31 for the month of March!
I hope you'll join us and play along with the sketch! If you're interested in seeing a bit more inspiration for this sketch, check out the amazing inspiration from the design team over on the {BYSH} Cardmakers blog!


Thanks so much for stopping by!
See ya next time.

Inky hugs,
Crystal


{Please note that comment moderation is ON. Your lovely comment will appear shortly.}