Thursday, February 29, 2024

Unity Lovers ATC ~ Galentines ~ Unity Stamp Co.

Hello there crafty friend! 
I know that Galentines and Valentine's Day are well passed us but I just wanted to share the Galentines ATCs that I made for the Unity Lovers ATC swap. I used a whole bunch of Unity goodies to make these ATCs. It's always so much fun to turn on one of my audible e-books and get inky while I listen. Often times I can remember bits of the story that I listened to when I look at the projects I was working on. In fact, I remember I was listening to Divine Rivals by Rebecca Ross. I really enjoyed this book... a bit of romance, some fantasy and magic all during a time of war between gods. A really good read!


I started with two full sheets of Distress Watercolor Card Stock from Ranger measuring 8-1/2 x 11". I ink smooshed Lost Shadow, Spun Sugar, Picked Raspberry, Vintage Photo, and Speckled Egg Distress Oxide inks on each sheet. I dried the card stock completely with a heat tool. Stamped the cute hearts from Mousing Around: Hiya Pal all over the card stock using Speckled Egg, Ground Espresso, and Picked Raspberry. I wasn't thinking about the direction of the hearts and how I'd need to cut the card stock for the ATCs. So I ended up needing to ink smoosh another full sheet of card stock. Ooops! I splattered all three sheets using Tarnished Brass Mica Spray and Picket Fence Spray Stain and cut them up into ATCs. And then I distressed the edges with Vintage Photo Distress Oxide ink.


I stamped the distressed hearts from A Little Grunge Love using Picked Raspberry Distress Oxide ink and lightly blended some Kitsch Flamingo Distress Oxide ink over them. I also stamped the 'love' sentiment from Winter Cheer and Deer using the same Picked Raspberry ink. I fussy cut each of the hearts and the 'love' sentiments. Oy... that took some time! I think my eyes went a bit cross eyed once or twice! LOL!


And then I die cut Early Espresso card stock from Stampin' Up using the Unity {metal die}... I die cut 36 of those babies! {Sadly, I'm not seeing this die on the website right now... it must be out of stock}. Adhered two together using my new favorite Bearly Art Precision Craft Glue. I love this glue for die cut sentiments! The fine tip is amazing and I haven't had an issue with clogging. All that was left to do was adhere the sentiments to the ATCs and I popped up the hearts with foam tape. I did shift the placement of the popped up hearts depending on the ATC. I didn't want to cover up all the pretty hearts in the background. So the cards aren't quite identical but they are pretty close!

That's it for me today! Have an ink-tastic day!

Thanks so much for stopping by!
See ya next time.

Inky hugs,
Crystal

{Please note that comment moderation is on. Your lovely comment will appear shortly.}

Wednesday, February 28, 2024

Membership Wednesday ~ February 2024 KOM Grace and More Grace ~ Unity Stamp Co.

  Hello there crafty friend!
Today I'm sharing a lovely monochromatic card featuring the fabulous February 2024 Kit of the Month membership from Unity. I've just been itching to ink up this beautiful fairy! Love her!


I stamped the beautiful fairy with Black Amalgam ink from Gina K. Designs. I knew I wanted to work with purple for this one so I went looking through my papers and found the Watercolor Stripes {paper pack}. I die cut the fairy panel using a die from the Deckle & Stitches Nesting Die Set.


I copic colored the cute fairy with just a handful of Copic markers: E000, E00, V000, V12, V15. I stamped the fairy again on a post it note and fussy cut around her and the circle in the background. I placed my mask over the panel and ink blended with Seedless Preserves, Dusty Concord and Villainous Potion Distress Oxide inks. Adhered the fairy panel to the pattern paper and wrapped it with a piece of iridescent ribbon. I tied a pretty bow and secured it with a glue dot.


I wanted to use one of the many cut apart sentiments I have in my stash so I looked through them to find one that worked nicely with the fairy. Adhered it to the card front and trimmed off the edges. I then adhered the card front to a white A2 top fold card base using liquid glue.
 

Here's a quick look at this month's Kit of the Month membership! So amazing!

 Well, that's it for me today! Hope you have an ink-tastic day!


Thanks so much for stopping by!
See ya next time.

Inky Hugs,
Crystal


{Please note that comment moderation is on. Your lovely comment will appear once approved.}

Tuesday, February 27, 2024

Tawny Owl Paperie Inky Inspiration Sketch 19 ~ Epstein and Garfield ~ Rubbernecker Stamps

 Hello there crafty friend!
Today I'm sharing a brand new sketch for the Tawny Owl Paperie Inky Inspiration Facebook group. I had to much fun that I ended up making two cards to share! I'm still working on some birthday cards to build up my stash. And I'm still trying to use up those leftover papers from my days on the Scrapping for Less Design Team. These leftover papers have just been sitting there taking up room in my studio for over 3 years now. I challenged myself last month to start using them all up!! So, I'll be sharing the cards I create throughout the month. Some will be using the new TOPII sketch and others will just be ideas I came up with using the last few scraps. I hope you're inspired to not only play along with this month's sketch, but also use up those scraps right along with me!


My two cards for TOPII Sketch 19 featuring owl stamps from Rubbernecker Stamps. I thought these cuties would be perfect for this sketch! I used Epstein and Garfield... I can't seem to find them on the website now, but they do have a fun Have a Hoot stamp set that includes Epstein and a stamp that is kinda similar to Garfield. Always happy to enable crafty friends!


First up is the adorable Epstein owl from Rubbernecker Stamps. Isn't he just the cutest?! I stamped him up using Black Amalgam ink from Gina K. Designs. I think I might need to add some ink to my ink pad though. I just couldn't get a crisp stamping of his eyes. I will likely color them in black with my Memento Tuxedo Black marker. 


I used up a bunch of the pattern papers last week with my three cards for Sketch 18 so I decided to just use a strip of the pattern paper for my cards today. These strips measure 1-3/4 x 5-1/4". I also used some leftover card stock for my red card front and for the white scallops strips. So I don't actually know what brand of card stock these are.


I didn't want to cover up the pretty pattern paper so I die cut a vellum circle using a die from the Scallops & Circles {nesting dies} from Unity. I adhered the owls to the vellum circle and then adhered the vellum circle by just adding glue behind the owls so none of the glue would show through the vellum.

Here's a quick list of the Copic markers I used to color Epstein up:

Feathers: W00, W1, W3, W5, E84, E87, E89
Eyes: Y11, Y15, Y26
Beak / Feet: YR15, YR27
Heart: R20, R14, R46 


Here's a look at the fun new sketch for Tawny Owl Paperie Inky Inspiration Sketch 19. I think this'll be a good sketch for those larger leftover pieces. The sketch, as always, is meant to inspire not require. So let the sketch lead in your design, but don't feel limited by it. I have a few fun ideas for this sketch and I hope to play some more with it during the next few weeks.


My second card featuring the cute Garfield owl from Rubbernecker Stamps.
I used another scrap for this card along with a fun yellow card front from my stash. I love how the yellow background makes Garfield's eyes and cup pop on the card.


I used an old scallop edge punch from Stampin' Up with some scraps of white card stock to make the fun white scallop edges. I punched them and then trimmed the edges... I'd say they're about 1/2" wide so I could just adhere them to the pattern paper strip before adhering the strips to the card fronts.

Here's a quick list of the Copic markers I used to color up Garfield:
 
Feathers: W00, W1, W3, W5, E84, E87, E89
Eyes / Cup: Y11, Y15, Y26
Beak / Feet: YR15, YR27 


The sentiment is from the Gotta Love Sentiments from Unity Stamp Co. I trimmed them and popped them up with foam tape. So happy with how these cards turned out and they didn't take very long either! I hope you're inspired to play along with the sketch... and maybe even use up some of those paper scraps and/or paper pads! Have a wonderful week!

Thanks so much for stopping by!
See ya next time.

Inky Hugs,
Crystal


{Please note that comment moderation is on. Your lovely comment will appear once approved.}

Monday, February 26, 2024

Inky Paws Challenge #217 ~ Lucky Green Theme Challenge Reminder

Hello there crafty friend!
There's still time to play along with the Inky Paws Challenge #217 - Lucky Green Theme Challenge!! You have until this coming Friday, March 1st to get your entries in for this fun challenge and a chance to win a $20 store credit to Newton's Nook Designs!


I was once again inspired by the shamrocks for my card!


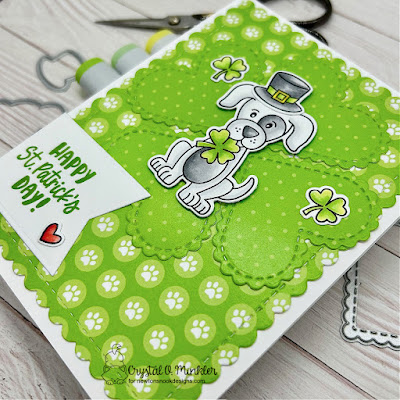
I just had to ink up the adorable Lucky Dog Stamp Set. Isn't he just the cutest?! I also stamped a couple shamrocks, a heart, and a hat using Memento Tuxedo Black ink. The awesome coordinating die... Lucky Dog Die Set... came in super handy to die cut all these images once I had them colored with my Copic markers.


I paired the pup up with the A Cat's Life 6x6 Paper Pad. I really like the greens in these papers and thought they were perfect for a St. Patrick's Day card. I die cut the bottom layer using the largest die from the Frames & Flags Die Set. I adhered it to a white A2 top fold card base of Stampers Select White card stock from Papertrey Ink. I die cut four hearts using the pretty scalloped hearts from the Heart Frames Die Set. I adhered them on the background layer to form a four-leaf clover.

Here's a quick list of the Copic markers I used to color up the pup, shamrock and heart:

Pup: C00, C1, N0, N1, N3, N5
Hat: N0, N1, N3, N5, YG21, YG11, YG23, Y06, Y28
Shamrocks: YG21, YG11, YG23
Heart: R20, R14, R46


I stamped the sentiment from the Lucky Dog Stamp Set onto white card stock that I had die cut using the fishtail banner from the Frames & Flags Die Set using Mowed Lawn Distress Oxide ink. I added the cute little heart to the open space on the banner I cut. I like the little pop of red. It adds interest to the card. To finish off the card I adhered the shamrocks and popped up the pup using foam tape.


Now it's your turn to get your paws inky with your Newton's Nook Designs products and create a project with a Lucky Green theme. Be sure to link up to the Inky Paws Challenge! Can't wait to see your projects!


Thanks so much for stopping by!
See ya next time.

Inky Hugs,
Crystal


{Please note that comment moderation is on. Your lovely comment will appear once approved.}

Saturday, February 24, 2024

Snarky Birthday Card ~ Sup, Cool Cat ~ Unity Stamp Co.

Hello there crafty friend! 
I just had to ink up the seriously intellectual and adorable Sup, Cool Cat from Unity Stamp Co. I couldn't make a card with this kitty without also using the awesome new Cozy Nook stamp. Ohhh... I think they are so perfect together!


I really wanted to use one of the new paper packs and the Nostalgic Amour {paper pack} just arrived in my latest order. I wasn't totally sure at first that it would work, but I think it does! The colors in these papers are so romantic and endearing. They also have the whole vintage vibe so I'm really glad I used them. All of my layers are die cut using the Deckle & Stitches Nesting Die Set. My mats are Early Espresso card stock from Stampin' Up. And I adhered all of my layers to a white A2 card base of Stampers Select White card stock from Papertrey Ink.


I stamped the Sup, Cool Cat kitty with Black Amalgam ink on Stampers Select White card stock from Papertrey Ink. Colored up the kitty very simply with my Copic markers and also stamped the book nook to coordinate with the pretty papers. 

Here's a quick list of the Copic Markers I used: 
Kitty: R00, R20, N0, N1, N3, N5
Bookcase: E51, E53, E55, E57
Red Books / Vase / Flowers: RV34, R37, RV69
Tan Books: E51, E53, E55
Yellow Books / Vase / Flowers: YR21, YR23
Green Pot / Leaves / Ground: YG95, YG97


 I distressed the edges of the Cozy Nook layer and a tiny bit on the kitty using Vintage Photo Distress Ink. The fun sentiment is from the Snarky Cat Thoughts stamps, also from Unity and I distressed edges, too. I love the sentiments in this kit! To finish off the card, I fussy cut the kitty leaving a white skinny border and then I popped it up on the card using lots of foam tape. That's it for me today! Have an ink-tastic day!

Thanks so much for stopping by!
See ya next time.

Inky hugs,
Crystal

{Please note that comment moderation is on. Your lovely comment will appear shortly.}

Friday, February 23, 2024

{BYSHC} Sketch Challenge 42 ~ Farmhouse Christmas ~ Not 2 Shabby

Hello there crafty friend!
I'm sharing one last card for the {BYSHC} Sketch Challenge 42 hosted in the Build Your Stash Holiday Cardmakers Facebook group! Today I'm sharing a sweet Christmas card featuring the pretty barn from the Farmhouse Christmas stamp set from our lovely sponsor Not 2 Shabby! We've changed things up this year and Not 2 Shabby is Sponsoring our {BYSHC} Sketch Challenge 42 this month!! Jamie, the owner of Not 2 Shabby, has generously offered up a fun-filled Christmas prize package for one lucky winner of the challenge! Thanks so much, Jamie!


I stamped the pretty barn from the Farmhouse Christmas stamp set using Memento Tuxedo Black ink. I colored it up with Copics and fussy cut it.


I paired up the barn with the gorgeous A Shabby Christmas 6x6 paper pad. Both of these lovely items I just got in my recent order. Have you taken advantage of the 15% OFF code that Jamie shared with us?! I stocked up on some Christmas papers and ephemera... and I got this pretty stamp set, too! Woohoo! Here's the code in case you want to do some shopping over at Not 2 Shabby... BYSH15.


I stamped the sentiment using Barn Door Distress Oxide ink and fussy cut it. I didn't want to cover up the barn so I ended up just putting the sentiment under the barn a bit. Both the barn and sentiment are popped up with foam tape.

Here's a quick list of the Copic markers I used:

Wreath / Banner: YG11, G24, G46, R20, R14, R46
Barn: E08, E19, E09
Snow: C00, C1, C3


Here's a look at {BYSHC} Sketch Challenge 42 for the month of February. This has been such a fun sketch! The entries this month have all been so awesome! I hope you'll join us and play along with the sketch. There's still some time! The challenge ends February 29th. If you're interested in seeing a bunch more inspiration for this sketch, check out the amazing inspiration from the design team over on the {BYSH} Cardmakers blog! Since it's a short month there's a WHOLE bunch of inspiration like two weeks worth on the {BYSHC} blog today.


Thanks so much for stopping by!
See ya next time.

Inky hugs,
Crystal


{Please note that comment moderation is ON. Your lovely comment will appear shortly.}

Wednesday, February 21, 2024

Membership Wednesday ~ February 2024 KOM and BOM ~ Unity Stamp Co.

  Hello there crafty friend!
Today I'm sharing a lovely card featuring the fabulous February 2024 Kit of the Month membership along with the gorgeous background stamp from the February 2024 Background of the Month membership from Unity.


I stamped the beautiful Artistic Pallet background stamp on Crumb Cake card stock from Stampin' Up with Vintage Photo Distress Ink. Super easy background for a pretty card!


I stamped the pretty cup of flowers from the Grace and More Grace KOM using Black Amalgam ink on Stampers Select White Card Stock from Papertrey Ink. I colored it up with some Copic markers and die cut it with a stitched tag die from the Make a Tag {die set}. I also die cut a mat from Chocolate Chip card stock {also from Stampin' Up} using the next largest tag die from the set. Here's a quick list of the Copic markers I used:

Cup: BG70, BG01, BG34
Leaves: YG03, YG93
Yellow Flowers: Y06, Y15, Y35, YR27
Orange Flower: Y15, Y35, YR15, YR27
Pink Flowers: R00, R83, R32
Purple Flowers: V000, V12, V15
Teal Flowers: BG01, BG34
Steam: C00, C1
Grounding: C00, C1, C3


I trimmed the background down to 4-1/8 x 5-3/8" and adhered it to a Chocolate Chip card stock mat. I adhered the tags together and adhered them to the card. I stamped a lovely sentiment from the recently released Navigating Grief {Edition One} sentiment kit. Love the sentiments in this kit!


Here's a quick look at the Background of the Month membership this month! Love it! 


Here's a quick look at this month's Kit of the Month membership! So amazing!

 Well, that's it for me today! Hope you have an ink-tastic day!


Thanks so much for stopping by!
See ya next time.

Inky Hugs,
Crystal


{Please note that comment moderation is on. Your lovely comment will appear once approved.}
Tuesday, February 20, 2024

Tawny Owl Paperie Inky Inspiration Sketch 18 ~ Peek-a-Boo Cats with Pawsome Peepers ~ Unity Stamp Co.

 Hello there crafty friend!
I'm back to share a few more fun birthday cards that I created using the Tawny Owl Paperie Inky Inspiration Sketch 18. I am so pleased with the stash that I've created this month using this sketch! It's so awesome to add to my birthday cards stash. I picked another 'leftover' paper pack from my supplies and I actually just picked the first one I saw. Luckily it's a gorgeous paper pack!


Here's a look at the three cards I made. Whatcha think? I wanted to use smaller stamped images so I didn't cover up too much of the pretty papers.


I LOVE the colors in these papers! I have no idea where these papers are from. If you do, I'd love to know! I thought it would be fun to share what I had in the leftovers pack. I probably won't use the paper flowers or sequins. I've set those aside. My focus is really using up the papers right now.


My first card of the trio featuring the adorable winking kitty from the Peek-a-Boo Cats from Unity. I adore this kitty! I just realized I didn't finish coloring up the cute little paw. LOL! Ooops!


I colored up the kitty with just a few Copic markers: R00, R20, N0, N1, N3, N5. Fussy cut it and adhered it just inside the one paper window. It almost looks like the kitty is looking over a counter top. So fun!


Here's another look at the fun sketch for Tawny Owl Paperie Inky Inspiration Sketch 18. This has been such a fun sketch to play with! The sketch, as always, is meant to inspire not require. So let the sketch lead in your design, but don't feel limited by it. Loving it! 


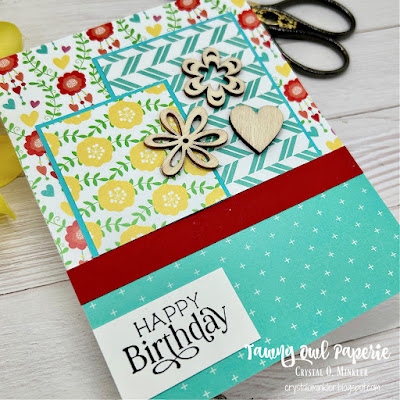
For my second card, I thought I'd just use the wood flowers from the leftover pack. The two just didn't look right on their own so I went searching through my stuff and found one heart. I think they look great together and adds a bit of dimension to the card.


I had mentioned earlier in the month that I was using these leftover papers from my days on the Scrapping for Less Design Team. I also found some of the card stock that was included in the card kits. So I used some for this card. I have no idea what company these papers are from or even what colors they are officially called. They coordinate really well with the colors in the pattern papers though.


My third and final card for Sketch 18 features the super adorable dachshund pup from the Pawsome Peepers. Here's a quick list of the Copic markers I used for the pup: E21, E23, E25, N0, N1, N3. I fussy cut this cutie too and colored the edges with a Memento Tuxedo Black marker to make the fussy cut look nice and neat.


I used the sketch for the background but I adjusted the measurements for the paper rectangles since I just used some of the papers that were already cut. You may recognize the sentiment. I used it last week for a card. It's from the Rainbow Birthday stamps, also from Unity. 

I hope you're inspired to play along with the sketch... there's only a few more days to enter the challenge! I also hope that you're inspired to use up some of those paper scraps and/or paper pads! I'll be back next week with a whole new sketch and I'm going to try to finish off these leftover papers. Or at least get a card or maybe two from what's left. Have a wonderful week!

Thanks so much for stopping by!
See ya next time.

Inky Hugs,
Crystal


{Please note that comment moderation is on. Your lovely comment will appear once approved.}

Monday, February 19, 2024

Inky Paws Challenge #217 ~ Lucky Green Theme Challenge

Hello there crafty friend!
It's time for a new Inky Paws Challenge... a super fun Lucky Green Theme Challenge! Such a fun challenge! I sure hope that you'll join in the fun and play along with us using your Newton's Nook Designs products! You have until Friday, March 1st to get your entries in for the #217 Lucky Green Theme Challenge and a chance to win a $20 store credit to Newton's Nook Designs!


I adore making St. Patrick's Day cards so I was most drawn to the shamrocks. The perfect excuse to ink up my new stamps, too!!


I stamped the sweet kitty from the Newton's Lucky Clover Stamp Set along with his cute hat and bunch of clovers using Memento Tuxedo Black ink. I colored up all the kitty, hat and shamrocks with my Copic markers and then die cut them using the coordinating dies from the Newton's Lucky Clover Die Set.


I knew I wanted to make a simple almost CAS {Clean and Simple} design. So I went looking through my stencils and came across the awesome Bokeh Stencil Set. I thought it would make for a fun and simple background for my card. I blended Twisted Citron and Mowed Lawn Distress Oxide inks over the two stencils in the set being sure to leave white space around the edges. 


I die cut the bokeh background using the large postage stamp die from the Framework Die Set. Stamped the sentiment using Mowed Lawn Distress Oxide ink. Adhered the postage stamp panel to a white A2 top fold card base. And then adhered the clovers and kitty with his little hat.

Here's a quick list of the Copic markers I used:

Kitty: R00, R20, W00, W1, W2, W3
Hat: N1, N3, N5, YG21, YG11, YG23, Y06, Y28
Clovers: YG21, YG11, YG23


Now it's your turn to get your paws inky with your Newton's Nook Designs products and create a project with a Lucky Green theme. Be sure to link up to the Inky Paws Challenge! Can't wait to see your projects!


Thanks so much for stopping by!
See ya next time.

Inky Hugs,
Crystal


{Please note that comment moderation is on. Your lovely comment will appear once approved.}

Friday, February 16, 2024

{BYSHC} Sketch Challenge 42 ~ Pattern Papers with Ephemera ~ Not 2 Shabby

Hello there crafty friend!
I'm back sharing inspiration for the sketch challenge over in the Build Your Stash Holiday Cardmakers Facebook group! Today I'm sharing three super quick cards using the coordinating paper pads and ephemera from Not 2 Shabby! I love the papers and ephemera from Not 2 Shabby! They coordinate so well and they're always so beautiful! Don't forget we're changing things up for 2024 and Not 2 Shabby is Sponsoring our {BYSHC} Sketch Challenge 42! Jamie has generously offered up a super fun-filled Christmas prize package for one lucky winner! Yay! Thank you so much, Jamie!


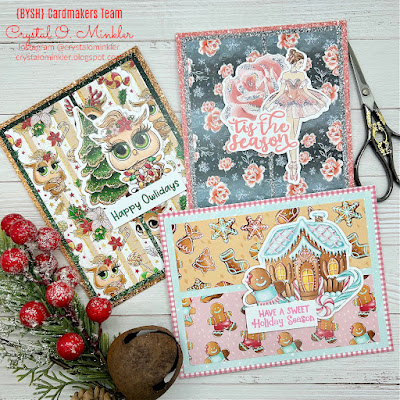
Here's a look at all three cards together! Aren't they just too cute!?


First up is the adorable owl papers and ephemera from the Deck the Owls 6x6 paper pad and the coordinating ephemera. Love the beautiful owls in these papers! I also love the glitter paper... it's so sparkly but doesn't have any of the gritty feel of actual glitter. Which also means no glittery mess! 


I used the measurements from the sketch for this card. I paired up two ephemera pieces for this one. I stamped a sentiment from the Holiday Owls stamp set using Rustic Wilderness Distress Oxide ink. I trimmed up the sentiment and adhered them all together and then added foam tape to the back.


For my second card I used the gorgeous Winter Magic 6x6 paper pad and coordinating ephemera. The papers in this paper pad are absolutely gorgeous!! I just had to use a couple of the glitter papers for this one too! 


I stamped the sentiment from the Nutcracker Dolls stamp set using Saltwater Taffy Distress Oxide ink. It looks so nice with the ephemera! I combined a couple ephemera for this card too. I adhered the ephemera with the sentiment and added foam tape to the back of all three pieces and popped them up on the card.


My third and last card featuring the adorable Gingerbread Kisses 6x6 paper pad and coordinating ephemera. Now the paper strips for this one are a bit smaller because I just used pieces that were already cut in the pack. 


No need to combine ephemera for this one. All the cute images were combined on one piece of ephemera! Love it! I stamped the sentiment from the Gingerbread Hugs stamp set using Kitsch Flamingo Distress Oxide ink. I adhered the sentiment to the ephemera and added foam tape to the back. I love the dimension that the popped up ephemera gives to the cards.


Here's a look at {BYSHC} Sketch Challenge 42 for the month of February. Loving this fun sketch! I hope you'll join us and play along with the sketch! If you're interested in seeing a bit more inspiration for this sketch, check out the amazing inspiration from the design team over on the {BYSH} Cardmakers blog! The design team made some really beautiful cards! Have an ink-tastic day!


Thanks so much for stopping by!
See ya next time.

Inky hugs,
Crystal


{Please note that comment moderation is ON. Your lovely comment will appear shortly.}