Showing posts with label Unity Challenge. Show all posts

Thursday, December 29, 2022

Ink Swipe Technique with Oxides ~ December Challenge ~ Kindness Is Like Snow ~ Unity Stamp Co.

 Hello there crafty friend!
Today I'm sharing more inspiration for the December challenge over in the Unity Show & Tell group. It's All About Backgrounds this month!! I got inky with the beautiful Kindness Is Like Snow stamps. I adore this fox!


The background was created by swiping oxide inks directly onto a piece of distress watercolor paper measuring 4-1/4 x 5-1/2". I inked it up with Villainous Potion, Seedless Preserves, Wilted Violet, Tumbled Glass and Uncharted Mariner Distress Oxide inks. I then blended the inks with some water and a paint brush.


A bit of water splatters and white acrylic paint splatters to add more snow in the background. I then dried the background completely with a heat tool. Applied some anti static powder and stamped the snowflakes from the Kindness Is Like Snow stamps with white pigment ink. And then I added some white embossing powder over the snowflakes and heat embossed them with my heat tool.


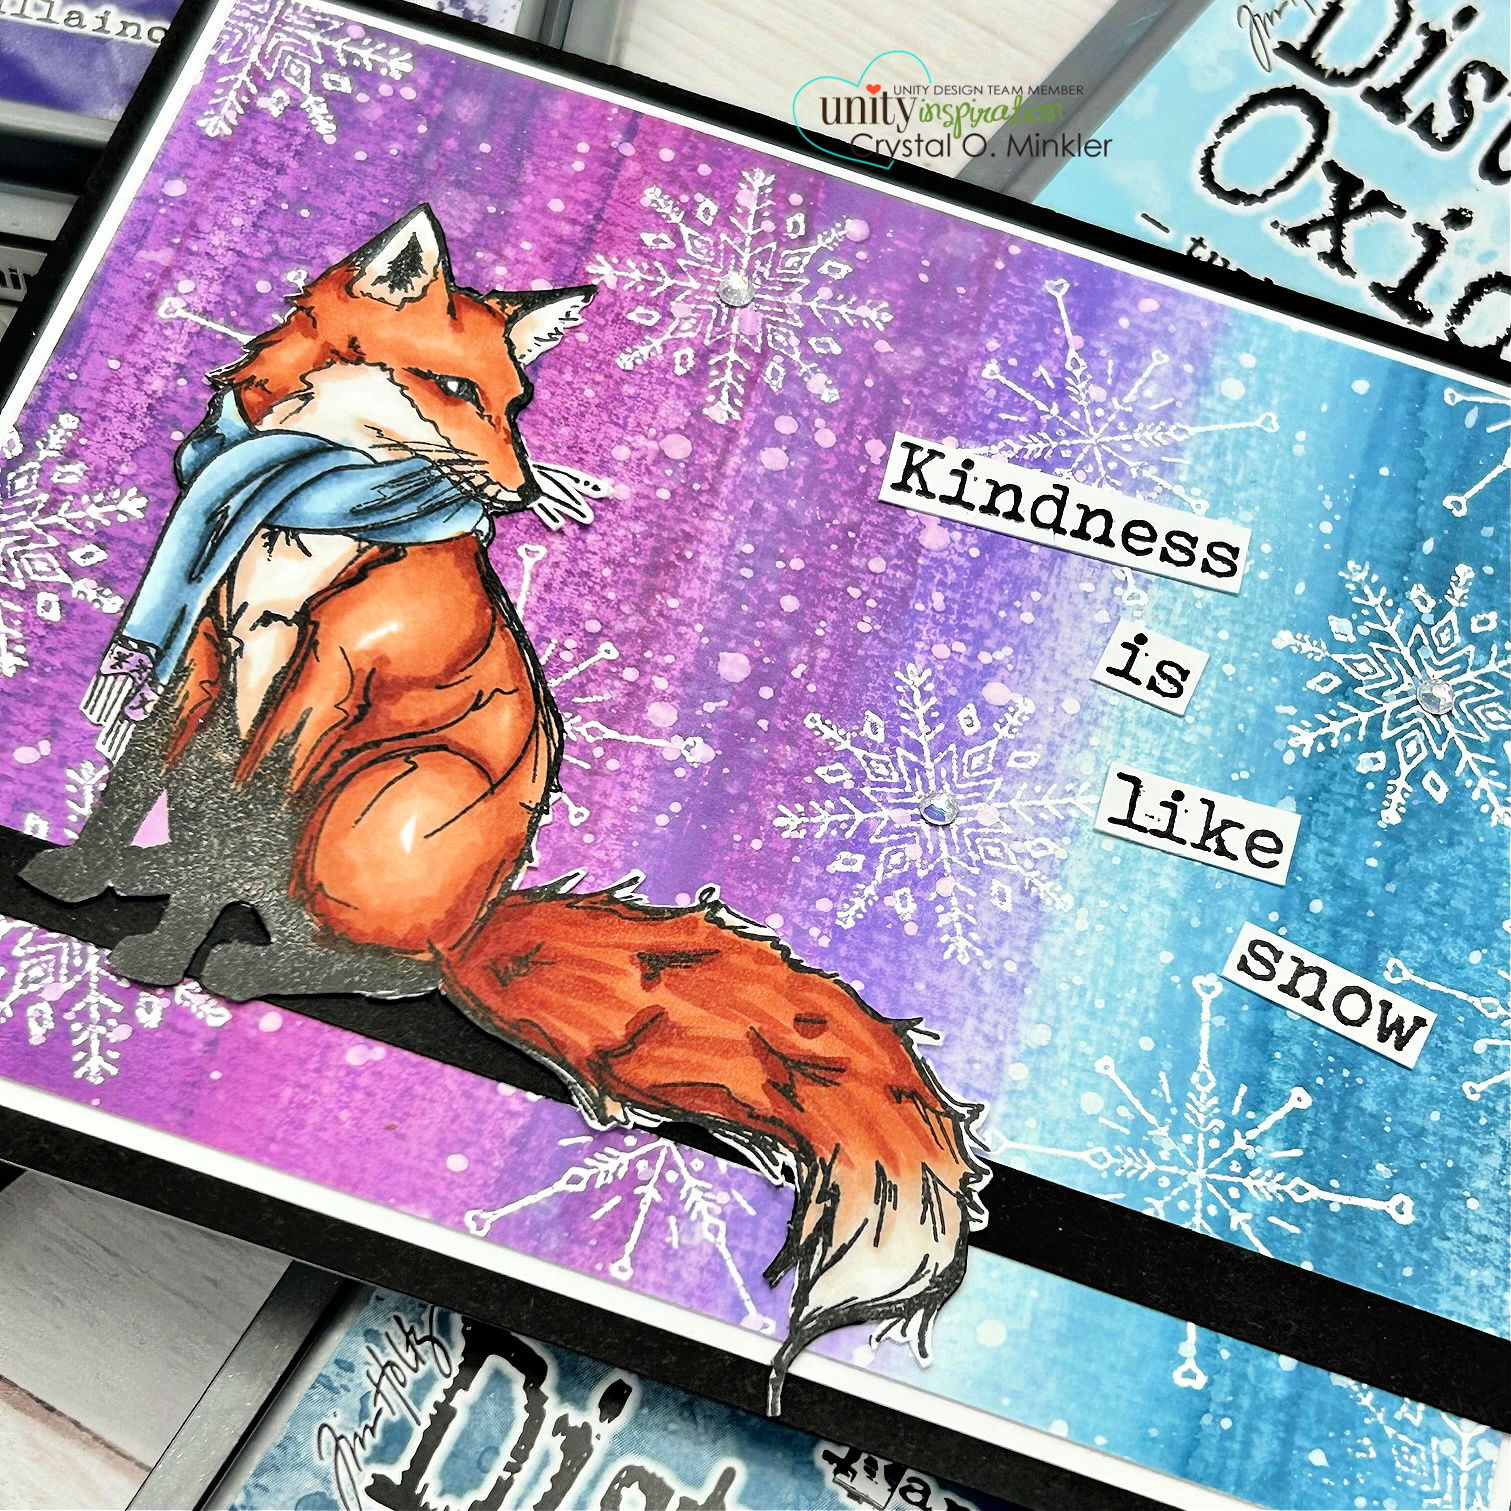
Next I stamped the beautiful fox from the Kindness Is Like Snow stamps. I colored him up with the following Copic markers:

Fox ~ E95, E97, E09, W00, W1
Scarf ~ B000, B91, B95, B97, B99, V12, V17

You can check out my Copic coloring video here... Fox Copic Coloring | Kindness Is Like Snow | Unity Stamp Co. {My process video is further down in the blog post}


I continued the sentiment inside the card by masking the top portion with a post-it note.


What do you think of the ink swiping technique with the oxide inks?! I am in love!! I have a feeling I'll be playing with this technique often! The All About Backgrounds challenge is coming to an end. I can't believe how fast December has flown by. I hope you can find some time to play along and be sure to enter your card into the album before the challenge ends on December 31st. I'd love to see what you create so please share your cards in the Unity Show & Tell group and tag me too!! I have had a blast sharing inspiration for the last three months. I hope you all have also enjoyed the inspiration. Echo will be starting up a new challenge next Thursday... how exciting! I can't wait to see what she has in store for us all!

Thanks so much for stopping by!
See ya next time.

Inky Hugs,
Crystal


{Please note that comment moderation is on. Your lovely comment will appear once approved.}

Thursday, December 15, 2022

Shake Your Flakes ~ December Challenge ~ Unity Stamp Co.

 Hello there crafty friend!
Today I'm sharing more inspiration for the December challenge over in the Unity Show & Tell group. It's All About Backgrounds this month!! I got inky with the fabulous Shake Your Flakes {December 2022 Sentiment Kit}.


The background was created by first stamping the cluster of snowflakes all over the white card front measuring 4-1/4 x 5-1/2". I inked it up with white pigment ink. I then added some white embossing powder to the card front and melted it with a heat tool. 


I blended Shaded Lilac, Wilted Violet and Villainous Potion Distress Oxide inks over the background. When I blend oxides I like to go over the blends a few times until I'm happy with the colors.


Next I stamped the background with the awesome Criss Cross Grunge December 2022 Background of the Month stamp. I wiped off the embossed flakes with a microfiber cloth and the lines of the background stamp moved to the back of the card like magic! Love the magic of heat embossing! I finished off the background with some water splatter and some white acrylic paint splatters. I wanted to break up the background a bit so I cut it on a diagonal and adhered the background to a white A2 top fold card base.

You can check out my process video here... Shake Your Flakes | December Callenge | Unity Stamp Co.


I stamped the sweet sentiment with Wilted Violet oxide ink. Next, I die cut it with the smalled stitched circle die from the Scallops & Circles {nesting dies}. I also die cut a stitched scalloped circle from white card stock and adhered the layers before popping it up on the card. To finish off the card, I added some pretty rhinestones to some of the snowflakes centers.


I've used a few background stamps the last few weeks for this challenge but you can create a background without using background stamps!! Repetitive stamping, like I did with the snowflakes cluster, is a great way to use your stamps for a wonderful background. The possibilities are seriously endless!! I hope you get a chance to play along. I'd love to see what you create. Be sure to share your cards in the Unity Show & Tell group and also add them to the December challenge album in the group to be entered for a prize!! See you back here next Thursday for more inspiration for the All About Backgrounds challenge!

Thanks so much for stopping by!
See ya next time.

Inky Hugs,
Crystal


{Please note that comment moderation is on. Your lovely comment will appear once approved.}

Thursday, December 1, 2022

Advent Calendar Day 1 ~ December Challenge All About Backgrounds ~ Unity Stamp Co.

Hello there crafty friend!
It's time for a new challenge for December over in the Unity Show & Tell group... it's All About Backgrounds this month!! I'm also sharing inspiration for Day 1 of the 2022 Advent Calendar!! I just love Unity's Advent Calendar! It gets more amazing each year.


The sweet and delicate ornament stamp is the first Advent Calendar stamp. I colored it very simply with just a few Copic Markers: C00, C2, R14 and G24. And then I die cut it with the smallest circle die from the Scallops & Circles {nesting dies}. Next I mat it with a red circle die cut from the next largest circle die from the set.


This month's challenge is all about the backgrounds though! I started this background with an ink smooshed card front that I had actually made last week during the video for my Mixed Media Background card. Ink smooshed with Twisted Citron and Evergreen Bough Distress Oxide inks. I stamped the beautiful Holly Days Background with Mowed Lawn and Pine Needles Distress Oxide inks.


What makes this background even more fun is the texture. After I stamped it with the Holly Days Background stamp I placed it in a woodgrain embossing folder and ran it through my Big Shot. I then lightly rubbed the Mowed Lawn oxide ink over the embossed background. It gives the background a bit of dimension. I think you can see some of the texture in this photo. I finished off the card with a few white rhinestones and a sweet sentiment from the Christmas Wishin' stamps.

You can check out my video revealing the Advent Calendar Day 1 stamp and my process in making this card here... Advent Calendar Day 1 | December Challenge | All About Backgrounds | Unity Stamp Co. 


I am so excited about this month's challenge! To play along just make a fun background using inks, stamps, paints, embossing folders... really the list could go on and on. I can't wait to see what you create! Be sure to share your cards in the Unity Show & Tell group and also add them to the November challenge album in the group to be entered for a prize!! See you back here next Thursday for more inspiration for the All About Backgrounds challenge! Tomorrow Echo Noble will be sharing inspiration for Day 2 of the Unity 2022 Advent Calendar on her YouTube channel. You can check out her channel here... Stamp N Ground. And Sandhya Iyer will be sharing inspiration for Day 3 on her YouTube channel here... Sanju's Creations. And then I will be back here on Sunday for Day 4 of the Advent Calendar.


Thanks so much for stopping by!
See ya next time.
 
Inky Hugs,
Crystal


{Please note that comment moderation is on. Your lovely comment will appear once approved.}

Thursday, November 24, 2022

Mixed Media Background ~ November Challenge ~ Unity Stamp Co.

 Hello there crafty friend!
Today I'm sharing one last card for the November Build Your Holiday Stash Challenge in the Unity Show & Tell. A beautiful mixed media card featuring the wonderful Good Tidings to You stamp! 


Sometimes it just feels good to get inky... know what I mean?! The mixed media background for this card was so fun to create. A bit of heat embossing, some oxide ink smooshing and I finished it off with dry embossing with an embossing folder.


The background was also die cut with the largest dies from the Scallops & Rectangles {nesting dies}. And then adhered to a kraft A2 top fold card base.


The poinsettia was stamped with Black Amalgam ink and then colored with the following Copic markers:

Poinsettia ~ RV10, RV21, RV14, RV29, Y11, Y15, Y28
Leaves ~ YG11, YG23
Pine Needles ~ YG11, G24, G46
Tiny Leaves ~ YG11, G24


The beautiful sentiment is the recently released Greetings of the Season {die set}. I die cut it from green card stock three times and then once from pink card stock. The 'merry' is three layers of green card stock adhered together and then adhered to the kraft outline die cut. The 'christmas' is two bottom layers of green card stock and then a pink layer on top. Such a fun way to mix it up!

You can check out my video for this card here... Mixed Media Background | November Challenge | Unity Stamp Co.


Have you played along with this month's challenge? If you do be sure to share your cards in the Unity Show & Tell group and also add them to the November challenge album in the group to be entered for a prize!! See you back here next Thursday... I'll be sharing one last card for the Build Your Holiday Stash challenge!

Thanks so much for stopping by!
See ya next time.

Inky Hugs,
Crystal


{Please note that comment moderation is on. Your lovely comment will appear once approved.}

Thursday, November 17, 2022

Copic Colored Vintage Poinsettia ~ November Challenge ~ Unity Stamp Co.

 Hello there crafty friend!
Today I'm sharing inspiration for the November Build Your Holiday Stash Challenge in the Unity Show & Tell. Today I have a card featuring the gorgeous, newly released Vintage Poinsettia stamp from Unity Stamp Co! 


Vintage for me almost always means kraft card stock is required. Copic coloring on kraft gives the image muted tones which I also think has a nice vintage vibe. A bit of distressing around the edges with some Vintage Photo and Ground Espresso Distress ink along with distressed edges from a pair of scissors or a paper distresser completes the vintage look.


To give the card a bit more dimension I stamped two poinsettias. I colored just the middle and smallest part of the flower on the one that was my top layer. And then I colored the biggest bottom part of the flower on the other stamped poinsettia giving the middle petals just a bit of color because the outer edges would be visible once the top layer was popped up with foam tape.


Here's a quick list of the Copic markers I used to color up this beautiful poinsettia on kraft card stock:

Red ~ R20, R14, R37, R59
Green ~ YG11, G24, G46
Yellow ~ Y06, Y15, Y28


I fussy cut both portions of the poinsettia. Cleaned up the edges by coloring them with black marker and popped up my top layer with foam tape. I adhered all my layers onto a kraft A2 top fold card base. And to finish it off, I added some Glitter Gloss Aqua Shimmer to the center of the poinsettia along with a few dots of white gel pen.

You can check out my video for this card here... Copic Colored Vintage Poinsettia | November Challenge | Unity Stamp Co.


Have you played along with this month's challenge? If you do be sure to share your cards in the Unity Show & Tell group and also add them to the November challenge album in the group to be entered for a prize!! See you back here next Thursday... I'll be sharing one last card for the Build Your Holiday Stash challenge!


Thanks so much for stopping by!
See ya next time.
 
Inky Hugs,
Crystal


{Please note that comment moderation is on. Your lovely comment will appear once approved.}

Thursday, November 10, 2022

3 x 3 Holiday Note Cards ~ November Challenge ~ Unity Stamp Co.

 Hello there crafty friend!
Today I'm sharing some adorable Holiday note cards featuring the sweet stamps from The New Nice {November 2022 Sentiment Kit} from Unity!! Each year when the holidays come around I make a bunch of Holiday note cards. They are super handy to add to last minute gifts. When my nieces and nephews were all little I also used to send them a card each along with the family gifts.


I've made some CAS {Clean & Simple} Holiday note cards to share with you all today. These are 3 x 3" note cards that measure 3 x 6" and they're scored at 3".


I've adhered a 1 x 2-7/8" piece of pattern paper to each of the cards. A great way to use up some of those scrap papers!


The sentiments are all trimmed and popped up with foam tape.


The stamped and colored images were also fussy cut and adhered directly to the cards.


I stamped each of the adorable images with Black Amalgam ink and colored them up with the following Copic markers:

Sweater ~ R20, R14, R27, YG11, G24, G46
Snowman ~ YR15, B0000, B000, R20, R14
Gifts ~ YG11, G24, G46, R20, R14, R27, B0000, B000, B00
Socks ~ YG11, G24, G46, B0000, B000, B00, R20, R14, R27 


Bonus!! I was in the groove and made a few more. These cuties feature the Merry, Moe & Joe stamps and the striped paper from the Holiday Traditions {paper pack}. I watercolored these adorable mice with ZIG Clean Color Real Brush markers.


Grab your holiday stamps, papers and other goodies and play along with the November Challenge!! I can’t wait to see what you create! Be sure to share your cards in the Unity Show & Tell group and also add them to the November challenge album in the group to be entered for a prize!! See you back here next Thursday for more inspiration for the Build Your Holiday Stash challenge!


Thanks so much for stopping by!
See ya next time.

Inky Hugs,
Crystal


{Please note that comment moderation is on. Your lovely comment will appear shortly.}

Thursday, November 3, 2022

From the Cat Holiday Greetings ~ November Challenge ~ Unity Stamp Co.

 Hello there crafty friend!
It's time for a brand new challenge over in the Unity Show & Tell group… a Build Your Holiday Stash challenge!! I love making Christmas cards! So much so that I make them all year long. But now that the holidays are just around the corner its time to crank out those last few needed for our stash.


My background layer was created by die cutting two pattern papers from the Farmhouse Christmas {paper pack} with the largest stitched scalloped die from the Scallops & Rectangles {nesting dies} (currently out of stock).


The sweet tag was made using the smallest tag from the Make a Tag {die set}. I punched a hole with my crop-a-dile and added some jute ribbon tied with some green twine.


The adorable focal piece of the card is the brand new kitty stamp that just released last week. From the Cat was stamped with an alcohol friendly black ink and then I colored him up with the following Copic markers:
 
Kitty ~ YR0000, YR00, YR21, YR15, YR27, R00, R20, RV21
Eyes ~ YG11, G24
Hat ~ G00, G24, G46, C00, C2, C3


Did you notice what kitty's holding onto? New sentiment dies called Greetings of the Season!! Woohoo! They are a must have, my friends! Available later today when the fabulous Brown Thursday sale begins! Die cut the happy holidays three times; twice from kraft card stock and then once from pattern paper. Adhered them all together with the pretty pattern paper on top and then adhered them to the kraft outline die. Adhered kitty to the sentiment outline and then I added foam tape to the back. Popped up the kitty and sentiment together on the card with foam tape.
 
You can check out my video for this card here... From the Cat Holiday Greetings | November Challenge | Unity Stamp Co.


I can’t wait to see what you create! Be sure to share your cards in the Unity Show & Tell group and also add them to the November challenge album in the group to be entered for a prize!! See you back here next Thursday for more inspiration for the Build Your Holiday Stash challenge!


Thanks so much for stopping by!
See ya next time.

Inky Hugs,
Crystal


{Please note that comment moderation is on. Your lovely comment will appear shortly.}

Thursday, December 30, 2021

Cozy Winter Mouse Gnome ~ Unity Sketch Challenge ~ Unity Stamp Co.

 Hello there crafty friend!
Today I'm sharing one last card for the December Sketch Challenge over at the Unity Show & Tell Facebook group! This week I used three awesome kits for a fun wintry card!!


If you didn't get all your Christmas cards done for the year or maybe you didn't get them all sent out... save those for next year and make a fun wintry card to send to your friends and family! 


I paired up the adorable Peppermint Kisses Mouse Gnome with the fantastic Wintertime Window and Paneling {background} kits.

The mouse gnome and Wintertime Window were both stamped with Gina K. Black Amalgam ink and colored up with the following Copic markers:

Nose / Paws ~ E000, E00, E11
Ears ~ R20, R21, E000, N0, N2, N3
Tail ~ N0, N2, N3
Beard ~ C00, C2
Hat ~ R14, R20, R27, R37, C00, C2
Candy Cane ~ R14, R20, R27, C00, C2, G14, G46
Window ~ Y06, Y15, Y35, E43, E44, E47
Bricks ~ E31, E33, E37, E39
Trees ~ G14


Don't forget to ink up the inside of your card! I stamped the sweet mouse gnome and added the second half of the sentiment inside the card. So fun! Check out my process video here… Cozy Winter Mouse Gnome | December Sketch Challenge.


Here’s a look at the sketch! Always remember the sketch is meant to inspire, not require… have fun with it!! The sketch challenge ends tomorrow so there's still a bit of time to play along! I hope you can play along! This is my last week hosting the Unity Challenges... I hope you've had some fun and been inspired over the last three months. Next week Echo starts a brand new challenge... I can't wait to see the new challenge for January! So exciting!


Thanks so much for stopping by!
See ya next time.


Inky Hugs,
Crystal


{Please note that comment moderation is ON. Your lovely comment will appear shortly.}

Thursday, December 16, 2021

Layered Mandala Thanks ~ Unity Sketch Challenge ~ Unity Stamp Co.

 Hello there crafty friend!
Today I'm sharing a bit of inspiration for the December Sketch Challenge over at the Unity Show & Tell Facebook group!! I couldn't wait to ink up the beautiful new Layered Mandala... there are SO many possibilities with this beautiful set!


A simple design using a kraft, white and light blue color palette.


I stamped the center and third layers together as they came in the kit with clear embossing ink and then melted Alabaster white embossing powder. Didn't realize the second layer in between wouldn't quite line up right... but I love the variation it gives to the pattern!


Love the font for the sentiment... I embossed it on the light blue card stock using clear embossing ink and Alabaster White embossing powder.


The white A2 top fold card base was stamped using the center layer with Tumbled Glass Distress Oxide ink.


A simple thank you card with a hint of a wintry vibe... a perfect thank you for a holiday gift.


Here's a look at the December Unity Sketch! Please remember the sketch is meant to inspire, not require... have fun with it! I can't wait to see what you all create with this sketch!


Thanks so much for stopping by!
See ya next time.

Inky Hugs,
Crystal


{Please note that comment moderation is ON. Your comment will appear shortly.}

Thursday, December 2, 2021

Dino Anniversary ~ Unity Sketch Challenge ~ Unity Stamp Co.

 Hello there crafty friend!
It's time for a brand new challenge over in the Unity Show & Tell Facebook group... a sketch challenge!! I absolutely love a good sketch!! It can help a cardmaker get that mojo going when in a crafty funk! I hope that you all will have fun with the sketch that I came up with for our challenge! But first, let's check out the card I made using the sketch...


A dino Anniversary card... so cute! I couldn't wait to ink up the adorable dinos from the Stomping Great Day stamp kit that just released for Cyber Monday!! 


I paired up these cute dinos with some pretty pattern papers for a quick and super easy scene card. 


I also die cut the fabulous Happy Anniversary stamp from the I Did. I Do. I Will stamp kit and coordinating die... these also just released!! Love it!


Here's the list of Copic markers that I used for these cuties:

Dino #1 ~ V17, V20, V22, V25, R20, RV13
Dino #2 ~ G09, G14, Y06, Y35


The sentiment was stamped on a strip of white card stock, trimmed and then popped up on the card with foam tape.


Here's a look at the sketch! Not a lot of layers but you can always add layers like I did by matting my little scene with white card stock. Always remember the sketch is meant to inspire not require... have fun with it!! I can't wait to see what you all create with this sketch!


Thanks so much for stomping by! ;)
See ya next time.


Inky Hugs,
Crystal


{Please note that comment moderation is ON. Your comment will appear shortly.}