Showing posts with label Hot Cocoa. Show all posts

Wednesday, April 1, 2026

{BYSHC} Sketch Challenge 68 ~ Reindeer Blend ~ Jaded Blossom

Hello there crafty friend!
It's time for a new sketch challenge over in the Build Your Stash Holiday Cardmakers Facebook group! Today I'm sharing an adorable Christmas card featuring a sweet stamp from our wonderful Sponsor Jaded Blossom! This month's prize is a $25 gift card to Jaded Blossom! So excited!


I inked up the super cute and sweet reindeer mug from the Reindeer Blend clear stamp set. I also stamped the sentiment while I was at it. And then I die cut them both using the coordinating dies from the Reindeer Blend Outline Dies. 


I set them aside and got to work on my background. I used retired papers from My Favorite Things called Plaid Patterns Merry & Bright 6x6 Paper Pack. I had some scraps and ended up cutting a few more for my background. I just eyeballed the placement for the strips. I tried to keep them about 1/8" apart. I used 6 or 7 different pattern papers and alternated each design. It was fun once I got in the groove. So fun I made another background that I'll be sharing soon.


Once my background was done. I trimmed it down to 4 x 5-1/4" and then I adhered it to a white A2 top fold card base. I then die cut two circles for my focal image. I die cut a piece of Lovely Lady card stock and Stampers Select White card stock from Papertrey Ink using the Scallops & Circles {nesting dies} from Unity and adhered them to the card. And then I popped up the reindeer mug and sentiment using foam tape.


Here's a look at {BYSHC} Sketch Challenge 68 for the month of April. If you're interested in seeing a bunch more inspiration for this sketch, check out the amazing inspiration from the design team over on the {BYSH} Cardmakers blog!

Thanks so much for stopping by!

Inky hugs,
Crystal

Tuesday, October 14, 2025

Release Day Blog Hop ~ Hot Cocoa Kisses ~ The Greeting Farm


The October 2025 New Release is now available for purchase in The Greeting Farm Store! This month we introduced 3 new stamp sets. Our first stamp set called COZY WINTER will have you embracing the magic of the holiday season with it's peaceful snowbank scene, snowman, and trio of furry friends. Next, we have KNITTING ANYA, featuring our sweet girl sitting in her favorite chair knitting away alongside her adorable dog with his slouchy sweater and whimsical mouse. Lastly, we introduced HOT COCOA KISSES with four cheerful snowmen dressed in cozy scarves and hats waiting for a steamy cup of hot cocoa from their favorite gingerbread man. *Please note that Hot Cocoa Kisses has been delayed. We'll let you know when it's available in the shop. So sorry for the inconvenience. 


I paired up one of the adorable snowmen with some fun snowman papers from my stash. They're all in line to get some yummy hot cocoa. 


I stamped all the images using Memento Tuxedo Black ink. I colored them up with Copic markers and then I fussy cut them all on the line and colored the edges with a black marker to make the fussy cutting nice and neat.

Here's a quick list of the Copic markers I used:
Snowman: BG000, BG10, R20, R14, R29
Snowman Hat: C0, C1, R20, R14, R29
Snowman Scarf: R20, R14, R29
Gingerbread Man: E21, E23, E25, RV02
Gingerbread Man Hat: C0, C1, BG000, BG10, BG23
Hot Cocoa Stand: RV10, RV02, BG000, BG10, E21, E23
Cup: RV10, RV02, E23, E25


I die cut a circle from white card stock and then tore two scraps of white card stock for my snow layers. I die cut those two scraps using the same circle die. Added a bit of glittery fun to the torn ends using glue and some fine glitter from my stash. It's been EONS since I've used glitter on anything and it was actually fun. LOL! Not too terribly messy either. The sentiment is also die cut with a slightly smaller circle die. I added a touch of cool gray marker to ground the images and then popped them up with foam tape. And then I finished off the card with some clay snowflakes embellies from my stash. 


My card was inspired by one of the older {BYSHC} Sketches. I omitted all of the mats and just kept my layers simple. Do you like to use sketches when you create? I do. It makes the designing so much easier. 


To celebrate this release we are having a short BLOG HOP! One lucky fan will win a $50.00 Gift Certificate to The Greeting Farm Store!! You have until October 18th 12pm CST/1pm EST to leave your comments on each Designer's Blog. Then head back to The Greeting Farm Blog to let us know you completed the hop. **Remember to qualify for the prize you MUST leave a comment on each Designer's Blog AND The Greeting Farm Blog letting us know you completed the hop.

NOTE: Comments on The Greeting Farm Blog are admin approved so it may take a day for your comment to be visible. Please only comment once, and use the same name on all the blogs when leaving a comment. Do not pick the Anonymous option (otherwise we won't be able to verify that it's you). We will announce the random winner later in the week on the Blog and in our Facebook Group: The Greeting Farm Fan Page.

TGF Design Team:

Crystal
Cynthia
Elisabete

This is a short hop, and definitely worth playing along! If you want to grab your favorites now, you can purchase the new stamps HERE. We will have more cards featuring the New Release from our Design Team Leaders starting on the 16th so be sure to stop by The Greeting Farm Blog to see more inspiration.

Happy Hopping!

Thanks for stopping by!

Inky hugs!
Crystal

Monday, November 14, 2022

Membership Monday ~ Color Burst Backgrounds ~ November 2022 Kit of the Month ~ Unity Stamp Co.

 Hello there crafty friend!
I'm back for Membership Monday with inspiration for the November 2022 Kit of the Month! Today I’m sharing fun watercolored cards using Color Burst which is a fine concentrated powder colorant to be used with water on porous surfaces. A wonderful and quick way to make a great background to showcase any stamp!


For my first card, I stamped Santa with VersaFine Onyx Black ink on Canson XL Watercolor paper. I used ZIG Clean Color Real Brush markers to watercolor Santa. Fussy cut him and set him aside.


Santa's background was created with Terre Verte and Chartreuse Color Bursts. I love the texture that the bursts of color give to the card!


The trimmed background was mat with a green card stock measuring 4 x 5-1/4". It was then adhered to a red card front measuring 4-1/4 x 5-1/2" that was adhered to a white A2 top fold card base.


My second card and I have to say I really love the pop of colors on this one! Same steps as the first card, I stamped it with VersaFine Onyx Black ink on Canson XL Watercolor paper and used ZIGs to watercolor it.


The background was created with Ultramarine Blue and Violet Color Bursts. I used a heat tool to help the drying process on both of the backgrounds. 


This panel was trimmed to 4 x 5-1/4" and adhered to a purple card front measuring 4-1/4 x 5-1/2". I adhered it to a white A2 top fold card base, as well. You can check out my video sharing this technique here… Quick Color Burst Backgrounds | November 2022 Kit of the Month | Unity Stamp Co.


Here’s a look at the whole Kit of the Month for November!! Isn't it awesome?! I couldn't wait for this KOM to get to my mailbox!


Hope you've been inspired to get inky with your November Kit of the Month and if you haven't received yours yet, why not try this technique with stamps from a past KOM! I just love this technique. I hope you'll give it a try.


Thanks so much for stopping by!
See ya next time.

Inky Hugs,
Crystal


{Please note that comment moderation is on. Your lovely comment will appear once approved.}

Friday, April 1, 2022

{BYSHC} Sketch Challenge 21 ~ Cocoa Love ~ Not 2 Shabby

 Hello there crafty friend!
It's time for a new Sketch Challenge over at Build Your Stash Holiday Cardmakers and I have a cute cocoa card to share for the new sketch using an adorable stamp from Not 2 Shabby called Cocoa Love.


I paired up this adorable cocoa stamp with the beautiful Hot Cocoa Warm Hearts paper pack also from Not 2 Shabby. I'm partial to the amazing plaid in this paper pack so I just had to use it again for my background paper. I used the brown pattern paper in the pack for my mats for each layer.


I stamped the adorable cocoa mug with Gina K. Black Amalgam ink and colored it up with the following Copic Markers:

Mug ~ E33, E35, E37
Marshmallows ~ C00, C2
Heart / Cheeks ~ R20, R14, R27
Candy Cane ~ R20, R14, R27, C00, C2
Steam ~ N0, N1, N3


I die cut the cocoa mug with the coordinating Cocoa Love Shabby Snips Coordinating die. The cute little red bow is from the Cocoa Love ephemera pack that coordinates with the papers and stamps. However, the ephemera pack didn't have any Christmas sentiments so I looked through some of my other ephemera packs and found the Let it Snow Chit Chat ephemera from Doodlebug Designs that had the perfect sentiment for my card. I think this one turned out pretty cute!


Here's a look at the fun {BYSHC} Sketch 21 for the month of April!
I hope you'll join us and play along with the sketch! If you're interested in seeing a bit more inspiration for this sketch, check out the amazing inspiration from the design team over on the  {BYSH} Cardmakers blog! I'll be back next Friday with my regular weekly Christmas card using this new sketch!


Thanks so much for stopping by!
See ya next time.

Inky hugs,
Crystal


{Please note that comment moderation is ON. Your lovely comment will appear shortly.}

Friday, February 25, 2022

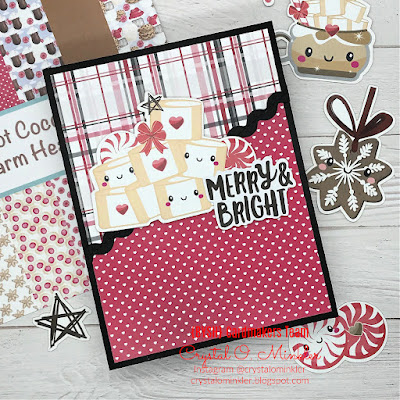
{BYSHC} Sketch Challenge 19 ~ Hot Cocoa Love ~ Not 2 Shabby

 Hello there crafty friend!
It's been a busy week at the Minkler house and I've been getting worried that I wouldn't have time to make my weekly Christmas card. So when I had a bit of time I thought I'd use some fun ephemera that I got awhile ago but haven't played with yet. And I got the coordinating papers too!


So... here's my card!! Cute, right! I love how quick it came together using ephemera and the pattern papers! And since it was so quick I actually made two cards!!


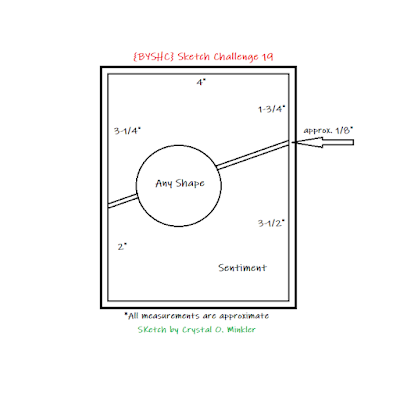
I picked two cute pattern papers from the Hot Cocoa Warm Hearts paper pack from Not 2 Shabby and cut them to 4 x 5-1/4". I stacked the papers together and cut them at an angle. Cutting the papers together makes it very easy to line them up for this particular card design.


I adhered the pattern papers to a black card front and die cut some black card stock with the Stitched Ric Rac die from My Favorite Things. I adhered the Ric Rac die cut to the card. And popped up the ephemera piece with foam tape.


Now for card #2!! Aren't those marshmallows just THE cutest! I love them! 


I used the leftover pieces from the first card which made this card SO easy!


The Cocoa Love ephemera pack didn't have any Christmas sentiments so I looked through some of my other ephemera packs and found the Say Cheese Christmas ephemera from Simple Stories that had a couple sentiments that worked perfectly for my cards.


Here's another look at the fun {BYSHC} Sketch 19 for the month of February! There's still a few days to play along with the sketch! If you'd like to see more inspiration for the sketch head on over to the {BYSH} Cardmakers blog! I'll be back on Tuesday with inspiration for the new {BYSHC} Sketch Challenge 20!!


Thanks so much for stopping by!
See ya next time.

Inky hugs,
Crystal

{Please note that comment moderation is ON. Your lovely comment will appear shortly.}

Wednesday, November 10, 2021

Hot Cocoa Pocket Card ~ Coffee With a Heart ~ Unity Stamp Co.

 Hello there crafty friend!
Today I'm sharing a cute Hot Cocoa Pocket card using the awesome new Coffee With a Heart stamp kit from Unity Stamp Co. I love making pocket cards and it's even more fun when it's a gift you can send to a friend!


The design is very simple. The bottom layer is just a 4-1/4 x 5-1/2" piece of pattern paper. The two front papers also measured 4-1/4 x 5-1/2" {these can be cut wider because my pieces didn't quite cover the whole front}. 


I cut the two front papers at a diagonal. I scored the front papers on the longer edge and adhered them to the back of the bottom layer.


I then adhered the two front papers to just the bottom of the card and to each other where they overlapped. I haven't found my tear tape or red tape liner so I just used liquid glue for this and was careful not to put too much glue.


I stamped the pretty heart cup and marshmallows and then I colored them with the following Copic markers:

Cup ~ Y15, YR15, YR21, YR68
Cocoa ~ E23, E27, E50
Marshmallows ~ C00, C2


I trimmed the sentiment and adhered it to the heart mug. I then adhered the sentiment and the bottom portion of the heart mug to the front of the pocket card. I wrapped the card with some twine and tied a pretty bow. This size of pocket card works perfectly with the cocoa packets. I plan to send this to a friend in a little care package. I hope my directions make sense... if you have any questions, please feel free to ask in the comments. I'll do my best to answer any questions you might have.


Thanks so much for stopping by!
See ya next time.


Inky Hugs,
Crystal


{Please note that comment moderation is ON. Your comment will appear shortly.}

Tuesday, October 26, 2021

Falling for the Holidays 2021 {BYSHC} Hop ~ Have a Cup of Cheer ~ Not 2 Shabby

 Hello there crafty friend!

I can't believe that we are more than halfway through the Falling for the Holidays 2021 {BSYHC} Hop already!! Today I'm sharing a fun card using the sweet freebie digi from hop Sponsor Not 2 Shabby!! I couldn't wait to print this beautiful digi stamp and do some coloring! I also thought it would be fun to do a bit of paper piecing!


First of all, if you haven't already... be sure to check out the Not 2 Shabby freebie digi stamp!! You can find it here ---> Have a Cup of Cheer digi!! It's amazing! So fun to color and it looks so yummy! I printed it off on white card stock and colored it up! And then I printed it again on copy paper so I'd have an idea of where to tape my pattern paper. I used some washi tape to secure a piece of Pine St. Square paper from The Paper Studio over the coffee cup sleeve. I used a slightly larger piece of pattern paper in case the printer shifted when it print... and of course it did!


I fussy cut the coffee cup sleeve and set it aside. I colored up the cup with the following Copic markers:

Cup ~ R00, R14
Cocoa ~ E23, E27
Whipped Cream ~ C00, C2, R00, R14
Sleeve ~ W00, W2, W4


I wanted to add a bit of texture to the digi layer but since I'd already trimmed the image I decided to die cut a piece of white card stock and then adhere the digi layer to that die cut card stock. I adhered a piece of the pattern paper to a white card front measuring 4-1/4 x 5-1/2". I then die cut the layers with the Slash Stitched Rectangle die from hop Sponsor Gina Marie Designs. Can you see a bit of the die cut stitches on both the bottom white layer and the pattern paper?


I adhered the bottom layer to a white A2 top fold card base and then I adhered the focal piece. I love how this card turned out!! It was pretty quick and oh, so fun to make!


I hope you'll go check out the Falling for the Holidays linky party hop if you haven't already. I'm enjoying all the fabulous inspiration being shared. Even if you're not able to play along, I hope that you've been inspired to build your stash of Holiday cards!

Thanks so much for stopping by!
See ya next time.

Inky Hugs,
Crystal


{Please note that comment moderation is ON. Your comment will appear shortly.}

Friday, December 28, 2018

Scrapping for Less ~ Sneak Peek ~ December 2018 Flavor of the Month Card Kit

Hello! Today I'm sharing a Sneak Peek of the December 2018 Flavor of the Month card kit!! Eeep! This kit is so stinking cute! You are going to need it!!


This fabulous shaker card is part of one of the collections and I just HAD to use it to create this sweet card... isn't that little penguin adorable! I just love him with his cup of cocoa! Here's a quick run down of the Copic markers I used:

Penguin ~ C0, C2, C4, C8, R20, YR15, YR27, YR68

Hat/Scarf ~ BG10, BG11, N0, N1, Colorless Blender

Mug ~ B0000, B000, B39, B99, N0, N1


I hope you've enjoyed the week of sneak peeks by the design team! Be sure to join us
 at midnight tonight for the blog hop and full reveal of the Flavor of the Month card kit.

Thanks so much for stopping by!
See ya next time.

Inky Hugs,
Crystal

Wednesday, December 13, 2017

Hot Cocoa ~ To Warm Your Heart!


Hello! This is my 6th card for the Winter Coffee Lovers Blog hop... I'm having so much fun with this hop!  I'm back today with a card for National Cocoa Day! I love me some Hot Cocoa... extra whipped cream, please!


Isn't this sweet little mouse just adorable! I thought he was perfect for today's post. He's from a Simon Says Stamp set called Cocoa & Love. 


 I stamped him using Memento tuxedo black ink and colored him in with copic markers {R000, R14, R20, R27, G14, G17, N0, N1, N3, B00, 0}. I added a touch of texture using a Marvy Snow Marker and then I fussy cut him out and set him aside.


I added a couple simple strips of Knit Picky patterned paper from Lawn Fawn cutting a scalloped edge on one strip. I adhered those to a white card base and then added the merry mouse. I then stamped the sentiment from Jaded Blossom's Hot Cocoa set and added a couple hearts from the Cocoa & Love set. Such a simple card but I love it! I hope you do too! And be sure to enjoy a mug full of delicious hot cocoa heaping with marshmallows... or whipped cream! 

Go check out the Coffee Loving Cardmakers blog to play along!!

I'm also entering this card in the Simon Says Stamp Wednesday Challenge ~ Stitch It!


Thanks for stopping by!

See ya next time.
~ Crystal