Showing posts with label FOTM. Show all posts

Wednesday, July 1, 2020

Scrapping for Less ~ Sketch Challenge #6 ~ June 2020 FOTM Card Kit

Hello there crafty friends!
Today I'm sharing the July challenge for the Scrapping for Less: Show & Share Facebook group!! We have another sketch challenge this month... I sure do love a good sketch!! You may recognize this sketch from the reveal of the new June 2020 FOTM Card Kit... it's included in this month's downloads of sketches! I hope you'll check it out and play along!

Before we get to the sketch and the card I created... the key to playing along with the challenge is being a member of the Scrapping for Less: Show & Share Facebook group so if you aren't already a member ---> join here!! Also, please note that you don't need a blog to enter the challenge as you're adding a photo of your creation directly in the Challenge album in the group. You are welcome to include a link to your blog in the description of your creation, if you'd like.

Let's check out Sketch Challenge #6...


What do you think? Another fun sketch challenge!! I can't wait to see what you all create!!


A super easy and quick card for this sketch! I can't get enough of the ephemera pieces in Collection One... I just had to make one more card using the cute pink lemonade ephemera.


The sentiment is from Collection Three: Pond Life. I thought it was perfect to pair up with the pink lemonade... I'd love to drink a pink lemonade on the patio and just relax and breathe. 
Sounds wonderful!!


Here's a little process video for this card.

This challenge will run from today, July 1st and will end July 31st at 11:59pm EST. The winner will be announced on Saturday, August 1st in the challenge album. Please use #sflsketchchallenge6 in any social media posts when playing along with the challenge.

And I'd like to invite you, again, to come play along with this challenge over in the Scrapping for Less: Show & Share Facebook Group! We'd love to see what you create using this fun sketch!

Thanks so much for stopping by!
See ya next time.

Inky Hugs,
Crystal


Tuesday, November 19, 2019

Scrapping for Less ~ November 2019 Flavor of the Month Card Kit ~ Special Incentive and a Sneak Peek!!

Hello there crafty friends!!
I'm so excited to share a beautiful project made using the fabulous incentive offered by Scrapping for Less if you sign up for a new Flavor of the Month subscription in November!! And let me tell you... the November 2019 card kit is fabulous!!!


Here's a look at the sweet incentive package you'll receive!


I made a beautiful gift card pouch to share with you today using the products in the incentive package, as well as a couple of items from the November 2019 A Vintage Christmas Card Kit!!! 
A little early sneak peek... woohoo!!!


I won't go into detail though on what exactly is in the card kit... but this month's kit is absolutely gorgeous!! You are going to love it!! And why not sign up now and get this beautiful incentive package with all these wonderful goodies for free!?!?


And because I love to enable and share sneak peeks whenever I can {and Teresa says it's ok, lol}... here's a sneak peek of the gorgeous Christmas papers in the kit this month! Gorgeous!!

You can sign up for your subscription here---> Flavor of the Month subscription! You are not going to want to miss out on this kit!!


Thanks so much for stopping by!
See ya next time.

Inky Hugs,
Crystal


Monday, July 29, 2019

Scrapping for Less ~ July 2019 Summer Camp Card Kit ~ Another Look!

Hi there crafty friends!
I'm back with a bonus card from the July 2019 Flavor of the Month Card Kit called Summer Camp! I love this kit so much!! I had this fun little idea for a card while working on my cards for the hop but I didn't have time to finish it. So... I finished it and here it is! I think it turned out pretty cute!


I used the fabulous My Favorite Things Blueprints 15 dies to design my card... I'm not sure if these dies are still available but if you can find them snatch them up, because they can make for a quick card design! I die cut the patterned paper layers using the dies from the set and adhered them to a Kraft card base. I then colored up a cute little scene with copic markers on a kraft tag that's included in the card kit. I paper pieced the bears tent from the patterned papers in the kit. Fussy cut it and adhered it to the colored bear image. I then fussy cut that out and adhered it to the tag! I popped up the tag and the sentiment on the card... done!

Copic markers used for this card:
Scene ~ G24, G29, E55, E57, E59, Y13, Y17
Bear/Inside of Tent ~ W0, W1, W2, W4, N1, N2


Here's a close up picture of the card and the little scene I created for the snoozing bear. Such a cute stamp!! If you haven't checked out the hop for this new kit, you can do that here ---> July 2019 FOTM Card Kit Reveal & Hop!! You can also check out the other cards I made using this fabulous card kit and start hopping ---> here!

I sure hope you enjoyed my little bonus card for the July 2019 Summer Camp card kit! I'd love to hear what you think of it in the comments below!

Thanks so much for stopping by my blog!
See ya next time.

Inky Hugs,
Crystal

Friday, July 26, 2019

Scrapping for Less ~ July 2019 Flavor of the Month Card Kit ~ Sneak Peek

Hi there crafty friends!
Today, I am sharing the last Sneak Peek of the July 2019 Flavor of the Month Card Kit!!! Oh my goodness... this is such a fun kit! Perfect for summer!!


I combined the beautiful patterned papers for my layers on this card... the papers in this card kit are amazing!! I especially love the ones in this collection! I stamped and colored my little camper using the following Copic markers ~ B0000, B00, B24, B52, RV10, RV21, N0, N2, N4, N7, and Y00. To finish off the card I added a few black rhinestones... they look like planets in the background!


I just love how the blues in the camper help the blues in the background paper to pop!!
Glamping under the stars could definitely be my happy place... especially with this sweet little camper!! The kit reveals tonight at midnight... be sure to sign up for your kit subscription!! Don't miss out on this fabulous kit and go subscribe ---> July 2019 FOTM Card Kit!!!! And be sure to use the hashtag #FOTMsummercamp when you share your creations using this fabulous kit!!

Thanks so much for checking out my blog!
See ya next time.

Inky Hugs,
Crystal

Friday, June 28, 2019

Scrapping for Less ~ June 2019 Flavor of the Month ~ Under the Sea Babies


Where is your most favorite place in the world? 
Well other than Ireland (oh how I love that country...another story for another day), my favorite place would be the beach and the ocean. I love and am fascinated by anything and everything that has to do with sand and saltwater! So let's dive deep and see if we can spot any Under the Sea babies in that wonderful blue ocean water. Dive on through the hop and SEA what our fabulous designers brought to the surface for you! Make sure you visit the Scrapping for Less website to grab your kit of "Under the Sea Babies" and you too can get lost in an ocean of cards. Don't forget to enter the Rafflecopter for a chance to win a prize! ~ Teresa, SFL Co-Owner


If you are just starting hopping, we're so glad to have you join us! 
The hop starts on the Scrapping for Less blog or you can start hopping right here.

Here's a quick look at the June 2019 Under the Sea Babies card kit...


The June 2019 Under the Sea Babies card kit is my absolute favorite card kit!!
So many adorable images to stamp and color and the papers are amazing!!


Collection One: Sea Babies
I love this beautiful little mermaid... so much that I used her for my Sneak Peek this month... and she paired up so well with the adorable papers in the collection. This card came together so quickly by using the papers and card stock for my layers along with the second sketch. I added the washi across the front of the card and then popped up the white die cut circle. I stamped the mermaid with Gina K. Amalgam Jet Black ink, heat set it and then colored away. I pulled my color choices from the papers I chose for the card. I fussy cut her leaving a skinny border and adhered her to the side of the circle die. Easy peasy!

Supplies used (not found in the kit):
Copics ~ E000, E00, E21 (skin); RV02, RV34, RV63 (hair); BG10, BG13, 
BG23, B0000, B000, B02 (top/tail)
Gina K. Amalgam Jet Black ink cube
Spellbinders Standard Circles Large dies


Collection Two: Neon Sea Life
How stinking cute is that octopus!?! 
Oh my goodness... this adorable octopus is cut from a die that is included in the Banana Split Subscription. I just love it!! I die cut some Canson XL 140lb watercolor paper and used the Daniel Smith Watercolor dots, also included in the Banana Split Subscription, to watercolor.... so fun and I love how it turned out! I cut and adhered all of my layers onto a Limeade card stock base. I die cut a wonky stitched oval from white card stock and popped it up on the card with foam tape. I then stamped the cute little fish and octopus with Gina K. Amalgam Jet Black ink, heat set it and watercolored them, as well. I fussy cut them and then added all the little sea creatures to the card using liquid glue. I stamped the sentiment from the Sentiment Stamp set included in the Banana Split Subscription onto Blu Raspberry card stock using VersaMark watermark ink and then heat embossed a fine white embossing powder. I popped up the sentiment on the card and added a couple google eyes from my stash to the octopus... so cute!

Supplies used (not found in the kit):
MFT Wonky Stitched Oval die
Watercolor Brush pen
Brutus Monroe Alabaster Ultra Fine embossing powder
Doodlebug All Eyes on You Shape Sprinkles


Collection Three: Sea Creatures
This card was so fun to create and it almost has a patriotic feel with the colors and the stars... a fun bonus to my card! LOL! I cut the fun papers from the collection and adhered them to a 4-1/8 x 5-3/8" piece of white card stock and then adhered it to a Black Licorice card base. I set the card aside and inked up the super cute otter and had fun coloring him up! So fun! I fussy cut him and then got to thinking that he'd be cute holding one of those starfish from the patterned paper, so I fussy cut one out and using my craft knife to make a slit around the otters front legs I was then able to insert the starfish. I added a tiny bit of glue to the starfish to help it lay down... so cute! 
I set him aside and added some mesh from the collection to the card using a little bit of multi medium matte just in a few random places so the mesh isn't flat.... gives it some fun dimension!  I then adhered the cute otter to the card along with a bunch of sequins. I stamped the sentiment and die cut it with a banner die that I trimmed off the left side and then popped it up on the card. And for my final touch for this one, I bent the wire embellishment into the shape of a heart and adhered it with a few tiny dabs of multi medium matte.

Supplies used (not found in the kit):
Copics ~ E42, E43, E44, E47
Ranger Multi Medium Matte


Collection Four: Sea Buddies
I love to color turtles!! I think it's because I love my greens and blues... Lol! I just adore these sweet turtles in the Sea Buddies stamp set by Scrapping for Less!! So cute and so fun to color!
I cut all my patterned papers for the background to my design and adhered them to a Blu Raspberry card base. I stamped, colored and fussy cut the turtles... now the shell on my larger turtle for some reason got messed up when I started coloring - the black ink bled - so I stamped it again and colored it separately, fussy cut it out, and adhered it over the messed up turtle shell. I'm actually glad that the first shell messed up because I love the dimension the additional shell gives to the turtle. I die cut a couple of circles from white card stock and then blended a little Tumbled Glass Distress Oxide ink over the Bubble Stencil that's included in the collection... love the dimension it gives to the turtles! And speaking of dimension... I popped up the turtles with some foam tape, as well!

Supplies used (not found in the kit):
Copics ~ G12, G24, G28, BG10, BG23
Spellbinders Standard Circles Large dies
Ranger Mini Ink Blending Tool


I sure hope you've enjoyed the cards I've shared today.

Your next stop on the hop is... Stacy

Be sure to head back over to the Scrapping for Less blog to enter the Rafflecopter once you've finished hopping!


Thank you friends for checking out my blog post!
See ya next time.

Inky Hugs,
Crystal

Friday, May 24, 2019

Scrapping for Less ~ May 2019 Flavor of the Month ~ Myths and Legends


Our Myths and Legends blog hop begins at the Scrapping for Less blog. There, you will find the complete lineup AND…make sure you enter the Rafflecopter. You can find the new kit for May on the Subscription page as well as great photographs of the contents of the kit. Make sure to grab your kit fast as it may sell out quickly! Thanks for joining us today! Happy Crafting! 

P.S. For some fun facts on the elements and origins of the myths and legends of this month's
kit head to the Scrapping for Less blog for some little tidbits about our legendary elements. 
~ Teresa, SFL Owner


If you are just starting hopping, we're so glad to have you join us! The hop starts on the Scrapping for Less blog or you can just start hopping from here.

Here's a quick look at the May 2019 Myths and Legends card kit...


I am loving this month's kit so much! So many adorable stamps and beautiful papers!
Let's dive right in and check out the cards I created so we can keep hopping along... 


Collection One: Nessie
I simplified the sketch for my first card because I just couldn't cover up these pretty papers!
I kept with the circle theme throughout the card putting the focal image in a circle. I masked my image to blend the waves but realized that it makes it look like Nessie is floating over the water... lol... well, I went back over and blended lightly again this time going over Nessie and it's still hard to see. Oh well... I'm still loving it! Rather than cut a scalloped trim for the edge I decided to cut a strip of the scallops in one of the beautiful papers in the kit. Love the mix of colors! To finish this card off I added those five sequins inside the circles... love the simple but fun touch it gives the card!

Supplies used (not found in the kit):
Copics ~ BG11, BG13, BG32; BV000, BV04
Tumbled Glass Distress Ink
MFT Make Waves stencil


Collection Two: Pretty Little Rainbows
I loved that one of the sketches was for a circle shaped card! So fun! I started by cutting my card base from the Sweet Corn card stock. I used a large circle die to cut this out. I then die cut a scalloped circle out of the pretty rainbow papers. I stamped a combination of the stars repeatedly over the rainbow paper and adhered it to the card base. I stamped the adorable pegasus stamp and colored it in. I fussy cut it out and popped it up on the card. I stamped the sentiments and adhered them to the card. The last touch for this one is that faux bow I made with the pretty ribbon in the kit. I just tied a knot and cut the ends to look like a bow. I used a glue dot to adhere it to the card.

Supplies used (not found in the kit):
Copics ~ R81, R85, YR00, YR02, YR24, Y000, Y02, YG0000, YG21, G000, B0000, B000, N0, N2
Tumbled Glass, Scattered Straw, and Spun Sugar Distress Ink
MFT Essential Slanted Sentiment Strips


Collection Three: Fairy's Garden
So, I've become a bit obsessed with making cloud backgrounds... I just love them!! I knew for this sketch I just had to make another one. I kept the layers simple for this card so the focal image could... well, just be the focal image! Lol! I tied the pretty twine around the top panel before adhering it to the Sour Apple card base. To finish off this card, I adhered the pink paper flower and added a bunch of sequins to the center of the flower. So pretty!

Supplies used (not found in the kit):
Copics ~ E000, E51, E55, E57, E59, RV10, RV11, RV21
Tumbled Glass Distress Ink
MFT Mini Cloud Edges stencil 


Collection Four: Gnomie Home
I adore how this card turned out and it was so simple!! I loved this forest scene paper and I layered it on another piece of beautiful green paper in the kit. I adhered these layers to a white card base. I then cut a strip of the bright green paper and stamped the sentiment from the exclusive sentiment stamp set by Scrapping for Less only available in the Banana Split subscription. Love love love this sentiment!! I stamped it using VersaMark watermark ink and heat embossed a fine white embossing powder. I stamped the adorable gnome couple and colored them in. I fussy cut them and then popped them up on the card. I adhered the sentiment strip using liquid glue and then added the sequins.

Supplies used (not found in the kit):
Copics ~ B04, B24, R14, R20, R27, E000, E51, E55, E57, E59, G12, G14, Y000, Y06, 
Y17, Y35, Y38, N0, N2


Here's a close-up of the adorable gnome couple!! Love this stamp!

I sure hope that you've enjoyed the cards I've shared today!
Your next stop is... Luci

Be sure to head back over to the Scrapping for Less blog to enter the Rafflecopter once you've finished hopping!


Thank you friends for checking out my blog post!
See ya next time.

Inky Hugs,
Crystal


Scrapping for Less ~ May 2019 Flavor of the Month Sneak Peek

Hello there crafty friends!
I have a fabulous sneak peek today for the May 2019 Flavor of the Month card kit!
Each month I am blown away by these fabulous kits... Absolutely love this month's kit!!


I did a little stamping on my pink card front using VersaMark watermark ink so the little butterflies are faint in the background. Love the subtle touch it gives! I added a strip of one of the gorgeous papers in the collection and then set the card aside. I stamped all of my images onto a small piece of white card stock measuring 2-3/4" x 3-3/4". I stamped the images again on post it notes, fussy cut them out and the applied them to the stamped images. I then lightly blended my background... when done, I removed the masks and colored the sweet images with the following Copic markers:
Butterflies ~ BG000, BG01, BG53
Skin ~ E000, E00
Wings ~ RV0000, RV10
Hair ~ RV10, RV11, RV21
Dresses/Shoes ~ YG0000, YG23, YG25


I mat the focal image with the green card stock in the kit and popped it up on the card with foam tape from my stash. I stamped the sentiment on a strip of white card stock and then partially popped it up (on the bottom) and adhered the top portion with liquid glue. To finish off the card, I added a few sequins in groups of two. So cute!!

The May 2019 Myths & Legends card kit goes live tonight at Midnight EST!!
Be sure to order yours before they are all gone!!

Thanks so much for checking out my blog post!
See ya next time.

Inky Hugs,
Crystal

Friday, April 26, 2019

Scrapping for Less ~ April 2019 Flavor of the Month Card Kit ~ Spring Critters


"Spring is Here! Finally! 
I know some of you in the northern states and other parts of the world may not be experiencing warm weather, so you can pretend with these beautiful stamps and spring papers. 
Our April Flavor of the Month kit is all about "Spring Critters" cute ones at that! So hop on along and get inspired to make some spring cards with this adorable kit. Head to the brand new website's Subscription page and see what we have to offer this month. Make sure to check out our Blog Hop so you can join in our Rafflecopter. All winners are announced each month in the Teresa Talks post on the blog on the first of the month." ~ Teresa, SFL Owner


If you are just starting hopping, we're so glad to have you join us!! Here's a quick look at the April 2019 Spring Critters card kit...


Banana Split Subscription...


Aren't those just the most adorable stamps and papers!?! I love this kit so much! 
Let's dive right in and check out the cards I created...


Collection One: Spring Bees
I started my first card by adding paper layers to an Applemint card base. On a scrap of white card stock I stamped the beehive and then colored a tree limb and leaves freehand using Copic markers. {If you click on the picture above, I hope you can see some of the detail in the tree limb}
I colored the beehive and die cut the beehive scene with a stitched oval die and then mat it on a larger stitched oval die cut out of Applemint card stock. I colored the bees on a scrap piece of white card stock, fussy cut the bees and then adhered them to the scene, popping one bee up on the card with foam adhesive. To finish off the card, I stamped the sentiment and trimmed it down to a banner and adhered it to the card. Oh, and I added a cute little bumblebee sticker from the collection. So cute!
I used the following Copic markers on this card:

Bee ~ Y06, Y17, N2, N4, N7
Beehive ~ Y06, Y17, Y38
Tree Limb/Leaves ~ E55, E57, E59, YG05, YG17
Sky Background ~ B0000, B01


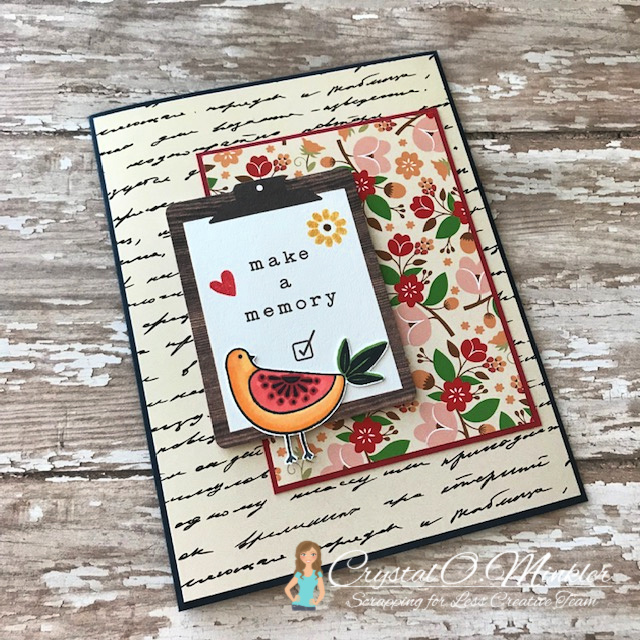
Collection Two: Spring Birds
This collection is my absolute favorite!! I love the bird folk art feel to the stamp set in the collection... love, love, love!!! The papers in this collection are also amazing... I had a hard time cutting into them! LOL! I did end up cutting the floral paper and I mat it on Red Velvet card stock. I adhered that layer to a In the Navy card base that I had adhered this beautiful navy script paper. Such pretty papers! I chose the clip board ephemeral from the collection but I stamped the heart and little flower from the Pink Fresh stamp set using Candied Apple, Wild Honey, and Scattered Straw distress Ink; also coloring in the center of the flower with a Walnut Stain distress marker. On a scrap of white card stock, I stamped the bird and colored it in with the following Copic markers: YR12, YR15, YR21, R14, R27, and YG17. I fussy cut the bird and adhered it to the popped up clip board.


Collection Three: Spring Frogs
Every once in a while I get a crazy idea to attempt No-Line Coloring again... and in this case, I really love how this little frog turned out! Some of the smaller parts were tricky but I was careful to use just the tip of the Copic marker. I colored the entire scene using the following Copic markers:

Frog ~ YG05, YG11, YG17, R000, R20, N2, N4, N10
Lily Pad ~ YG03, YG61
Reeds ~ YG23, YG63, YG91, YG93, YG95
Sky ~ B0000
Grass ~ G03, YG45
Water ~ B000, B00, B01, B02

Assembling the card was very simple... 
I adhered two strips of patterned paper from the collection to a Blue Lagoon card base and also mat my focal image to a piece of the same card stock. To finish off the card, I adhered the three wood butterflies using the Multi Matte Medium in the Banana Split subscription.


Collection Four: Spring Ducks
The patterned papers in the fourth collection are absolutely beautiful... I especially love the ombre dot papers that I used for my card. I loved it so much I paper pieced the little ducks umbrella with the paper too! I colored in my background using Copic markers and then added the cute cloud sticker... now I didn't want the cute ducky to cover up the rain drops so I decided to cut them out and stuck them around the image that I fussy cut and adhered to the main panel. I popped up the main panel on the card and realized I forgot about the sentiment... lol... so I had to get creative because I wanted the sentiment on the main panel. I masked each side of the sentiment in turn and stamped the portions using a Stamp Platform. Voila! 
I used the following Copic markers on this card:

Duck ~ Y000, Y02, Y06, Y13, Y17, YR15, YR16
Hat/Grass ~ YG01, YG06
Sky ~ B00, B000, B0000
Umbrella ~ R11, RV95


I sure hope that you've enjoyed the cards that I've shared with you today.
Your next stop is...  Courtney


Be sure to head back over to the Scrapping for Less blog to enter the Rafflecopter once you've finished hopping!


Thank you friends for checking out my blog post!
See ya next time.

Inky Hugs,
Crystal

Friday, January 25, 2019

Scrapping for Less ~ Flavor of the Month ~ Perk Up & Start the New Year


 Let’s “Perk Up and Start the New Year” with our January Flavor of the Month kit. 
I have a little story to tell…I never drank coffee until I retired about 6 years ago from teaching school…cause who wants a cold cup of what is supposed to be hot coffee? So now…with my wonderful flavored creamer I enjoy a cup of coffee every morning and especially love drinking my coffee while watching crafty videos on YouTube…so sit back and take a look at our Coffee themed FOTM blog hop this month. If you have not already snagged your kit please head over to the Flavor of the Month page and scroll down to choose the level of kit you would like! Make sure you head to the website to check out the rafflecopter, as well, to enter to win a prize!

P.S. I am behind on choosing prizes so stay tuned for those winners on the Teresa Talks 
post on Feb. 1st.


Oh My Goodness!!! When I received my card kit this month... I was crazy excited to start playing! If you follow my blog, you may have noticed that I love coffee! It's nearly an obsession... definitely an addiction! LOL! I actually made 8 cards for this hop and release... I could have made more, but I ran out of time! So this kit seriously blew me away and I'll stop chit chatting about it now so we can get to the cards!


For my first card I used Sketch #1 with Collection One.
I wanted to showcase some of the gorgeous Coffee Time papers in this collection but also had to use some of the fabulous ephemera... all by Scrapping for Less!! The browns and blues in these papers are absolutely gorgeous!! So rich and beautiful... I could just gush about them all day! But I won't... because we have more cards!


For my second card I used Sketch #2 with Collection One.
So you're going to notice that I used variations of sketch #2 for each of the collections and I have to admit that I absolutely love this sketch! It has a great balance of papers and endless possibilities for the focal image! Love love love it!! Oh, and for a little tip for this sketch... I cut the papers into strips and didn't actually layer them over each other. So the top paper is 4-1/4 x 2-1/4", the middle paper is 4-1/4 x 1-3/4", and the bottom paper is 4-1/4 x 1/4". All of those papers are adhered to a Whip Cream card base. I used the following Copic markers to color the beautiful coffee cup from the Humming Along stamp set by Scrapping for Less in Collection One.

Steam ~ N0, N1, N4, Colorless Blender
Cup/Saucer ~ BG000, BG90, B0000, B000,T0, T1, T3, (W1 - heart)
Coffee ~ E27, E47, E49


For my third card I used Sketch #2 with Collection Two.
Here is my first variation on sketch #2... I used the wood icon cup and bubbles in place of the oval/banner focal images in the sketch. I just couldn't cover up the pretty cups in the Love, Coffee and Donuts paper by Scrapping for Less... and the plaid!! Oh my! Love it!


For my fourth card I used Sketch #4 with Collection Two.
Isn't Newton just the cutest hanging from that donut?! I adore this stamp... and I just had to pair it with the fun donut papers in the collection. I also added some of the paper with coffee cups on the top so that I could tie the sentiment in with the card. The top sentiment goes with the main image, but the bottom sentiment I borrowed (and masked to get it just right for my design) from the fabulous Melting Snowman stamp set made exclusively for Scrapping for Less by Your Next Stamp that is included in the Banana Split subscription. 
I used ZIG clean color real brush pens to color in sweet Newton on Canson XL watercolor paper from my stash.


For my fifth card I used Sketch #2 with Collection Three.
For this one, I die cut the focal image using a stitched rectangle die instead of an oval, as seen on the sketch. I also popped up the focal image and the sentiment. I just had to use some of the sequins in the collection by Scrapping for Less... such a perfect mix of colors and sizes!
I also colored this image using ZIG clean color real brush pens on Canson XL watercolor paper from my stash.


For my sixth card I used Sketch #3 with Collection Three.
I fell in love with this beautiful blue paper so there was no way I was going to cover it up. With that being said... I did not stick to the sketch on this one. I omitted two elements on the sketch and enlarged my focal image. Speaking of the focal image... is this melting snowman just the absolute cutest!! He just melted my heart! He's part of the Melting Snowman stamp set included in the Banana Split subscription. I stamped him and the sentiment using VersaMark watermark ink and heat embossed a fine black embossing powder. I then water colored him using ZIG clean color real brush pens. In fact, I stamped and heat embossed all of my watercolored images. I find that to be an easy way of keeping the watercolors where you want them to be. :)


For my seventh card I used Sketch #2 with Collection Four.
This is another variation of sketch #2 using the beautiful Anya for my focal image. I am loving this sweet Brew It Anya stamp... I used her for my sneak peek card. If you missed that card you can check it out here ---> Sneak Peek Card
I stamped Anya with VersaMark watermark ink on Canson XL watercolor paper and then heat embossed a fine black embossing powder. I then watercolored the image using ZIG clean color real brush pens. I fussy cut the image and adhered it to a Cotton Candy card base with the strips of Echo Park Coffee papers.


I love the snarky fun coffee sentiments in the Echo Park Coffee paper included in this collection. I wanted to focus on this sentiment so I cut out an additional one and popped it up over the other. Seriously, love this sentiment!


For my eighth and final card I used Sketch #4 with Collection Four.
For this card I flipped the sketch and omitted the half circles. Since I was using a larger focal image (one of the cut aparts included in the collection) the half circles would have just been lost in the design so out they went! To keep a tiny 'touch' of circles in the card design, I did decided to add some of the pretty enamel dots included in the collection. Such a simple card design... what's not to love!

Here's a look at the Double Dip Subscription.


Here's a look at the Banana Split Subscription.


Next up on the hop is Lynnea!

After checking out the hop, make sure to join the Rafflecopter back on the SFL blog to have a chance to win an awesome prize!!


Thank you friends for checking out my blog post!
See ya next time.

Inky Hugs!
Crystal