Showing posts with label trees. Show all posts

Sunday, June 1, 2025

{BYSHC} Sketch Challenge 58 ~ Christmas Tree Deer ~ A Colorful Life Designs

Hello there crafty friend!
It's time for a new sketch challenge over in the Build Your Stash Holiday Cardmakers Facebook group! Today I'm sharing a fun Christmas card featuring one of my all-time favorite stencils from our amazing Sponsor, A Colorful Life Designs! A Colorful Life Designs has generously offered up a $25 gift code as a prize for the {BYSHC} Sketch Challenge 58 this month! So fantastic!


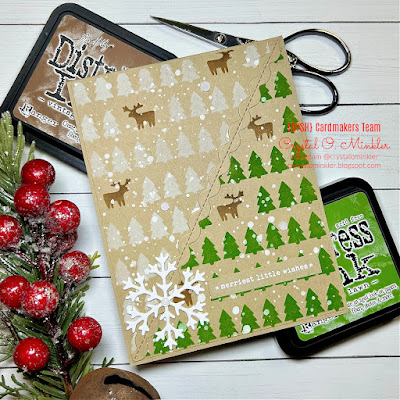
The fabulous Christmas Tree Deer Stencil is the very first stencil I purchased at A Colorful Life Designs. It's my most favorite and I just had to use it! I secured it to my Kraft card stock panel using iCraft Removable Pixie Tape. I also ran a strip of the tape diagonally across the panel and then I blended Mowed Lawn Distress Ink over the bottom portion of the stencil. 


I removed the tape and cleaned the stencil. I like to clean the stencil with just a touch of hand soap and then I rinse it thoroughly. I replaced the tape and blended Sugar Cube White Pigment ink from Taylored Expressions over the top portion of the stencil. I cleaned the stencil once again and placed it back on the panel. I masked around the deer and blended Vintage Photo Distress Ink with just a touch of Walnut Stain Distress Ink on the top.


I spattered the panel with White Acrylic paint spatters that I spritzed with just a drop of water to thin it out. I die cut two pieces of ric rac using the retired Ric Rac die from My Favorite Things. I also die cut two snowflakes using the Small Snowflake die from Gina Marie Designs. I adhered those together and then adhered it over the spot where the two ric rac pieces meet. I heat embossed a quick sentiment using the Simple Little Wishes from Unity. And then I finished off the card with a few confetti pieces from the White Glossy Card Bling from A Colorful Life Designs.


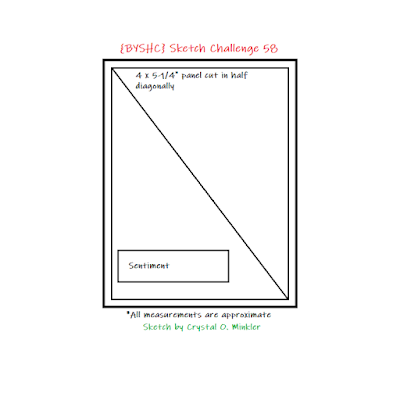
Here's a look at {BYSHC} Sketch Challenge 58 for the month of June. I flipped the sketch for my card today! If you're interested in seeing a bit more inspiration for this sketch, check out the amazing inspiration from the design team over on the {BYSH} Cardmakers blog!


Thanks so much for stopping by!
See ya next time.

Inky hugs,
Crystal


{Please note that comment moderation is ON. Your lovely comment will appear shortly.}

Monday, December 16, 2024

Inky Paws Challenge #235 ~ Year End Cards Theme Challenge {Week 3}

Hello there crafty friend!
 Sharing some more inspiration for week 3, our final week of the Inky Paws Challenge #235 - Year End Cards Theme Challenge! You have until this coming Friday, December 20th to get your entries in for the challenge and a chance to win a $20 store credit to Newton's Nook Designs!


I usually find myself in need of a thank you card. And what's better than a coffee themed thank you card!?


I inked up the beautiful girl from Pumpkin Latte Stamp Set with Memento Tuxedo Black ink. I colored her up with my Copic markers and then I die cut her with the coordinating die from the Pumpkin Latte Die Set. I love these stamps! And was excited to see that I could use it for a holiday card.

Here's a quick list of the Copic markers I used:
Skin: E000, E00, E11
Hair: Y21, Y02, E23, Y26, E25
Blue Jacket: BG10, BG70, BG72
Buttons / Belt / Sleeve: R20, R14, R56
Scarf: BG10, BG72, R20, R14, R56
Boots: E51, E55, E57
Cup: C00, C1, R20, R14, YG11, G24, G46


I created a simple background by blending white pigment ink over the Evergreens Stencil onto Kraft card stock. I die cut the background using a die from the Frames & Flags Die Set. I also die cut the red scalloped mat using a die from the same set. And the white card stock layer is die cut using a die from the Basic Frames Die Set.


Before adhering all of my layers, I die cut the Thanks a Latte Dies from the white layer and the red layer. A fun trick I like to use to stretch out my card stock supply sometimes. I finished off the card with a few enamel dots from my stash.


Now it's your turn to get your paws inky with your Newton's Nook Designs products and create a card using this month's fun theme. Be sure to link up to the Inky Paws Challenge! Can't wait to see your projects!


Thanks so much for stopping by!
See ya next time.

Inky Hugs,
Crystal


{Please note that comment moderation is on. Your lovely comment will appear once approved.}

Tuesday, December 3, 2024

Unity Advent Calendar 2024 Day 3 ~ Unity Stamp Co.

Hello there crafty friend!
It's Day 3 of the 2024 Advent Calendar from Unity!! I am loving the creations being shared with these fun and adorable Advent Calendar stamps. Keep them coming! Today I'm also sharing inspiration for the Tawny Owl Paperie Inky Inspiration ALL the Sketches Challenge!


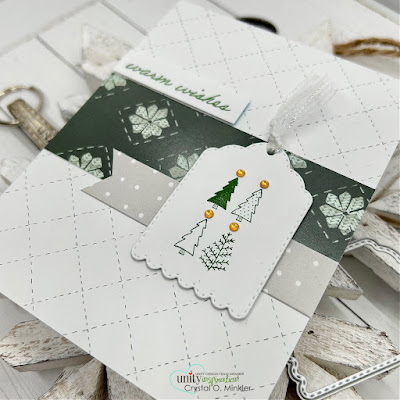
Today's Advent Calendar stamp is a sweet quartet of trees! They are stamped with Rustic Wilderness Distress Ink. And I covered the cute stars with little yellow rhinestones. Should I have done white? I'm just not sure.

You can check out my video revealing the Advent Calendar Day 3 stamp and my process in making this card here... Unity Advent Calendar 2024 Day 3 | Unity Stamp Co.


There are 27 different sketches to inspire us to create this month! Here's a look at six of them. I was inspired by the first one... Sketch 1.


A closer look at Tawny Owl Paperie Inky Inspiration Sketch 1! This is one of my favorite sketches! It's so simple. Stop by the Tawny Owl Paperie Inky Inspiration Facebook group to check out the challenge and see all the inspiration for each of the sketches. Maybe you'll be inspired to play along with us!


I die cut the pretty trees using a die from the Scalloped Tags {looks like these aren't available anymore}. I added some pretty ribbon that I tied off with twine. The pretty sentiment is from the Bitty Forest stamps.


I paired up the pretty trees with the White Winter {paper pack}. And I finished off this card with the yellow rhinestones from the Rainbow Rhinestones from Gina Marie Designs.

I'll be back tomorrow for Day 4 of the 2024 Advent Calendar from Unity!
Have an inkredible day!


Thanks so much for stopping by!
See ya next time.
 
Inky Hugs,
Crystal


{Please note that comment moderation is on. Your lovely comment will appear once approved.}

Sunday, December 1, 2024

Unity Advent Calendar 2024 Day 1 ~ Unity Stamp Co.

Hello there crafty friend!
It's time for Day 1 of the 2024 Advent Calendar from Unity!! I just love Unity's Advent Calendar! It gets more amazing each year. My plan is to reveal the Advent Calendar stamp on my YouTube channel each day and also have a short blog post. Fingers crossed, friends, that I can keep it up!


The Day 1 stamp is a lovely sentiment tree! It's so pretty! I heat embossed it with a Wow Clear Embossing Ink and fine black embossing powder from Stampin' Up.

You can check out my video revealing the Advent Calendar Day 1 stamp and my process in making this card here... Unity Advent Calendar 2024 Day 1 | Unity Stamp Co.


Inspiration for my card came from the {BYSHC} Sketch 11! Be sure to check out my other blog post today for the brand new {BYSHC} Sketch Challenge 52. Christmas is going to be here before we know it... join us for the sketch challenge and finish up those last few cards you need!


I die cut the pretty tree using a die from the Scallops & Circles {nesting dies}. And mat the focal image with another circle die cut using another die from the set.


I paired up the pretty tree with the North Pole Collection {paper pack}. And finished off the card with a few black enamel dots from Spellbinders.

I'll be back tomorrow for Day 2 of the 2024 Advent Calendar from Unity!
Have an ink-tastic day!


Thanks so much for stopping by!
See ya next time.
 
Inky Hugs,
Crystal


{Please note that comment moderation is on. Your lovely comment will appear once approved.}

Wednesday, October 23, 2024

Falling for the Holidays 2024 {BYSHC} Linky Party ~ Unity October 2024 KOM Sweet Bliss of Christmas ~ Unity Stamp Co.

 Hello there crafty friend!
It's always so surprising to me how fast the last few days of the Linky Party just zip on by! We are nearing the end of the Falling for the Holidays 2024 {BYSHC} Linky Party! I'm super happy to be adding so many cards to my stash! I hope you've been inspired to play along with us. My card today features a couple of stamps from the October 2024 Kit of the Month called Sweet Bliss of Christmas from our amazing Sponsor Unity Stamp Co. It's also Membership Wednesday... a fun day to share inspiration for the awesome memberships over at Unity! I just had to ink up the beautiful tree stamp from this month's fab KOM! Good news!! The KOM membership is now available for Canadian shoppers!! Woohoo!!


I had a fun idea for a simple shaped card. Actually it came to mind while I was sleeping and woke me up! That was so crazy! I was trying to figure out a card design when I was falling asleep so it only makes sense that the idea would wake me up! LOL


 I die cut my base first using the largest die from the Scallops & Circles {nesting dies}. I had a 8-1/2 x 4-1/4" piece of Pure Poppy card stock from Papertrey Ink that I scored at 4-1/4" for a square base. I placed the die over the closed/folded card base and secured it with washi tape so that the die didn't cut through the top of the fold. I die cut another red circle for my top layer. And then I die cut a piece of Stampers Select White card stock using the next smallest circle die from the same set.


 I stamped the wonderful tree using Crushed Olive Distress Ink. I used the corner of the Walnut Stain Distress Ink pad to ink up the trunk of the tree. I wiped off the excess on the branches and then stamped it. I think it adds a subtle touch of brown for the trunk. I stamped the Merry Christmas sentiment using Candied Apple Distress Ink. And then I stamped the Full of Merry sentiment from the September 2024 KOM called Wander and Wonder using the same red ink. I fussy cut both of the sentiments. I adhered all of my circle layers using the iCraft UltraBond Adhesive from Sponsor Therm O Web. I added foam tape from Therm O Web called iCraft 3D Foam Tape Jumbo Roll (white) to both of the sentiments and popped them up on the card.


I finished off the card with a bunch of red confetti from the Hologram Red Card Bling from Sponsor A Colorful Life Designs. Pretty much all of the confetti is adhered over the ornaments on the tree stamp. I think I may have added two extras just to balance out the tree a bit. It was so fun making a circle shaped card!


I hope you'll stop by the Falling for the Holidays 2024 {BYSHC} Linky Party to check out all the wonderful holiday inspiration being shared! Seeing all the inspiration makes me want to just make more cards! I sure hope you'll stop by and check it out! Have a fabulINK day!


Thanks so much for stopping by!
See ya next time.

Inky Hugs,
Crystal


{Please note that comment moderation is ON. Your comment will appear shortly.}

Saturday, October 5, 2024

~ Friends of Unity October 2024 Blog Hop ~

Hello there crafty friend!
It's time for our Friends of Unity Blog Hop!! And I am so excited for this month's cue! It's a fun one...


This month's cue is CASEd It! Such a fun idea for a blog hop and I can't wait to see what our friends made this month!


First up is an adorable kitty card featuring the sweet kitty from A Little Not Fine that just released yesterday for World Card Making Day. Don't ya just want to pick that kitty up and give it a cuddle?! So adorbs!


You may recognize my card design from this awesome card by Gaylynn Martling for the October release. I absolutely adore Gaylynn's card and just had to give it a try with my own spin.


I paired up the adorable kitty with the gorgeous Gosh, I Love You {paper pack}. I die cut the kitty and the sentiment using the dies from Grunge Cuts {tag dies} and Distress Tickets {ticket dies}.


I punched a hole through both of the tags using a handheld punch from my stash and then I tied a pretty bow of {Ivory} Burlap string from May Arts. All my papers are adhered directly to the white A2 top fold card base that I turned on the side for a landscape card, except for the kitty and sentiment that I popped up with foam tape.  

Here's a quick list of the Copic Markers I used to color up the kitty:
Kitty: N0, N2, N4, N6, Colorless Blender
Nose / Ears: R00, R20
Eyes: YG11, YG63, YG45
Ground: E51, E55


Next up is a fun card featuring the cow from Someone Left the Gate Open. So excited to finally ink this cute cow up!


This time I CASEd these fun cards by Beth Artz! Beth shares her creations often in the Unity Show & Tell Facebook group. Love her creations! This is such a versatile card design... I had to give it a go!


I paired the cows up with the awesome Rustic Cowhide {paper pack}. So fun! The cows are both die cut using a die from the Scallops & Circles {nesting dies}.


The fun burlap ribbon has been in my stash forever. I'm pretty sure it's from Stampin' Up. Because it's so thick I popped up the cowhide papers using a thick foam tape. And then the cow circles are popped up on either side of the burlap ribbon using a thinner foam tape. Lots of dimension for these cards!

Here's a quick list of the Copic Markers I used to color up the cows:
Eyes / Teeth: C00, C2
Horns: E51
Face / Neck: N0, N2, N4, Colorless Blender
Nose: R00, R20, N0, N2, N4, E51


Last up is a pretty holiday card featuring the super sweet Simple Little Wishes that also just released for World Card Making Day. I love this Charlie Brown tree!! So cute! 


Some of you may recognize this awesome technique that Jenni Shamblin shared a few months ago for the Christmas in July 2024 {BYSHC} Linky Party. I fell in love with the design but didn't play with it until now and OH BOY am I hooked!! It was so much fun!


You may also recognize the papers from the card I shared on Thursday. This card design is perfect for those scraps and since I was playing with leftover paper scraps, it just made sense to use them again! I do recommend to use copy paper for this technique. It took several runs through my Big Shot with the largest die from the Scallops & Rectangles {nesting dies} to get that background layer cut all the way through.


The adorable tree is die cut using a die from the Scallops & Circles {nesting dies}. The sentiment and tree circle are popped up with foam tape. And then I finished off the card with a few shiny pieces of confetti from the Crystal Metallic Quicksilver Card Bling set from A Colorful Life Designs. 

Now before we get to the hopping, I chose a lucky winner from the comments on last month's hop to win a fun prize and the lucky winner is...


... Karen Letchworth!! Congratulations, Karen!!
Please email me at crystalominkler@gmail.com to claim your prize. 
Please claim the prize before October 30th, 2024. 

Well, that's it for me this time! Please hop along and enjoy some more inspiration from the Friends of Unity! I can't wait to see the CASEd creations our friends made for this month's cue. I will be doing another fun giveaway this month!! Be sure to hop along and comment for a chance to win. {When you comment please leave your name just in case it posts as anonymous.} I'll announce the winner next month! 


Let's get to the hopping...

Crystal <--- you're here

up next ---> Amber


Thanks so very much for supporting our little hop!
We appreciate you so much!!

See ya next time.

Inky Hugs,
Crystal


{Please note that comment moderation is ON. Your comment will appear shortly.}


Tuesday, September 5, 2023

Java Merry Christmas ~ Christmas Deer Stencil ~ A Colorful Life Designs

 Hello there crafty friend!
Today I'm so excited to share a fun holiday card as a guest designer for A Colorful Life Designs. I am just smitten with the amazing selection of stencils over at A Colorful Life Designs. So many options and for every occasion!! I was so happy to be asked to guest design for them this month. Before we get to my card, please use code Crystal10 for 10% OFF your order over at A Colorful Life Designs and tell them Crystal sent you over!


Now, on to my card... featuring the adorable and sweet Christmas Deer Stencil. I have seen a bunch of cards using the sweet Christmas Deer Stencil it was an absolute MUST HAVE for my stencil collection!! You all know I love making Christmas cards!! 


I blended Mowed Lawn and Forest Moss Distress Oxide inks over the trees and Vintage Photo and Ground Espresso Distress Oxide inks over the deer. I die cut a post it note using a small circle die to mask the deer and used the negative as well for blending the deer. You can see what I mean in my process video below.


I stamped the sweet Latte Santa and sentiments from Unity and colored up Santa with the following Copic markers:

Skin: E000, E00, E11, E04
Mustache / Beard: C00, C1, C3
Hat: C00, C1, C3, YG11, G24, G46
Shirt: YG11, G24, G46, R20, R14, R46
Pants: R20, R14, R46, E21, E23, E25
Mug: R20, R14, R46, E21, E23, E25

The stenciled background was die cut using the Scallops & Rectangles Nesting Dies from Unity. The sentiment was die cut using the Banner Nesting Dies, also from Unity, but out of stock. And the sentiment inside the card {down below} was also die cut using the Scalloped & Stitched Sentiment Nesting Dies from Unity.


I absolutely love this sentiment and had to use it for the inside of the card. And how sweet is that little deer in the corner?! Love it!


 Be sure to head over to A Colorful Life Designs and check out their amazing selection of stencils. And don't forget to use code Crystal10 for 10% OFF your order! Also, drop by Unity Stamp Co. to check out all the amazing new releases for the month of September... including Latte Santa!

Thanks so much for stopping by!
See ya next time.

Inky hugs,
Crystal


{Please note that comment moderation is on. Your lovely comment will appear once approved.}

Friday, December 17, 2021

{BYSHC} Sketch Challenge 17 ~ Extra Sweet Christmas ~ Polka Dot Orchard

 Hello there crafty friend!
I'm back with my weekly Christmas card for the {BYSHC} Sketch Challenge for the month of December... today's card features a sweet new digital stamp set from Polka Dot Orchard called Extra Sweet Christmas!!


What do you think?! Pretty cute, right? I created the background by first ink smooshing Bundled Sage, Mowed Lawn and Rustic Wilderness Distress Oxide inks on a piece of white card stock. I made sure to dry it completely with my heat tool and then I printed the resized background digital snowflakes stamp on the ink smooshed background.


I trimmed the background to 3-11/16 x 4-13/16"and mat it on a 3-7/8 x 5" piece of Real Red card stock. I mat it again on a 4 x 5-1/4" piece of Garden Green card stock and then adhered it to a Real Red card front measuring 4-1/4 x 5-1/2".


I used a leftover piece of the ink smooshed background for my angled strip and adhered it to the background. I used a 1/2" scrap of Garden Green card stock across the background and to cover up where those two pieces meet, I added a skinny strip of Real Red card stock that's 1/8" wide.


Now for the plate of cookies... does it look like a plate of cookies to you? That's what I was going for... I sure hope it does. I resized the snowflakes from the digital stamp set in different sizes and placed them in kind of a circular formation. And then I printed them off. I colored the snowflakes very simply with R14 and R20 Copic Markers. I die cut the snowflakes with two stitched circle dies and colored the edges with C00 and C2 Copic Markers. I die cut an extra outer piece to adhere under the colored piece so it looked a bit more like a plate. I die cut the larger circle one more time and cut it to be a bit smaller so I could adhere my plate layers to it. I then adhered the plate to my card.


I combined and resized the Christmas tree cookies in a Microsoft Word Document. I printed them off along with the sentiment. Time to color! I used the following Copic Markers...

Cookie base ~ E30, E33
Green icing ~ YG11, G14, G24
Stars ~ Y06, Y15
Red & White Candy Garland ~ C00, C2, R14, R20
Red Swirly Garland ~ R14, R20


The sentiment is just trimmed and then adhered to the card... easy peasy!


Here's a look at Sketch 17... join us in the Build Your Stash Holiday Cardmakers Facebook group for inspiration and fun!

I have a short Copic coloring video for the cookies and the snowflakes, if you are interested check it out here... Christmas Tree Cookie Coloring ~ Extra Sweet Christmas Digital Stamp Set.


I hope you'll join us and play along with the sketch! If you're interested in seeing a bit more inspiration for this sketch, check out the {BYSH} Cardmakers blog! I'll be back next Friday with my weekly Christmas card using this month's sketch! Head over to Polka Dot Orchard to check out all the fun new releases!!


Thanks so much for stopping by!
See ya next time.

Inky hugs,
Crystal


{Please note that comment moderation is ON. Your comment will appear shortly.}