Sunday, June 29, 2025

Some Days ~ Winnie the Pooh: Time to Think ~ Unity Stamp Co.

Hello there crafty friend! 
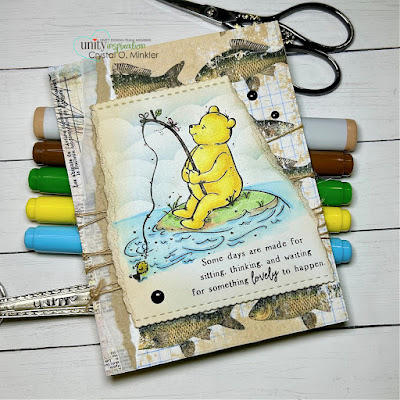
Any Winnie the Pooh fans out there?! Me. Me. I just had to ink this guy up! Unity just added this cutie to the Winnie the Pooh collection.


This cutie is the Winnie the Pooh: Time to Think stamps. Pooh bear's just having a little quiet time at the pond. So cute! I stamped and Copic colored sweet Pooh. I then die cut the panel using a die from the Scallops & Squares {nesting dies}. I carefully blended some clouds around Pooh bear using the Cloud & Wave Stencil with Tumbled Glass Distress Ink. The square panel covered up too much of my background so I tore the sides.

Here's a quick list of the Copic markers I used:
Winnie the Pooh: Y11, Y02, Y15
Ground: YG11, G21, YG17, E21, E33
Water: B000, B02
Dragonfly: RV02
Fishing Pole: E21, E25, YG11, YG17
Fish: Y11, Y15, B000, B02


Speaking of my background, I paired up Winnie the Pooh with the Takin' Em Fishin' {paper pack}. I used a couple pieces from the pattern papers and used a scrap of kraft and vellum card stock for the edge of the fish papers. Sometimes it's just fun to tear up that paper! I wrapped the pattern papers with Natural May Arts Burlap String and just tied it off with a knot.


I added foam tape to the back of the Pooh bear panel and popped it up on the card. I finished off the card with some black enamel dots from Spellbinders. I really like how this one turned out.

Thanks so much for stopping by!
See ya next time.

Inky hugs,
Crystal

{Please note that comment moderation is on. Your lovely comment will appear shortly.}

Saturday, June 28, 2025

Need a Hug ~ Heart Mode: Activated ~ Unity Stamp Co.

Hello there crafty friend! 
How stinkin' cute is this sweet new robot from Unity!? 


I inked up the cute robot from the Heart Mode: Activated stamps and colored him up with Copic markers. I fussy cut him leaving a border around and set him aside.

Here's a quick list of the Copic markers I used:
Robot: C0, C1, C3, C5
Heart: R20, R14, R27
Ground: YG11, G94


I chose the Nostalgic Armour Romantic Vintage {paper pack} to pair up with this cutie. I have a piece adhered to my card front giving me those pretty hearts in the background. I die cut a piece of Vintage Cream card stock from Papertrey Ink using the retired Fall Out Hearts Background die from Unity. The cream card stock didn't quite look right so I blended Aged Mahogany Distress Ink all over it. It coordinates nicely with the papers. 


I wanted to break up the hearts in the background so I chose the striped paper and tore the top to expose some of the hearts in the background. I like how the stripes ground the robot too. I die cut hearts from the pattern papers using dies from the Dashes and Frills Hearts Die Set. I stamped, trimmed and adhered the sentiment to the heart. I also adhered the robot and then added foam tape to the back of the robot and the heart and popped them up on the card. I adhered the second sentiment to the bottom of the card. I had to break up all that white on the side of the sentiment so I blended Aged Mahogany Distress Ink over one of the hearts from the background. Love it!

Thanks so much for stopping by!
See ya next time.

Inky hugs,
Crystal

{Please note that comment moderation is on. Your lovely comment will appear shortly.}

Friday, June 27, 2025

{BYSHC} Sketch Challenge 58 ~ Layered Holly with Fancy Merry Christmas ~ A Colorful Life Designs

Hello there crafty friend!
I'm back with one last card for the {BYSHC} Sketch Challenge 58 hosted in the Build Your Stash Holiday Cardmakers Facebook group! Today I'm sharing a vintage style holiday card featuring a couple of great stencils from our wonderful Sponsor, A Colorful Life Designs.


I started by laying down a postage stencil from the Marvelous Masks Postage Stamp Stencil A over a card front of Kraft card stock from Papertrey Ink. I then laid the holly leaf stencil overtop of the postage stencil. I used a piece of iCraft Removable Pixie Tape to diagonally mask the other half of the card front and then blended Mowed Lawn Distress Ink over the holly stencil. I replaced the holly for the berry stencil. Also replacing the pixie tape mask and blended Candied Apple Distress Ink. The holly and berries stencils are from the Layered Holly Stencil


I removed the stencil and laid the Fancy Merry Christmas Stencil. I again used the pixie tape to mask the card this time covering the holly and berries. I blended Vintage Photo over the whole stencil being more heavy in the center and a lighter touch around the edges. I then blended Walnut Stain Distress Ink over the Merry Christmas sentiment. 


I trimmed the stenciled panel to 4 x 5-1/4" and adhered it to an A2 card base of Dark Chocolate card stock from Papertrey Ink. I finished off the card with a few confetti pieces from the Hologram Red Card Bling.


Here's a look at {BYSHC} Sketch Challenge 58 for the month of June. There's just a few days left to enter the challenge! If you're interested in seeing a bit more inspiration for this sketch, check out the amazing inspiration from the design team over on the {BYSH} Cardmakers blog! I'm always blown away by the creations from the DT... they are amazingly talented cardmakers!


Thanks so much for stopping by!
See ya next time.

Inky hugs,
Crystal


{Please note that comment moderation is ON. Your lovely comment will appear shortly.}

Wednesday, June 25, 2025

Time to Shine ~ Anya Reboot ~ The Greeting Farm

 Hello there crafty friend!
 Today I'm sharing a sweet rainbow card I made featuring a super cute Anya from the Anya Reboot Big Kit from The Greeting Farm!


I had this cutie already stamped and partially colored on my desk so I thought I'd make a card with her to share. Unfortunately, the Anya Reboot Big kit isn't currently on the website. But if you'd like to add her and the rest of the adorable reboot Anyas to your collection, you can check out thFarmers Market and submit a request via email... maybe it'll be available for the next Farmers Market. Fingers crossed!


I inked her up with Memento Tuxedo Black ink and colored her up with Copic markers. I fussy cut Superstar Anya on the line and then I used a Memento Tuxedo Black marker to color the edges of my fussy cutting. This makes the fussy cutting look nice and neat.

Here's a quick list of the Copic markers I used:
Skin: E000, E00, E11, E04, R00, R20
Hair: E70, E71, E74, E77
Mouth: R00, R20, R14
Star Glasses: Y000, Y11, Y15, Y08, R20, YR20, Y11, G000, B000, V000
Feather Boa: Y000, Y15, YR20, YR15, R00, R20, V000, V12, B000, B00
Top: V000, V12, C0, C1
Skirt: B000, B00
Belt: Y11, Y15, C0, C1
Bracelet: R00, R20, R14
Die Cut Star: Y000, Y11, Y15, Y08


I paired up Superstar Anya with the Team Tie-Dye papers from Honey Bee Stamps. My coloring was also inspired by these soft pastel rainbow colors. The fun frame was die cut from white card stock using the Just for You Frame Dies from The Greeting Farm. I'm not sure if retired dies ever make it to the Farmer's Market but it's worth a try if you'd like to request these. It's a great frame for a shaker card! The sentiment is from the Miss Anya Red Carpet stamp set.


I got all of my layers adhered to a white A2 top fold card base and went searching for a star in my stash to fill the empty space beside the sentiment. I die cut the star using a freebie die I got from My Favorite Things and colored it with Copics {listed above with the other Copics I used}. I popped up the star on the card to finish it off. I hope I've inspired you to get inky!

Thanks so much for stopping by!
See ya next time.

Inky Hugs,
Crystal

{Please note that comment moderation is on. Your lovely comment will appear once approved.}

Membership Wednesday ~ June 2025 BOM Check it Out ~ Unity Stamp Co.

Hello there crafty friend!
Happy Membership Wednesday! Today I'm sharing a quick masculine card featuring an older stamp from Unity along with the awesome Check it Out background stamp from the June 2025 Background of the Month membership. 


I stamped the awesome background directly onto the front of a white A2 top fold card base with Black Amalgam ink and distressed the edges with some Vintage Photo Distress Ink. So super easy and it looks just like a chess board. 


My oldest son likes to play chess so I thought I'd make him a chess themed birthday card. I remembered the chess pieces from an old KOM and after a bit of investigating I found it. It's in the December 2018 KOM called Best Friend Till the End. I stamped them with Black Amalgam ink and colored them with just a few Copic markers - E000, E21, E33.


I die cut the chess pieces using a square die from the Scallops & Squares {nesting dies} and distressed the edges very lightly using residual ink on my brush. I then adhered it to a black mat that I die cut with the next largest die. The fun sentiment is a new fave from the Ween Party Crew stamps that I heat embossed using Ultra Fine Embossing Powder Raven embossing powder from Brutus Monroe. I trimmed up the sentiment and mat it with some leftover black card stock. Easy peasy and I sure hope he likes it.


Here's a quick look at this month's Background of the Month membership!

Well, that's it for me today! I hope you've been inspired to play with your membership stamps! Have an INKtastic day!


Thanks so much for stopping by!
See ya next time.

Inky Hugs,
Crystal


{Please note that comment moderation is on. Your lovely comment will appear once approved.}
Tuesday, June 24, 2025

Tawny Owl Paperie Inky Inspiration Sketch 34 ~ Still Peckin' Fabulous ~ Unity Stamp Co.

 Hello there crafty friend!
I hope you're having a great day! Today I'm sharing my first card for the Tawny Owl Paperie Inky Inspiration Sketch Challenge 34 in the Tawny Owl Paperie Inky Inspiration Facebook group. I inked up one of the new fabulous chickens from the Still Peckin' Fabulous stamps from Unity. 


First of all, that sentiment!!! LOL! Hilarious! I love it! I stamped the chicken and the sentiment on scraps of white card stock. I colored the images up with Copic Markers. I die cut the chicken using a die from the Grunge Cuts {tag dies}.

Here's a list of the Copic Markers I used: 
Chicken / Eyes: C0, C1, C2
Beak / Feet: YR20, YR15, YR27
Wattle: R20, R14, R27
Hat: R20, R14, R27, BG23, G14, Y15
Cake: E21, E25, YG11, YG03, BG10, Y15
Balloon: Y000, Y11, Y15
Ground: C0, C2
Background: BG000, BG10


Here's a look at the fun sketch for Tawny Owl Paperie Inky Inspiration Sketch Challenge 34. The sketch, as always, is meant to inspire not require. So let the sketch lead in your design, but don't feel limited by it. I came up with this card design when I was using up scraps. You can check out the original card here... February Scraps Cards. I really need to get back to using up my scraps so I'm really excited for this sketch.


I pulled these scraps right out of my Oh Hey! It's Your Day! {paper pack}. I left the widths as they were but trimmed the ends to 3-3/4". I love how quick this card came together with a fun embossing folder for the background and with some scraps. I used the Confetti embossing folder from Stampin' Up. The ribbon is also from SU, it's the Wild Wasabi Grosgrain Stitched ribbon. I stapled it to the tag using the Tim Holtz Idea-ology Tiny Attacher Stapler.


I think this will be a really fun sketch to play with for the next four weeks! Lots of possibilities and we can use up some scraps! I hope you can find time to play along. I can't wait to see what you create. Have an INKredible week!

Thanks so much for stopping by!
See ya next time.

Inky Hugs,
Crystal


{Please note that comment moderation is on. Your lovely comment will appear once approved.}

Monday, June 23, 2025

Inky Paws Challenge 241 ~ Sunny Days Theme Challenge {Week 4}

Hello there crafty friend!
 There's just a few more days to play along with the Inky Paws Challenge #241 - Sunny Days Theme Challenge! You have until this coming Friday, June 27th to get your entries in for the challenge and a chance to win a $20 store credit to Newton's Nook Designs!


This has been such a fun challenge! I hope you have a chance to play along with us if you haven't already! There's just a few days left to play!


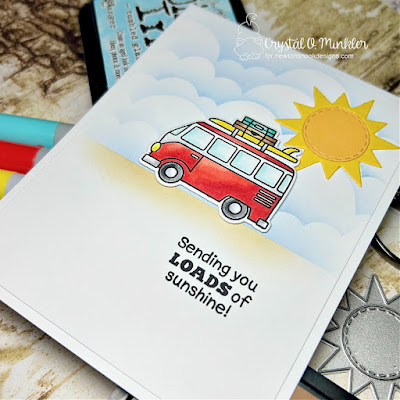
I'm sharing a CAS card today featuring the awesome bus from the Beach Bound Stamp Set. It's die cut using the coordinating die from the Beach Bound Die Set. I stamped it with Memento Tuxedo Black ink and colored it with Copic markers.

Here's a quick list of the Copic markers I used:
Bus: C0, C2, R20, R14, R27
Windows: BG000, BG10
Tires: N0, N2, N4, N6, C0, C2
Headlight / Surf Board: Y11, Y15
Suitcases: BG000, BG10, BG15, E21, E25, C0


I blended a simple background using the edge of a piece of card stock for my ground. I used the residue ink from my brown blending brush to lightly blend my ground. And then I blended some clouds over the Clouds Stencil with Tumbled Glass Distress Ink.


This fun scene card just needed a sun to finish it off so I die cut a sun from a couple yellow card stocks using the sun die from the Sky Scene Builder Die Set. I adhered the sun to the card, popped up the bus with foam tape and then stamped the sentiment on the card. Love how quickly this one came together!


Now it's your turn to get your paws inky with your Newton's Nook Designs products and create a project using the fun sketch. Be sure to link up to the Inky Paws Challenge! Can't wait to see your projects!


Thanks so much for stopping by!
See ya next time.

Inky Hugs,
Crystal


{Please note that comment moderation is on. Your lovely comment will appear once approved.}

Wednesday, June 18, 2025

Membership Wednesday ~ June 2025 KOM Squeeze the Sweetness ~ Unity Stamp Co.

Hello there crafty friend!
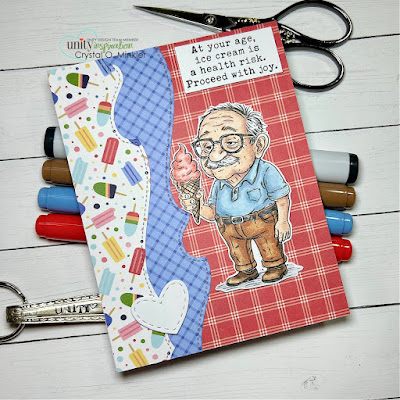
Happy Membership Wednesday! Today I'm sharing a card featuring another really cute stamp from the June 2025 Kit of the Month membership from Unity called Squeeze the Sweetness. 


I stamped the sweet gentleman with Black Amalgam ink and colored him up with Copic markers. 

Here's a quick list of the Copic markers I used: 
Skin: E000, E00, E11, E04
Hair / Mustache: C0, C2
Glasses: N6, N8
Shirt: B000, B91, B93
Pants: E53, E15
Belt: N3, N6, N8, C0
Shoes: E53, E59
Cone: E21, E25
Ice Cream: R20, R14
Ground: C0, C2


I paired up this cute gentleman with the My Favorite Summer 6x6 Paper Pad from Echo Park Paper Co. I used the Stitched Wave Borders dies from Lawn Fawn for the fun edges on my paper layers. And I found a cute stitched heart in my scraps so I popped it up on the card, too.


I fussy cut the gentleman and trimmed the sentiment. I added foam tape to the back of both and popped them up on the card. I love the fun colors on this one!


Here's a quick look at this month's Kit of the Month membership!

Well, that's it for me today! I hope you've been inspired to play with your membership stamps! Have an ink-tastic day!


Thanks so much for stopping by!
See ya next time.

Inky Hugs,
Crystal


{Please note that comment moderation is on. Your lovely comment will appear once approved.}

Tuesday, June 17, 2025

Tawny Owl Paperie Inky Inspiration Sketch 33 ~ Sun's Out, Sass Out Pissy Kitty ~ Unity Stamp Co.

 Hello there crafty friend!
Today I'm sharing one last card for the Tawny Owl Paperie Inky Inspiration Sketch Challenge 33 in the Tawny Owl Paperie Inky Inspiration Facebook group. I inked up the cute and grumpy kitty from the Sun's Out, Sass Out Pissy Kitty stamps. Another super fun cat!


I stamped the kitty and sentiment with Amalgam Black ink on Stampers Select White card stock and colored the kitty up with Copic Markers. I fussy cut the kitty leaving a white border around the image. 

Here's a list of the Copic Markers I used:
Kitty: C0, C2, C3, R00, R20
Eyes: YG11, G14
Bikini: BG000, BG10, BG15
Flamingo Floatie: RV10, RV02, RV04, Y11, Y15, C0, C2
Water: B000, B00


Here's a look at the fun sketch for Tawny Owl Paperie Inky Inspiration Sketch Challenge 33. The sketch, as always, is meant to inspire not require. So let the sketch lead in your design, but don't feel limited by it. 


I paired up the pissy kitty with the awesome Sun's Out, Sass Out Pissy Kitty Coordinating {paper pack}. I adhered the circle, sentiment, flamingo papers and the leaves paper together and then added foam tape to the back and popped the panel up on the card. I also slipped a simple scalloped edge in there that I had punched out of white card stock using an old punch from Stampin' Up. My panel was then adhered to a white A2 top fold card base.


This fun kitty and the papers are also available together as a bundle here... Sun's Out, Sass Out Pissy Kitty Bundle. I finished off the card with a few white enamel dots from my stash. There's just a few days left to play along with this sketch challenge. I hope you can find time to play along. Have an ink-tastic week!

Thanks so much for stopping by!
See ya next time.

Inky Hugs,
Crystal


{Please note that comment moderation is on. Your lovely comment will appear once approved.}

Monday, June 16, 2025

Inky Paws Challenge 241 ~ Sunny Days Theme Challenge {Week 3}

Hello there crafty friend!
 Sharing some more inspiration for week 3 of the Inky Paws Challenge #241 - Sunny Days Theme Challenge! You have until Friday, June 27th to get your entries in for the challenge and a chance to win a $20 store credit to Newton's Nook Designs!


The weather is definitely shifting into Summer... the heat is here!! I just had to play with the fun daisy dies for a fun sunny day card!


I die cut the daisies from white, yellow and green card stock using the fun dies from the Daisies Die Set. These daisies came together so quickly using these dies!


I wanted a fun sunny days background for my daisies so I grabbed the Summertime 6x6 Paper Pad and die cut all of the pieces using scraps from the Frames & Tags Die Set.


I had a hard time picking which sentiment to use for my card last week so I had a little victory and used the other sentiment from the Sunflower Days Stamp Set. I adore this font and the sentiment!


Now it's your turn to get your paws inky with your Newton's Nook Designs products and create a card using this month's fun theme. Be sure to link up to the Inky Paws Challenge! Can't wait to see your projects!


Thanks so much for stopping by!
See ya next time.

Inky Hugs,
Crystal


{Please note that comment moderation is on. Your lovely comment will appear once approved.}

Sunday, June 15, 2025

Lasting Beauty ~ Nocturnal Nature ~ Unity Stamp Co.

Hello there crafty friend! 
Why make one card when you can make two?! I ink smooshed a quick half sheet of white card stock so I thought... why not make two cards. So I did! I used the gorgeous new Nocturnal Nature for a couple of quick mixed media style cards. 


I ink smooshed the half sheet of white card stock using Shaded Lilac, Wilted Violet and Villainous Potion Distress Inks. I was sure to leave some white in the background for contrast.


I stamped the grid and grunge stamps three times on each panel using Black Amalgam ink. I also stamped the sentiments alternating placement on each panel just to change them up a little.


For my first card, I die cut the panel using the second largest die in the Deckle & Stitches Nesting dies. I considered adhering the panel to a black card front but decided to ink smoosh another card front with the same three purples. I added foam tape to the back of my focal panel and adhered it to the card front and then adhered the panel to a white A2 top fold card base. 


For my second card, I die cut the panel using the largest die from the Deckle & Stitches Nesting dies and adhered it to a black A2 top fold card base. I set aside the cards and stamped the moths. I colored them with just a few Copic markers: YG00, YG11, and YG23. 


I fussy cut the moths close to the black line and popped them up on the cards with foam tape. And then I finished them both off with a few glitter enamel dots from my stash. I think these turned out pretty nice.

Thanks so much for stopping by!
See ya next time.

Inky hugs,
Crystal

{Please note that comment moderation is on. Your lovely comment will appear shortly.}

Saturday, June 14, 2025

Release Day Blog Hop ~ Anya Paints ~ The Greeting Farm

The June 2025 New Release is now available for purchase in The Greeting Farm Store! This month we introduced 3 new stamp sets. In our first set called ANYA PAINTS, Anya is ready to brush those worries away by exploring her creative side. For our next set called HUNNY BUNNY, we introduced 6 of the cutest bunnies hopping by with well wishes. Lastly, we have GLOW UP ANYA, featuring Anya with her makeup palette along with a gorgeous makeup vanity.


Anya is busy painting a big flower on her wall. I just love this stamp set! I stamped the flower using the brushstroke stamp with Mustard Seed Distress Ink. I stamped the heart on a scrap of white card stock with Abandoned Coral Distress Ink. I fussy cut the heart. I colored a quick stem and leaf using Copic markers and adhered the heart to the center of the flower.


I stamped sweet Anya and two paint cans using Memento Tuxedo Black ink. I colored them up with some Copic markers. I fussy cut all of the images on the line and colored the edges with a black marker.

Here's a quick list of the Copic markers I used:
Skin: E000, E00, E21
Hair: Y11, E00, E21, E15
Shorts: B000, B93
Bow / Top / Belt: V12, V15, V17
Paint Brush: E21, E25, E57, C2, C5, R20, R14
Paint Cans: C0, C2, Y02, Y15, R20, R14


I die cut the panel using a Wonky Stitched Rectangle die from Gina Marie Designs. I adhered it to a black A2 top fold card base. I popped up Anya and the paint cans using foam tape. And then I finished off the card by stamping the sentiment directly on the panel.


To celebrate this release we are having a short BLOG HOP! One lucky fan will win a $50.00 Gift Certificate to The Greeting Farm Store!! You have until June 18th, 12pm CST/1pm EST to leave your comments on each Designer's Blog. Then head back to The Greeting Farm Blog to let us know you completed the hop. **Remember to qualify for the prize you MUST leave a comment on each Designer's Blog AND The Greeting Farm Blog letting us know you completed the hop.

NOTE: Comments on The Greeting Farm Blog are admin approved so it may take a day for your comment to be visible. Please only comment once, and use the same name on all the blogs when leaving a comment. Do not pick the Anonymous option (otherwise we won't be able to verify that it's you). We will announce the random winner later in the week on the Blog and in our Facebook Group: The Greeting Farm Fan Page.

TGF Design Team:

This is a short hop, and definitely worth playing along! If you want to grab your favorites now, you can purchase the new stamps HERE. We will have more cards featuring the New Release from our Design Team Leaders starting on the 17th so be sure to stop by The Greeting Farm Blog to see more inspiration.

Happy Hopping!

Inky Hugs,
Crystal


{Please note that comment moderation is on. Your lovely comment will appear once approved.}