Friday, March 28, 2025

{BYSHC} Sketch Challenge 55 ~ Empty Snow Globe ~ Pink & Main

Hello there crafty friend!
I'm back with one last card for the {BYSHC} Sketch Challenge 55 hosted in the Build Your Stash Holiday Cardmakers Facebook group! Today I'm sharing another sweet holiday card featuring a couple of great stamps from our wonderful Sponsor, Pink & Main.


I paired up the fun Empty Snow Globe stamp set with one of the adorable gingerbreads from the Sugar and Spice Holidays stamp set to make a faux shaker card. My intention was to make a shaker card, but I got distracted and forgot to add the clear card stock {acetate} layer so a faux shaker it is! LOL!


I stamped the Empty Snow Globe and the ginger using Memento Tuxedo Black ink and colored them up with some Copic markers. I brightened up the white icing using a Sakura White Gelly Roll pen.

Here's a quick list of what I used:
Gingerbread: E30, E34, E35
White Icing: C00, C2
Red: R20, R14
Snow Globe Base: E21, E23, E25


I used the lovely Sugar Plum 6x6 Paper Pad from My Mind's Eye for my pretty paper layers for this card. They are all adhered to a Kraft A2 top fold card base. The snow globe is popped up with some foam strips from Stampin' Up. Oh, and the snowflakes I added were from the Advent Calendar last year from Unity.


Here's a look at {BYSHC} Sketch Challenge 55 for the month of March. There's just a few days left to enter the challenge! If you're interested in seeing a bit more inspiration for this sketch, check out the amazing inspiration from the design team over on the {BYSH} Cardmakers blog! I'm always blown away by the creations from the DT... they are amazingly talented cardmakers!


Thanks so much for stopping by!
See ya next time.

Inky hugs,
Crystal


{Please note that comment moderation is ON. Your lovely comment will appear shortly.}

Wednesday, March 26, 2025

Fun Bunny Background ~ Happy Easter ~ The Greeting Farm

 Hello there crafty friend!
Today I'm excited to share a super sweet and fun Easter card with you all!


I created a fun partial background using the adorable bunny peep from the Happy Easter stamp set. The adorable girl is also from the same stamp set. Unfortunately, I can't seem to find the Happy Easter stamp set on the website. But if you'd like to add it to your collection, you can check out the Farmers Market and submit a request via email... maybe it'll be available for the next Farmers Market.


I stamped the girl and bunnies with Memento Tuxedo black ink and colored them up with Copic Markers. I also spattered the partial background with Mustard Seed, Tumbled Glass, and Kitsch Flamingo Distress Ink.

Here's a quick list of the Copic markers I used:
Girl Skin: E000, E00, E51, R00, R20
Girl Hair: Y21, E43, E44
Dress: V000, V12
Green Bunnies: YG11, YG23 
Yellow Bunnies: Y11, Y15
Pink Bunnies: RV10, RV02
Purple Bunnies: V000, V12
Orange Bunnies: YR21, YR15
Blue Bunnies: B0000, B00
Ground: C00, C2


I added a 1/8" strip of black card stock to break up the partial background. And I mat the cute focal image with a black circle mat. 

You can check out my process video here... Fun Bunny Background | Happy Easter | The Greeting Farm.


Anyone else working on Easter cards for their stash? I just adore how this one turned out! I hope I've inspired you to get inky.

Thanks so much for stopping by!
See ya next time.

Inky Hugs,
Crystal

{Please note that comment moderation is on. Your lovely comment will appear once approved.}

Membership Wednesday ~ March 2025 BOM Mandala of the Heart ~ Unity Stamp Co.

Hello there crafty friend!
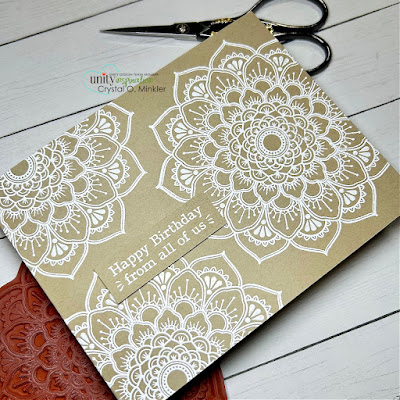
Happy Membership Wednesday! Today I'm sharing a quick birthday card featuring the gorgeous background stamp from the March 2025 Background of the Month membership from Unity called Mandala of the Heart. 


I love this beautiful stamp! I embossed it on Kraft card stock from Papertrey Ink using Sugar Cube Pigment Ink from Taylored Expressions along with Alabaster White Embossing Powder from Brutus Monroe. My favorite combo for a bright white embossed image!


I melted the embossing powder with a Wagner Precision Heat Tool. I kept this card very simple by just stamping the background three times with the beautiful stamp directly on the front of a kraft A2 card base. No extra layers or die cutting.


I also heat embossed the sentiment. I thought about using one of the fab sentiments that comes with the background stamp, but I like to keep my birthday card stash full so I thought it would make a lovely birthday card. I used a sentiment from the Ween Party Crew stamps.


Here's a quick look at this month's Background of the Month membership! I adore this stamp!

Well, that's it for me today! I hope you've been inspired to play with your membership stamps! 
Have an inkredible day!


Thanks so much for stopping by!
See ya next time.

Inky Hugs,
Crystal


{Please note that comment moderation is on. Your lovely comment will appear once approved.}

Tuesday, March 25, 2025

Tawny Owl Paperie Inky Inspiration Sketch 31 ~ Love Stays, No Matter What ~ Unity Stamp Co.

 Hello there crafty friend!
It's time for a brand new sketch challenge! Woohoo! Today I'm sharing my first card for the Tawny Owl Paperie Inky Inspiration Sketch Challenge 31 in the Tawny Owl Paperie Inky Inspiration Facebook group. I inked up the wonderful new stamp from Unity's In the Light collection called Love Stays, No Matter What. 10% of sales from the In the Light line of stamps will be donated to various mental health and addiction movements, as well as families facing these battles.


Something about this girl just spoke to me. I needed to have her in my collection. I think she'll be great for encouragement cards. I stamped the girl and sentiment with Amalgam Black ink on Stampers Select White card stock and colored her up with Copic Markers.

Here's a list of the Copic Markers I used:
Skin: E000, E00, E21
Hair: E43, E44
Shirt: YG21, YG03
Jeans: B91, B95, B97


Here's a look at the fun sketch for Tawny Owl Paperie Inky Inspiration Sketch Challenge 31. The sketch, as always, is meant to inspire not require. So let the sketch lead in your design, but don't feel limited by it. I'm just realizing that this one is just slightly different from the one last month... LOL! Oh well. I think it's still fun!


I paired up this girl with the Rainbow Wishes {paper pack}. I thought the colors were nice with this image and the patterns are cheerful. 


I think this will be a really fun sketch to play with for the next four weeks! Lots of possibilities! I hope you can find time to play along. I can't wait to see what you create. Have an ink-tastic week!

Thanks so much for stopping by!
See ya next time.

Inky Hugs,
Crystal


{Please note that comment moderation is on. Your lovely comment will appear once approved.}

Monday, March 24, 2025

Inky Paws Challenge 238 ~ Showers & Flowers Theme Challenge {Week 4}

Hello there crafty friend!
 There's just a few more days to play along with the Inky Paws Challenge #238 - Showers & Flowers Theme Challenge! You have until this coming Friday, March 28th to get your entries in for the challenge and a chance to win a $20 store credit to Newton's Nook Designs!


This has been such a fun challenge! I hope you have a chance to play along with us if you haven't already! There's just a few days left to play!


I adore the sweet doxie from the Rainy Day Doxie Stamp Set so I just had to ink him up again. I stamped him with Memento Tuxedo Black ink and colored him up with Copic markers. I then die cut the image using the coordinating Rainy Day Doxie Die Set.

Here's a quick list of the Copic markers I used:
Doxie: E21, E13, E17, N2, N4, N6
Jacket: Y11, Y15, B0000, B00
Umbrella: V000, V01, V12, C00, C2, C3


I paired up the sweet pup with the Spring Blooms 6x6 Paper Pad. Daisies are my favorite flowers! So I thought it would be fun to use a couple daisy papers from the paper pad to create my card.


I die cut the background paper using the largest die from the Frames & Flags Die Set. I then die cut the daisy scene paper using a square die from the Frames Squared Die Set. I had originally chosen the yellow pattern paper with daisies for my strip across the card, but I think it was too much daisies. If that's even possible! LOL! So I changed it out with the gingham yellow papers which just happened to be a scrap in my paper pad. I added some dimension to the card by popping up the square focal image with the sentiment adhered to the bottom corner AND popping up the pup, all with foam tape.


Now it's your turn to get your paws inky with your Newton's Nook Designs products and create a project using the fun sketch. Be sure to link up to the Inky Paws Challenge! Can't wait to see your projects!


Thanks so much for stopping by!
See ya next time.

Inky Hugs,
Crystal


{Please note that comment moderation is on. Your lovely comment will appear once approved.}

Sunday, March 23, 2025

Mother's Day Card ~ Ink & Bloom: Camellia ~ Unity Stamp Co.

Hello there crafty friend! 
Today I'm sharing a simple Mother's Day card featuring the gorgeous camellia stamp from the Ink & Bloom: Camellia stamps just released at Unity. Such a gorgeous flower!


 I stamped the gorgeous flowers and sentiment with Amalgam Black ink on white card stock and colored them with Copic markers.

Here's a quick list of the Copic markers I used:
Petals: B0000, B91, B23, B66
Stems / Leaves: G000, G24, G07


I die cut the flowers using the largest die from the Deckle & Stitches Nesting Die Set. This is such a huge stamp I actually cut off a bit of the bottom.


I kept it very simple and just adhered the panel to a black A2 top fold card base that I turned on the side for a landscape card. I adore that sentiment! 


Thanks so much for stopping by!
See ya next time.

Inky hugs,
Crystal

{Please note that comment moderation is on. Your lovely comment will appear shortly.}

Saturday, March 22, 2025

Big Birthday Wishes ~ Lil' Jumbo ~ Unity Stamp Co.

Hello there crafty friend! 
I'm so excited to share another card for Unity's latest release. The sweet elephant from the Lil' Jumbo stamps is jut TOO CUTE!! I had to color her up!


I stamped Lil' Jumbo with Black Amalgam ink and colored her up with just a few Copic markers.

Here's a quick list of the ones I used:
Elephant: N0, N2, N4, N6, V000, R00, R20
Balloon: BG10, BG01
Ground: C00, C2


Inspiration for my card comes from the the fun sketch challenge going on NOW in the Unity Show & Tell Facebook group! There's still time to play along with us! AND there's TWO $25 gift certificates being offered as the prize for this challenge! Challenge ends on Monday, March 31st. I hope you'll join us!


I die cut Lil' Jumbo using a die from the Scallops & Circles {nesting dies}. And I paired her up with the Oh Hey! It's Your Day! {paper pack}.

You can check out my process video here... Big Birthday Wishes | Lil' Jumbo | Unity Stamp Co.


I adhered the sentiment to the focal image and then popped them both up with foam tape finishing off this sweet card.


Thanks so much for stopping by!
See ya next time.

Inky hugs,
Crystal

{Please note that comment moderation is on. Your lovely comment will appear shortly.}

Wednesday, March 19, 2025

Membership Wednesday ~ March 2025 KOM Chapters & Crossings ~ Unity Stamp Co.

Hello there crafty friend!
Happy Membership Wednesday! Today I'm sharing another sweet card featuring another fab stamp from the March 2025 Kit of the Month membership from Unity called Chapters & Crossings. 


Any other avid readers out there?! I love to read! I also read with the kids as part of our homeschool day and I just love it. I stamped the reading girl with Black Amalgam ink and colored her up with some Copic markers that coordinated with the papers I chose ahead of time.

Here's a quick list of the Copic markers I used:
Skin: E000, E00, E51, R00, R20
Hair: Y21, E43, E44
Flowers: Y11, Y15, R11, R22, R27, RV10, RV02, B91, YG11, YG03
Nail Polish: R22, R27
Clothes: C00, C2, BG10, BG01
Book: C00, C2, Y21, Y26
Ground: B0000, B91, B95


Just like with the mouse I shared last week, I paired up the girl with some old papers in my stash that just seemed perfect! Coincidentally enough, they are called Practically Perfect by Carta Bella. I trimmed the papers and adhered them to a white A2 top fold card base. They measure 4-1/8 x 5-3/8".


I die cut the girl and the sentiment using dies from the Scallops & Banners {nesting dies}. I adhered them directly to the card and trimmed off the top. I wrapped the front of the card using a couple pieces of natural May Arts Burlap string and tied a bow. And then I finished off the card with a few blue enamel dots from the stash.


Here's a quick look at this month's Kit of the Month membership! Love it!

Well, that's it for me today! I hope you've been inspired to play with your membership stamps! Have an inkredible day!


Thanks so much for stopping by!
See ya next time.

Inky Hugs,
Crystal


{Please note that comment moderation is on. Your lovely comment will appear once approved.}

Tuesday, March 18, 2025

Tawny Owl Paperie Inky Inspiration Sketch 30 ~ Douglas ~ Unity Stamp Co.

 Hello there crafty friend!
Today I'm sharing one last card for the Tawny Owl Paperie Inky Inspiration Sketch Challenge 30 in the Tawny Owl Paperie Inky Inspiration Facebook group. I inked up the super cute Douglas stamp from Unity. This cutie is one of the fun Rescue Tales stamps. Unity is donating 10% of every purchase from the Rescue Tales collection to animal welfare causes throughout the year.


Isn't he just darling?! I stamped the cute pup and sentiment with Amalgam Black ink and colored up the puppy with a few Copic markers: E51, E23, E25, and E27.


Here's a look at the fun sketch for Tawny Owl Paperie Inky Inspiration Sketch Challenge 30. The sketch, as always, is meant to inspire not require. So let the sketch lead in your design, but don't feel limited by it. The challenge ends on Monday, March 24th. 


I paired up cute Douglas with the Oh Hey! It's Your Day! {paper pack}. Loving these new birthday papers!


I die cut a piece of vellum card stock with a circle die from the Scallops & Circles {nesting dies}. I also die cut one of the pattern papers using a slightly smaller die from the same set. I added a few red enamel dots from my stash to finish off the card. I just love how this card turned out! There's just six days left to play along with the sketch challenge! Have an ink-tastic week!

Thanks so much for stopping by!
See ya next time.

Inky Hugs,
Crystal


{Please note that comment moderation is on. Your lovely comment will appear once approved.}

Monday, March 17, 2025

Inky Paws Challenge 238 ~ Showers & Flowers Theme Challenge {Week 3}

Hello there crafty friend!
 Sharing some more inspiration for week 3 of the Inky Paws Challenge #238 - Showers & Flowers Theme Challenge! You have until Friday, March 28th to get your entries in for the challenge and a chance to win a $20 store credit to Newton's Nook Designs!


The weather is definitely shifting into Spring and I just had to color up another flower stamp.


I stamped the gorgeous Cherry Blossom Stamp Set three times on white card stock and colored them up with Copic markers. I die cut each of them using the coordinating Cherry Blossom Die Set.

Here's a quick list of the Copic markers I used:
Petals: RV0000, RV10, RV02, RV14
Stems: E21, E23
Background: BG10, BG01


I had some of the postage cut outs in my stash {the little rectangles} from another project so I colored them up with a couple of Copic markers and then I adhered the cherry blossoms to them trimming off the excess with my scissors. I tried to change up the position of the blossoms so each one is a little different.


And then I had to die cut the frame again from the Postage Stamp Layout Die... so I have six more of those postage cut outs. LOL! Oh well, I'll figure out another use for them. I adhered the frame to a Kraft A2 card base and then I adhered each of the postage cherry blossoms. I stamped, trimmed, and popped up the sentiment using foam tape to finish off this pretty card.


Now it's your turn to get your paws inky with your Newton's Nook Designs products and create a card using this month's fun theme. Be sure to link up to the Inky Paws Challenge! Can't wait to see your projects!


Thanks so much for stopping by!
See ya next time.

Inky Hugs,
Crystal


{Please note that comment moderation is on. Your lovely comment will appear once approved.}

Friday, March 14, 2025

Release Day Blog Hop ~ You Are My Sunshine ~ The Greeting Farm


The March 2025 New Release is now available for purchase in The Greeting Farm Store! This month we introduced 3 new stamp sets. Our first set called REGENCY COUPLE is full of elegance and romance and features a dapper Ian ready to court our beautiful Anya. Next, all the cute TGF animals have gathered outside to bask under the warm sun in our set called YOU ARE MY SUNSHINE. Lastly, we showcased ANYA'S CANDY SHOP which carries a wide assortment of delicious sweet treats.


I just adore this sweet bear from the super cute You Are My Sunshine stamp set and wanted to feature him on a CAS card so I pulled out a pretty embossing folder from my stash. I ran it through my big shot and trimmed it down to 4 x 5-1/4". I adhered it to a white A2 top fold card base. I then found a scrap of white card stock to adhere across the card base.


I die cut a piece of white card stock using a square die from my stash. I stamped the sweet bear and flowers on a scrap of white card stock and colored them up with Copic markers. I fussy cut the bear and the flowers and colored the edges with a black marker. I adhered the bear to the square and popped up the square on the card. I stamped, trimmed and popped up the sentiment on the card with foam tape.

Here's a quick list of the Copic markers I used:
Flower Crown: Y11, Y15, R11, R22, V000, V12, V15, B000, B00, YG11, YG03, YG63
Bear: E51, E33, E35, N2, N4, N6
Flowers: Y11, YR15, R00, R11, R22


To celebrate this release we are having a short BLOG HOP! One lucky fan will take home the entire release! You have until March 18th, 12pm CST/1pm EST to leave your comments on each Designer's Blog. Then head back to The Greeting Farm Blog to let us know you completed the hop. **Remember to qualify for the prize you MUST leave a comment on each Designer's Blog AND The Greeting Farm Blog letting us know you completed the hop.

NOTE: Comments on The Greeting Farm Blog are admin approved so it may take a day for your comment to be visible. Please only comment once, and use the same name on all the blogs when leaving a comment. Do not pick the Anonymous option (otherwise we won't be able to verify that it's you). We will announce the random winner later in the week on the Blog and in our Facebook Group: The Greeting Farm Fan Page.

TGF Design Team:

This is a short hop, and definitely worth playing along! If you want to grab your favorites now, you can purchase the new stamps HERE. We will have more cards featuring the New Release from our Design Team Leaders starting on the 19th so be sure to stop by The Greeting Farm Blog to see more inspiration.

Happy Hopping!


Thanks so much for stopping by!
See ya next time.

Inky Hugs,
Crystal


{Please note that comment moderation is on. Your lovely comment will appear once approved.}

{BYSHC} Sketch Challenge 55 ~ Winter Cardinals Set 2 ~ Pink & Main

Hello there crafty friend!
I'm back with a little inspiration for the {BYSHC} Sketch Challenge 55 hosted in the Build Your Stash Holiday Cardmakers Facebook group! Today I'm sharing another sweet holiday card featuring an adorable stamp from our lovely Sponsor, Pink & Main!


This time I've inked up the cutest little cardinal from the Winter Cardinals Set 2. I absolutely adore cardinals and was tickled to see that there are two full sets of these adorable birds! Of course, I needed them both! I stamped the cute bird using Memento Tuxedo Black ink and colored it up with Copic markers. I die cut the cardinal using the coordinating Winter Cardinals Set 2 Dies.

Here's a quick list of the Copic markers I used:
Red: R20, R14, R27
White: C00, C2
Beak / Feet: YR15
Scarf: YG11, G24, G46
Lantern: N0, N2, N4
Candle: Y11, Y15, Y17


I paired up this cutie with the same papers I used last time... the Santa Claus Lane 6x6 Paper Pad from Echo Park Paper Co. Only this time I die cut my background layer using the Cloudy Frames Dies. Unfortunately, it looks like those dies are retired. I went back and forth on my paper choices for that background layer and just decided to keep both pieces together. The light green layer behind the cardinal is also from this paper pad.


I stamped the sentiment also from the Winter Cardinals Set 2. And I was pleasantly surprised to see a coordinating die for the sentiment included in the Winter Cardinals Set 2 Dies. Yay! I adhered all of my layers to a black A2 top fold card base.


Here's a look at {BYSHC} Sketch Challenge 55 for the month of March. If you're interested in seeing a bit more inspiration for this sketch, check out the amazing inspiration from the design team over on the {BYSH} Cardmakers blog! The design team, as always, rocked this sketch!


Thanks so much for stopping by!
See ya next time.

Inky hugs,
Crystal


{Please note that comment moderation is ON. Your lovely comment will appear shortly.}