Tuesday, January 28, 2020

Polka Dot Orchard ~ CAS Card ~ Trust Your Journey

Hello there crafty friends!
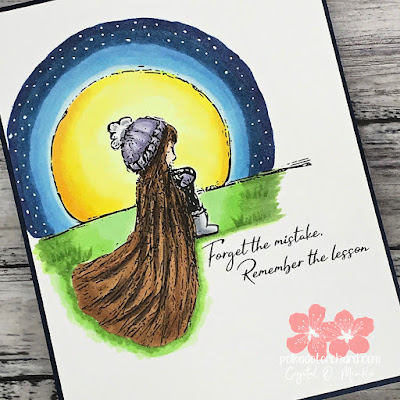
Today, I'm sharing a CAS card using the adorable digi set called Trust Your Journey by Polka Dot Orchard. I just adore this sweet digi set and the sentiments included in this digi set have such deep meaning. I especially love the one I used for my card today... 'Forget the mistake, Remember the lesson.' This is definitely a meaningful sentiment... one that I take to heart.

Now if you're not familiar with CAS cards, the acronym CAS stands for Clean And Simple... so a CAS card is a card that is clean and simple. And CAS cards are my jam! I love them! Sometimes they come together super quick but other times, even though they are clean and simple, they aren't necessarily easy. But I have found while working with digi stamps that digi stamps are perfect for CAS cards. I can easily combine images together in a Word Document and print off a card front. For the card I created to share today, I combined the image of the girl with the moon and combined it with the sentiment... both I kept higher up on the card front. I then printed it off.


I trimmed the card front to 4-1/8 x 5-3/8" and got to coloring! Since I wanted a CAS card, I only did a limited amount of coloring focusing on the direct area of the image and a little bit around it.


I used the following copic markers:
Skin ~ E000, E00
Hair ~ E35, E37, E47
Clothes ~ BV000, BV02, BV11, C00, C1, C3
Moon ~ Y000, Y02, Y06, Y15, Y35
Sky ~ B0000, B12, B21, B37, B39
Grass ~ YG05, YG11, YG17


Once I was done blending and coloring the image, I added a few stars to the darker part of the sky with white gel pen. I adhered the card front to a Night of Navy card base and called this CAS card done! I love how this turned out!


I sure hope that you love it too! If you love this sweet image, you can check it out here ---> Trust Your Journey digi set. If you're curious about digi stamps and want to see some of the other images available by the fabulous artists of Polka Dot Orchard, check out this link ---> Polka Dot Orchard.

Thanks so much for stopping by!
See ya next time.

Inky Hugs,
Crystal

Friday, January 24, 2020

Scrapping for Less ~ January 2020 Flavor of the Month Card Kit ~ It's All About the Boys


We have listened to our customers and have given you an entire kit for masculine themed cards. We all know those are difficult cards to make, so for all the men in our lives here is a whole kit dedicated to those wonderful men we need to make cards for. Head on over to Scrapping for Less to either subscribe or purchase a 1x kit. Make sure you also enter our Rafflecopter as well too! 
~ Teresa, SFL Owner


If you are just starting hopping, we're so glad to have you join us! 
The hop starts on the Scrapping for Less blog or you can start hopping right here.

Here's a quick look at the January 2020 It's All About the Boys card kit...


Isn't that just a fabulous kit for all your masculine card needs!?! I'm so excited for this kit!

Let's get to the cards I created...


Collection One: Gnome What
Eeep! Gnomes!!! So... I am loving the gnome trend going on and these guys are just so much fun! I had a blast coloring them up and then fussy cutting them out. And just a note about that... there's a fabulous Gnome die included in the Banana Split subscription to die cut these sweet gnomes out but I haven't received mine yet so I had to fussy cut them. If you don't like fussy cutting, be sure to get the Banana Split subscription!! Anywho, this fun card measures 4-1/4" squared and I added a 4" squared piece of the patterned paper along with some stitched squares. So fun! I stamped the sentiment with the Spiced Marmalade distress ink included in the Banana Split subscription (colors vary). And then I used my favorite sentiment banner die to cut the sentiment out. I popped up the gnomes along with the sentiment. Love how this card turned out!!

Supplies used (not found in the kit):
Copics: Noses ~ E000, E00, E21; Beards ~ N0, N1, N2, C00, C1, C3; Hats ~ W00, W1, W3, W4, B0000, B000, B60, E95, E99, YG11, YG61, YG63; Shoes ~ E09, E11, E13
Tombow Mono Multi Liquid Glue
Taylored Expressions Stitched Square Stacklets dies
Lawn Fawn Everday Sentiment Banners dies


Collection Two: Buffaloed
I used this awesome collection for my sneak peek card, you can check that out here ---> It's All About the Boys Card Kit sneak peek! I love this collection!! The buffalo check papers and this cool buffalo are amazing! Perfect for masculine cards! I trimmed my layers of card stock for my card and adhered them to a black card base. I then die cut the rectangle piece and adhered it to the card. I stamped the buffalo onto the white card stock flag that is included in the collection and colored him up pretty simply with gray copic markers. I stamped the sentiment and die cut it with the sentiment banners die. I then adhered the flag and sentiment to the card... done!

Supplies used (not found in the kit):
Copics: N0, N2, N4, N7, C00, C1, C3
Memento Tuxedo black ink
Tombow Mono Multi Liquid Glue
My Favorite Things Stitched Rectangle STAX
Lawn Fawn Everday Sentiment Banners dies


Collection Three: Birthday King
I am loving the size of the stamp in this collection! How awesome is that?! I love it! So, I had a bit of fun with this card. I wouldn't normally add glittery fun to a masculine card, but I think since it's a card fit for a King... it works!! I adhered all of my layers of patterned paper together and then adhered them to a white card base. I then stamped the 'Birthday King' sentiment using Blueprint Sketch Distress Oxide ink... I did this in my Stamp Platform so that I would get a nice crisp inked sentiment. Keeping with the royal theme of this card, I used a fun stitched bracket die to die cut the sentiment. I then popped it up on the card with foam tape.

Supplies used (not found in the kit):
Blueprint Sketch Distress Oxide ink
Tombow Mono Multi Liquid Glue
Taylored Expressions Stitched Bracket Stacklets dies


Collection Four: Tool Time
I was pleasantly surprised to see a gatefold card in our sketches for this month! When I saw the papers for the Tool Time collection, I knew I had to use them with the gatefold card sketch! Such a fun masculine card!! The cork stickers included in the collection are amazing too! They were easy to stamp on. I placed the whole sheet in my Stamp Platform and stamped the sentiments and saw a few times with Ranger Archival Jet Black ink. Easy peasy! I layered the cork sticker on a couple of card stock pieces and adhered it to my belt. Now I have a Father's Day card ready to go and it's only January!! Woohoo!!

Supplies used (not found in the kit):
Ranger Archival Jet Black ink
Tombow Mono Multi Liquid Glue


I sure hope you've enjoyed my cards today!
Your next stop on the hop is... Kim

Be sure to head back over to the Scrapping for Less blog to enter the Rafflecopter once you've finished hopping!


Thank you friends for checking out my blog post!
See ya next time.

Inky Hugs,
Crystal


Scrapping for Less ~ January 2020 Flavor of the Month Card Kit ~ Sneak Peek!

Hello there crafty friends! 
Today, I'm sharing a sneak peek of the fabulous new January 2020 Flavor of the Month card kit called It's All About the Boys!! This masculine themed card kit is absolutely wonderful and I am so excited to share my sneak peek card with you...


What do you think?! I'm super excited about all the masculine cards that I can make using all the wonderful collections in this card kit! I especially love the buffalo check patterns in the papers with this awesome buffalo! Perfect for masculine birthday cards!!


I enjoyed coloring this buffalo too! I used the following copic markers ~ E23, E29, E49, N0, N2, N4, N7. I kept the design very simple for my card so you could see a sneak peek of the papers and I could feature this wonderful buffalo stamp, as well!


I hope that you've enjoyed my sneak peek card! To ensure you get your hands on this fabulous masculine themed kit you can sign up for a Flavor of the Month subscription here ---> January 2020 It's All About the Boys card kit. Be sure to check back for the reveal of the gorgeous January 2020 It's All About the Boys card kit tonight at midnight Eastern time. The design team is hopping with all kinds of wonderful inspiration... we hope you'll come back to have a look!

Thanks so much for stopping by! 
See ya next time.

Inky Hugs,
Crystal


Friday, January 17, 2020

Scrapping for Less ~ Winter Fairy House ~ Fairy Warm Winter

Hello there crafty friends!
Today I'm sharing a sweet little copic colored scene created using the cute Winter Fairy House stamp set from Scrapping for Less!! I am loving this adorable fairy cottage... it looks so cozy!


I knew that I wanted to create a little snowy scene with the cottage from the Winter Fairy House stamp set and the trees from the Winter Fairies stamp set. They work perfectly together!! I stamped the cottage on a card front of white card stock measuring 4-1/4 x 5-1/2". I then stamped the cottage and trees on another piece of white card stock and colored them with the following copic markers:

Fairy Cottage ~ BV00, BV02, BV08, BV11, R00, R81, R83, Y000, Y11, N0, N1, N2, N4
Trees ~ YG0000, YG11, YG61
Snow ~ C00, C1, C3
Sky ~ B0000, B000, B00, B01


Once all the trees and the cottage were colored, I fussy cut them and cleaned up the edges with a Memento tuxedo black marker. I even cut apart a pair of trees giving me more options in creating my scene. I then set the images aside and grabbed the card front that I had previously stamped the cottage on. I wanted to create a snowy scene but still have a lot of white left on the card... since I was going to basically paper piece the cottage I was able to color over the image on the card front but still have an idea of placement for all of the images. 


I started by drawing a light line of blue with the lightest blue copic marker across the card front to divide the sky and the snow. I then colored the sky by just flicking my markers upwards working from lightest to darkest blue until I was happy with the blend. I then added just a little bit of shadow with a light gray copic marker for all of my snow. I placed the trees in the areas that I planned to adhere them and colored the shadows for those, as well. 


I adhered all of the elements for my scene using a liquid glue and then adhered the entire panel to a dark purple card base... I think this turned out really cute! To finish off the card, I stamped the sentiment on a scrap of white card stock and mat it on black card stock. I adhered it to the card and decided this one was done. I just love how cozy this little scene feels!

Thanks so much for stopping by!
See ya next time.

Inky Hugs,
Crystal


Sunday, January 12, 2020

Polka Dot Orchard ~ Anything Goes Card ~ Pocket Card that's a Gift!

Hello there crafty friends!
Today, I'm sharing a cute little gift idea that I made for Christmas gifts using the adorable From Our Gnome to Yours digi set. I made these for Christmas, but I think these could be used any time of the year and for all occasions! 


I did customize the measurements to fit the Starbucks hot cocoa packets that I was including in the pockets. I started with a 8-3/8 x 6-1/8" piece of kraft card stock. I scored it at 1/4", 4-1/4",  and 4-3/8". I creased the scored lines well with my bone folder and then adhered the 1/4" flap to the inside of the pocket using tear tape. With the pocket ready to go, now it was time for the fun part... adding pretty papers and the adorable gnome from the From Our Gnome to Yours digi set.


I cut the patterned paper from Lawn Fawn's Snow Day Remix papers to 3-3/4 x 6" and then used a pencil to lightly mark off my cut points for the diagonal cut on the top portion. Once I had all of those cut, I used those cut off diagonal pieces to add another layer of paper to the pocket. 


I mix matched a bunch of the papers and for this particular pocket, I adhered the bunny paper on the top portion where the gnome would be adhered. On my other pocket cards (sadly, I forgot to take a picture), I adhered the diagonal piece of paper on the bottom portion where the gnome would be adhered. I hope that makes sense.


Now for the cute gnome... I resized and combined the Christmas tree digi with the gnome holding the sign that says "Wishing you a Merry Gnomemas and lots of holiday cheer for a bright year" in a Word document. I was able to fit 9 of these on one full 8-1/2 x 11" sheet of card stock. I printed off a few of these sheets with this little guy on kraft card stock and colored them all with the same prismacolor pencils. I trimmed each of them down and mat them on a piece of white card stock that I had die cut with a small stitched square die.


I adhered the mat gnome panels to the front of the pocket cards with tear tape. I did leave the top of the gnome panel open on some so I could slide in a gift card. It really turned into quite a fun gift idea and even though I assembled over 20 of these, I had so much fun and can't wait to make more!


To finish these off, I added the hot cocoa packets and candy canes... I even added some twine to some of the ones that I sent to family and friends (sadly, I didn't get a picture before sending those off). I sure hope that the family and friends that received them really enjoyed them!

Thanks so much for stopping by!
See ya next time.

Inky Hugs,
Crystal
Friday, January 10, 2020

Scrapping for Less ~ Winter Fairies ~ Bright Fairy Wishes

Hello there crafty friends!
 Today I'm sharing a sweet card using the adorable Winter Fairies stamp set by Scrapping for Less. I couldn't wait to ink up this adorable fairy napping on the moon... doesn't she just look so happy?! Love it!


I started by stamping the cute fairy on the moon with Memento tuxedo black ink and then I colored the image in with the following copic markers:

Skin ~ E000, E00, E21, R00, R20
Hair ~ E35, E37
Clothes ~ RV0000, RV10, RV11, C00, C1
Moon/Cloud ~ Y000, Y11, Y13, Y18, B000

Once the cute fairy and moon were colored, I fussy cut them... and even used my craft knife to cut the tiny space between the fairy's hat and the moon. I just realized that I missed the space between her hat and her wing... oops! Anywho, I set that aside and got to work on the background.


I blended a tiny bit of Squeezed Lemonade Distress Oxide ink in the center left portion of the panel and blended some Tumbled Glass, Blueprint Sketch, and Chipped Sapphire Distress Oxide inks around that center portion working my way outwards to the edge. I blended over these a few times to get just the right blend. I then dried my background with a heat tool and splattered some white acrylic paint onto the background for my stars.


I set the background aside to dry and die cut the stitched scallop frame from Gina Marie Designs and the stitched clouds from Lawn Fawn, both from white card stock. I then adhered the clouds to the back of the frame piece and trimmed the edges. I trimmed down the blended background to 4-1/8 x 5-3/8" and then popped up the frame/cloud piece on the blended background.


I then adhered the entire panel onto a white card base. I love how this sweet card turned out!
I sure hope that you like it too!

Thanks so much for stopping by!
See ya next time.

Inky Hugs,
Crystal


Saturday, January 4, 2020

~ Friends of Unity January 2020 Blog Hop ~

Hello there crafty friends!!
It's my favorite time of the month... time for the Friends of Unity Blog Hop!!


This month we are creating with our Favorite Unity Stamp of 2019!! I was so excited to have this as our cue, but it was very hard to narrow down the choices... there's really so many that I consider to be my favorites from the last year.


Now, coffee stamps are my jam... I love them!! AND the border backgrounds stamps are one of my most favorite stamp lines that Unity offers. So naturally I had to use my most favorite border backgrounds stamp called Hot Mess {border backgrounds}, but I wanted to use a metallic embossing powder. I chose the fun Penny Ultra Fine Embossing Powder from Brutus Monroe... love this stuff!!!


And then using the backside of a piece of Tim Holtz Distress Watercolor paper, I smooshed some watered down Peacock Feathers, Vintage Photo, and Ground Espresso Distress Oxide inks. I dried the paper in between layers... I really love the dimension the different layers of colors gives to the panel. I dried the panel with my Ranger heat tool to ensure that it was completely dry before adhering it to a piece of Really Rust card stock that I cut just slightly larger than the panel. I then mat it with a 4-1/4 x 5-1/2" piece of Taken with Teal card stock and then adhered the entire panel to a white card base.


Another favorite stamp set from 2019 is the A Little Warmth kit... this kit has a beautiful Angie Girl along with a bunch of sentiments. I originally wanted to use the girl from the kit, but I decided not to cover up the background. So, I went with one of the sentiments from the kit instead. I stamped it on a scrap piece of Really Rust card stock with VersaMark watermark ink and heat embossed it with the same Penny metallic embossing powder that I used on the background. I trimmed the sentiment and cut it to fit within the Really Rust card stock layer on the card. I just love how this turned out!


While I was working on the background for my first card, I happened to notice the fabulous colors resembled a rusty kind of color and thought that they would be fantastic with one of my new favorite truck stamps in the kit by Tierra Jackson called Ol' Fashion Holiday Love. So for this card I've decided to use some of my new favorite kits that I haven't had a chance to ink up yet... lol! I have just been itching to get these kits inked up... so glad I finally did!


I considered paper piecing the truck to make it look slightly more realistic but I just couldn't cut into it. I really love how it turned out. I made a very similar background to the last one using the same distress oxides only this time I used the textured side of the distress watercolor paper. I love the texture it gives this truck!! A total happy accident because my plan was to copy the other background as much as possible! I fussy cut the truck and added some glossy accents and then set it aside to dry. The background was easy peasy and I absolutely love how it turned out! I stamped the gorgeous Alpine Wonderland stamp onto a card front of kraft card stock measuring 4-1/4 x 5-1/2" with VersaMark watermark ink and then heat embossed Alabaster embossing powder by Brutus Monroe that is available at Unity! I love Brutus Monroe embossing powders!! So glad that Unity carries them in their shop! Once the background was heat set, I decided to add a bit of color to the background... the clean kraft just wasn't quite right. I added a bit of Pine Needles distress ink to the ground and the trees, and Stormy Sky distress ink to the sky. I wiped off the white embossed background with a paper towel to get the colored inks off. It buffed the embossed background a bit too much so I reheated the background to get the pretty glossy shine back. 


You can see some of the discoloration in the white embossed background in this picture, but in person it's really not as visible. I trimmed the background and distressed the edges. I adhered it to a 4-1/8 x 5-3/8" piece of Lost Lagoon card stock and then adhered it to a white card base that I trimmed just tiny bit to fit the slightly smaller card front.


To finish off the card, I stamped the fun sentiment from the November 2019 KOM called Wonder. It took me a bit of searching to find just the right sentiment, but I think this one really works with the design of my card. That's it for me this month! I can't wait to see what my friends have made to share with us this month!! 

Before we get to the hop list, I'm having another giveaway this month... I have a fabulous brand new Say It Big May 2019 Sentiment Kit to share with one lucky winner!! I'll announce the winner during next month's hop. A few of my friends are also having giveaways so be sure to check out all the fabulous creations along the hop and comment on each blog for a chance to win!! 

Thank you all so much for your continued support of our little hop... and for all of your lovely comments! I really, truly do appreciate each and every one of your sweet comments. 


Let's get to the hopping...

Crystal <--- you're here

up next ---> Kim


Thanks so much for checking out my blog post!
See ya next time.

Inky Hugs,
Crystal


Friday, January 3, 2020

Scrapping for Less ~ Winter Fairies ~ Bright Winter Wishes!

Hello there crafty friends!
Today, I have a beautiful card using the newly released Winter Fairies stamp set for a card that could be used for the Holidays or just a winter themed card to brighten someone's day! 


This is a two step stamping process... I stamped the light string three times on a white card front measuring 4-1/4 x 5-1/2" using Memento tuxedo black ink. I then lined up the little light bulb and stamped it using different colors.


I then colored in each of the little light sockets and bulbs... which actually didn't take very long. The lights are so cute and quick to color in. I used the following copic markers:

Light Sockets ~ N0, N2, N5, N7, N9
Light Bulbs ~ R000, R14, R29, Y000, Y13, Y35, B0000, B00, B02, B04, G0000, G000, G46, YG11, YG63


I gave each of the little light bulbs a bit of a glow by coloring around the light bulb with the lightest color. The green was a little dark so I ended up going around the outer edge of the glow with the Colorless Blender... lightened it right up! I placed my card front in my Travel Stamp Platform and lined up the sentiment. Sadly, I didn't notice a bit of ink that I had neglected to clean off of my platform so I ended up with a couple of smudges near both ends of my crisp clean white card front *insert palm to head emoji*... I tried to fix it with my handy dandy Tombow Mono Sand Eraser, but it wouldn't work. I opted to trim off the ends. 


So... I decided to pop up the panel onto a white card base and I'm actually really happy with the end result! I hope you like it too! Be sure to check out the new release... there's only a limited number available!!

Thanks so much for stopping by!
See ya next time.

Inky Hugs,
Crystal


Wednesday, January 1, 2020

Scrapping for Less ~ Sketch Challenge #3 ~ SFL New Release Winter Fairies

Hello there crafty friends! 
Happy New Year!! Today, I'm so excited to share the January challenge over at Scrapping for Less: Show & Share!! This month's challenge is a sketch challenge, but it's also a special day because Scrapping for Less is having their very first release this month (outside of the card kits) and I was honored to once again collaborate with Teresa on the illustrations!! I am so excited to finally be able to share this little secret! And even more excited to share a card using one of the stamp sets along with the gorgeous papers being released!

Before we get to the card... the key to playing along with the challenge is being a member of the Scrapping for Less: Show & Share Facebook group so if you aren't already a member ---> join here!! Also, please note that you don't need a blog to enter the challenge as you're adding a photo of your creation directly in the Challenge album in the group. You are welcome to include a link to your blog in the description of your creation.

Let's check out Sketch Challenge #3...


A fun little sketch to get you inspired! Now, let's check out the card I created using this fun sketch along with the new Winter Fairies stamp set and the Winter in Pink papers...


Eeeep! Isn't she the cutest?! I love fairy stamps and this one has a wonderful winter feel that can be used for the Holidays or just for some sweet wintry cards! I stamped the sweet fairy with Memento tuxedo black ink and colored her in with the following copic markers:

Skin ~ E000, E00, E21
Hair ~ E23, E37, E47
Eyes ~ B000, B00, B02
Wand - Y000, Y13, Y35
Clothes ~ N0, N1, RV0000, RV10, RV11, YG000, YG11, YG61

Once I was all done coloring, I fussy cut the fairy and cleaned up the edges with a Memento tuxedo black marker. I set her aside and stamped the sentiment... A Warm Fairy Hello... and trimmed down the paper and mat it with a scrap of the patterned paper. I cut my patterned papers and used a corner rounder punch on the snowflake paper. I adhered the papers together and then adhered them to a white card base using a liquid glue.


 I then die cut an oval out of white card stock, trimmed the one edge and then lightly blended a few pink clouds using the Mini Cloud Edges stencil by My Favorite Things along with the Spun Sugar distress ink. I left a white edge around the oval by masking the outer edge with a large post it note. I love the softness it gives the clouds behind the fairy. I then adhered the oval to the card and popped up the fairy using foam squares. I adhered the sentiment to the card and to finish it off, I added a few pretty pearls from my stash... even adding a couple to the fairy's hat. 


Here's one more look at the card... I just love how this turned out! I hope that you do too!

This challenge will run from today, January 1st and will end January 31st at 11:59pm EST.  The winner will be announced on Saturday, February 1st in the challenge album!! Please use #sflsketchchallenge3 in any social media posts when playing along with the challenge.

Lots of time to play along!! And remember if you use SFL products in your challenge entry it qualifies for two entries for a chance to win a prize!! I can't wait to see what you create!


Thanks so much for stopping by!
See ya next time.

Inky Hugs,
Crystal