Sunday, February 19, 2017

CYCI147 - Poppies Make me Happy!!

Hello! I'm so glad that you've stopped by my blog! Today, I have for you a new challenge with CYCI... another fabulous color challenge ~ Pink, Red, Black, and Silver!


I have to be completely honest with you, as much as I love these colors... I was stumped on what to do. I didn't want to make another Valentine's card which had been my original thought. I did, however, really want to do something simple maybe with a bit of a wow factor. I just recently got these gorgeous poppies from Unity Stamp Company! Aren't they just stunning! I love them! 
To keep the design simple, I decided only to layer the one smaller poppy. The rest is stamped and splattered directly on the white card base.  First, I stamped the pink poppy on a scrap of white card stock using the pink ZIG Clean Color Real Brush marker. I did go back over it a bit with one of my water pens to smooth some of the color out. Now for the red poppy, I did the same - I colored the stamp directly with the red ZIG marker, but then I spritzed the stamp with a bit of water and then stamped it directly on the card base. I also went over this image a bit with the water pen just to even out some of the color. I love the effect that the water gave to the red poppy!! I then stamped the outline poppy images with Memento tuxedo black ink. Part of the fun with these stamps is that they are stunning even if you don't get the lines matched perfectly with the image. My next step was to mask the red poppy and splatter the card base with some Silver silks! I love my silks!! I went a little crazy with it and some splotches got a little too wet and leaked through the post it note which you can see in the close up picture below... 


In this close up picture you can see the shine from the silks and the added shimmer to the middle of the poppies that I added using a black Wink of Stella pen. My last step for this card was stamping and embossing the sentiment. I had recently won a prize package from Unity and this sentiment was in my prize package so I'm not sure what kit it comes from, but it was perfect for this card. I stamped it in black craft ink and heat embossed it. At this point I was done and walked away... but I couldn't take a photo until the next morning since my studio was so dark. The next morning when I came in to take the photos, I decided that the card needed a bit more silver... so I added the bit of ribbon to the top. After about five minutes of trying to tie a decent bow, I decided to just make a pretty knot and call it done! Haha! Just keeping it real! 


 canyoucaseit.com


I can't wait to see what you create with these colors!! Be sure that you've joined our new Facebook group so that you can enter the challenge... Can You Case It? Challenge Group. Be sure to go check out all the other lovelies created by the CYCI design team!


Here are the products I used for this card:
Stamps: Donna Poppies (Unity)
Card Stock: white (PTI)
Inks: Memento Tuxedo Black (SU!), black craft (retired SU!)
Adhesives: Stampin' Dimensionals (SU!)
Tools: Heat Tool (SU!)
Miscellaneous: Silver silks (FSJ), ZIG Clean Color Real Brush markers (Amazon), 
black detailed embossing powder (retired SU!), Silver 1/8" ribbon (SU!)


Thanks for stopping by!

See ya next time.
~ Crystal


Monday, February 13, 2017

Super Mom!

So, the CASology cue card: Hero made me think of my Mom! My Mom is my hero!! I love her dearly! I had to pull out one of my favorite super hero stamps from Unity... Laney Girl!


I love this stamp!  I used a bunch of Copic markers to color this image. I'll list them below. I missed the cutoff for submitting this beauty, but that's okay. I'm going to send it to my hero! :)


Here are the products I used for this card:
Stamps: Laney Girl (Unity)
Card Stock: white (PTI)
Inks: Memento Tuxedo Black (SU!)
Copics: E0000, E000, E00, E02, E51, E55, E57, N1,N2, N3, BG000, BG01, BG02, RV0000, RV13, RV14, RV21, RV23, Y00, Y02, Y11, Y13


Thanks for stopping by!

See ya next time.
~ Crystal

Friday, February 10, 2017

Happy Valentine's Day... a little early!

I just finished making this beauty... I'm really loving the way this card turned out! Here's the kicker, I made it to sell to my hubby to give to me for Valentine's Day! Lol!


The details are pretty simple. I stamped and embossed the image and the sentiment both in black. I colored the image with ZIG clean color real brush markers. I cut out the panel using a stitched rectangle die. I also cut out the scalloped stitched nested rectangle piece. I adhered the watercolor piece to the scalloped piece. I popped the entire thing on a white card base using stampin' dimensionals. I added a few dew drops and called it done! 

Here are the products I used for this card:
Stamps: Valentina Girl, Kitty Love (Unity)
Card Stock: white (PTI), Sweet Sugarplum (SU!), watercolor paper (SSS)
Inks: black craft ink (retired SU!)
Miscellaneous: Robin's Nest Orchid Dew Drops


Thanks for stopping by!

See ya next time.
~ Crystal

Thank so much for stopping by!

Sunday, February 5, 2017

My Youth... in a Nutshell!

I just adore this little girl reading in a big comfy chair.


 This is me when I was a kid. My favorite color was yellow and the pattern I chose for the chair could very well have been my parents or grandparents furniture! Since this pretty much sums up my youth... I'm going to make this my second entry for the CASology challenge.

 casology


Here are the products I used for this card:
Stamps: Our Story (MFT)
Card Stock: white (PTI), Perhaps (BG)
Inks: Memento Tuxedo Black (SU!)
Copics: Skin - E000, 00, 21; Hair - E47, 55, 57; Book - E34, 37, 39; Clothes - Y15, 17, 35, 38

Go check out the challenge over at CASology... there's still some time to play along!!
Thanks for stopping by!

See ya next time.
~ Crystal


CYCI146 - A Wonderful Birthday!

I can't believe that it's already time for another CYCI challenge, can you?! Time is just flying by... 
We have another color challenge for you this go around... Curry Yellow, Teal, Orange, and Burgundy! Isn't that a gorgeous group of colors! I love it! I think Amber nailed it with this combo.


It took a couple tries to get this background the way I liked. I used Ken Oliver's Color Burst - Yellow Ochre, Turquoise, Orange, and Merlot. These are very rich colors and for this card I wanted a softer more feminine feel, so I dabbed the watercolor paper with paper towel to get just the right shade. 
I pulled out my neglected January 2017 Kit of the Month from Unity and stamped this sweet sneaker stamp in Memento Tuxedo black ink using the Stamp Perfect tool so I got a nice clear stamped image. That can be difficult to achieve with the texture of watercolor paper so using the tool really helped.

 I'm loving Lawn Fawn's Stitched Hillside border dies... if you hadn't noticed... I think I've only used them twice to make an actual hill. I cut the top of the watercolor paper with the hillside die and also cut a scrap of True Black card stock with the same die, layered them and then ran them through the big shot again with Taylored Expressions' Stitched Rectangle Stacklets. I die cut a piece of white card stock with the same rectangle die and layered the watercolor piece on top. I stamped this sweet birthday sentiment from Unity's Butterflies and Sunbeams kit also in Memento Tuxedo black ink. I adhered the whole panel to the white card base and added a few charcoal sequins... Voila!


 canyoucaseit.com


Here's a look at the color challenge. Be sure to click on it and you'll see all the wonderful creations from the CYCI Design Team! I sure hope you'll play along.


Here are the products I used for this card:
Card Stock: white, true black (PTI), watercolor paper (SSS)
Inks: Memento Tuxedo Black (SU!)
Adhesives: Tombow Mono Multi (SSS)
Color Burst: Orange, Turquoise, Yellow Ochre, Merlot (Blitsy)


Thanks for stopping by!

See ya next time.
~ Crystal


Savvy 7 ~ February Blog Hop ~ All You Need Is Love!!

I am LOVing the theme for this month's Savvy 7 blog hop ~ All You Need Is Love! Isn't it perfect for this time of year! 


I don't know about you, but I've been working on my Valentine's Day cards... I have a couple of them to show you today. 


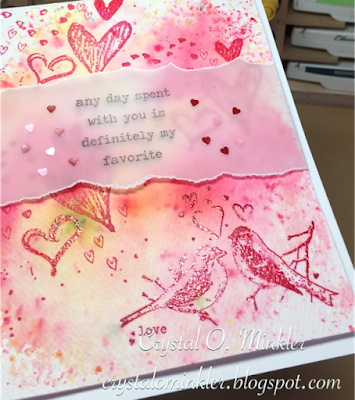
My first card is this one I made on a whim. I had the background that I had created a while ago sitting on my desk. I used Ken Oliver's Color Burst to create the background. Love it! I received my most recent Unity order and these sweet birds were in the kit, Going to Be Okay. Once I saw them and glimpsed the background paper sitting on my desk the ideas just starting whirling around in the old brain. The kit also includes the hearts and the sentiment.


Here's a close up of the card that shows the clear embossed shimmer. I created this by going over the stamped image with my VersaMarker and adding clear embossing powder to the birds and a few of the hearts.
I finished off the card by stamping the sentiment on vellum cardstock that I adhered to the back of the card. I then popped up the whole panel on the card base using stampin' dimensionals. I wanted to add a little bit of something on either side of the sentiment and went with some glitter hearts from Stampin' Up! that I've had in my stash forever!


Since I was on a roll, I decided to make another card. This one I started off by clear embossing the sentiment from Unity's Your My Happy {Layers of Life} kit on white card stock and then used Worn Lipstick, Festive Berries, and Tea Dye distress inks to create the background. I spritzed and splattered the background with water and dabbed it with paper towel to get that splotchy look. I die cut the edge using Lawn Fawn's Stitched Hillside Borders. I then die cut the stitched heart out using Lawn Fawn's Stitched Heart Stackables. I die cut the other heart on the other half of the distressed panel that I had cut off with the border die using Lawn Fawn's Heart Stackables. I layered the hearts and popped them up... BAM! Now for the other side of the card, I inked up the Take the Moment stamp with the VersaMarker {avoiding the snow} and heat embossed some black detail embossing powder. I colored in the little birdies with distress inks and a blender pen. I then masked the image and used Tumbled Glass distress ink to make a sky background. I layered the whole piece on another piece of white card stock and adhered it to a white card base that I had distressed the edges with Tea Dye distress ink. I popped up the heart piece using stamping dimensionals. I really love the way this one turned out! Hope you do too!


Here are the products I used for these cards:
Card Stock: white (PTI), watercolor paper (SSS), vellum (SU!)
Inks: Real RedVersaMark (SU!)
Ken Oliver's Color Burst: Chartreuse, Fuchsia
Miscellaneous: VersaMarker pen, Black Detail EP (retired SU!), Hero Arts Ultra Fine Clear EP (SSS)


Thanks for stopping by!

See ya next time.
~ Crystal


Wednesday, February 1, 2017

Happy Birthday Donuts!!

Have you seen the most recent CASology Cue Card? It's YOUTH!! Oh, the possibilities!! This is one idea that I had... well, my second attempt at this one idea. Hahaha!! 


This is a pretty quick and simple card and it screams YOUTH!! I know, I know... everyone loves donuts! Anywho, the details... I stamped the sentiment and donuts in Memento Tuxedo black ink. I clear embossed the sprinkles and colored in the donuts using Copics (E34, Y16, Y68). I happily discovered that the alcohol markers discolored the embossed sprinkles and when rubbed with a paper towel they became a yellow color which I think worked for these adorable donuts! To finish the donuts off I covered the icing with Journey Glaze. All that was left was adhering the offset piece on a white card base. I decided to add just a strip of True Black card stock.... BAM! I'm loving the way it turned out!


 CASology


Here are the products I used for this card:
Stamps: Birthday Basics (PTI), Donut Worry (LF)
Card Stock: White, True Black (PTI)
Inks: memento tuxedo black (SU!)
Adhesives: tombow mono multi (SU!)
Miscellaneous: Journey Glaze (FSJ)

Go check out the challenge over at CASology... there's still some time to play along!!
Thanks for stopping by!

See ya next time.
~ Crystal