Showing posts with label Simon Says Stamp. Show all posts

Sunday, September 7, 2025

Skate Paw-ty ~ STAMPtember Collab ~ Newton's Nook Designs & Simon Says Stamp

 Hello there crafty friend!
Today I'm so super excited to be sharing a cute card featuring stamps from the adorable STAMPtember collaboration stamp called Skate Paw-ty from Newton's Nook Designs that's available over at Simon Says Stamp!! Oh my gosh... I just can't handle the cuteness in this set!


I made a fun wintry card featuring one of the pups and the kitty from the stamp set. I stamped them with Memento Tuxedo Black ink and colored them with Copic markers. I die cut them both using the Skate Paw-ty coordinating dies.

Here's a quick list of the Copic markers I used:
Kitty: C0, C2, R00, R20
Pup: E000, E00, E11, E23 N0, N2, N4
Blues: B000, B00
Purples: BV000, BV02
White: B000, B00


I used a scrap piece of card stock to mask the top portion of my card base and blended lightly with Tumbled Glass Distress Ink to create the ice for our skaters. And then stamped a bunch of snowflakes on the card. I also stamped three on a scrap piece of paper and die cut them using the coordinating dies.


I adhered the skaters and snowflakes with liquid glue and the I stamped the sentiment with the same Tumbled Glass Distress ink to finish off the card.


 Be sure to head over to Simon Says Stamp to get yours before they are all gone! These exclusive cuties will not be restocked! Once they are gone.. they are gone!!

Thanks so much for stopping by!

Inky hugs,
Crystal

Monday, September 25, 2023

Santa Paws Filled with Joy ~ STAMPtember Collab ~ Newton's Nook Designs & Simon Says Stamp

 Hello there crafty friend!
Today I'm so super excited to be sharing a cute card featuring a couple stamps from the adorable STAMPtember collaboration stamp called Santa Paws from Newton's Nook Designs that's available over at Simon Says Stamp!! Oh my gosh... I just can't handle the cuteness in this set!


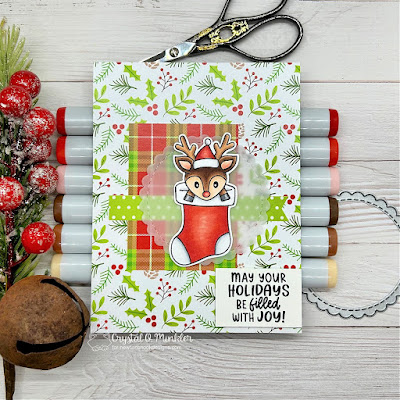
I paired up this sweet reindeer in a stocking with the gorgeous Christmas Time 6x6 Paper Pad from Newton's Nook Designs. The vellum scalloped circle was die cut using a die from the Circle Frames Die Set from Newton's Nook Designs.


Inspiration for my card came from my new Tawny Owl Paperie Inky Inspiration Sketch 15 {will be posted a bit later today in the group}. A pretty simple sketch with almost a CAS vibe. I share monthly sketches in my Tawny Owl Paperie Inky Inspiration Facebook group. Sketches make designing a card so much quicker. I use them all the time and started sharing them monthly last year, I think. I just recently started doing challenges with the sketches and I pick a winner to send a fun prize to each month. I hope you'll join in the fun and play along.


The adorable reindeer from the exclusive Santa Paws Stamp Set was so fun to color up. Here's a quick list of the Copic markers I used to color it up:

Deer: E000, E51, E21, E23, E25, E27, N0, N1, N3, N5
Ears: R00, R20, E000
Nose: R20, R14, R46
Antlers: E21, E23
Hat / Stocking: C00, C1, C3, R20, R14, R46


I stamped the cute reindeer and the sentiment using Memento Tuxedo Black Ink. I trimmed up the sentiment and I popped it up using foam tape. I fussy cut the deer leaving a white border. FYI - this cute stamp set does have a coordinating die set available if you're not one for fussy cutting (it comes as a combo set).


 Be sure to head over to Simon Says Stamp to get yours before they are all gone! These exclusive cuties will not be restocked! Once they are gone.. they are gone!!

Thanks so much for stopping by!
See ya next time.

Inky hugs,
Crystal


{Please note that comment moderation is on. Your lovely comment will appear once approved.}

Tuesday, June 1, 2021

{BYSHC} Sketch Challenge 11 ~ Snow Bunnies ~ Lawn Fawn

 Hello there crafty friend!

It's the first day of June which means it's time for a new sketch challenge over at the Build Your Stash Holiday Cardmakers Facebook group!! I have a sweet card using the adorable Snow Bunnies... a STAMPtember exclusive from Lawn Fawn and Simon Says Stamp!! Another one that I HAD to HAVE and finally inked up! Woohoo!


I paired it up with the adorable Snow Day Remix papers also from Lawn Fawn. This sweet card will be for my daughter who just adores all things BUNNY!! I think she'll love it!


I created a little scene by adding some white stitched hillsides to a circle die cut of the sheet music papers. I stamped all the images with Memento Tuxedo black ink and colored them with Copic markers. I then used the coordinating dies to cut each of them out. I thought it would be fun for the bunnies to use carrots as ornaments on their tree... it just makes sense! I adhered the carrots and tree topper to the larger tree and then adhered both trees directly to the scene. I adhered the one carrot to the bunny's paw and then popped up both bunnies with foam squares. I stamped the sentiment and then popped it up on the card too.


Here's a list of the Copic markers I used to color up these cuties:

Carrots ~ YR15, YR21, YR68, YG11, G14
Trees ~ YG11, G14, E55, E57
Star Topper ~ Y06, Y15, Y28, Y35
Bunnies ~ W00, W2, W3, C00, C2, R00, R14, R20, R46, YG11, G14


Here's a look at the fun {BYSHC} Sketch 11 for the month of June!
I hope you'll join us and play along with the sketch! If you're interested in seeing a bit more inspiration, check out the {BYSH} Cardmakers blog!


Thanks so much for stopping by!
See ya next time.

Inky hugs,
Crystal


{Please note that comment moderation is ON. Your lovely comment will appear shortly.}

Thursday, December 6, 2018

Fall / Winter Coffee Lovers Blog Hop ~ Rubbernecker Stamps ~ Happy Holidays!


Hello! I'm sharing another card for the Fall/Winter 2018 Coffee Lovers Blog Hop... I am having so much fun creating! I've shared a couple other cards for this hop on my Instagram... if you follow me on Instagram you've probably seen them. If you don't follow me there, I invite you to check out my Instagram here ---> link to Crystal's Instagram


During the last Coffee Lovers Blog Hop... the Spring/Summer hop, I bought the sweet owls from Rubbernecker Stamps that was shared so much by others. I just adore these line of stamps by Rubbernecker Stamps! Love them! I knew I had to create at least one card for this hop with one of these cuties. I chose to ink up Garfield... those eyes! I just love this owl! He was so fun to color too! I used the following Copic markers ~ BG70, BG72, BG75, E30, E35, E37, Y11, Y21, YR15, YR27, YR68, Colorless Blender.

Now for the card... I die cut the birch tree die from Simon Says Stamp from a piece of white card stock and then die cut it again with a stitched rectangle die measuring 3-3/4" x 5". I then blended some Vintage Photo distress ink onto a 4-1/8" x 5-3/8" piece of Kraft card stock being sure to keep the middle portion clean so it would appear lighter. Once that was done, I decided I wanted to add a layer of  Lost Lagoon card stock to the mix so I found an oval die (it was actually a stitched die, but the correct size was more important) that was larger than the birch tree die so that the Lost Lagoon layer would not show through my kraft layer. Clear as mud, lol! I hope that made sense. If not just ask for clarification in the comments. :) I adhered the birch tree layer to the Lost Lagoon layer and then popped it up on the Kraft layer using stampin' dimensionals. I then adhered the entire panel onto a white card base. I die cut Mr. Garfield and adhered him to the card.

It was time to figure out a sentiment... I wanted something for the Holidays and something kind of punny. I was thrilled to find the Happy Hoolidays stamp set from A Jillian Vance Design in my stash! (Sadly, it appears this stamp set is no longer available.) This set was perfect! I stamped the sentiment and then trimmed it into a banner and adhered it to the card. And then I got to thinking something was missing... the card needed something. I happened to look at my pile of recent Black Friday purchases and saw the Rina Snowflake die from Simon Says Stamp... perfect! I die cut it four times and adhered two each together and then adhered them to the card being sure to just adhere the centers so I could lift the edges of the snowflake to give them some dimension. I just love how this card turned out! I sure hope you do too!


Here's a close up of Mr. Garfield! Isn't he sweet!

I encourage you to check out the hop, if you haven't already. I always have a great time participating! There's still time to play along! 

Thanks so much for stopping by!
See ya next time.

Inky Hugs!
~ Crystal

Friday, November 2, 2018

Coffee Loving Cardmakers ~ Good Coffee Good Friends


I am beyond excited to be a Guest Designer for Coffee Loving Cardmakers for the month of November! OMG! This is one happy... and overly caffeinated lady!!


The next best thing to a good cup of coffee is a good friend! 
I just had to ink up this sweet set that I got during the STAMPtember event at Simon Says Stamp.  I stamped these fun gals with Memento tuxedo black ink on a 5-1/4 x 4" piece of white card stock. I did a mix of paper piecing and Copic coloring.


For the paper piecing I stamped the images on different pieces of patterned paper from the Echo Park Fall is in the Air 6 x 6 paper pad. I fussy cut the pieces and set them aside. I then colored in the images with the following Copic markers: E0000, E000, E00, E07, E08, E09, E31, E34, E40, E55, E57, E74, W00, W1, W3, C00, C1, C3, C5, R14, R20, R29, B0000, B000, BG000, BG13, BG32, Y28, YR15, YR16, YR27, YR68.


 Once the images and the background were colored in, I adhered the patterned paper pieces and then set it aside. I grabbed another piece of white card stock that I ran through my Big Shot with the Stampin Up Woodland embossing folder. I then ran that through the Big Shot again with an oval die to cut out my 'frame'. I adhered the framed woodland piece to the image and then mat the entire piece on black card stock measuring 5-3/8 x 4-1/8". I then adhered that piece to a kraft card base.


The sentiment for this AI Pumpkin Spice set is rather large so I went searching through my stash to find a smaller sentiment that wouldn't cover up the focal image. I came across the Altenew Latte set and thought this was the perfect sentiment! I stamped it with black ink and die cut it with a banner die. I then trimmed it off on one edge. I thought it needed a little contrast of color so it would pop off the card so I also die cut a black banner. I adhered the pieces together and then adhered them to the card. My final touch was a bow... oh my goodness, this bow took some work! I tied and retied and then tied it again.... but I finally got a bow that I liked. I adhered the bow to the card with some pop dots. I just love how this card turned out... I sure hope you do too!


Thank you friends for checking out my blog post!
See ya next time.

Inky Hugs!
~ Crystal


Wednesday, December 13, 2017

Hot Cocoa ~ To Warm Your Heart!


Hello! This is my 6th card for the Winter Coffee Lovers Blog hop... I'm having so much fun with this hop!  I'm back today with a card for National Cocoa Day! I love me some Hot Cocoa... extra whipped cream, please!


Isn't this sweet little mouse just adorable! I thought he was perfect for today's post. He's from a Simon Says Stamp set called Cocoa & Love. 


 I stamped him using Memento tuxedo black ink and colored him in with copic markers {R000, R14, R20, R27, G14, G17, N0, N1, N3, B00, 0}. I added a touch of texture using a Marvy Snow Marker and then I fussy cut him out and set him aside.


I added a couple simple strips of Knit Picky patterned paper from Lawn Fawn cutting a scalloped edge on one strip. I adhered those to a white card base and then added the merry mouse. I then stamped the sentiment from Jaded Blossom's Hot Cocoa set and added a couple hearts from the Cocoa & Love set. Such a simple card but I love it! I hope you do too! And be sure to enjoy a mug full of delicious hot cocoa heaping with marshmallows... or whipped cream! 

Go check out the Coffee Loving Cardmakers blog to play along!!

I'm also entering this card in the Simon Says Stamp Wednesday Challenge ~ Stitch It!


Thanks for stopping by!

See ya next time.
~ Crystal


Saturday, December 2, 2017

~ Friends of Unity December Blog Hop ~

Hello and welcome to our first Friends of Unity Blog Hop!!


Amber and I were chatting the other day and realized that we had the same idea stirring... let's start a blog hop featuring our favorite stamps from Unity Stamp Company!! Fabulous!!

That conversation quickly turned into a fantastic group of friends - old and new - that are just as excited to hop sharing their love of Unity. Our name was born... Friends of Unity! 

Enough with this silly intro... let's get inky!


I love wreaths! I think I've mentioned that before, but I am really in love with this Cheery Christmas wreath designed by Graciellie Designs for Unity Stamp Co. The detail to this stamp is simply amazing! I really wanted to make this special so I had to go with the No Line Coloring technique. I stamped the image using Simon Says Stamp's Barely Beige ink. I then pulled out my prismacolor pencils and got to coloring. I had a blast blending and layering color... I love these pencils!


Once I had the wreath colored, I went digging through my endless Christmas papers. I found this gorgeous holly and berry paper in a paper pack by The Paper Studio called Pine St. Square. I die cut the paper with a rectangle stitched die and layered it with a scrap of Garden Green card stock from Stampin' Up! I set that aside and pulled out a kraft card base. I blended the edges of the card base with Vintage Photo and Black Soot distress inks. I wrapped some gold thread around the patterned paper several times and then I adhered the patterned paper to the card base. I tied a little bit of gold ribbon round the thread. And then I decided to die cut the wreath using the Mod Square Stax die from My Favorite Things. I blended the edges of this piece with the same distress inks and then I popped up the whole thing on the card base. To finish off my card I wanted a small sentiment so I used the 'Merry Christmas' from the Entwined Poinsettia kit. I stamped it in VersaMark ink and then heat embossed Ultra Fine Antique Gold embossing powder from Simon Says Stamp.

I absolutely love the way this card turned out! I sure hope that you do too!

~ Let's Hop ~

Crystal O. Minkler <--- you're here

up next ---> Wynne Grob

Eileen Mathys

Robyn Jordan

Jeanie Hays

Amber Trubiak

Dawn Fields


Thanks so much for stopping by for our first Friends of Unity blog hop!!

Hope to see you next month for our second hop!
~ Crystal


Tuesday, October 31, 2017

~ 3 Days of Halloween ~ Day 3 ~

Hello! It's my final day for my 3 Days of Halloween series! I know I already shared a card using this beautiful stamp... but I think Unity's Esmerelda Girl is my favorite so I just had to make another card!


For this card, I stamped Esmerelda on a piece of white card stock in Memento Tuxedo black ink and then colored her in with the following Copic markers: Dress/hat - V01, V05, V09; Hair - E02, E07, E08; Skin - E50, E51, E53; Broom - E55, E57; Ground/belts - N01, N02, N05. I die cut the piece using the largest rectangle in the In & Out Diagonal Stitched Rectangle Stax set from My Favorite Things. I then blended some Hickory Smoke and Black Soot distress inks around the edge. I stamped a few background stamps from Stampin' Up!'s Ghoulish Grunge set. I still had the Tim Holtz Cobweb thinlit die on my desk so I decided to cut out another True Black cobweb. I added some glittery goodness to it using a clear Wink of Stella pen. I decided to cut up some of the web so I could fit more of it on the card. I then decide to add some more purple to the card and mat the panel onto a scalloped rectangle of Blackberry Bliss card stock from Stampin' Up! I adhered the entire panel to a card base of Soft Stone card stock from Papertrey Ink. The finishing touch was a quick sentiment from the Simon Says Stamp set If The Hat Fits I used on yesterday's Halloween card. I stamped it in VersaMark ink and then heat embossed a fine white embossing powder. I fussy cut a banner and popped it up on the card using dimensionals. I just love how this card turned out! I sure hope you do, too!

If you missed Day 1 of my ~ 3 Days of Halloween ~ series... you can check it out here and Day 2 can be found... here.

I sure hope that you've enjoyed my ~ 3 Days of Halloween ~ series!!

Thanks for stopping by!

See ya next time.
~ Crystal

Monday, October 30, 2017

~ 3 Days of Halloween ~ Day 2 ~

Hello! Are you ready for another Halloween card?! I am!! I had so much fun making this card...


I started out by looking through my Halloween papers. I found these old Stampin' Up! papers and thought they'd be fun to use. I cut the True Black card base for this card like normal (11-1/2" x 4-1/4"), but I scored it at 3-1/2" and 9". I then cut out the papers using an Edgers die from Papertrey Ink and layered them together. Once I had that done, I realized that the top portion wasn't going to be sturdy enough just using patterned paper so I layered it on an additional piece of True Black card stock. I adhered the entire piece to the top fold of the card and then set it aside.


 I stamped these fun hats from the If the Hat Fits stamp set from Simon Says Stamp onto a piece of white card stock using Memento Tuxedo black ink. I colored them in using Copic markers and then fussy cut them out. I also stamped the sentiment onto some Very Vanilla card stock and then die cut it out using the My Favorite Thing Fishtail Banner Stax dies. I had the negative die cut piece of the black and vanilla paper left so I adhered it to the bottom of the banner. I popped up the banner and the hats on the card using dimensionals.


I don't always stamp the inside of my cards, but when I do... it's fabulous!! Lol!
The sentiment is from the If the Hat Fits set and the web is from the Ghoulish Grunge set by Stampin' Up! That may, or may not be a clue for what's coming tomorrow ~ my third and last day sharing Halloween cards! Hope you enjoyed this card and will be by tomorrow for my final card.

If you missed Day 1 of my ~ 3 Days of Halloween ~ series... you can check it out here.

Be sure to come by tomorrow for Day 3 of my ~ 3 Days of Halloween ~ series!!

Thanks for stopping by!

See ya next time.
~ Crystal

Sunday, October 29, 2017

~ 3 Days of Halloween ~ Day 1 ~

Hello! I've always had a love for Halloween... I love all the fun decorations and the costumes! Even more than all that, I love all the fun Halloween stamps and papers that are released from all the different companies. They get more fun every year! I was starting to get bummed because I really hadn't had time to play with my Halloween stamps and get some Halloween cards made to mail out. So... I decided the housework could wait, and I got inky!! Yay!


I just had to ink up Unity's Esmerelda Girl... I love this stamp and how fun is she to paper piece?! I used some Papertrey Ink papers that I had bought during their big sale. I die cut the layers using a set of Edgers dies from Papertrey Ink. I added a little bit of purple with some washi tapes from my stash. I die cut the Tim Holtz Cobweb thinlit die from True Black card stock and then added some glittery goodness using a clear wink of stella pen. I adhered that to the layers on the card. Now the fun part, I stamped Esmerelda in Memento Tuxedo black ink on white card stock so I could color some of her using Copic markers. I also stamped her on the black and white star paper. I colored the parts of Esmerelda that I wanted and then fussy cut out her dress and hat and adhered those to the image. I then cut out the entire image and adhered her to the card. Now this sentiment is hilarious... I just had to have it when I saw it. It's from Simon Says Stamp, in their If the Hat Fits set. I stamped it and die cut it with My Favorite Things Jumbo Fishtail Banner Stax die. To finish off the card, I added a few drops of black Nuvo drops. Such a fun card to make! Hope you like it!

Be sure to come by tomorrow for Day 2 of my ~ 3 Days of Halloween ~ series!!

Thanks for stopping by!

See ya next time.
~ Crystal


Wednesday, August 9, 2017

~ I Miss You Every Day ~

I was encouraged... or maybe nudged by a couple of fellow inky gals to play along with this fun CAS(E) this Sketch challenge... how could I possibly resist!?!?!


Any excuse to play with some of my favorite Unity stamps works for me!! The background was made with a little masking magic, some oxide inks, and, of course, some water splatter. I stamped the flowers and the sentiment using Memento Tuxedo black ink. I stamped the flower again on a scrap piece of white card stock and then colored it in with some copics. I basically paper pieced the flower onto the card base. I added a little tuft of 'grass' and called it done.


Here are the products I used for this card:
Card Stock: White (PTI)


Go check out the challenge over at CAS(E) this Sketch!!
Thanks so much for stopping by!

See ya next time.

~ Crystal

Thursday, August 3, 2017

~ Hello Friend! ~

I've just been waiting for a chance to ink up this fun bunch of fruit and I think the CASology Cue Card: Juicy was the perfect inspiration! 


I stamped the image using Memento Tuxedo Black ink on a white card base and then colored it in with copics. I added a few highlights with a white gel pen. I stamped the sentiment in VersaMark and heat embossed white embossing powder on a strip of True Black card stock. I cut it into a banner and popped it up on the card. Bam! Love how this one turned out!


Here are the products I used for this card:
Card Stock: WhiteTrue Black (PTI)
Tools: Heat Tool (SU!)


Go check out the challenge over at CASology!!
Thanks so much for stopping by!

See ya next time.

~ Crystal

Thursday, July 27, 2017

CASology 5-Year Anniversary Blog Hop!

First of all, Happy Birthday CASology!! Congratulations on 5 fabulous years!!


To celebrate this fabulous anniversary, CASology has the cue card Balloon. How fun is that!?


I knew as soon as I saw it that I just had to use this adorable owl from a brand new sentiment kit from Unity Stamp Company. I decided to go super CAS with this card and let the sweet owl with balloons get all the love.


I find it so hard sometimes to transition from one medium to the next... do you do that too? 
I've been working with watercolor more lately and it took me awhile to get this little owl colored how I wanted him with the copics. I do like how the card turned out, though.

Here are the products I used for this card:
Card Stock: White (PTI)
BG11 (Oozak)


Go check out the challenge over at CASology... there's still some time to play along!!
Thanks for stopping by!

See ya next time.

~ Crystal


Make It Monday #292 - Color Blocking

Hello again! When I saw this week's Make It Monday challenge, I just knew I had to play along. What a fun technique to use to make a bunch of birthday cards?! And I am always in need of more birthday cards! I just love it!


I started out with the watercoloring version of the technique. I love to watercolor... so this was really fun to make. My colors mixed a bit more than I would like so I actually set this panel aside. I came back to it later and decided to go ahead and finish it up. I layered it on a piece of Winter Wisteria card stock that I die cut with a larger stitched rectangle die. I adhered the panel to a white card base. I had stamped a bunch of the Gran's Garden flowers and leaves in the colors I planned to use for these cards so it was just a matter of picking pieces to go together. I also die cut a bunch of the happy birthday die pieces to make several cards. I like how the white card base makes the happy birthday sentiment pop. 
For the watercolored version I used Winter Wisteria, Simply Chartreuse, and Tropical Teal.


I used the same three colors for this card. All the same fun flowers and leaves from Gran's Garden.


I changed things up for this card and used all pinks... Pale Peony, Berry Sorbet, and Raspberry Fizz.


For this last one, I went out of my comfort zone a bit with the colors. I'm still on the fence with it... not sure that I like it. I used Bright Buttercup, Tropical Teal, and Simply Chartreuse. I used Bright Buttercup and Simply Chartreuse for the larger flower... I kind of like the way it turned out. Maybe I should have used a different green for the leaves. I'm just not sure. 

I did add some clear Wink of Stella to the flowers but that isn't visible in the pictures, unfortunately. I hope that you like the cards I shared today.

Here are the products I used for this card:
Stamps: Gran's Garden (PTI)


 I'd love to hear what you thought of my creations.
Thanks for stopping by!

See ya next time.
~ Crystal