Showing posts with label Distress Oxide Inks. Show all posts

Thursday, November 14, 2024

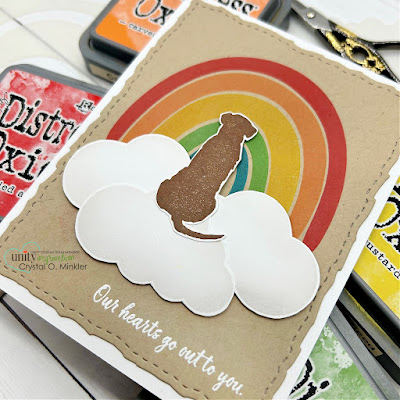
Pet Sympathy Card on Kraft ~ Somewhere Over the Rainbow Bundle ~ Unity Stamp Co.

Hello there crafty friend! 
I'm back with another card featuring goodies from the awesome Brown Thursday Sale over at Unity!!! What's Brown Thursday, you ask? Well, it's Unity's version of Black Friday and it's filled with a HUGE new release and a fabulous sale! Today I'm sharing another pet sympathy card.


Not one bit of coloring for this card! Just some fun ink blending with my oxide inks. I used Candied Apple, Carved Pumpkin, Mustard Seed, Mowed Lawn and Salty Ocean Distress Oxide inks for the rainbow along with the fabulous Somewhere Over the Rainbow Stencil. I absolutely love how the rows of the rainbow alternate on the stencil... so smart for blending over!!


I die cut the rainbow panel with the largest die from the Deckle & Stitches Nesting Dies. I blended a little bit of Lost Shadow Distress Oxide ink around the clouds on the Somewhere Over the Rainbow Stencil. I fussy cut them leaving a little bit of a white border around the edges. I stamped the cute pup silhouette from the Somewhere Over the Rainbow stamps with Vintage Photo Distress Oxide ink and fussy cut him as well. The clouds and pup are adhered together and then popped up with foam tape.

You can check out my process video for this card here... Pet Sympathy Card on Kraft | Somewhere Over the Rainbow Bundle | Unity Stamp Co.


The sentiment is heat embossed with white pigment ink, white embossing powder and melted with a heat tool. Head over to Unity and check out all the awesome releases! It's a HUGE release friends! And it's the BIGGEST SALE of the year! 

Thanks so much for stopping by!
See ya next time.

Inky hugs,
Crystal

{Please note that comment moderation is on. Your lovely comment will appear shortly.}

Wednesday, August 28, 2024

Membership Wednesday ~ Halloween Card ~ August 2024 KOM Thanks in All the Things ~ Unity Stamp Co.

  Hello there crafty friend!
Today I'm sharing a fun no-layer ink blended Halloween card featuring the cool moon and bats stamp from the August 2024 Kit of the Month membership from Unity called Thanks in All the Things. I think this is my third or fourth card using this awesome kit. It's safe to say that this has been my MOST favorite kit! I love it! I'm just bummed I didn't get to the sweet fawn or the flowers!


I started by ink blending Squeezed Lemonade Distress Oxide ink in a circular motion near the top center of my card base. And then I blended a little Mustard Seed Distress Oxide ink in a circular motion around the lighter yellow. Once I was happy with that blend, I went back over the center a tiny bit more with the Squeezed Lemonade Distress Oxide ink. And then I blended Carved Pumpkin Distress Oxide ink around the rest of the front of the card base. I blended around the yellow just a smidge with Mustard Seed to give it a nice blend with the orange.


I'm playing along with the Color Hues Challenge today! Orange and Yellow are so perfect for a Halloween card! This fun challenge is open until August 29th, if you want to play along! 


I probably should have dried the oxide ink, but I was already late making dinner so I just decided to go for it! I stamped the moon and bat stamp and the sentiment with Black Amalgam ink. I did use an acetate grid to double check my placement for the bats and the sentiment. I quick cut two post-it notes to place over the bats and sentiment and then I went a little nuts with the black acrylic paint splatters.


That was it! A super quick Halloween card... I think it took me 10 minutes tops! AND I still had dinner ready by 6pm. LOL! 
 

Here's a quick look at this month's Kit of the Month membership! LOVE it SO MUCH!!

Well, that's it for me today! I hope you've been inspired to play with your membership stamps! 
Hope you have an inkredible day!


Thanks so much for stopping by!
See ya next time.

Inky Hugs,
Crystal


{Please note that comment moderation is on. Your lovely comment will appear once approved.}

Friday, May 17, 2019

Scrapping for Less ~ Lawn Fawn ~ Lovable Legends 3 Ways

Hey there crafty friends!
I'm here today with a trio of cards using Lawn Fawn's Lovable Legends stamp set! 
I thought it might be fun to share a trio of cards starting with a simple design and then building from that design to a slightly more involved card design.


My first card started with a simple stenciled background using the Echo Park Good Vibes Stripe stencil along with the Tumbled Glass Distress Oxide ink that I blended over the stencil. Once my background was done, I die cut it with a wonky rectangle die. I then cut a 1" strip of the beautiful Watercolor Foil paper from Pink & Main and fussy cut the little flag end on one side. I adhered it to the panel and then trimmed off the excess. 

I stamped the super cute sentiment directly on the panel and then adhered the entire panel to a white card base. I stamped the bigfoot character three times and decided for my card design... he'd be a cute yeti so I colored him very simply with the following Copic markers ~ N0, N1, N2, B0000, B00, Colorless Blender. I fussy cut my cute yeti and popped him up on the card.
So this is my first card design... pretty simple, right?! But still adorable!!


For my next card, to add a little somethin' somethin' and bring it up a step from simple,  I decided to blend the background using distress oxide inks. I used Tumbled Glass, Stormy Sky, and Salty Ocean Distress Oxide ink. I then blended Tumbled Glass distress oxide ink over the same Good Vibes Stripe stencil that I used on the first card. I love the subtle stripes it made on the background! I die cut the panel with the same wonky rectangle die and adhered it directly on a white card base.

I adhered a strip of the Watercolor Foil paper just like the first card, but this time I stamped the sentiments on scraps of white card stock. I used a banner die to cut out the 'Have An' sentiment and fussy cut the 'Unbelievable Birthday'. I adhered both sentiment directly to the card. I popped up the cute yeti and to finish off this card I added a couple of trees that I stamped from the same set using green inks in my stash. I love how the Watercolor Foil paper breaks up the stripes of the background and the foil in the paper adds a pretty shine for interest.

Are you ready for the third and final card... ?!


Whatcha think?! I'm a little partial to the background on this one because I love splatter!! I created the background the very same as the second card, but I added water and white acrylic paint splatters. I adhered the strip of  Watercolor Foil paper and the top sentiment directly to the card, but I popped up the bottom sentiment using foam tape. I adhered more trees to surround Mr. Yeti... huh, just decided to name him... LOL! I also popped up the two trees on the far right. My final touch to finish this card was to add some random dots to the trees using a white gel pen... almost like snow falling on the trees from the splatter in the background.


Here's a picture showing all of the cards together. I had a bunch of fun making these cards to share with you... I hope that you've enjoyed seeing the different steps in adding interest and dimension to the cards! I hope this inspires you to try different levels of cardmaking!!

Thanks so much for stopping by!
See ya next time.

Inky Hugs,
Crystal

Friday, May 10, 2019

Scrapping for Less ~ Unicorn Marci with Watercolor Foil Paper

Hi there crafty peeps!
I'm sharing an adorable card today using Unicorn Marci and some absolutely beautiful 
paper from Pink & Main called Watercolor Foil.


I shared a card last week using Unicorn Marci... you can check out that card here ---> Unicorn Marci with Coffee Distress Oxide Watercolor card! I watercolored my card for last week, but for this week I wanted to use bright colors to coordinate the beautiful Watercolor Foil papers so I stamped Unicorn Marci using Gina K Designs Amalgam black ink and then colored her in using the 
following Copic markers:

Skin ~ E000, E21, E51, R20
Hair ~ E42, E43, E44, Y21
Pajamas ~ RV10, RV14, RV17, RV25, N0, N1
Slipper boots ~ N0, N1, Colorless Blender


I die cut the Watercolor Foil papers and adhered them to a white card base. I then fussy cut Unicorn Marci and set her aside. I die cut some clouds that I lightly sponged with some Tumbled Glass Distress Oxide ink but any blue oxide ink would work. There happens to be this ink in the shop ---> Salty Ocean Distress Oxide ink... which would work just as well when lightly sponged on.


I adhered the die cut clouds with liquid glue so I could adjust them quickly before they set. 
I popped up my fussy cut Unicorn Marci with foam tape. I then stamped the cute sentiment 
on white card stock with Gina K Designs Amalgam black ink, fussy cut a flag, and then popped it 
up on the card. I just love that beautiful shine from the foil in the Watercolor Foil papers! 
So pretty! I sure hope you've enjoyed my card!

Thanks for checking out my blog post!
See ya next time.

Inky Hugs,
Crystal


Sunday, February 17, 2019

The Rabbit Hole Designs ~ Caffeinated Octopus ~ Gets me Kraken!

Hello there! Today, I'm sharing a card I made with the fabulous Caffeinated: Octopus set from The Rabbit Hole Designs for the CASology Cue Card: Wave challenge. I am loving all the fun Caffeinated stamps from this new stamp company!! And thought this octopus would be perfect for this challenge!!


I blended Tumbled Glass Distress Oxide ink over the My Favorite Things Make Waves stencil being sure to keep the blending light. I then stamped the Caffeinated: Octopus twice... once over the stenciled background and again on a scrap piece of white card stock. I knew that I didn't want to fussy cut around all those wayward hairs poking out of the octopus' curlers so I could fussy cut those right off but still have them on the card.


I colored in the octopus using the following Copic markers:

Octopus ~ BV04, BV31, BV34, R000, R11
Curlers ~ BG000, BG13, BG15
Coffee Pot ~ E44, E47, E49, N0, N1, N5, N8
Mugs ~ RV0000, RV17, RV19, RV21

I also used a touch of white gel pen on the mugs and coffee pot. The red in the eyes was made using a Paper Mate Ink Joy pen. I colored around the outer edges of the eyes with the R000 and R11 copic markers and then made tiny squiggly lines with the red pen. I fussy cut the octopus and then adhered it over the image I had stamped on the card front. I then ran the card front through the Big Shot with the My Favorite Things Wonky Stitched Rectangle die. I stamped the sentiment in the top right corner and then adhered the whole piece to a white card base.


Here's one more look at the finished card... pretty simple, but oh so fun!
Love this Caffeinated: Octopus!! 

There's still a little bit of time to play along with the CASology challenge! 
You can check it out here ---> CASology Cue Card: Wave challenge.


Thank you friends for checking out my blog post!
See ya next time.

Inky Hugs!
Crystal


Friday, December 28, 2018

Scrapping for Less ~ December 2018 Blog Hop ~ Animals in the Arctic


December’s kit is all about Arctic Animals…Now if you are anything like me, you hate the cold weather, snow, and anything that would mean being cold. However, snow and these cute little critters in this kit are all about fun! So grab your warm beverage, sit back, and hop along with us to see these adorable critters and all the inspiration our designers have to share. Check out the Flavor of the Month page to place your order if you haven’t subscribed. Also, don’t forget to check the A La Carte items (items that are leftover - full packs and such - from putting the kits together, and other items that we have on the website that may coordinate with this kit). Make sure you also put your name in for that Rafflecopter prize!


Hey there! I am loving the theme of this month's kit... Animals in the Arctic! The critters in the stamp sets are all so cute! Let's not waste anymore time and get straight to the cards!


For my first card I used Sketch #2 with Collection One.
I did a mix of layers using the Winter Skies patterned paper by Scrapping for Less along with some Sno Cone card stock. I adhered all of the layers on a white card base. I added a few sequins to the main image and on the card base.


Here's a close up of the watercolored bear. In real life the watercolors coordinate a whole lot better with the colors in the background. You can also see the touches of purple organza ribbon on either side of the bear.


For my second card I used Sketch #4 with Collection Two.
I say I used sketch #4 for this one but it's a loose interpretation... what I mean is, I went rogue! LOL! I kinda sorta used some of the elements of the sketch, but it really had a mind of it's own. ;)  Now you may notice that this card looks kind of similar to my sneak peak card... and that's because I made them at the same time. I just loved this color palette that I pulled from these Alexandra Renke papers included in Collection One so I had to use it for this card too. I trimmed my layers of patterned paper and adhered them to a kraft card stock base. I stamped the adorable penguin with memento tuxedo black ink and colored him in with the following Copic markers:
Penguin ~ C0, C2, C4, C8, R20, YR15, YR27, YR68
Hat/Scarf ~ BG10, BG11, N0, N1, Colorless Blender
Mug ~ B0000, B000, B39, B99, N1


I added some sparkle to the hat and marshmallows using stickles from my stash. I then die cut the image using a wonky square die. I popped it up on the card base and adhered a few die cut snowflakes using the snowflake die from Collection Three. The sentiment was simply stamped, trimmed, and then popped up, as well.


For my third card I used Sketch #1 with Collection Three.
I adhered my layer of grey snowflake patterned paper to a piece of Grape Jelly card stock. I stamped a few snowflakes on the white card base using Wilted Violet and Hickory Smoke Distress Oxide inks. I adhered my grey/purple panel to the card base and then stamped the 'Snow Much Fun' sentiment using Wilted Violet Distress Oxide ink.


I trimmed a small piece of white card stock for my focal scene and stamped the mountains and chunk of ice using Memento Tuxedo black ink. I then stamped the owl and penguin on a scrap piece of white card stock and got to coloring using the following Copic markers:
Mountains ~BV20, BV23, N1
Sky ~ B60
Water/Ice ~ B000, B02, BG0000
Penguin ~ N0, N1, N5, YR15, YR68, V17
Owl ~ C1, YR15, YR68, B02, BG0000
I fussy cut the penguin and owl and adhered them to the scene. I added a few banners cut from the Frosty patterned paper by Pink and Main in the collection. And my last touch was a few sequins here and there.


For my last card I used Sketch #3 with Collection Four.
Now for this card, I flipped the sketch because I wanted to use the Winter Tree Stencil from the Banana Split subscription in my focal panel. I blended Worn Lipstick, Tattered Rose, and Shaded Lilac Distress Oxide inks over the stencil and then set it aside to dry while I stamped and colored the owl and moose. The owl is part of the stamp set included in Collection Four, but the moose is from the Arctic Sentiments set by Scrapping for Less that is in the Banana Split subscription. I colored the images using the following Copic markers:
Owl ~ BV04, BV20, BV31, YR27, YR68
Moose ~ E00, E01, E02, R01, RV95, W5


I fussy cut the images and adhered them to the focal panel that I had mat on Bubblegum card stock. I adhered a few banners on the back of the focal panel and then popped up the panel on the card base. I adhered some snowflakes and sequins all over the card and then realized I didn't have a sentiment yet... so I stamped out the 'Snow Much Fun' sentiment again, trimmed it, and adhered it to the card.
Such a fun kit to play with!! I had a blast creating these cards. I sure hope you've enjoyed them as much as I have.

Here's a look at the Double Dip Subscription.


Here's a look at the Banana Split Subscription.


Next up on the hop is Luci!

After checking out the hop, make sure to join the Rafflecopter back on the SFL blog to have a chance to win an awesome prize!!


Thank you friends for checking out my blog post!
See ya next time.

Inky Hugs!
Crystal

Tuesday, December 25, 2018

Brutus Monroe ~ Snow Friends ~ Merry & Bright

Hello! I'm back with another guest spot featuring Snowy Friends from Brutus Monroe! I just couldn't resist inking up this snowman... isn't he the cutest snowman?! I can't get enough of him... so I made up a bunch of cards using him!


I started by stamping the snowman from Snowy Friends multiple times with Raven Detail Ink on a light kraft card stock. I colored the snowman first using the following Copic markers ~ B0000, B00, BG000, BG15, BG18, YR15, YR27, YT68, R14, R27, R89.


I love the look of Copics on kraft card stock! To finish off the images, I used some white Prismacolor pencil to highlight here and there. I then fussy cut all the snowmen and set them aside.


I had these note cards in my stash forever and I thought it was time to finally use them. They measure 3-1/2 x 5" when folded. I die cut a circle from a scrap piece of light weight card stock for my 'stencil' and then stamped the trees from the Freshly Cut stamp set by Brutus Monroe and Unity Stamp Company using Pine Needles Distress Oxide ink. I then blended some Shabby Shutters and Vintage Photo Distress Oxide ink around the outer edge of the circle. I used a heat tool to help the oxide inks dry completely and then rubbed an anti-static pouch over the circle area. 


I then stamped the Merry & Bright sentiment using clear embossing ink and heat set Alabaster white embossing powder. I added a few drops of Nuvo white blizzard glitter drops. To finish them up, I wrapped the cards a couple of times with a metallic turquoise twine and tied them with a bow.

Thanks so much for stopping by!
See ya next time.

Inky Hugs!
~ Crystal


{Supplies}

Affiliate links are used:


Friday, November 2, 2018

Scrapping for Less ~ Reindeer Games ~ Season's Greetings

Hello! I'm so excited to share some adorable cards I created using the Reindeer Games stamp set by Scrapping for Less from the October 2018 Joy to the World card kit. I just adore this set and I was needing to make some Christmas cards for a Christmas card drive that I've participated in for the last two years, so I thought this set was perfect!


I started by finding a simple sketch and you may be looking at the card saying, "That doesn't look simple" and you're very right! The simple sketch evolved into more layers and extra elements that this card just needed to have. Once I had the sketch picked out, I started cutting patterned papers. I used the papers from Collection Four ~ Santa's Workshop by Echo Park. I didn't have enough leftovers so I ended up digging into my leftover pieces from the October 2017 Merry & Bright card kit and found some papers from Collection Two that had similar colors ~ the I Love Christmas by Echo Park papers. Once I had all my patterned papers cut, I also went ahead and prepared my card bases and the card stock I needed for the focal image.


Now it was time for stamping!! I used my Tim Holtz Stamp Platform to stamp multiples of each of the images so I'd have enough for all the cards. And then the fun... it was time to color! I love to color! I find it so relaxing! I used a bunch of Copic markers:
Penguin ~ W00, W1, W5, W8, R14, R20, R27, Y06, Y17, YR15, YR16, B000, B02
Reindeer Kid ~ R14, R20, R27, E000, E23, E25, E31, E34, E51, YR23, YR27
Elf ~ G24, G28, G29, Y06, Y17, R14, R20, R27, E000, E51

Once my images were all colored, I used my Scan n Cut to get them all cut out. I then stamped the sentiments from the Stamping Bella Christmas Bug stamp set in Collection One and die cut them out with a banner die. To create my 'scene' I wanted some kind of 'snow' so I decided to use a snowfall backdrop die. Before die cutting these I blended some Tumbled Glass Distress Oxide inks over the top half of the 3 x 3" pieces of white card stock. I then die cut them, backed them with white card stock, and then mat them with a coordinating card stock. I die cut some stitched hills from scraps of white card stock that I adhered to the bottom portion of the snowy backgrounds. I was going to adhere all of my layers to the white card base, but it was just too much white so I decided to use some coordinating card stock to add another layer. To jazz up those extra layers of card stock, I ran them through my Big Shot with a snowflake embossing folder. It gives the card some extra texture that I just love!


Now all that was left was to adhere all of my layers to the white card base. Once that was done, I adhered my elf and reindeer to the little 'scene' I created for my focal point. I popped up the sentiments with foam tape and then decided to pop up the little penguins too.


I just adore this sweet Reindeer Games set from the Banana Split subscription!! **Editing to add that it's in the shop separately!! It's such a fabulous set... go take a look!** It made my cards for this year's Christmas card drive so much fun to make! I sure hope that you like my cards and find some inspiration for your cards when your kit arrives.

Thank you friends for checking out my blog post!
See ya next time.

Inky Hugs!
~ Crystal


Monday, September 24, 2018

~ Growing in Unity ~ Day One ~ Hello

Hello! I am so excited to be the Growing in Unity gal this week! 
I've been thinking and planning for this week for months... but even with all that excitement, I had the hardest time deciding what to share this week.

Sometimes inspiration just hits you and sometimes it just doesn't. You need a little something to get your creative juices flowing... well, I decided to share my Sources of Inspiration. I'll be sharing each day this week a card {or cards} created using one of my Sources of Inspiration.

Let's get to it!


My first Source of Inspiration is a Cue... a keyword or image.

Earlier this month I shared a couple of cards for the Friends of Unity blog hop that I created using the Cue ~ Wings. Well, I was inspired to make another card and thought it would be perfect for my first day of my GIU week. And here is what I created...


I started with a piece of Tim Holtz Distress Watercolor card stock that I stamped the background butterfly image from the Layers of Life Beautiful Moments stamp set using VersaMark watermark ink and then heat embossed a fine black embossing powder. I thought that was nice, but I wanted to add a little something to it so I decided to reheat the black embossing powder and add some Pewter embossing powder. I heated that up and I loved how it turned out. I'm not sure if that's a technique but I sure do like the effect! Next I smooshed the card stock in some Dusty Concord, Shaded Lilac, and Tumbled Glass distress oxide inks. I heat set those and then did some stamping with the circles from the Never stamp set using the Seedless Preserves distress oxide ink. I stamped the other image from the Never set with VersaMark watermark ink and heat embossed the pewter embossing powder.


I die cut the panel using the In & Out Diagonal Stitched Rectangle Stax dies and then mat the piece on a 5-1/4 x 4" piece of Tonic Studios Gleaming Lilac Pearlescent Card. I then wrapped the panel with black metallic thread and popped it up on the True Black card base. I then die cut the 'Hello' three times from True Black card stock and adhered the layers together. I added the Hello die cut and a few Silver Bells Dew Drops to the card and that's my first card for this week.

Be sure to leave a comment for a chance to win one of two fabulous grab bags of 25 stamps from Unity Stamp Company!!! Love me some deeply etched red rubber stamps!

Come back tomorrow for my next Source of Inspiration post!

Thanks so much for stopping by!

See ya next time.
~ Crystal


Saturday, August 4, 2018

~ Friends of Unity August Blog Hop ~ Coffee & Tea

Hello!! It's time for the August Blog Hop with the Friends of Unity and our theme this month is...


Coffee & Tea!
Ahhh... I don't know about you but I just love a good cuppa, be it coffee or tea! I tend to drink more coffee though so for this hop I decided my projects are all about the coffee!! I'm also a huge fan of blues with browns ~ my absolute favorite color combo! So let's get to the projects...


It's been a while since I've worked on a mixed media project. I wasn't sure where this was going to go... but I like how it turned out. I started with a panel of watercolor paper. Using mod podge I added bit of papers... the paper with text is from a pack of Stampin' Up! papers called Typeset Specialty DSP and the other papers are from Heartfelt Creations Coffee Talk Collection. Once I had my papers adhered and the mod podge was dry I smudged some acrylic paints just using my finger to apply it. I also used a bit of bubble wrap to add texture. Some of the bubble wrap spots smudged terribly so I covered them with mod podge and laid antique gold tissue paper over top wrinkling it here and there. I let the mod podge dry and then tore off the excess paper. I applied more mod podge around the edges of the gold tissue paper and also adhered a doily... you can see some of the texture of the doily in the girls face.


 So once all the mod podge was dry, I did some blending with Vintage Photo and Evergreen Bough Distress Oxide Inks. I stamped the coffee girl image from Unity's Itty Bitty set called Best Friends. I just love this girl... she's all full of sass! I also stamped a coffee ring and splatter using my new Ground Espresso Distress Ink! So excited to have this new color in my stash! The coffee ring stamp is from the January 2017 SMAK kit called Progress and Change. The splatter is from the Blow Your Mind kit.


I trimmed the panel down to 4-1/2 x 6 inches and then wrapped some gold thread around it several times after threading the heart charm onto the thread. I added a touch of Ranger Multi Medium Matte around the edges of the heart charm to adhere it in place on the panel. To secure the thread I just used some packing tape on the back of the paper.


My final touch for this piece was the die cut COFFEE. I die cut it twice from white card stock and then once with Lost Lagoon card stock. I adhered all of the layers and then sponged some Vintage Photo distress ink around the edges of the letters. I then adhered it to the panel. Well, it was still too clean... lol... so I stamped a splatter stamp from the Never kit with the Vintage Photo distress ink and that did it. I thought I was done at this point but when I saw it the next morning I decided to not make it into a card, but to mat it and potentially frame it. So, I mat it on Lost Lagoon and then Early Espresso card stocks. I really like how this turned out. I hope you do too!


Now for my card, I started with a 4-1/4 x 5-1/2 piece of Crumb Cake card stock. I blended some Tea Dye and Vintage Photo Distress Oxide inks over the little flower stencil (not sure that it's a flower but we'll go with that) in the Woodblock Prints from Papertrey Ink. I then blended some Evergreen Bough Distress Oxide ink over the Knitted Sweater Stencil from Echo Park. I then blended some Ground Espresso Distress Oxide ink over the Mini Art Is stencil from The Crafters Worshop and the coffee and splatter stencil from Tim Holtz' Mini Stencil Set #3. I stamped the big ornate background stamp from the Never kit using VersaMark watermark ink and then heat embossed fine white embossing powder. I did goof and forget to use my embossing buddy so the powder kind of splattered but we're going with it. I did also heat up the embossed area again and added some more embossing powder... it kind of thickened it up. I die cut the piece using a Wonky Scalloped Frame die from Avery Elle. I did this so I could mat the piece and then pop it up on the card. I mat it using Lost Lagoon card stock from Stampin' Up. I then mat the scalloped frame on Early Espresso card stock and adhered the entire piece to a white card base. I stamped the girl from Dream of Being on a piece of white card stock and colored her in using Copic markers {E0000, E000, E43, E47, E57, C1, R20, RV21, BG10, BG13, BG32}. I fussy cut her out and adhered her to the card. I added a few enamel dots here and there. I stamped my favorite 'happy birthday' stamp from the Abundant Blessings sentiment kit onto Early Espresso card stock using Versamark watermark ink and heat embossed a fine white embossing powder. I trimmed the sentiment and adhered it to the card. And there you have it! My projects for this month's hop.


Here's a look at both projects... it looks like the girls are looking at each other. How funny... I just noticed that while writing up my blog post. LOL

Before we move on to the hopping, I have some business to take care of. Last month I had a giveaway and I need to share who the lucky winner of the brand new Jolly Ol' Santa stamp set is...  drum roll please... the lucky winner is...


Marjorie Dumontier!!!! Woohoo! 
Marjorie please email me at crystalominkler@gmail.com with your mailing address to claim your prize. Prize must be claimed within two weeks.
Thank you to all those that hopped with us last month and, of course, this month!

 One or two of my friends are having giveaways on their blogs for this month's hop so be sure to hop and comment on each of our blogs so you'll be entered into this giveaway. We sure appreciate and love all of your fun comments! 


Now let's get hopping!


Crystal <--- you are here

up next ---> Joyce


Thanks for stopping by!

See ya next time.
~ Crystal