Showing posts with label Scrapping For Less. Show all posts

Wednesday, September 10, 2025

Amelia the Bunny ~ Preview Day 2 ~ The Greeting Farm

 Hello there crafty friend!
It's Day 2 of previews at The Greeting Farm for the fabulous September release. AMELIA THE BUNNY is not just the cutest bunny stamp set, it's the comfiest one! LOL! My daughter loves bunnies so I'm always looking for the cutest bunnies to add to my collection... I adore these sweet buns!


I inked up all three of the bunnies for my card, but could only fit the two on my card with all of the other stamps I used. I stamped all the images with Memento Tuxedo Black ink and colored them up with Copic markers that coordinated with the colors in my papers. 

Here's a quick list of the Copic markers I used:
Chair Bunny: W0, W1, W2, R00, R20, C0, C2
Chair Bunny Head Band: W2, W5
Chair: YR20, YR21, YR15
Knitting / Yarn: BG000, BG01
Flower: YR20, YR23, YR15, BG000, BG01, W1, W3, W5, Y15
Blanket Bunny: C0, C2, W0, W2, W3, W5, R00, R20
Blanket Bunny Head Band: YR000, YR15
Blanket: BG000, BG01, YR000, YR20, YR15, W0, W1, W3
Pillow: BG000, BG01, YR000, YR20
Duck: YR000, YR20, YR21, YR15
Mug: YR20, YR15


I paired up the cute buns with Fall papers in my stash. Unfortunately, they are from a company that is no longer in business. I die cut the papers using the Card Layout 3 Die from Newton's Nook Designs. And adhered all of my layers to a white A2 top fold card that I turned on the side for a landscape card.


I fussy cut all of the colored images and colored the edges with a Memento Tuxedo Black marker. I adhered all the images on the bottom of the frame building my little scene. I popped up the trimmed sentiment using foam tape to finish off my card.


I'm playing along with the Atlantic Hearts Sketch Challenge 646.


Such a fun card to make! Be sure to stop by the TGF blog to see all the makes from the design team. The release goes live in the store on the 15th at 12am EST.

Thanks so much for stopping by!

Inky Hugs,
Crystal


Tuesday, July 8, 2025

Have Fun! ~ Summer Anya ~ The Greeting Farm

 Hello there crafty friend!
I'm having some summer fun with the super cute and adorable Summer Anya from The Greeting Farm!


I found this adorable stamp in my stash and she just needed to see some ink! Unfortunately, I can't seem to find Summer Anya on the website. But if you'd like to add her to your collection, you can check out thFarmers Market and submit a request via email... maybe she'll be available for the next Farmers Market.  


I inked her up with Memento Tuxedo Black ink and colored her up with Copic markers. I fussy cut Summer Anya leaving a white border around her. I added foam tape to the back of her and popped her up on the card.

Here's a quick list of the Copic markers I used:
Skin: E000, E00, E11, E04, R00, R20
Hair: Y11, E43, E44
Rubber Band / Bow: RV10, RV29, YG11, YG63, G07
Mouth: R20, R14, C0, C2
Top: YG11, YG63, G07
Shorts: N0, N2, N4, N6
Shoes: C0, C2, N0, N2, N4, N6
Ice Cream: E21, E25, R20, R14, RV10, RV29
Sunglasses: N0, N2, N4


I paired up Summer Anya with some fun watermelon papers from my stash. I cut my green layer down to 4 x 5-1/4" and adhered it to a black A2 top fold card base. The pink watermelon seed paper layer measures 3-3/4 x 2-1/4". And the watermelon layer was die cut with a wonky stitched die and measures approximately 3 x 4-1/4". I adhered the trimmed sentiment to the watermelon paper and popped up the layer with foam tape.


Such a fun summer card! Makes me want to get some watermelon sorbet and cool off! I finished off the card by adding a few 'watermelon seed' sprinkles to the ice cream with a black marker. I hope I've inspired you to get inky!

Thanks for stopping by!

Inky Hugs,
Crystal

Thursday, June 12, 2025

Glow Up Anya ~ Preview Day 3 ~ The Greeting Farm

 Hello there crafty friend!
It's the final day of previews at The Greeting Farm for the June release! Introducing Glow Up Anya... today's super sweet stamp set has a beautiful Anya getting all dressed up for a celebration! 


I stamped Anya and all the accessories with Memento Tuxedo Black ink and colored them with Copic markers. I fussy cut each of them on the line and then colored the edges with a Memento Tuxedo Black marker making the edges nice and neat.

Here's a quick list of the Copic markers I used:
Skin: E000, E00, E11, E04, R00, R20
Hair: E95, E43, E44
Dress / Shoes: RV000, RV10, RV02, RV04
Makeup Brush: N2, N4, N6, N8
Makeup: Y02, Y15, Y28, RV000, RV10, RV02, RV04, R00, R20
Stool / Vanity: N2, N4, N6, N8
Mirror: C0, C2
Makeup on Vanity: Y02, Y15, Y28, C0, C2, RV000, RV10, RV02, RV04, N2, N4, N6
Kitty: R00, R20, N2, N4, N6, N8, C0


I created a fun background for my scene using retired papers from my stash. Unfortunately, they are from a crafty company that isn't around anymore. I have just some small scraps left. Trying to use them up! The chevron and striped papers worked nicely for my wall and floor. I think my favorite is the lips rug for the kitty. I die cut the paper using a stitched circle die from the Scallops & Circles {nesting dies} from Unity.


I stamped and trimmed the sentiment. I adhered my papers to a black A2 landscape card front. I adhered the vanity and kitty to the card. I popped up Anya and the sentiment using foam tape.


I finished off the card with glitter enamel dots from my stash. I'm also trying to use up my crazy huge stash of enamel dots. LOL! The release goes live in the store on the 15th at 12am EST! Woohoo! Be sure to come back tomorrow for the release Blog Hop!! One lucky winner will receive a $50 gift card to The Greeting Farm. All you have to do is comment on the hop! Yay!

Thanks so much for stopping by!
See ya next time.

Inky Hugs,
Crystal


{Please note that comment moderation is on. Your lovely comment will appear once approved.}

Friday, December 4, 2020

Scrapping for Less ~ Christmas Inspiration and a Farewell

 Hello there crafty friend!

Today is my final blog post for Scrapping for Less. I have a quick card to share that I created using the October 2020 FOTM and then I'd like to go down memory lane a little bit with you. This is kind of a long post, but it's mostly pictures... with a little chatter. I hope you'll stick around until the end.


I just love the Merry Christmas sentiment in the Christmas Elements stencil that was included in the Banana Split subscription of the October 2020 FOTM card kit. I actually used it and had planned on sharing an extra card for the hop and reveal for the October kit but I didn't have enough time. So I set it aside for another day. I have a quick video sharing my process for this card. 
You can check that out... here.


I really love how this turned out! I hope you like it too!


Now for some reminiscing... 


Way back in August of 2017 Teresa and Kim asked me to guest design for Scrapping for Less. This is my second card as a guest designer. Why didn't I share my first card? Well... I like this one more. lol
After a short guest design gig, Teresa and Kim asked me to join the design team and I was so elated!!
I'm very grateful for the opportunity that Teresa and Kim gave me... it was literally the beginning of a crazy crafty journey that has led me to design for other companies and start my YouTube channel AND to illustrate some of my very own physical and digital stamps. 
So I just want to say a BIG THANK YOU to Teresa and Kim!! 

Now I'm going to share some of my favorite cards over the 3-1/2 years that I've designed for SFL and throw in some of my favorite cards created with my own stamps that I designed for SFL too.


One of my absolute favorite cards... a slimline before the latest slimline trend! I colored and paper pieced this sweet scene way back in November 2018. You can check out the original post here... Have a Magical Christmas.


Another favorite... the black base and pop of Fall colors really make this card so beautiful. You can check out the original post here... Fall Breeze card.


Now this card has a special place in my heart as the first ever stamp that I designed for Scrapping for Less. I really enjoyed the process going back and forth with Teresa and Kim designing this beautiful stamp. You can check out the original post here... Nordic Winter card.


I was so honored when Teresa asked me to design the first ever stamp sets to be released outside of the card kits. I had so much fun designing the adorable Winter Fairies and the coordinating Fairy House. So much fun to illustrate and then to see them as physical stamps... awesome! There's still a few sets available in the shop if you'd like to add these to your collection {click the links above}!!


What little girl doesn't dream of being Cinderella?! I had a blast drawing these glass slippers. You can check out the original post here... It's All About the Girls. And there's still some of these sweet Glass Slippers in the shop!


Often times, Teresa would just give me a general idea for the stamp and let me run with it. I sure love the way this one turned out... I drew it with my daughter in mind. You can check out the original post here... Layered Stencils for CAS Cards. This cutie is still available in the shop... Live Your Best Life.


Another fun one that turned out really cute. Here's the original post... City Streets and Country Roads. There's only a couple of these left in the shop... Country Roads.


I had to giggle a little when Teresa shared her idea for this stamp. A chicken blowing bubble gum...?! Haha!! Definitely a fun request and one that I enjoyed drawing. Here's the original post for this one... Bubble Galore. You can add this hilarious stamp to your collection here... Blowing Bubbles.


And the last stamp that I designed for Scrapping for Less... I adore snowmen so this one I will cherish forever! Here's the original post for this one... Christmas is Covered.


Well... that was a little long, but I hope you enjoyed reminiscing with me. I do have one last card to share and this one is my absolute favorite card of all time while creating for Scrapping for Less...


I love love love this card! The design is so pretty. I'm so happy with the coloring on the die cut pieces. And that sentiment speaks to my soul! You can check out the original post here... City Streets and Country Roads Sneak Peek. This die is actually still in the shop!! Get it here... Flowery Camera die!!

Okay. Well, I've delayed the end here long enough. 


Thank you SO MUCH for following my crafty journey while with Scrapping for Less! 
See ya next time.


Inky Hugs,

Crystal

Tuesday, December 1, 2020

Scrapping for Less ~ Christmas Card Challenge ~ Rustic Watermelon with Victorian House

 Hello there crafty friend!
Today I'm sharing inspiration for the new December Card Challenge for the Scrapping for Less: Show & Share Facebook group! This month is a Christmas Card Challenge. Super easy peasy... just enter your newly created Christmas card to the album! I think this would be a great way to get us inking up the new products from the October 2020 Christmas is Covered card kit!! But really you can enter any Christmas card that you've created, but please only newly created Christmas cards!

Before we get any further... the key to playing along with the challenge is being a member of the Scrapping for Less: Show & Share Facebook group so if you aren't already a member be sure to join in the fun ---> here. Also, please note that you don't need a blog to enter the challenge as you're adding a photo of your creation directly into the challenge album in the group. You are welcome to include a link to your blog in the description of your creation, if you'd like.

Ok... enough chit chat... let's get to my card!


So... I had a little fun with this card. Do you recognize the patterned paper I used? If you said Rustic Watermelon, you're right!! Yes, I had a fun idea for a pink and green Christmas card using the Rustic Watermelon papers. What do you think?! It's different... but I think it works!


I used the scalloped rectangle die and stitched rectangle die from the My Favorite Things Blueprints 20 dies. For the focal image I die cut white card stock with a Stitched Rectangle STAX die, also from My Favorite Things. I wrapped the focal panel with a light pink 1/4" grosgrain ribbon from my stash. I then tied a knot with the ribbon and cut fishtails on both ends for a faux bow. I did some simple copic coloring on the house with the following Copic Markers:

House ~ W00, W1, W3
Roof/Accents ~ N2, N4, N5
Windows ~ Y06, Y35
Bows ~ R27
Wreath ~ G000, G14
Snow ~ C00, C2
Christmas Lights ~ Y06, YR15, R27, G14, B02


And since I was already working on the one card, why not make two!


It took me a bit to find a green ribbon that works well with the green in these papers. I ended up using New Leaf Topnotch Twill Tape from Papertrey Ink.


Here's a closer look at the added shine from the Ranger Glossy Accents that I added to the windows and Christmas lights. Such a fun touch to the house!

I have a video on my YouTube channel sharing my process in making these cute cards!
You can check the video out... here!


I love how these two cards turned out using non-Christmas papers! I hope you like them too and are inspired to join us in the Christmas Card Challenge!

The December Christmas Card Challenge will run from today, December 1st, and will end December 31st at 11:59pm EST. The winner will be announced in the comments of the challenge album on Friday January 1st. Please use #sflchristmascardchallenge in any social media posts when playing along with the challenge. I can't wait to see what you create!

Thanks so much for stopping by!
See ya next time.

Inky Hugs,
Crystal

Friday, November 27, 2020

Scrapping for Less ~ November 2020 FOTM Card Kit ~ A Little Inspiration

Hello there crafty friend!
Today I'm sharing a little more inspiration using the November 2020 FOTM Card Kit Simply Sentimental. I had a fun idea for a quick card while creating my cards for the hop and reveal so I gave it a quick try... Loved it!! So I decided to make three more cards using the same techniques and they really were quick!


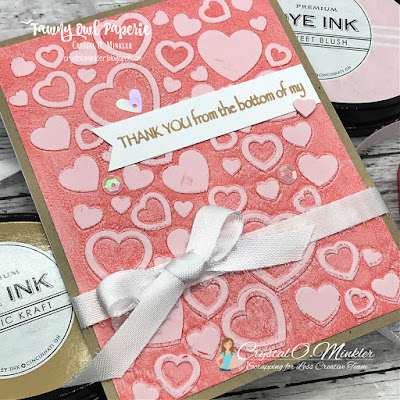
My first original card... I started with a 4-1/4 x 5-1/2" piece of Pink Lemonade card stock. I inked up the de-bossed side {the side that indents) of the Hearts Embossing folder with Sweet Blush dye ink from Papertrey Ink. I then ran the embossing folder through my big shot... now when I did this the card stock jumped a bit {my plate is really bowed in the center... I keep flipping it over but I think it's time to replace the plate} and that's why the bottom portion of the card looks blurry... almost 3D. 
 

Anywho, I do love the texture that this technique gives to the card!! I trimmed down the card front to 4 x 5-1/4" and adhered it to a Kraft card front measuring 4-1/4 x 5-1/2". I then wrapped the card front with the beautiful ribbon that I received in the Banana Split goodies! With a separate piece of ribbon I tied a bow and I adhered it with a glue dot. I stamped the sentiment from the Thanks So Much stamp set found in Collection Two with Classic Kraft ink from Papertrey Ink. I masked the little heart in the sentiment... I thought it would be fun to use a little heart punch from my stash to add a little interest to the sentiment. I finished off this card with a few sequins, also from the Banana Split subscription.


My second card... I used the very same technique for this card and the next two. For this one I used Picket Fence Distress Ink in the embossing folder and the Razzleberry card stock from the card kit.


I also used Raspberry Fizz dye ink from Papertrey Ink to darken the raised hearts and also for the heart at the end of the sentiment.


For card #3... I used Mint Julep dye ink. Isn't it beautiful!


This one just might be my favorite of them all!


And the last card... I used Melon Berry dye ink. It has almost a wood grain feel for this one with the colors and also the texture in the background.


And I changed things up with this one and used a different thank you sentiment from the same stamp set. I like how it changes up the design of the card.

I do have a video sharing the process in making the last three cards and finishing up the first card with the sentiment. You can check that out... here!


A look at all four cards! Which one is your favorite?! I'd love to know... if you have a minute, please share in the comments. Well, that's it for me this time!

Thanks so much for stopping by!
See ya next time.

Inky Hugs,
Crystal

Friday, November 20, 2020

Scrapping for Less ~ November 2020 FOTM Card Kit ~ Simply Sentimental


Hello my dear crafty friends! It has been a wild and wondrous ride over the past 3 and 3/4 years! I am soooo very thankful that you all supported the Flavor of the Month kit and helped me to realize a dream. It is with gratefulness and gratitude that I bring you this fantastic last kit "Simply Sentimental". We have very few kits available so you will not want to hesitate at all. Run, run, run to the website to get the final Flavor of the Month kit for yourself. Make sure to enter the Rafflecopter as well! 

~ Teresa, {SFL Owner}


This card kit is seriously sentimental... and fabulous!!!

I had a blast creating my cards to share with you all... let's check them out!


Collection One: Puppy Paws
How adorable is this sweet puppers?! Oh my goodness... with this sweet stamp plus all the adorable papers in the Puppy Paws papers you just can't help but smile when you see them. I couldn't wait to play with this collection. I used the first sketch in the November 2020 Sketch Sheet and really this card was quick! I used the following Copic markers for the pup: 
Fur ~ W00, W1, W2, W4
Tongue ~ R00, R14
Nose ~ N0, N1, N4
Paws ~ R00, W1, W2


Collection Two: Thanks So Much
The papers in this collection are absolutely gorgeous!! I just had to feature the beautiful floral paper for this card... I love it! I stamped the sentiment with Sweet Blush ink on white card stock and ended up having to trim the left side to fit in the angle there. I would definitely recommend adhering your sentiment first... lol. Hindsight and all that, am I right? 


Collection Three: Family Ties
So... I was instantly drawn to the gray and teal papers in the Family Ties paper pack! Amazing!!! I paired them up with the dark grey card stock... love this card!  I used a corner rounder on the two top corners and a stitched hillside die on the teal flower papers. I stamped the sentiment with Weathervane ink and die cut it with a circle die. I then mat it with a scalloped circle cut from the same dark grey card stock. Love love love this card!


Collection Four: Wildflowers
And another collection with beautiful aqua colors in the paper!!! Be still my heart!! Of course, I paired it up with the kraft card stock in the kit. I used Classic Kraft ink for this card from Papertrey Ink and colored the flowers very simply with BG10 and BG23. Love the fabulous ephemera pieces in this collection! They make for such a quick card! I used this fantastic collection for my sneak peek. If you missed it you can check it out here... Sneak Peek card!!


That's it for me this time!


Next up in the hop is... Teresa!!


Don't forget to head back over to the SFL blog when you're done hopping and enter the Rafflecopter for a chance to win a prize!


Thanks so much for stopping by!
See ya next time.

Inky Hugs,
Crystal