Showing posts with label watermelon. Show all posts

Tuesday, July 8, 2025

Have Fun! ~ Summer Anya ~ The Greeting Farm

 Hello there crafty friend!
I'm having some summer fun with the super cute and adorable Summer Anya from The Greeting Farm!


I found this adorable stamp in my stash and she just needed to see some ink! Unfortunately, I can't seem to find Summer Anya on the website. But if you'd like to add her to your collection, you can check out thFarmers Market and submit a request via email... maybe she'll be available for the next Farmers Market.  


I inked her up with Memento Tuxedo Black ink and colored her up with Copic markers. I fussy cut Summer Anya leaving a white border around her. I added foam tape to the back of her and popped her up on the card.

Here's a quick list of the Copic markers I used:
Skin: E000, E00, E11, E04, R00, R20
Hair: Y11, E43, E44
Rubber Band / Bow: RV10, RV29, YG11, YG63, G07
Mouth: R20, R14, C0, C2
Top: YG11, YG63, G07
Shorts: N0, N2, N4, N6
Shoes: C0, C2, N0, N2, N4, N6
Ice Cream: E21, E25, R20, R14, RV10, RV29
Sunglasses: N0, N2, N4


I paired up Summer Anya with some fun watermelon papers from my stash. I cut my green layer down to 4 x 5-1/4" and adhered it to a black A2 top fold card base. The pink watermelon seed paper layer measures 3-3/4 x 2-1/4". And the watermelon layer was die cut with a wonky stitched die and measures approximately 3 x 4-1/4". I adhered the trimmed sentiment to the watermelon paper and popped up the layer with foam tape.


Such a fun summer card! Makes me want to get some watermelon sorbet and cool off! I finished off the card by adding a few 'watermelon seed' sprinkles to the ice cream with a black marker. I hope I've inspired you to get inky!

Thanks for stopping by!

Inky Hugs,
Crystal

Wednesday, August 23, 2023

Membership Wednesday ~ August 2023 Whit Kit Vintage Blooms & Botany ~ Unity Stamp Co.

 Hello there crafty friend!
I had lots of fun playing with the August 2023 Whit Kit from Unity Stamp Co. I made three cards featuring this fabulous kit. Three VERY different cards.


First up is a card featuring a beautiful pattern paper from the Vintage Blooms & Botany {paper pack}. This piece of pattern paper is my absolute fave from the pack! I love that beautiful yellow flower. I cut the pattern paper to 4 x 5-1/4" and then cut away a couple of strips. I adhered the pattern paper to an A2 top fold card base of Kraft Card Stock from Papertrey Ink.


Stamped the sentiment with Sugar Cube Pigment Ink from Taylored Expressions. I added some Alabaster White Embossing Powder to the wet ink and then melted it with my Wagner Precision Heat Tool. Next, I die cut it with a stitched banner die from the Banner Nesting Dies {sadly, these may be retired}. I popped it up on the card with Scotch 3M Double Sided 1" Foam Tape. Card one done!


My second card... are you surprised I used that beautiful yellow flower again?! Hahaha! This card had a mind of it's own. Not at all what I was planning for this one, but I sure do love how it turned out. I cut the pattern paper in strips and added it to a piece of Kraft Card Stock. Next, I die cut it with a die from the Make a Tag Die Set. I stamped and heat embossed the sentiment like I did for the previous card. I laid it on the tag piece and then secured the tag die to the sentiment with washi tape. I ran it through my Big Shot and adhered it to the tag.


I used the Woven 3D Embossing Folder from Tim Holtz for my bottom layer. I also die cut it with the largest die from the Deckle & Stitches Nesting Dies from Unity. I blended or distressed the edges of the tag, card base, and the die cut woven layer using Vintage Photo Distress Ink. I adhered the woven layer to a Kraft A2 top fold card base. And then I popped up the tag using Scotch 3M Double Sided 1" Foam Tape. Love how this turned out!


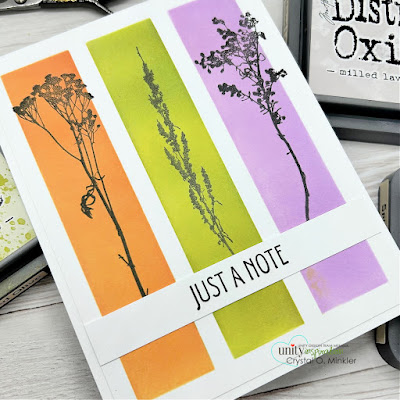
And my last card... I just HAD to play with the cool stencil in this month's kit. I also wanted to ink up more of the stamps. I secured the stencil over a card front of Stampers Select Card Stock from Papertrey Ink using iCraft Purple Tape. I masked the two left rectangles and blended Milled Lavender Distress Oxide Ink. I think there's some other purples mixed in there though. I need to clean my blending brushes! Anywho, I moved the mask to cover the right and left side rectangles. I then blended Crushed Olive Distress Oxide Ink. I moved the mask to cover the green rectangle and blended Spiced Marmalade Distress Oxide Ink. Still using colors I normally wouldn't grab. And I love how it turned out!


I stamped three of the Vintage Blooms & Botany stamps over the rectangles using Black Amalgam Ink from Gina K. Designs. I also stamped the sentiment on a long piece of white card stock. I trimmed up the panel cutting 1/8" off of each side. I then adhered the sentiment to the panel and trimmed off the excess. All that was left was to adhere it to the white A2 top fold card base.


Here's a look at the wonderful Whit Kit for August!! Such a lovely card kit! This wonderful card kit is available for only $42.99. That includes shipping! Members get a $6.95 discount on every order from Unity over $45. Members are also able to purchase past Whit Kit stamp sets for just $14 and past Whit Kit paper packs for $2 off!! So awesome!!! 

That's it for me today! I'll be back next week with inspiration for the Kit of the Month membership... I hope you'll stop by again and check it out. Have an ink-tastic day!

Thanks so much for stopping by!
See ya next time.

Inky Hugs,
Crystal


{Please note that comment moderation is on. Your lovely comment will appear once approved.}

Wednesday, July 26, 2023

Membership Wednesday ~ July 2023 Kit of the Month Anchored by Love ~ Unity Stamp Co.

 Hello there crafty friend!
I'm back for another Membership Wednesday and today I'm sharing a card using one of the sweet ice cream cone stamps in the July 2023 Kit of the Month called Anchored by Love from Unity Stamp Co. I just can't get enough of all the fun Summer stamps in this month's kit! I've wanted to color up this ice cream cone since I saw it!


I paired up the sweet ice cream cone with the Slices of Summer - A Watermelon Harvest {paper pack} from this month's Whit Kit membership. I was really wanting to do a fun pink color for a watermelon sorbet ice cream cone. Yum! These papers are perfect!


I stamped the cute ice cream cone on white card stock with Black Amalgam ink and colored it up with the following Copic markers:

Cone ~ E21, E23, E25
Sorbet ~ RV00, RV21, RV13, RV04
Leaves ~ YG11, G24
Stick ~ E21, E23, E25
Berries ~ BV01, BV13, B63
Grounding ~ C00, C1, C3


You may notice that my card design today is similar to my card design from yesterday. Well, I couldn't help but use the same design. It was perfect for the scraps of pattern paper tucked in with my paper pad. This is the Tawny Owl Paperie Inky Inspiration Sketch 14. I host a fun little sketch challenge in my Tawny Owl Paperie Inky Inspiration Facebook group each month. I've had a lot of fun sharing sketches in my other group... Build Your Stash Holiday Cardmakers Facebook group... but since that group is Christmas themed only I wanted to share sketches that could be used for any occasion. 


I trimmed a 4 x 5-1/4" panel of white card stock and adhered the triangle pieces on either end. I then adhered the strips of pattern paper down the middle. I did have to cut the white with black polka dot and pink pattern papers in half and adhere them to the edges. This left some white space in the middle which was okay because the focal panel covers it.


I cut my focal panel to the measurements on the sketch and adhered them together. I colored the bottom of the panel to ground the ice cream cone. I then fussy cut the ice cream cone and cleaned up the edges by coloring them with the edge of my Memento Tuxedo black marker. A trick I like to use to make fussy cut images nice and neat. I then adhered it to the card. I heat embossed the sentiment using Black Amalgam ink with a fine black embossing powder that I melted with a heat tool. I die cut the sentiment using the Scalloped & Stitched Sentiment Nesting dies and adhered it across the card.


Here's a look at the whole Kit of the Month for July!! The perfect Summer kit! Can you believe that you get this full sheet of rubber for only $44.99. That includes shipping! You also get a $6.95 discount on every order from Unity over $45. And you can purchase any past kits for only $34 plus shipping. Such a great value!

I'll be back for another Membership Wednesday blog post in two weeks. Next week, I'll be sharing inspiration for the amazing new August 2023 Background of the Month on my Instagram.


Thanks so much for stopping by!
See ya next time.

Inky Hugs,
Crystal


{Please note that comment moderation is on. Your lovely comment will appear once approved.}

Wednesday, July 19, 2023

Membership Wednesday ~ July 2023 Whit Kit Slices of Summer ~ Unity Stamp Co.

 Hello there crafty friend!
I had so much fun playing with the July 2023 Whit Kit from Unity Stamp Co. I made three cards featuring this fabulous kit. Simple {relatively} CAS card designs too. 


The pattern papers in this month's kit are GORGEOUS!! I mean it! So perfect for Summer and so fun! Love, love, love them! Anywho, when I have a hard time picking papers I like to do a tearing technique and layer some of the papers together for my background. I did limit myself to just four pattern papers because I wanted to go for more of a CAS design.


Otherwise, I probably would have torn more papers and filled up the whole background. The colors in these papers are so beautiful. I just can't get enough of them! I adhered the torn and layered pattern papers to a card front of white card stock and then I trimmed it down to 4 x 5-1/4". I adhered it to a white A2 top fold card. 


I stamped the sentiment onto white card stock using Black Amalgam ink and trimmed it down. I then mat it on the pink pattern paper and trimmed it down. I adhered the cute watermelon ephemera piece from the kit to the sentiment and then I added foam tape to the back of both pieces and popped them up on the card. I finished off the card with three of the water droplet beads from the kit.


My second card features three of the pattern papers again. I cut a 1" strip of the striped papers and die cut two of the other papers using the smallest circle dies from the Scallops & Circles Nesting Dies. I stamped the beautiful watermelon from the Slices of Summer stamps with Black Amalgam ink. I colored it up with the following Copic markers: YG11, YG21, G14, G24, RV00, RV63, RV55, E44.


I die cut the watermelon using the next largest circle die from the Scallops & Circles nesting dies. I adhered the striped paper to a 4 x 5-1/4" piece of white card stock. I then adhered the green striped circle and the pink circle. I popped up the watermelon focal piece using foam tape.


Here's a look at the sketch that inspired my card. So fun! This isn't the current challenge over at Freshly Made Sketches but I thought the circles would be fun with the watermelon.


I partially stamped the sentiment using Black Amalgam ink and die cut it using a scalloped and stitched die from the Scalloped & Stitched Sentiment Nesting Dies. I actually die cut this sentiment twice using the ends of the same die. A trick I like to do when I don't have quite the right die in my stash. To finish off this card, I also added a few of the water droplet beads.


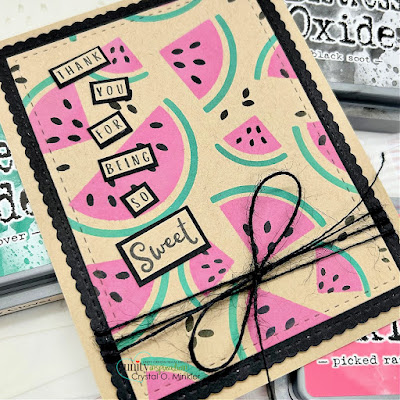
My third and final card featuring the fabulous stencil set in the kit! Oh my gosh... these stencils were so easy to use and so fun! They each have a tab on the side that helps you line them up just right. They literally made these watermelon slices come together so fast! And how fun... I did my ink blending on kraft. I love kraft card stock!


I used Lucky Clover, Picked Raspberry and Black Soot Distress Oxide inks over the three stencils to create my background. I then die cut the background using the largest stitched rectangle die from the Scallops & Rectangles Nesting Dies. I also die cut a piece of True Black card stock from Papertrey Ink using the larges scalloped die from the die set. I adhered the layers together and wrapped it with Black May Arts Burlap String.


I then adhered it to a kraft A2 top fold card base. I stamped the sentiment using Black Amalgam ink on the kraft card stock. I then trimmed each word of the sentiment and mat it on True Black card stock. Breaking up the words of the sentiment doesn't cover up as much of the background... which I really didn't want to cover up at all. It's so pretty!


Here's a look at the wonderful Whit Kit for July!! So perfect for a Summer card kit! This wonderful card kit is available for only $42.99. That includes shipping! Members get a $6.95 discount on every order from Unity over $45. Members are also able to purchase past Whit Kit stamp sets for just $14 and past Whit Kit paper packs for $2 off!! So awesome!!! 


Here's a look at all three card together. All so different and so fun! 
That's it for me today! I'll be back next week with inspiration for one of the July memberships... I can't seem to pick one right now!! LOL! Have an ink-tastic day!

Thanks so much for stopping by!
See ya next time.

Inky Hugs,
Crystal


{Please note that comment moderation is on. Your lovely comment will appear once approved.}

Tuesday, December 1, 2020

Scrapping for Less ~ Christmas Card Challenge ~ Rustic Watermelon with Victorian House

 Hello there crafty friend!
Today I'm sharing inspiration for the new December Card Challenge for the Scrapping for Less: Show & Share Facebook group! This month is a Christmas Card Challenge. Super easy peasy... just enter your newly created Christmas card to the album! I think this would be a great way to get us inking up the new products from the October 2020 Christmas is Covered card kit!! But really you can enter any Christmas card that you've created, but please only newly created Christmas cards!

Before we get any further... the key to playing along with the challenge is being a member of the Scrapping for Less: Show & Share Facebook group so if you aren't already a member be sure to join in the fun ---> here. Also, please note that you don't need a blog to enter the challenge as you're adding a photo of your creation directly into the challenge album in the group. You are welcome to include a link to your blog in the description of your creation, if you'd like.

Ok... enough chit chat... let's get to my card!


So... I had a little fun with this card. Do you recognize the patterned paper I used? If you said Rustic Watermelon, you're right!! Yes, I had a fun idea for a pink and green Christmas card using the Rustic Watermelon papers. What do you think?! It's different... but I think it works!


I used the scalloped rectangle die and stitched rectangle die from the My Favorite Things Blueprints 20 dies. For the focal image I die cut white card stock with a Stitched Rectangle STAX die, also from My Favorite Things. I wrapped the focal panel with a light pink 1/4" grosgrain ribbon from my stash. I then tied a knot with the ribbon and cut fishtails on both ends for a faux bow. I did some simple copic coloring on the house with the following Copic Markers:

House ~ W00, W1, W3
Roof/Accents ~ N2, N4, N5
Windows ~ Y06, Y35
Bows ~ R27
Wreath ~ G000, G14
Snow ~ C00, C2
Christmas Lights ~ Y06, YR15, R27, G14, B02


And since I was already working on the one card, why not make two!


It took me a bit to find a green ribbon that works well with the green in these papers. I ended up using New Leaf Topnotch Twill Tape from Papertrey Ink.


Here's a closer look at the added shine from the Ranger Glossy Accents that I added to the windows and Christmas lights. Such a fun touch to the house!

I have a video on my YouTube channel sharing my process in making these cute cards!
You can check the video out... here!


I love how these two cards turned out using non-Christmas papers! I hope you like them too and are inspired to join us in the Christmas Card Challenge!

The December Christmas Card Challenge will run from today, December 1st, and will end December 31st at 11:59pm EST. The winner will be announced in the comments of the challenge album on Friday January 1st. Please use #sflchristmascardchallenge in any social media posts when playing along with the challenge. I can't wait to see what you create!

Thanks so much for stopping by!
See ya next time.

Inky Hugs,
Crystal