Showing posts with label #diecutting. Show all posts

Thursday, August 8, 2024

Fun with Circles Holiday Card ~ Just for You Dear ~ Unity Stamp Co.

Hello there crafty friend! 
Today I'm sharing one more holiday card for Unity's August release. This time I inked up the super cute and adorable Just for You Dear. This adorable stamp is also available in photopolymer... {Clearly Unity} Just for You Dear. I love that Unity offers some of their stamps in clear and rubber now!


I had a fun idea for layering circles in a card design and wanted to give it a try! I thought the deer from Just for You Dear would work perfectly with this design. I stamped the sweet deer and sentiment with Black Amalgam ink and colored up the deer with my Copic markers. 

Here's a quick list of the Copic Markers I used:
Deer: E51, E21, E23, E25, E29
Ears: R00, R20
Scarf: R20, R14, G24, G46

You can check out my Copic coloring video here... Copic Color with Me | Just for You Dear | Unity Stamp Co.


I die cut the sweet deer, a green mat from Garden Green card stock from Stampin' Up, and a bunch of circles from the wonderful Watercolor Winter {paper pack} using the Scallops & Circles {nesting dies}. I die cut the sentiment using a die from the Scalloped & Stitched Sentiment Nesting Dies. I trimmed a mat from the same Garden Green card stock.

You can check out my process video for this card here... Fun with Circles Holiday Card | Just for You Dear | Unity Stamp Co.


The green striped pattern paper in the background measures 4 x 5-1/4". It's adhered to a 4-1/4 x 5-1/2" card front of Garden Green card stock and then I adhered the panel to a white A2 top fold card base. The adorable deer circles and the sentiment are popped up using foam tape. Such a fun card to make!
I hope you have an ink-tastic day! 

Thanks so much for stopping by!
See ya next time.

Inky hugs,
Crystal

{Please note that comment moderation is on. Your lovely comment will appear shortly.}

Monday, August 5, 2024

Inky Paws Challenge #229 ~ Birthday Theme Challenge

Hello there crafty friend!
It's time for a new Inky Paws Challenge... a super fun Birthday Theme Challenge! I sure hope that you'll play along with us using your Newton's Nook Designs products! You have until Friday, August 16th to get your entries in for the #229 Birthday Theme Challenge and a chance to win a $20 store credit to Newton's Nook Designs!


Such a broad and fun theme! I'm excited to see the entries for this one!


I really wanted to give the new Fractured Card Layout Die a try. So I grabbed the Birthday Meows 6x6 Paper Pad and trimmed a few pieces of the pattern paper to fit over the die. I secured them on the back of the die with a piece of washi tape. I love how quick and easy this design was to make!


I stamped the adorable kitty from Newton's Heart Stamp Set on white card stock using Memento Tuxedo Black ink. I then stamped it again on a scrap of the pink pattern paper. I Copic colored the kitty on white card stock and die cut it using the coordinating Newton's Heart Die Set. And I fussy cut the pattern paper heart and paper pieced it to the kitty.


I wanted the kitty to fit in with the birthday theme just a bit more so I also stamped the party hat and present from the Newton's Birthday Delights Stamp Set. I colored them with my Copic markers and then die cut them using the coordinating Newton's Birthday Delights Die Set. The sentiment also comes from the Newton's Birthday Delights Stamp Set. I masked the bottom portion of the sentiment using a post-it note when I inked it up. I removed the post-it note and then stamped the sentiment. I did this a couple of times in my mini misti to get a nice crisp stamped 'partial' sentiment. I trimmed it up and then adhered it directly to the card.

Here's a quick list of the Copic markers I used:
Kitty: C00, C1, C3, R00, R20
Party Hat: RV10, RV11, YG21, YG03, B000, B00
Present: YR21, YR15


Now it's your turn to get your paws inky with your Newton's Nook Designs products and create a project with a Summer theme. Be sure to link up to the Inky Paws Challenge! Can't wait to see your projects!


Thanks so much for stopping by!
See ya next time.

Inky Hugs,
Crystal


{Please note that comment moderation is on. Your lovely comment will appear once approved.}

Saturday, August 3, 2024

~ Friends of Unity August 2024 Blog Hop ~

Hello there crafty friend!
Welcome to our August Friends of Unity Blog Hop!! This month's cue is a sweet one. I hope you'll hop along with us and enjoy some wonderful inspiration from our friends!


This month's cue is Friendship. I am blessed to have friends from elementary school, high school, college, church, and a bunch of like-minded crafty friends online. My focus for this cue was to create cards to send to some of these friends.


First up is a card of encouragement for a dear friend. I stamped the gorgeous sunflower from the brand new Radiant Resilience stamps six times using Black Amalgam ink on white card stock. I then colored three of the sunflowers and colored just the inner petals of the other three sunflowers.


I die cut the three sunflowers using the second largest die from the Deckle & Stitches Nesting Dies. I fussy cut the three sunflowers around the inner petals. I secured the sunflowers to the die cut panel using washi tape and then I die cut the panel again using the same die. And then I added foam tape to the back of those inner petals and popped them up on the sunflowers. You can see some of the dimension in the photo above.


I die cut a piece of Orange Zest card stock from Papertrey Ink using the largest die from the Deckle & Stitches Nesting Dies. I adhered my panels together and then adhered them to an A2 top fold card base of Early Espresso card stock from Stampin' Up. I trimmed the sentiment and adhered it to the card. Trimmed the excess off the right side and then I added several enamel dots from my stash finishing up my first card. I think my friend will like it.

Here's a quick list of the Copic markers I used to color up the sunflowers:
Petals: YR21, Y06, YR15, YR16, YR27
Center: E21, E23, E25, E29


I created my second card using some leftover pieces from my first card. These are the inner petals that were leftover from the first card. I thought they'd look really pretty on a dark background. So I die cut a piece of Early Espresso card stock using the second largest die from the Deckle & Stitches Nesting Dies again. I adhered the partial sunflowers to the background and die cut the panel again.


And then I thought it would be fun to do some splatters. I went a little crazy with the splatters but it sure was fun! I let the panel dry and then I adhered it to a piece of Summer Sunrise card stock from Papertrey Ink. I wrapped the panel a few times with {Natural} May Arts Burlap String and then I added a bunch of foam tape to the back of the panel avoiding the string.


I heat embossed the sentiment from the adorable Lil' Bloomer stamps. I prepped the Early Espresso card stock with the TE Anti-Static Powder Tool from Taylored Expressions. I stamped the sentiment with Sugar Cube White Pigment ink, also from Taylored Expressions. I dusted the wet ink with Alabaster White Embossing Powder from Brutus Monroe and melted the powder with a Wagner Precision Heat Tool. Once it cooled, I trimmed the sentiment and then I adhered it to the sunflower panel. I trimmed off the excess and pulled the backing off of the foam tape and popped up the panel on an A2 top fold card base of Early Espresso card stock that I turned on it's side for a landscape card. Another lovely encouragement card for a friend.


My last card is a fun one for another friend. These crazy chickens from the Cuckoo stamps are just too much fun!! I hope it brings a smile to my friend's face. These chickens are so funny I decided to pair them up with the Rustic Cowhide {paper pack}. My daughter said they don't go together but I thought it was funny! Dare I say... a bit cuckoo! LOL!


I stamped the funny chickens from Cuckoo using Black Amalgam ink and then Copic colored them to look like some of our chickens. So recently we rescued a couple Silkie hybrid chickens. They are the craziest looking chickens and they look a lot like the two chickens on the right. So I colored those two to look like our Rip {bottom right} and Chewy {top right}. We don't actually have any white chickens but that middle one just looked like it should be white so I went with it. And then the top left is colored like a mix of our brown chickens... I think they are ISA browns and Rhode Island Reds. And the bottom left is colored like our Plymouth Rock Chickens. So much fun!


I die cut the chickens using a die from the Scallops & Squares {nesting dies}. I trimmed the pattern paper to the same height as the square and adhered them together. And I wanted to keep this card simple so I just adhered the panel to a black A2 top fold card base.


Inspiration for my third card is from the Tawny Owl Paperie Inky Inspiration Sketch Challenge 24. Did you know I host a sketch challenge in my Facebook group? I'd love for you to join the group and play along. You can find it here... Tawny Owl Paperie Inky Inspiration.


Sometimes I forget to take photos to share, but I do like to add a white panel in my cards when I use a black {or dark} card base. I also had a strip of the pattern paper leftover so I adhered it inside the card. 


Now before we get to the hopping, I chose a lucky winner from the comments on last month's hop to win a fun prize and the lucky winner is...


... Denise Bryant!! Congratulations, Denise!!
Please email me at crystalominkler@gmail.com to claim your prize. 
Please claim the prize before September 4th, 2024. 

*** Quick Announcement ***
Unfortunately, Gaylynn has stepped down from our FOU team so she asked me to announce her winner from last month's hop. Gaylynn's July 2024 hop prize winner is Silvia H (Anonymous). Congrats Silvia! Please contact Gaylynn Martling via Facebook Messenger or a note on Gaylynn's contact form located on her blog; within three weeks of this announcement.


Well, that's it for me this time! Please hop along and enjoy some more inspiration from the Friends of Unity! I can't wait to see how our friends were inspired by this month's cue. I will be doing another fun giveaway this month!! Be sure to hop along and comment for a chance to win. {When you comment please leave your name just in case it posts as anonymous.} I'll announce the winner next month! 


Let's get to the hopping...

Crystal <--- you're here

up next ---> Amber


Colleen


Thanks so very much for supporting our little hop!
We appreciate you so much!!

See ya next time.

Inky Hugs,
Crystal


{Please note that comment moderation is ON. Your comment will appear shortly.}


Friday, August 2, 2024

Winter Wonderland with Distress Crayons ~ A Wintry Hello ~ Unity Stamp Co.

Hello there crafty friend! 
I'm back with another holiday card for Unity's latest release. This time my card features two awesome new stamps from the August release. First is the beautiful A Wintry Hello which includes the gorgeous deer, a tree scene, some snowflakes, and four awesome sentiments. Love, love, love this amazing set of stamps! And I paired it with the absolutely beautiful Pines of Endearment that includes four lovely pine trees, a snowflake, a star, and three sentiments. This beautiful set of stamps is also available in photopolymer... {Clearly Unity} Pines of Endearment. I love that Unity offers some of their stamps in clear and rubber now!


I played a bit with my distress crayons again!! I colored a 4-1/4 x 5-1/2" piece of white card stock with 3 distress crayons. I used Evergreen Bough, Twisted Citron, and Peacock Feathers. I used a baby wipe to blend the colors on my background. And then I ran it through my Big Shot with the Simple Snowflakes Embossing Folder from Tim Holtz. I lightly rubbed the raised snowflakes with a Sugar Cube White Pigment ink pad. I love the fun mix of colors and how the white pigment ink made the snowflakes on the background pop!


I stamped the beautiful deer and the tree scene from the A Wintry Hello using Black Amalgam ink. I also decided I wanted a couple more trees so I stamped a couple of pines from the Pines of Endearment. I colored them up with my Copic markers and then fussy cut them leaving a white border. I also stamped the sentiment and trimmed it up.

Here's a quick list of the Copic markers I used:
Deer: E51, E55, E57
Trees: E55
Pine Trees: YG67, YG99


I die cut a hill using the Stitched Hillside Borders die from Lawn Fawn. I also die cut a scalloped frame using the Frames - Scalloped Stitched Rectangles die from Gina Marie Designs. I adhered all the elements of my scene onto the distress crayon background. I splattered some white acrylic paint over the scene. And then I adhered the frame over top. I had to trim off a bit of the distress crayon background. And then I adhered the framed panel to a white A2 top fold card based turned on its side. This was such a fun card to make!
I hope you have an ink-tastic day! 

Thanks so much for stopping by!
See ya next time.

Inky hugs,
Crystal

{Please note that comment moderation is on. Your lovely comment will appear shortly.}

Thursday, August 1, 2024

{BYSHC} Sketch Challenge 48 ~ A Few of My Faves ~ Unity Stamp Co.

Hello there crafty friend!
It's time for a new sketch challenge over in the Build Your Stash Holiday Cardmakers Facebook group! Today I'm sharing a sweet Christmas card featuring the super cute A Few of My Faves from our fabulous sponsor, Unity Stamp Co.! Unity has generously offered up a $25 gift card as a prize for the {BYSHC} Sketch Challenge 48 this month! So amazing!!


Not only am I sharing a brand new sketch, I'm also sharing a brand new stamp!! Yay! The adorable A Few of My Faves stamp just released over at Unity yesterday along with some other super cute and adorable holiday stamps!! Oh, and this adorable stamp is also available in photopolymer... {Clearly Unity} A Few of My Faves. I just can't get enough of this cute penguin!! I stamped it with Black Amalgam ink and Copic colored it with the following Copic markers:

Penguin: C00, C1, C3, YR21, YR15, YR
Scarf: R00, R20, R14
Presents: BG70, BG72, BG75, N0, N2, N4


I then die cut the penguin using a die from the Scallops & Circles {nesting dies}. And die cut a mat from the beautiful papers using the next largest die from the set. I had also stamped the sentiment on a decent sized scrap so I ended up die cutting that using the bottom portion of the same die I used to die cut the penguin. 


I love this month's sketch! The stripes in the background can be just striped paper or can be created using papers from a paper pack or even just random complimentary papers from a paper stash! The possibilities are endless!! So for my card today I decided to cut 1/2" strips from the papers in the Snowflake Elegance {paper pack}. There are 13 different papers in this paper pack so I just cut 1/2" strips of each of those 13 papers. I cut a 4 x 5-1/4" piece of a thin white card stock and I adhered the paper strips onto that card stock and then trimmed off all the excess. I adhered the penguin circles to the background and then adhered my background to a white A2 top fold card base. Easy peasy!


Here's a look at {BYSHC} Sketch Challenge 48 for the month of August. Loving this sketch! I can't wait to see what everyone does with it. I hope you'll join us and play along with the sketch. If you're interested in seeing a bit more inspiration for this sketch, check out the amazing inspiration from the design team over on the {BYSH} Cardmakers blog! Lots of beautiful inspiration this month from the design team.


Thanks so much for stopping by!
See ya next time.

Inky hugs,
Crystal


{Please note that comment moderation is ON. Your lovely comment will appear shortly.}

Friday, July 26, 2024

Christmas in July 2024 {BYSHC} Linky Party ~ Winter Cardinal ~ Pink & Main

 Hello there crafty friend!
I couldn't help myself I'm sneaking in another card for the Christmas in July 2024 {BYSHC} Linky Party! So I've played with this adorable Winter Cardinals Stamp Set from our lovely Sponsor Pink & Main a couple of times now. And I'm happy to say that with this card, I have stamped all of the adorable cardinals! How fun is that!? It's not often that I stamp every stamp from a stamp set.


I stamped the adorable cardinal using Memento Tuxedo Black ink in my mini misti with the Pressure Pal from our awesome Sponsor Twiddler's Nook. I love this tool! It comes in handy when my hands are hurting. I colored up the adorable Winter Cardinals using my Copic markers and die cut it using the X Stitched Circle die from our lovely Sponsor Gina Marie Designs. Unfortunately, I'm not finding this awesome die set on the website. I mat the cardinal with a black circle but it was in my file folder of black card stock. No idea what I used to die cut it though I would guess I used the Nesting Circles Dies from Sponsor Waffle Flower.

Here's a quick list of the Copic markers I used:
Cardinal: R20, R14, R46, C00, C1, C3, YR15
Scarf: C00, C1, C3, YG11, G24, G46
Holly: YG11, G24, G46, R20, R14, R46
Snow: C00, C1, C3


I'm also playing along with the Color Hues Challenge today! Red and Green are so perfect for a Christmas card! This fun challenge is open until July 29th, if you want to play along! 


The fun background was created using two dies from Pink & Main. I die cut New Leaf card stock from Papertrey Ink using the Plaid Cover Die Panel A. And then I die cut Pure Poppy card stock from Papertrey Ink using the Plaid Cover Die Panel B. These fabulous dies also come at a bit of a discount in a bundle called the Plaid Cover Dies Bundle. I adhered them over the front of a black A2 card base of True Black card stock also from Papertrey Ink using iCraft UltraBond Adhesive from our fab Sponsor Therm O Web.


I found a scrap of black card stock that was the width I was looking for but wasn't quite the length so I just cut it in half. I heat embossed the sentiment on the bottom piece. I prepped the card stock using the TE Anti-Static Powder Tool from Sponsor Taylored Expressions. And then I stamped the sentiment using the Sugar Cube White Pigment Ink from Taylored Expressions. I added some Alabaster White Embossing Powder and melted the powder with my Wagner Precision heat tool. I actually forgot to wipe away the excess powder... that's why it's so visible in the photo. Ugh. No time to redo! So just imagine it's all cleaned off. ;)


 I adhered the wide strip of black card stock on the top and bottom of the card and then I used iCraft 3D Foam Tape Jumbo Roll (white) from our lovely Sponsor Therm O Web to pop the cardinal circle up on the card. I finished off the card with three green Flat Back Rhinestones from Sponsor Twiddler's Nook.


My card design is inspired by a past sketch... the {BYSHC} Sketch 26. This is a classic sketch! I thought it would be perfect with this fun background and the circle focal image.


Have you stopped by the Christmas in July 2024 {BYSHC} Linky Party to check out all the wonderful Holiday inspiration being shared?! I've been inspired by so many of the cards! That's why I just had to make so many extras! LOL! I sure hope you'll stop by and check it out! Have an ink-credible day!


Thanks so much for stopping by!
See ya next time.

Inky Hugs,
Crystal


{Please note that comment moderation is ON. Your comment will appear shortly.}

{BYSHC} Sketch Challenge 47 ~ Christmas in July 2024 {BYSHC} Linky Party ~ Fluffy Friends Holiday ~ Taylored Expressions

Hello there crafty friend!
I'm back with more inspiration for the {BYSHC} Sketch Challenge 47 over in the Build Your Stash Holiday Cardmakers Facebook group! Today I'm sharing a fun Christmas card featuring the adorable Fluffy Friends - Holiday stamp set from our amazing sponsor, Taylored Expressions! Taylored Expressions has generously offered up a $25 gift card as a prize for the {BYSHC} Sketch Challenge 47 this month! So fabulous!!


I started with my background for this card. I ran a card front of Stampers Select White Card Stock from Papertrey Ink through my Big Shot with the cool Fanfare Cutting Plate from Taylored Expressions. It looked like little hills to me. Haha! I thought it would be fun for this cute bear!  Like he's sledding through some hilly snow. I also die cut a small scrap using the same cutting plate and then I die cut it again using a die from the Stitched Square Stacklets.


I trimmed the background to 3-7/8 x 5-1/8" and mat it with a piece of Pure Poppy card stock from Papertrey Ink measuring 4 x 5-1/4". I die cut a mat using the next largest square die from the Stitched Square Stacklets from Pure Poppy card stock. I pulled a fun scrap of pattern paper from the Meowy Christmas 6x6 Paper Pad from Newton's Nook Designs. It was a decent width but I had to trim the length. It measures 2 x 4-1/8" and then I mat it with a Pure Poppy mat measuring 2-1/8 x 4-1/4". I adhered all of my layers to a white A2 top fold card base using iCraft UltraBond Adhesive from Therm O Web.


 I stamped the adorable bear and hat from the Fluffy Friends - Holiday stamp set using Memento Tuxedo Black ink and then I die cut them using the coordinating Fluffy Friends - Holiday Die. I colored them up using Copic markers. I colored the black dots on the scarf using a Sakura White Gelly Roll pen. And then I added a few dots to the hat. I also cleaned up the edge under the sled where the red bled out of the line. Love my white gelly roll pen!! 

Here's a quick list of the Copic markers I used:
Bear: C00, C1, C3, R00, R20
Hat: R20, R14, R46
Scarf: YG11, G24, G46
Sled: R20, R14, R46, E53, E55, E57


 I heat embossed the sentiment from the Fluffy Friends - Holiday stamp set from Taylored Expressions. I prepped the red card stock with the TE Anti Static Powder Tool. I stamped the cute sentiment using the Sugar Cube White Pigment ink and added Alabaster White Embossing powder from Brutus Monroe. I then melted the embossing powder using my Wagner Precision Heat Tool. After letting the melted powder cool a bit, I rubbed my card stock with a microfiber cloth to remove the anti static powder. I trimmed up the sentiment and added a couple scrap pieces under the left side and the bottom using liquid glue. A great trick to adhere the sentiment flat for cards with layers. I also did that on the left and right sides of the squares.


Here's a look at {BYSHC} Sketch Challenge 47 for the month of July. Loving this sketch! There's just a few days left to play along with us. If you're interested in seeing a bit more inspiration for this sketch, check out the amazing inspiration from the design team over on the {BYSH} Cardmakers blog! So many fabulous cards this month from the design team.


I'm also playing along with the Christmas in July 2024 {BYSHC} Linky Party. Have you stopped by to check out all the wonderful holiday inspiration being shared?! I've been inspired by so many of the cards! That's why I've been making so many extras! LOL! I sure hope you'll stop by and check it out! Have a wonderful day!


Thanks so much for stopping by!
See ya next time.

Inky hugs,
Crystal


{Please note that comment moderation is ON. Your lovely comment will appear shortly.}

Tuesday, July 16, 2024

July Scraps Cards ~ Just Keep Swimming plus More ~ Unity Stamp Co.

 Hello there crafty friend!
I finished up my latest batch of leftover scraps and turned them into four pretty simple cards. Yay! I also played with some stamps that hadn't seen ink yet which is always a great bonus! It feels so good to have some more papers done!


Here's a look at the four cards all together. All very different! I'd love to know if you have a favorite of the batch. If you have a moment, comment below and let me know.


My first card features the beautiful turtle from the 
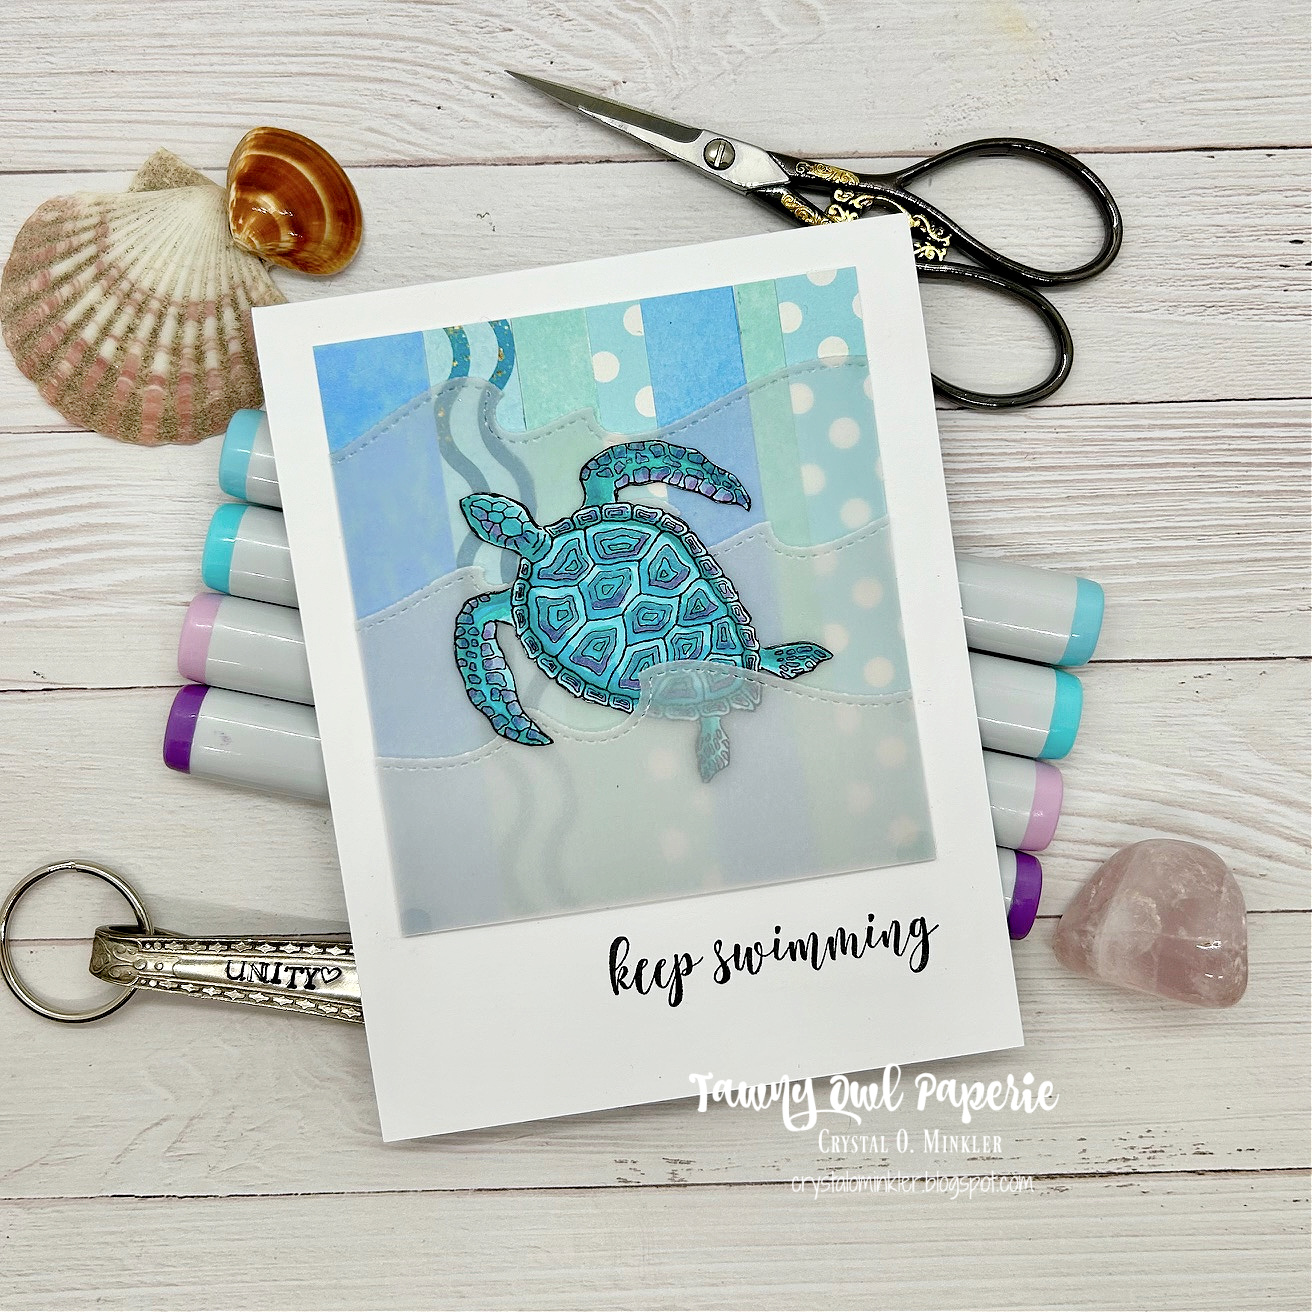
Just Keep Swimming stamps. I love this turtle! It's always so much fun to color too. As far as the scraps for this card, I had a bunch of paper strips that were different lengths and widths. I decided to combine them for a fun background. I adhered them all to a 3-1/2 x 3-7/8" piece of thin card stock. I trimmed off the excess paper strips and adhered the panel to a white A2 top fold card base. I die cut some Vellum Card Stock from Papertrey Ink using the Stitched Wave Borders dies from Lawn Fawn for a fun wave background for the turtle. 


I stamped the turtle with Black Amalgam ink from Gina K. Designs. I colored up the turtle using my Copic markers and then I fussy cut it on the line. I colored the edges of the fussy cutting using a Memento Tuxedo Black marker from behind the turtle just in case my marker slipped. I secured the vellum waves together using washi tape and then I trimmed the excess so they would fit over the 3-1/2 x 3-7/8" panel. I adhered the turtle tucking his bottom behind the last vellum wave. I adhered the vellum to the card by adding glue to the back of the turtle. Once it was a little dry and wouldn't shift anymore, I added a drop of liquid glue to the bottom corners of the vellum to secure it a tiny bit more. I also added tiny dots of glue under the stitches on the very edge of each layer. The stitches covered the glue pretty well. You can see the glue a tiny bit on those bottom corners but it's hardly noticeable in person. I finished this card by stamping the sentiment.

Copic Markers: BG000, BG01, BG15, BG05, BG57, V0000, V12, V15


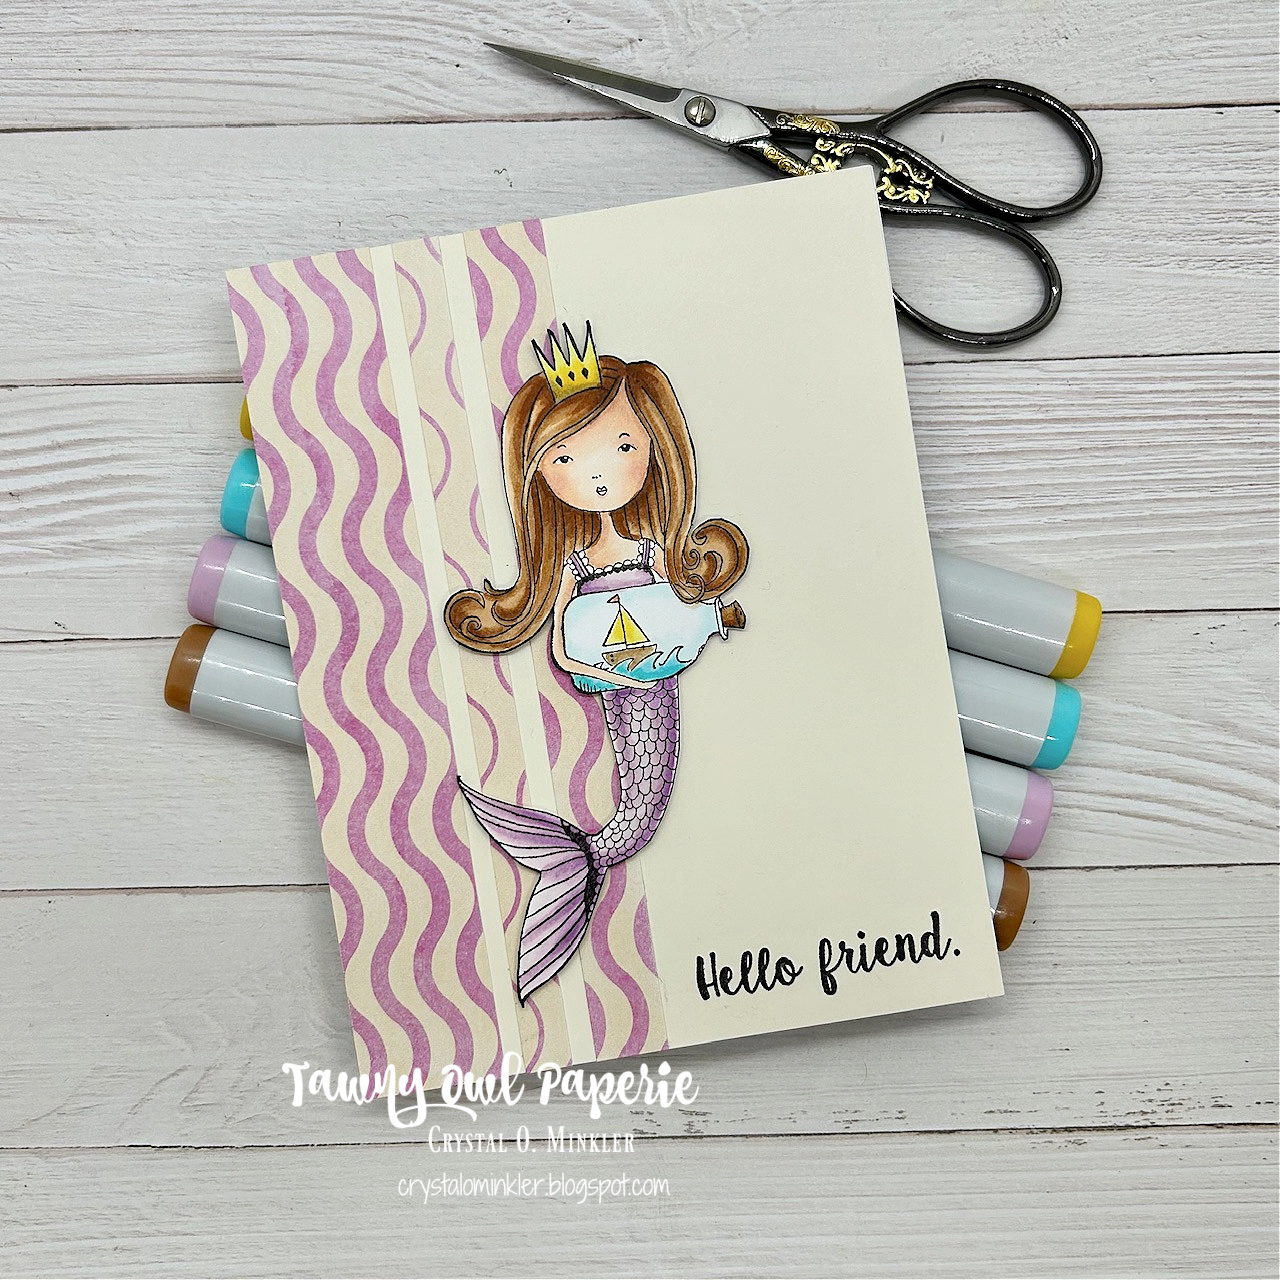
My second card uses three similar strips of pattern paper for a quick card design. I adhered them to a 4-1/4 x 5-1/2" piece of Vintage Cream Card Stock from Papertrey Ink. And then I adhered the card front to a white A2 top fold card base of Stampers Select White Card Stock, also from Papertrey Ink. I stamped the adorable mermaid from the Spirit of a Mermaid stamps using Black Amalgam Ink and I also stamped the sentiment on the card. Sadly, this is one of the retired stamp sets from Unity. I colored up this beauty with my Copic markers and fussy cut her just like I did with the turtle. I added a touch of Sakura White Gelly Roll pen to the whites of her eyes and the frill on her top. And I popped her up on the card using foam tape.

Here's a quick list of the Copic markers I used for the mermaid:
Skin: E000, E00, E11, R00, R20
Hair: E50, E30, E35, E37
Crown: Y11, Y15, Y28
Body / Tail: V0000, V000, V12, V15
Sailboat: Y11, Y15, R12, R05, E30, E35
Waves: BG000, BG01, BG15
Bottle: BG000
Cork: E30, E35, E37


My third card uses four rectangle scraps for an interesting background. I overlapped them just a bit and adhered them all to a white A2 top fold card base. I stamped the fish from the retiring Fishy Philosophy stamps with Black Amalgam ink and fussy cut them. The sentiment I stamped with Peacock Feathers Distress Ink. I added foam tape to the back of these fish and popped them up on the card. And I finished off the card with a few clear drops from my stash.

Copic Markers: Y11, Y15, YR15


My last card also features the cute fish from the Fishy Philosophy stamps. I love this cute stamp set! I had one last large piece of scrap pattern paper from these papers so I just adhered it directly to white A2 top fold card base that I turned on it's side for a landscape card. This was such a simple card! I stamped the fish and the sentiment using the Black Amalgam ink. I fussy cut the fish just like the others and popped it up on the card, too.

Copic Markers: Y11, Y15, R12, R05


I'm so excited to have another paper pack done! Woohoo! What do you think of the card designs this time? Do you have a favorite? I love the simple designs of all of them so it's hard for me to choose a favorite. Well, I'm excited to pick out another pattern paper pack to finish off. I'll definitely pick one out to use with the upcoming Tawny Owl Paperie Inky Inspiration Sketch 24 that will start in a couple of weeks. Have a wonderfully inky week!

Thanks so much for stopping by!
See ya next time.

Inky Hugs,
Crystal


{Please note that comment moderation is on. Your lovely comment will appear once approved.}