Showing posts with label #newrelease. Show all posts

Thursday, August 8, 2024

Fun with Circles Holiday Card ~ Just for You Dear ~ Unity Stamp Co.

Hello there crafty friend! 
Today I'm sharing one more holiday card for Unity's August release. This time I inked up the super cute and adorable Just for You Dear. This adorable stamp is also available in photopolymer... {Clearly Unity} Just for You Dear. I love that Unity offers some of their stamps in clear and rubber now!


I had a fun idea for layering circles in a card design and wanted to give it a try! I thought the deer from Just for You Dear would work perfectly with this design. I stamped the sweet deer and sentiment with Black Amalgam ink and colored up the deer with my Copic markers. 

Here's a quick list of the Copic Markers I used:
Deer: E51, E21, E23, E25, E29
Ears: R00, R20
Scarf: R20, R14, G24, G46

You can check out my Copic coloring video here... Copic Color with Me | Just for You Dear | Unity Stamp Co.


I die cut the sweet deer, a green mat from Garden Green card stock from Stampin' Up, and a bunch of circles from the wonderful Watercolor Winter {paper pack} using the Scallops & Circles {nesting dies}. I die cut the sentiment using a die from the Scalloped & Stitched Sentiment Nesting Dies. I trimmed a mat from the same Garden Green card stock.

You can check out my process video for this card here... Fun with Circles Holiday Card | Just for You Dear | Unity Stamp Co.


The green striped pattern paper in the background measures 4 x 5-1/4". It's adhered to a 4-1/4 x 5-1/2" card front of Garden Green card stock and then I adhered the panel to a white A2 top fold card base. The adorable deer circles and the sentiment are popped up using foam tape. Such a fun card to make!
I hope you have an ink-tastic day! 

Thanks so much for stopping by!
See ya next time.

Inky hugs,
Crystal

{Please note that comment moderation is on. Your lovely comment will appear shortly.}

Friday, August 2, 2024

Winter Wonderland with Distress Crayons ~ A Wintry Hello ~ Unity Stamp Co.

Hello there crafty friend! 
I'm back with another holiday card for Unity's latest release. This time my card features two awesome new stamps from the August release. First is the beautiful A Wintry Hello which includes the gorgeous deer, a tree scene, some snowflakes, and four awesome sentiments. Love, love, love this amazing set of stamps! And I paired it with the absolutely beautiful Pines of Endearment that includes four lovely pine trees, a snowflake, a star, and three sentiments. This beautiful set of stamps is also available in photopolymer... {Clearly Unity} Pines of Endearment. I love that Unity offers some of their stamps in clear and rubber now!


I played a bit with my distress crayons again!! I colored a 4-1/4 x 5-1/2" piece of white card stock with 3 distress crayons. I used Evergreen Bough, Twisted Citron, and Peacock Feathers. I used a baby wipe to blend the colors on my background. And then I ran it through my Big Shot with the Simple Snowflakes Embossing Folder from Tim Holtz. I lightly rubbed the raised snowflakes with a Sugar Cube White Pigment ink pad. I love the fun mix of colors and how the white pigment ink made the snowflakes on the background pop!


I stamped the beautiful deer and the tree scene from the A Wintry Hello using Black Amalgam ink. I also decided I wanted a couple more trees so I stamped a couple of pines from the Pines of Endearment. I colored them up with my Copic markers and then fussy cut them leaving a white border. I also stamped the sentiment and trimmed it up.

Here's a quick list of the Copic markers I used:
Deer: E51, E55, E57
Trees: E55
Pine Trees: YG67, YG99


I die cut a hill using the Stitched Hillside Borders die from Lawn Fawn. I also die cut a scalloped frame using the Frames - Scalloped Stitched Rectangles die from Gina Marie Designs. I adhered all the elements of my scene onto the distress crayon background. I splattered some white acrylic paint over the scene. And then I adhered the frame over top. I had to trim off a bit of the distress crayon background. And then I adhered the framed panel to a white A2 top fold card based turned on its side. This was such a fun card to make!
I hope you have an ink-tastic day! 

Thanks so much for stopping by!
See ya next time.

Inky hugs,
Crystal

{Please note that comment moderation is on. Your lovely comment will appear shortly.}

Sunday, July 14, 2024

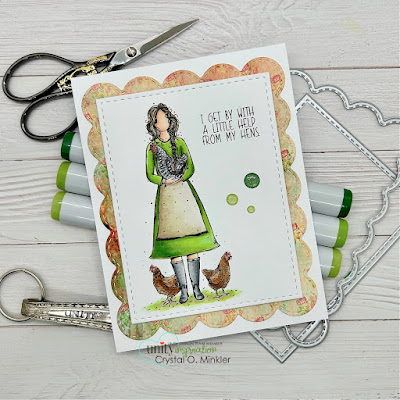
A Little Help From My Hens ~ Bobbie Sue Girl ~ Unity Stamp Co.

Hello there crafty friend! 
Today I'm sharing one more card for Unity's latest release. This time my card features the sweet new Bobbie Sue Girl and I tried to color her up like my dear friend, Bobbie Sue! Angie Blom did an amazing job illustrating this stamp to look like Bobbie Sue. Such a fun stamp to color up too.


I paired up Bobbie Sue Girl with a piece of pattern paper from the Bohemian Dream {paper pack}. I wanted to leave the card pretty much CAS but have a bit of color peeking out. The largest scallop die from the BIG Scallops & Rectangles {nesting dies} was perfect for that peeking paper. I also die cut the Bobbie Sue panel using the largest stitched rectangle die from the same die set. 


I stamped Bobbie Sue Girl and the sentiment using Memento Tuxedo Black Ink. I then colored her and the chickens up with my Copic markers. I added some touches of white to the black chicken using a Sakura White Gelly Roll pen. I added foam tape to the back of the main panel and popped it up on the card.

Here's a quick list of the Copic markers I used:
Skin: E000, E00, E11
Hair: E50, E53
Dress: YG11, YG03, YG25, YG67
Apron: E40, E81, E43
Boots: N2, N4, N6
Black Chicken: N2, N4, N6, R20, R14, R46
Left Bottom Chicken: E35, E37, E39, R20, R14, R46, YR21, YR15
Right Bottom Chicken: E35, E37, R20, R14, R46, YR21, Yr15
Grass: YG11, YG91, YG03, Colorless Blender


I finished off the card with a few glittery green enamel dots. So much fun to make! 
I hope you have an ink-tastic day! 

Thanks so much for stopping by!
See ya next time.

Inky hugs,
Crystal

{Please note that comment moderation is on. Your lovely comment will appear shortly.}

Saturday, July 13, 2024

Distress Crayons on Kraft ~ Serene Silhouettes ~ Unity Stamp Co.

Hello there crafty friend! 
Today I'm sharing a quick card for Unity's July release featuring the lovely Serene Silhouettes. I couldn't help but play with a few more Distress Crayons. But this time I thought I'd use them on Kraft card stock. I love the colors of the Distress Crayons on the Kraft... so awesome!


I used a couple strips of purple tape across my Kraft Card Stock panel to mask the area I wanted to color with the Distress Crayons. I then colored the space in between the tape using the Tumbled Glass, Twisted Citron, and Mermaid Lagoon Distress Crayons. I used a baby wipe to blend out the crayons.


I stamped the pretty trees from Serene Silhouettes with Black Amalgam ink from Gina K. Designs. Once I was happy with my pretty trees, I die cut the panel using the largest die from the Deckle & Stitches Nesting Die Set. I adhered my panel to a 4-1/4 x 5-1/2" piece of True Black Card Stock from Papertrey Ink and then adhered the panel to a white A2 top fold card base of Stampers Select Card Stock, also from Papertrey Ink.


I stamped the sentiment on the card but I messed it up so I stamped it again on a scrap of Kraft Card Stock and then mat it with a piece of black card stock. I then adhered it to the card. A great stamp for sympathy cards. Have an ink-redible day! 

Thanks so much for stopping by!
See ya next time.

Inky hugs,
Crystal

{Please note that comment moderation is on. Your lovely comment will appear shortly.}

Thursday, July 11, 2024

Hello, From the Flock ~ Flock Talk ~ Unity Stamp Co.

Hello there crafty friend! 
Today I'm sharing a sweet mini slimline card for Unity's July release. How freaking cute are these birds from the Flock Talk stamps!? I love them! So fun to color! On a completely different note... have you heard the amazing news that Unity is now offering select stamp sets in their amazing red rubber AND clear photopolymer?!?! Woohoo! I am so excited for this awesome change! I absolutely love Unity's red rubber stamps, but clear stamps are so easy to store since they are less bulky and they're easier to line up for stamping with clear blocks and in a stamp platform. So exciting!!


I paired up Flock Talk with the fun Cloud Hopper Chronicles {paper pack}. This mini slimline measures 6-1/2 x 7" and is scored at 3-1/2". Because it's 6-1/2" long I cut my 6 x 3-1/2" striped pattern paper in half at 3 x 3-1/2" and adhered it on either side of the white card base. You can barely notice the pattern paper missing in the middle of the card.


I stamped the adorable birds and sentiment from Flock Talk using Black Amalgam Ink from Gina K. Designs. I then colored them up with my Copic markers. I added a few clouds using the Cloud & Wave Stencil with some Tumbled Glass Distress Ink. 

Here's a quick list of the Copic markers I used:
Left Bird: YR21, YR15, YR16, C00, C1, C3, BV0000, BV20, BV11, BV34, Y11, Y15, B000, B00
Middle Bird: YR21, YR15, YR16, C00, C1, C3, B000, B00, B02, Y11, Y15, Colorless Blender
Right Bird: YR21, YR15, YR16, BV0000, BV20, BV11, Y11, Y15, RV10, RV11, B000, B00
Flowers: Y11, Y15
Grass / Stems: YG11, YG23


I die cut the panel using the Wonky Stitched Mini Slimline die from Gina Marie Designs. Added foam tape to the back of the panel and popped it up on the card. And then finished off the card with a few enamel dots. So much fun to make! I hope you have an ink-tastic day! 

Thanks so much for stopping by!
See ya next time.

Inky hugs,
Crystal

{Please note that comment moderation is on. Your lovely comment will appear shortly.}

Thursday, June 27, 2024

Good Day ~ Newsworthy Blooms ~ Unity Stamp Co.

Hello there crafty friend! 
Today I'm sharing one more card for Unity's latest mini release. I just had to ink up the amazing Newsworthy Blooms! Such an absolutely gorgeous stamp! And so fun to color up, too!


I paired up the Newsworthy Blooms with the gorgeous Nostalgic Amour - Romantic Vintage Paper Pack. I cut the heart paper for my background being sure to leave that beautiful heart so it would appear near the bottom of the card. That layer measures 4 x 5-1/4". The striped paper was in my stash and I'm not sure what the measurements are for it. I adhered them together and then adhered them to a card front of True Black Card Stock from Papertrey Ink measuring 4-1/4 x 5-1/2". 


I stamped the gorgeous Newsworthy Blooms using Black Amalgam Ink from Gina K. Designs. I then colored it up with my Copic markers. I fussy cut the flowers on the line but this time I didn't bother coloring the edges of the cut because I didn't want the black edge to be super neat and perfect. I die cut the sentiment using a die from the Scalloped & Stitched Sentiment Nesting Dies. I adhered the sentiment to the bottom of the newspaper and then added foam tape to the back of both and popped them up on the card.

Here's a quick list of the Copic markers I used:
Flowers: R20, R14, R35, R37, R59
Leaves: YG95, YG99
Newspaper: E41, E43, E44


I finished off the card with a few enamel dots. So much fun to make! I hope you have an ink-tastic day! 

Thanks so much for stopping by!
See ya next time.

Inky hugs,
Crystal

{Please note that comment moderation is on. Your lovely comment will appear shortly.}

Saturday, June 15, 2024

Happy 4th of July ~ Patriotic Gnome ~ Unity Stamp Co.

Hello there crafty friend! 
Sharing one more card for Unity's latest release. I just had to play with the awesome new Patriotic Gnome! How stinkin' cute is this guy?! And he was so fun to color up, too!


I've had these patriotic papers in my stash for awhile. Not sure where they came from but I really thought they would be fun to use with the awesome new Tab Fold {Fun Fold Die}. So I die cut the inside striped papers and the firecracker papers and then I didn't want to use either of those again for the tab and then I remembered Unity released a patriotic paper pack with an old Whit Kit. I went searching through my stash and found it! Actually, it wasn't much of a search it's called Americana Vibes {paper pack} so it was first in my Unity paper pack box since it's organized alphabetically. LOL


Here's a quick list of the Copic markers I used for Patriotic Gnome:
Skin: E000, E00, E11
Hair / Mustache / Beard: C00, C1, C3
Hat / Clothes / Sneakers: B91, B93, B95, C00, C1, C3, R20, R14, R46
Flowers: C1, Y15, YG11, YG23, R14, R46
Grass: YG11, YG23


I didn't want the tab to cover up the gnome so I used a ruler and pencil to draw a line where I wanted to cut an opening. I laid my card open and flat on my mat and used a Fiskars Fingertip Control Craft Knife along my ruler to cut out the line. I ended up having to extend the cut a tiny bit on either end but it fits perfectly. Super easy too.


Here you can see the tab pulled out.
The sentiment was stamped with Black Amalgam ink and then die cut using the smallest die from the Postage Stamp {nesting dies}. I added foam tape to the back and popped it up on the card.


Here you can see the inside of the card. I think I may die cut a panel of white card stock to insert here. Maybe I'll use the Postage Stamp {nesting dies} to coordinate with the sentiment on the front of the card. Oh, and maybe I'll stamp another Patriotic Gnome and add him inside the card too.


So the firecracker papers were a little too busy... I didn't just want to adhere the Patriotic Gnome over top and him get lost in the firecrackers so I die cut a circle from vellum card stock using a die from the Scallops & Circles {nesting dies}. Such a fun card to make. Hope you have an ink-tastic day! 

Thanks so much for stopping by!
See ya next time.

Inky hugs,
Crystal

{Please note that comment moderation is on. Your lovely comment will appear shortly.}

Thursday, June 13, 2024

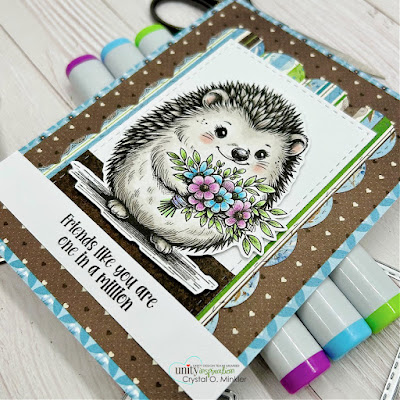
One in a Million Friend Card ~ A Hedgie Hello ~ Unity Stamp Co.

Hello there crafty friend! 
Popping in today with a sweet card featuring the adorable A Hedgie Hello from Unity!! It's time for Unity's June release and there are so many adorably sweet new stamps! It was so hard to pick one to play with, but the super cute hedgehog won out! It's just too sweet!


I stamped the A Hedgie Hello stamp and sentiment using Black Amalgam ink from Gina K Designs onto Stampers Select White Card Stock from Papertrey Ink. I colored up the hedgehog with my Copic markers. Fussy cut the hedgehog using my EK Success Cutter Bee Scissors and leaving a bit of a white border around the image. I die cut a stitched rectangle of white card stock using the middle die from the BIG Scallops & Rectangles {nesting dies}.

Here's a quick list of the Copic markers I used:
Hedgie: W00, W0, W2, W3, W5, R00, R20
Hedgie Nose: C00, C3
Flowers: B000, B02, B04, V01, V05, V06, Y06, Y15
Leaves / Stems: YG11, YG23, YG06


My paper layers are from the beautiful Penelope Collection from Bo Bunny. I colored before looking through my papers... ooopsies!... and was happy to find these papers have at least the blue and green to coordinate nicely. Lots of layers on this one. The bottom blue layer is a card front of 4-1/4 x 5-1/2". On top of that is the brown with hearts that measures 4 x 5-1/4". Next layer is the striped papers that I die cut using the middle scalloped die from the BIG Scallops & Rectangles {nesting dies}. I die cut a piece of dark brown pattern paper using the middle stitched rectangle die {same die I cut out the white card stock}. I trimmed the brown pattern paper and adhered it to the bottom of the white rectangle.


I adhered all of those layers together and then adhered them to a white A2 top fold card base. I trimmed the sentiment and adhered it across the card. I trimmed off the excess hanging off the edges. I added foam tape to the back of the hedgehog and popped it up on the card. I think this one turned out pretty cute. Hope you have an ink-tastic day! 

Thanks so much for stopping by!
See ya next time.

Inky hugs,
Crystal

{Please note that comment moderation is on. Your lovely comment will appear shortly.}
Thursday, May 23, 2024

Light Up the World ~ Echo of Kindness ~ Unity Stamp Co.

Hello there crafty friend! 
The birthday celebration continues over at Unity with Whit's Birthday Sale!! And another amazing release, of course! Woohoo! I don't know about you but I was super excited to see a new Angie Girl!! Isn't she just darling!? And my daughter is always making hearts with her fingers like this. This girl could totally be her. I love it!


I stamped the girl and sentiment from the beautiful new Echo of Kindness stamps using Black Amalgam ink from Gina K Designs onto Stampers Select White Card Stock from Papertrey Ink. I colored up the girl with my Copic markers. I die cut the girl with a die from the Stacked Baroque die set from Tim Holtz and Sizzix. I added these cool dies to my stash awhile ago and just found them in the wrong place... lol! So I thought I'd use them for this card. Aren't they perfect with this sketch? I also die cut a piece of True Black card stock from Papertrey Ink using the slightly larger die from the same die set.


I trimmed the four pattern papers from the gorgeous Enveloped in Love {paper pack} from Unity to 4 x 5-1/4" and then I used a ruler and pencil to cut my angles. I basically did the same measurements and cuts that I used in this video... Cutting & Assembling Papers for {BYSHC} Sketch 29. I then adhered the papers to a True Black card front measuring 4-1/4 x 5-1/2". And as I often do, I adhered the panel to a Stampers Select White Card Stock A2 top fold card base.

Here's a quick list of the Copic markers I used:

Skin: E000, E00, E11
Hair: E70, E71, E74, E77
Dress / Hair Tie: R000, R11, R32, R43


Inspiration for my card came from the {BYSHC} Sketch 29. It's not just a fabulous sketch for Christmas cards! LOL! This is an absolute favorite of mine! It always makes for a lovely card.


I die cut the sentiment using a die from the Scalloped & Stitched Sentiment Nesting Dies from Unity. I softened the brightness of the white card stock by blending with my brown blending brush. I didn't add any ink to it so it would stay light. I adhered the sentiment to the girl and added foam tape to the back of both. Popped it up on the card for a bit of dimension. I added a few black enamel dots from my stash to finish off the card. I love how this turned out! Hope you have an ink-tastic day! 

Thanks so much for stopping by!
See ya next time.

Inky hugs,
Crystal

{Please note that comment moderation is on. Your lovely comment will appear shortly.}

Sunday, May 19, 2024

Masculine Birthday Card ~ Still Turning Heads ~ Unity Stamp Co.

Hello there crafty friend! 
I'm digging this awesome new mustang stamp called Still Turning Heads from Unity's new release. I absolutely love old cars! This was a fun one to color too. All the details in the stamp made it so easy to color up.


I stamped the car and sentiment from the amazing Still Turning Heads stamps using Black Amalgam ink from Gina K Designs onto Stampers Select White Card Stock from Papertrey Ink. I knew I wanted to make a slimline card for this one so I stamped the car on the far right side. 

Here's a quick list of the Copic markers I used:

Car: BG000, BG02, BG45, BG57
Wheel / Lights: C00, C1, Colorless Blender
Plate: Y35, YR15, YR16


I die cut the image using the Big and Little Chain Slimline dies from Gina Marie Designs. I also die cut another piece of white card stock. I blended over a stencil in my stash. I believe it's from one of the past Whit Kit's but I'm really not sure. I just blended using my yellow and orange blending brushes. I didn't add any more ink to the brushes just used what was on them.


I cut the car panel diagonally and then adhered the panel to the stenciled panel. I trimmed a piece of True Black Card Stock from Papertrey Ink to 7 x 8-1/2" and scored it at 3-1/2" making a slimline card base. I adhered the car panel to the base finishing this card off. That's it for me today.
Hope you have an ink-tastic day! 

Thanks so much for stopping by!
See ya next time.

Inky hugs,
Crystal

{Please note that comment moderation is on. Your lovely comment will appear shortly.}

Saturday, May 18, 2024

Snarky Kitty Birthday Card ~ Pissy Party ~ Unity Stamp Co.

Hello there crafty friend! 
The birthday celebration continues over at Unity!! And that means another amazing release and sale! Woohoo! So many new favorites... I don't know if I can choose just one. Which one's your new fave?


I stamped the kitty and sentiment from the awesome new Pissy Party stamps using Black Amalgam ink from Gina K Designs onto Stampers Select White Card Stock from Papertrey Ink. I colored up the kitty with my Copic markers. I die cut the panel with the largest die from the Scallops & Rectangles {nesting dies}. I also die cut a piece of the pattern paper from the Pastel Party Parade {paper pack}


I trimmed the pattern paper to sit just under the shadow of the kitty and adhered the papers together. I then adhered the panel to a white A2 top fold card base.

Here's a quick list of the Copic markers I used:

Kitty: N0, N1, N3, N5
Nose: RV10
Eyes: YG21, YG11
Hat: Y11, Y15
Cupcake: RV10, RV02, RV14, BG000, BG02,  Y11, Y15


I trimmed the sentiment and popped it up on the card with foam tape. I added a couple enamel dots from my stash that's similar to the blue in the papers. This turned out so cute! 
Hope you have an ink-tastic day! 

Thanks so much for stopping by!
See ya next time.

Inky hugs,
Crystal

{Please note that comment moderation is on. Your lovely comment will appear shortly.}

Friday, May 10, 2024

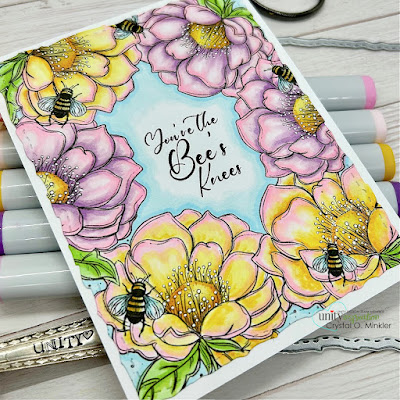
You're the Bee's Knees ~ Unity Stamp Co.

Hello there crafty friend! 
Sharing one more card using new goodies from Unity's 16th birthday celebration!! I am a huge fan of the background stamps at Unity. The new You're the Bee's Knees is a fabulous new addition to the line!


I stamped the background and sentiment using Black Amalgam ink from Gina K Designs. I'm not sure what kind of flowers these are so I had fun mixing colors when I colored them up using my Copic markers. This one actually took me a few days in between other projects, homeschool lessons and well, life. Haha... it was very relaxing and I enjoyed every second of it.

Here's a quick list of the Copic markers I used:

Pink & Yellow Flowers: RV0000, RV10, RV02, Y11, Y15, Y35
Pink & Purple Flowers: RV0000, RV10, RV02, V000, V12, V15
Flower Centers: Y11, Y15, Y35, YR14
Leaves / Stems: YG11, YG23, YG05
Background: B0000, B00, Colorless Blender


Once my coloring was completely dry, I used a Sakura White Gelly Roll pen to color in the little dots in the center of the flowers. I die cut the background using the largest die from the Deckle & Stitches Nesting Die Set.


I debated using a card front of yellow or purple or even kraft, but decided to go with just a white A2 top fold card base. Not only does it make for less layers so it's easy and cheaper to mail, the white background also helps the white dots pop on the flowers. I absolutely love how this turned out! Hope you have an ink-tastic day! And Happy Mother's Day weekend everyone!

Thanks so much for stopping by!
See ya next time.

Inky hugs,
Crystal

{Please note that comment moderation is on. Your lovely comment will appear shortly.}

Thursday, May 9, 2024

Pink Magnolias ~ Special Place ~ Unity Stamp Co.

Hello there crafty friend! 
Popping in with a pretty quick floral card I created using new goodies from Unity's 16th birthday celebration!! Woot woot! Happy Birthday, Unity! 


The gorgeous magnolias reminded me our past home in California where we had several magnolia trees in front of our home. They were so beautiful! They were also white... but I wanted to color some pink magnolias so here we are! LOL! I stamped the beautiful magnolias from the Special Place stamps on Stampers Select White card stock using Black Amalgam ink. I then colored the flowers with Copic markers {yes, I forgot to color the flower centers}.

Here's a quick list of the Copic markers I used:

Pink: RV0000, RV10, RV02
Green: G43, G99, G85


I die cut the magnolias using the largest die from the Postage Stamp {nesting dies}. And then I grabbed my Love Kitties {paper pack}. I remembered the lovely pink brick papers in this pack and just knew I had to use it. I cut down a full sheet of pattern paper for my background to 4-1/4 x 5-1/2". I didn't want to cover up the pretty pink brick paper so I tore the magnolia panel and adhered it to the brick pattern paper. I trimmed some {Ivory} May Arts Burlap String into three strand and then tied a triple bow. Using liquid glue I adhered the panel to a white A2 top fold card base that I turned on it's side for a landscape card. 


I fussy cut the sentiment and adhered it to the card. I finished off the card with three Translucent Enamel Dots from Gina Marie Designs. A simple and quick card for someone special! This turned out prettier than I had thought! Have an ink-tastic day!

Thanks so much for stopping by!
See ya next time.

Inky hugs,
Crystal

{Please note that comment moderation is on. Your lovely comment will appear shortly.}

Friday, May 3, 2024

Pawsome Birthday ~ Ween Party Crew ~ Unity Stamp Co.

Hello there crafty friend! 
Popping in with a quick birthday card I created using new goodies from Unity's 16th birthday celebration!! Woot woot! Happy Birthday, Unity! 


I just had to play with the adorable pups in the new Ween Party Crew! How sweet are those pups?! I love wiener dogs! I had fun coloring up this trio of weens with my Copic markers.

Here's a quick list of the Copic markers I used:

Red Ween: E11, E13, E17, E09
Pink Balloon: RV0000, RV10, RV02
Black Ween: E11, E13, N0, N1, N3, N5
Yellow Balloon: Y000, Y11
Tan Ween: E40, E11
Blue Balloon: BG0000, BG000, BG02


Inspiration for my card came from the Tawny Owl Paperie Inky Inspiration Sketch 21. This is the brand new sketch challenge from the Tawny Owl Paperie Inky Inspiration Facebook group. A fab sketch for those little scraps of pattern paper!


I stamped the cute pups and sentiment using Black Amalgam ink from Gina K. Designs. I die cut them using the largest stitched and scalloped die from the Scallops & Rectangles {nesting dies}. And then I grabbed my Pastel Party Parade {paper pack} - say that alliteration five times fast!! LOL! I cut down a full sheet of pattern paper for my background; measuring 4-1/4 x 5-1/2". And then I found a few scraps of papers. I had to cut a couple of them down a bit but otherwise, these were scraps!


I trimmed up the sentiment keeping it long so it would fit across the bottom of the card. I mat it with another scrap of pattern paper from the paper pack and then adhered it to the card. A simple and quick birthday card for my stash! This turned out cuter than I had thought! Have an ink-tastic day!

Thanks so much for stopping by!
See ya next time.

Inky hugs,
Crystal

{Please note that comment moderation is on. Your lovely comment will appear shortly.}

Thursday, April 25, 2024

Love You, Mom! ~ Snarky Mama ~ Unity Stamp Co.

Hello there crafty friend! 
Popping in with a pretty Mother's Day card featuring the beautiful flowers from the brand new stamp called Snarky Mama from Unity Stamp Co. Even though I love all the fun and snarky sentiments in this kit, I just had to use the 'Love You, Mom!' sentiment. I miss my mama every single day.


I paired up the pretty flowers with the Kindness is Magic {paper pack}. I really love the yellow in this paper and wanted to color the flowers yellow! Which I did using a handful of Copic markers and die cut them with a stitched arch die from the Scallops & Arches {nesting dies}. I also die cut the sentiment using one of the dies from the Scalloped & Stitched Sentiment Nesting Dies.

Here's a quick list of the Copic markers I used:

Yellow Flowers: Y11, Y15, Y35, E23, E25
Red Flowers: R14, R46
Leaves: YG03, YG63, YG97


Inspiration for my card came from the {BYSHC} Sketch #7. This is one of my favorite sketches from the Build Your Stash Holiday Cardmakers Facebook group. If you're interested in seeing more fun sketches, check out the group or stop by the Build Your Stash Holiday Cardmakers blog. I'd love to have you join us!

I die cut a scalloped arch from Kraft card stock from Papertrey Ink using the next largest die from the Scallops & Arches {nesting dies}. I used the dimensions for the sketch for my paper layers {minus the die cuts, of course}. The yellow card stock is Daffodil Delight from Stampin' Up and the green card stock is Prairie Grass from Papertrey Ink.


I adhered the sentiment to the arches and added foam tape to the back of both. I popped them up on the card. This turned out prettier than I had thought! Have a wonderful night friends!

Thanks so much for stopping by!
See ya next time.

Inky hugs,
Crystal

{Please note that comment moderation is on. Your lovely comment will appear shortly.}