Showing posts with label #backgroundstamp. Show all posts

Wednesday, May 22, 2024

Membership Wednesday ~ May 2024 BOM Grandma's Rose ~ Unity Stamp Co.

  Hello there crafty friend!
Today I'm sharing a super quick vintage card featuring the awesome background stamp from the May 2024 Background of the Month membership from Unity. This background reminds me of my grandparents couch when I was a kid. I just had to do a reddish pink hue to capture the color of their couch.


I ink smooshed a 4-1/4 x 5-1/2" piece of Kraft card stock from Papertrey Ink using Festive Berries and Tattered Rose Distress Oxide Inks. I completely dried the background using a Wagner Precision heat tool. And then I stamped the Grandma's Rose Background stamp using Vintage Photo Distress Ink. 


I die cut the Grandma's Rose background stamp using the largest die from the Scallops & Rectangles {nesting dies}. Adhered it to a 4-1/4 x 5-1/2" piece of Early Espresso Card Stock from Stampin' Up that I then adhered to a Kraft A2 top fold card base. I stamped the sassy vintage gal from Queen of the Universe. Love her sass! She actually reminds me of my Granny!


I went ahead and used the Vintage Photo Distress Ink to stamp the Queen of the Universe and the sentiment onto scraps of Kraft card stock. I die cut the queen using a die from the Deckle & Stitches Nesting Dies. I mat both pieces using scraps of the Early Espresso card stock. I adhered the sentiment overlapping the queen just a bit and then added foam tape to the back of both pieces. I removed the backing and popped them up on the card. I felt like the card needed a little something so I tied a pretty bow of Dark Chocolate 1/2" Satin Solid Ribbon from Papertrey Ink and adhered it to the card using a glue dot.
 

And here's a look at the awesome Background of the Month membership! So nostalgic! I love it! Well, that's it for me today! I hope you've been inspired to play with your membership stamps!
Have an ink-redible day!


Thanks so much for stopping by!
See ya next time.

Inky Hugs,
Crystal


{Please note that comment moderation is on. Your lovely comment will appear once approved.}

Friday, May 10, 2024

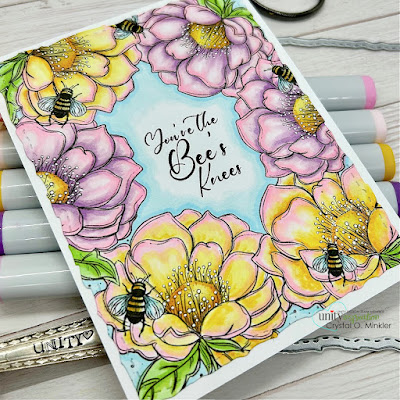
You're the Bee's Knees ~ Unity Stamp Co.

Hello there crafty friend! 
Sharing one more card using new goodies from Unity's 16th birthday celebration!! I am a huge fan of the background stamps at Unity. The new You're the Bee's Knees is a fabulous new addition to the line!


I stamped the background and sentiment using Black Amalgam ink from Gina K Designs. I'm not sure what kind of flowers these are so I had fun mixing colors when I colored them up using my Copic markers. This one actually took me a few days in between other projects, homeschool lessons and well, life. Haha... it was very relaxing and I enjoyed every second of it.

Here's a quick list of the Copic markers I used:

Pink & Yellow Flowers: RV0000, RV10, RV02, Y11, Y15, Y35
Pink & Purple Flowers: RV0000, RV10, RV02, V000, V12, V15
Flower Centers: Y11, Y15, Y35, YR14
Leaves / Stems: YG11, YG23, YG05
Background: B0000, B00, Colorless Blender


Once my coloring was completely dry, I used a Sakura White Gelly Roll pen to color in the little dots in the center of the flowers. I die cut the background using the largest die from the Deckle & Stitches Nesting Die Set.


I debated using a card front of yellow or purple or even kraft, but decided to go with just a white A2 top fold card base. Not only does it make for less layers so it's easy and cheaper to mail, the white background also helps the white dots pop on the flowers. I absolutely love how this turned out! Hope you have an ink-tastic day! And Happy Mother's Day weekend everyone!

Thanks so much for stopping by!
See ya next time.

Inky hugs,
Crystal

{Please note that comment moderation is on. Your lovely comment will appear shortly.}

Wednesday, March 27, 2024

Membership Wednesday ~ March 2024 BOM & UU ~ Unity Stamp Co.

  Hello there crafty friend!
Today I'm sharing a fun coffee card featuring the fabulous March 2024 Background of the Month membership along with the awesome coffee cup stamp from the March 2024 Uniquely Unity membership from Unity. These stamps were made for each other!!


I ink smooshed a 4-1/4 x 5-1/2" piece of Stampers Select White Card Stock from Papertrey Ink using Antique Linen and Vintage Photo Distress Oxide Inks. Once I was happy with my ink smooshed background, I stamped the awesome Global Brew background stamp using Ground Espresso Distress Oxide ink. I cleaned off my stamp and also inked it up with the Antique Linen oxide ink but just at a diagonal across the stamp. I love how it gives a distressed look to the background.


I die cut the background using the largest die from the Scallops & Rectangles {nesting dies}. I stamped the coffee ring and coffee bean a few times on the background using Vintage Photo Distress Oxide ink. I adhered the background to a white A2 top fold card base. 

I stamped the Thanks A Latte cup on white card stock using the Ground Espresso Distress Oxide ink. I smooshed the Salvaged Patina Distress Oxide ink pad on my round acrylic block and used my water pen to pull some ink and color the coffee cup. Since I stamped on white card stock and not watercolor paper, I didn't use a lot of water and I only went over the cup once with the ink. I then put my panel back in my stamp platform and stamped it again with the Ground Espresso Distress Oxide ink. This made any of the stamped areas that ran a bit with the water nice and crisp again. I fussy cut the cup and popped it up using a bunch of foam tape.


I die cut a scrap piece of white card stock using a die from the Scallops & Banners {nesting dies} and stamped the sentiment using the Ground Espresso oxide ink. I used an acetate grid to help me with placement. I had to shift the stamp a couple of times to get it just right. I adhered the sentiment directly to the card and trimmed off the excess from the top.


Here's a quick look at the Background of the Month membership this month! Love it! 


Here's a quick look at this month's Uniquely Unity membership! So amazing!

 Well, that's it for me today! Hope you have an ink-tastic day!


Thanks so much for stopping by!
See ya next time.

Inky Hugs,
Crystal


{Please note that comment moderation is on. Your lovely comment will appear once approved.}

Tuesday, December 12, 2023

Salad Spinner Art ~ Technique Tuesday ~ Unity Stamp Co.

 Hello there crafty friend!
I'm back with another Technique Tuesday! Can you believe it's December already? Sadly, that means it's my final blog post of 2023. I hope that you've been inspired to get inky and maybe even played along with some of the techniques that I've shared. If you missed some and want to check them out, you can do that here.


I do love getting inky and the technique I'm sharing today is another fun inky technique called Salad Spinner Art. This technique is wonderful for making awesome backgrounds! Lots of fun for mixing up colors. And can be used with a whole bunch of mediums.


I made a couple fun holiday cards using two of the four backgrounds that I created using the Salad Spinner Art technique. 


For the first background I used Sepia, Tangerine, and Alizarin Crimson Color Burst. I thought it was a fun mix of colors for a holiday card and I added a couple touches of gold by heat embossing the sentiment from Cute Santa using Gold Glory Embossing powder from Stampin' Up and adding some Gold Foil paper also from Stampin' Up.


I stamped Cute Santa with Black Amalgam ink and colored him with the following Copic markers:

Skin: E000, E00, E11, E04
White: C00, C1, C3
Red: R20, R14, R46
Black: N1, N3, N5, N7
Holly & Berries: YG11, G24, G46, R59


I then fussy cut Cute Santa and cleaned up the edges by coloring them with a Memento Tuxedo Black marker. The Spinner Art panel is adhered to a 4-1/4 x 5-1/2" card front of True Black card stock from Papertrey Ink that was adhered to a white A2 top fold card base. All the layers are nice and flat for easy mailing. 


Card number two uses the last panel that I created with the Cosmic Shimmer pigments I got back in June at the Unity Lovers get together in Deepwater, MO at The Craft Lab. I've been anxious to play with them and boy, were they fun! 


Continuing the copper color in the background which is very light, I decided to heat emboss the Blanket of Snow Background stamp. I used the Wow Clear Embossing ink and Penny Embossing Powder from Brutus Monroe. And for a bit more copper... I heat embossed the season's greetings sentiment {minus the dot for the i... I lost it}.


I die cut the season's greetings from the Greetings of the Season {die set} from a scrap piece of white card stock. Pressed the sentiment into the clear embossing ink using my tweezers doing one side of the sentiment at a time so I had a place to hold the sentiment with my tweezers. Quick tip... be sure to let the melted embossing powder cool before touching! Not only does it hurt a smidge, but it can smudge up the pretty embossing. I speak from experience! LOL

I wasn't able to record my card making but you can check out my process in creating the backgrounds I used for my cards plus two more backgrounds that I didn't get to play with just yet. Check it out here... Salad Spinner Art | Technique Tuesday | Unity Stamp Co.


Two very different holiday cards using one fun technique! I've had a blast the last 12 months sharing some fun techniques with you all. I hope you've enjoyed them! If you give this fun technique a try, I'd love to see what you create so please share your cards in the Unity Show & Tell group and tag me. Have an ink-tastic day!

Thanks so much for stopping by!
See ya next time.

Inky Hugs,
Crystal


{Please note that comment moderation is on. Your lovely comment will appear once approved.}

Thursday, November 2, 2023

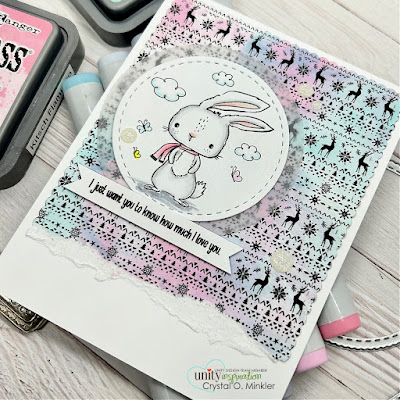
It's Brown Thursday!! ~ Frosted Fauna with Just Know Bunny ~ Unity Stamp Co.

Hello there crafty friend! 
The awesome Brown Thursday Sale over at Unity Stamp Co. is here!!! What's Brown Thursday, you ask? Well, it's Unity's version of Black Friday and it's filled with a HUGE new release and a fabulous sale! I'm sharing a sweet card featuring two stamps from the Brown Thursday release!! The sweet and adorable Just Know Bunny {ooops... the bunny is actually the freebie with a $100 order!} and the beautiful Frosted Fauna Background stamp! Love love love these!!


I ink smooshed my background with Kitsch Flamingo and Salvaged Patina Distress Oxide inks. I left it nice and light with some white space... kinda like snow. I stamped the gorgeous Frosted Fauna background stamp using Black Amalgam ink from Gina K. Designs.


Die cut the background using the largest die from the Scallops & Rectangles {nesting dies} and then I tore the bottom off revealing the white core in the paper. Adhered the torn background to a white A2 top fold card base.


The new Tawny Owl Paperie Inky Inspiration Sketch 16 inspired the design of my card. I decided to move the sentiment for this card. As with all my sketches, it's meant to inspire - not require so if you play along feel free to adjust to fit your design.


I stamped the adorable bunny on white card stock and die cut it using a stitched circle die from the Scallops & Circles {nesting dies}. I didn't want to cover up anymore of the background so I die cut another circle from vellum card stock using the next largest die from the same die set. Keeping with a white snowy kind of card, I colored up the image using just a little bit of color. Here's a quick list of the Copic markers I used:

Bunny: C00, C1, C3, R00, R20
Scarf: RV0000, RV52, RV13
Clouds: BG000
Butterflies: BG000, RV52, RV0000, Y06
Ground: C1, C3


I adhered the circles directly to the card but I only applied liquid glue behind the white circle. I trimmed the sentiment and cut fishtails on both ends. I added foam tape to the back and popped it up on the card. That's it for me today! Go check out the awesome new releases for Brown Thursday over at Unity! It's a HUGE release friends! Lots and lots of fabulous new goodies!

Thanks so much for stopping by!
See ya next time.

Inky hugs,
Crystal

{Please note that comment moderation is on. Your lovely comment will appear shortly.}

Friday, August 4, 2023

First Halloween Card of 2023 ~ Spooky Spirits and Starlight Background ~ Unity Stamp Co.

Hello there friend!
Today I'm sharing my first Halloween card for 2023!! Unity's August release is spook-tacular! You are going to love all the fabulous Halloween goodies available on the website! I have a whole slew of fun ideas for some of the new stamps, but up first is the fun Spooky Spirits and Starlight Background.
 

The background is so cool... filled with stars and moons and I thought it would be a fun backdrop for the spooky martini glass. The Starlight Background stamp is just simply stamped with black ink and then I colored the moons and a few stars very lightly with YG21 leaving some white space in the middle of the moons.


The background is adhered to a piece of Lemon Lime Twist card stock from Stampin' Up. It measures 4-1/8 x 5-1/4". And the card front measuring 4-1/4 x 5-1/2" is Rich Razzleberry card stock, also from Stampin' Up. I stamped the sentiment on white card stock and mat it with a scrap of Rich Razzleberry card stock.


The fun Spooky Spirits glass is stamped on white card stock with Black Amalgam ink. I also stamped the spider and the spiderweb. I did have to extend one part of the spiderweb to touch the glass. I used a copic fineline pen to just draw a line to touch the glass. I die cut the Spooky Spirits glass with a stitched circle die from the Scallops & Circles Nesting dies. And then I ink smooshed it a bit with Twisted Citron Distress Oxide ink. I added a bit of YG21, YG11, and G14 to the martini. I'm not totally sure if the Copics are okay coloring over the oxides. I don't think I've done that before but so far my Copic markers are fine. I colored up the eye balls using RV000, RV21, RV34. I used the green Copic markers to color up the iris of the eyes, but it's really hard to see that touch of green.


I adhered all my layers and then adhered them to an white A2 card base measuring 4-1/4 x 11", scored at 5-1/2". So happy to have a Halloween card to add to my stash. Do you like to make Halloween cards? I'd love to hear... let me know in the comments. Have an inktastic day!!


Thanks so much for stopping by!
See ya next time.

Inky hugs,
Crystal


{Please note that comment moderation is on. Your lovely comment will appear once approved.}

Wednesday, July 26, 2023

Christmas in July 2023 {BYSHC} Linky Party ~ Blessed Angel with Unique Flakes ~ Angie Blom Digital Designs

 Hello there crafty friend!
I'm back with my sixth card for the Christmas in July 2023 {BYSHC} Linky Party! My card today features a mix of products from just two of our linky party Sponsors. I used two stunning digital stamps from our return Sponsor Angie Blom Digital Designs. Blessed Angel and Unique Flakes... SO gorgeous! And even more so together! I also used the Deckle & Stitches Nesting Dies from Sponsor Unity Stamp Co.


I absolutely LOVE blues with snowflakes! I ink smooshed a half sheet of card stock measuring 8-1/2 x 5-1/2" using Salty Ocean, Faded Jeans, and Chipped Sapphire Distress Oxide inks leaving some white on the sheet. I dried my ink smooshed card panel completely with my heat tool and then ran it through my printer printing off the gorgeous Unique Flakes digi stamp. While I was ink smooshing the half sheet I also ink smooshed a piece of Distress Watercolor Paper from Tim Holtz. I die cut my snowflake background using the largest die from the Deckle & Stitches Nesting Dies from Unity. I added a bit of sparkle to the background by splattering some Liquid Pixie Dust from Inkon3. I dried the background again and then I adhered my snowflake background to the watercolor ink smooshed background.


I adore this gorgeous angel digi stamp called Blessed Angel. It's one of my favorites for Christmas. In fact, I used it last year for a pretty mini slimline card and I still had the Word Document saved in my files so I printed her off again for this card. Here's a quick list of the Copic Markers I used:

Skin ~ E000, E00, E11, E04
Hair ~ E95, E97, E19
Flowers ~ B0000, B02, B04, B34, B37 
Leaves ~ YG11, G24
Dress ~ C00, C1, C3


I fussy cut the angel leaving a bit of a white border and I trimmed the sentiment. I then adhered them together and added a bunch of 3D Foam Squares from Sponsor Therm O Web. I then removed the backing and popped the angel and sentiment up on the card. Love the dimension that it gives the card! I finished off the card by adding a few water droplet beads from the July 2023 Whit Kit from Unity Stamp Co.


Be sure to stop by Angie Blom Digital Designs and check out all the awesome Christmas digital stamps on sale 40% OFF - no code required. Woohoo!! And if you haven't already, stop by the Christmas in July 2023 {BYSHC} Linky Party to check out all the wonderful Holiday inspiration being shared!! I am blown away by all the amazing cards!


Thanks so much for stopping by!
See ya next time.

Inky Hugs,
Crystal


{Please note that comment moderation is ON. Your comment will appear shortly.}

Wednesday, July 12, 2023

Membership Wednesday ~ July 2023 Kit of the Month & Background of the Month ~ Unity Stamp Co.

 Hello there crafty friend!
I'm back for another Membership Wednesday and today I'm sharing a card using the sweet sandcastle stamp and a sentiment in the July 2023 Kit of the Month called Anchored by Love along with the July 2023 Background of the Month called Bubbles. Loving the summer themed stamps in this month's kit! This sandcastle stamp is the cutest!


The Bubbles background stamp is so fun in the background. When I was a kid, summer was all about blowing bubbles and making sandcastles on the beach. So much fun! The background was ink smooshed with Saltwater Taffy and Speckled Egg Distress Oxide inks. I then stamped the background using Archival Jet Black ink.


All of my layers were die cut with dies from the Deckle & Stitches Nesting Dies. The bottom layer is Ocean Tide card stock from Papertrey Ink. And all the layers are adhered to a white A2 top fold card base of Stampers Select card stock, also from Papertrey Ink.


The sentiment was trimmed and mat with Ocean Tide card stock. I then adhered them directly to the card. Here's a quick list of the Copic markers that I used to color up the sandcastle:

Sandcastle / Sand ~ E30, E33, R00, R22
Water ~ BG70, BG10
 Sky ~ BG000, BG10
Grass ~ YG23


Here's a look at the whole Kit of the Month for July!! A fabulous kit filled with awesome summer stamps! Can you believe that you get this full sheet of rubber for only $44.99. That includes shipping! You also get a $6.95 discount on every order from Unity over $45. And you can purchase any past kits for only $34 plus shipping. Such a great value!


And here's a look at the awesome Background of the Month stamp for July!! Love it! This membership is available for only $18.99. That includes shipping! Included with both of these memberships is a wonderful inspiration sheet with pictures and step-by-step instructions for two cards so you can easily recreate the cards yourself. And now when you sign up you have the ability to pause, skip or cancel your subscription within your Unity account.

I hope to see you next week for another Membership Wednesday blog post. I'll be sharing inspiration for the amazing new July 2023 Whit Kit membership.


Thanks so much for stopping by!
See ya next time.

Inky Hugs,
Crystal


{Please note that comment moderation is on. Your lovely comment will appear once approved.}

Tuesday, July 11, 2023

Fun with Background Stamps ~ Technique Tuesday ~ Unity Stamp Co.

 Hello there crafty friend!
I'm back with another Technique Tuesday! On the 2nd Tuesday of each month I'll be sharing a bit of inspiration and a video featuring a fun technique. I hope that you'll be inspired to get inky and play along with some of the techniques that I share.


Today's technique is a super fun one using background stamps that I learned about last year at a Unity Lovers Get Together for the Missouri/Kansas group that I am so honored to be a part of. I so wanted to share this technique for a challenge last year but other ideas kept getting in the way. Anywho, I'm super excited to share this fun technique with you today. I had a lot of fun creating some pretty backgrounds for my cards.


First up, I used the gorgeous Rustic Flutter with the Worn Grid background stamps. I also paired them up with the beautiful new Paper Wings. Die cut the background using the largest die from the Scallops & Rectangle {nesting dies} and I die cut the sentiment using a die from the Banner Nesting Dies. Adhered all the layers to an A2 top fold card. The butterflies' bodies are adhered to the card so the wings can be up giving the card lots of dimension.


Stamped the backgrounds with Frayed Burlap, Saltwater Taffy and Speckled Egg Distress Oxide inks.
Here's a quick list of the Copic markers I used ~ R00, R01, R05, R22, C3 


Next up is a soft, summery background featuring the Bloomy and Linen background stamps. Coincidentally, both of these stamps were Background of the Month stamps for the month of April {one in 2022 and the latest in 2023}. I thought that was fun! And they are SO beautiful together! I paired up the pretty background with the summer girl in the July 2023 Kit of the Month. I couldn't wait to color her up! So gorgeous! Die cut the background with the largest die from the Deckle & Stitches Nesting Dies. And die cut the sentiment using a die from the Scalloped & Stitched Sentiment Nesting Die Set.


Stamped the backgrounds with Lost Shadow, Tattered Rose and Bundled Sage Distress Oxide inks.
Here's a quick list of the Copic markers I used for the Summer Girl:

Skin ~ E000, E00, E11, E04
Hair ~ E40, E43, E44
Hat ~ E40, E43, R05
Dress ~ R00, R01, R20, R22, YG11, G24, Y15, Y38


My third card features the A Faithful Letter and the recently released Wrinkle background... a collaboration with Brutus Monroe. It's also my most favorite background right now, so I just had to use it! I paired it up with the beautiful typewriter stamp from the June 2023 Kit of the Month. I have had this sweet typewrite stamped and just sitting on my desk waiting to be on a card. So happy to finally use it! I love this stamp! Die cut the background using the largest die from the Postage Stamp Nesting Dies. I wrapped the background a few times with {Natural} May Arts Burlap String securing it on the back with some tape. I fussy cut the typewriter and popped it up on the card with foam tape. 


Stamped the backgrounds with Peacock Feathers, Evergreen Bough and Walnut Stain Distress Oxide inks.
Here's a quick list of the Copic markers I used for the typewriter ~ BG70, BG72, BG75, C00, C1


Last but not at all least, the fabulous coffee themed background featuring the Coffee Crazy and Coffee is Life background stamps. Such an easy background! I paired up this background with the sweet Ellie Girl. I don't believe I've ever inked her up so I was delighted to finally use her on a card. Die cut the background with the largest die from the Scallops & Rectangles {nesting dies}. Grounded Ellie Girl with a strip of Early Espresso card stock that I also mat the sentiment on.


Stamped the backgrounds with Antique Linen, Vintage Photo and Ground Espresso Distress Oxides inks.
Here's a quick list of the Copic markers I used for Ellie Girl:

Skin ~ E000, E00, E11, E04
Hair ~ E40, E43, E44
Top / Pants / Shoes ~ R00, R01, R22, R05, C00, C1, C3
Book ~ BG70, BG72, C00, C1
Cup ~ C00, C1, BG70, BG72, BG75

You can check out my process video here for creating the backgrounds... Fun with Background Stamps | Technique Tuesday | Unity Stamp Co.


Such a fun technique and so many possibilities depending on what colors you use and the mix of backgrounds, too! If you give this fun technique a try, I'd love to see what you create so please share your cards in the Unity Show & Tell group and tag me. Have an ink-tastic day!

Thanks so much for stopping by!
See ya next time.

Inky Hugs,
Crystal


{Please note that comment moderation is on, Your lovely comment will appear shortly.}

Friday, July 7, 2023

Sending Prayers ~ Peony Ledger ~ Unity Stamp Co.

 Hello there crafty friend!
Today I'm sharing a card I made using the new Peony Ledger stamp from Unity. Love love love this gorgeous stamp by Graciellie Design! If you haven't checked out the new releases or the current sale, be sure to stop by Unity. The sale ends tonight!!


I started this card by stamping the lovely Peony Ledger on a piece of white card stock measuring 4-1/4 x 5-1/2". I then ink smooshed Lost Shadow and Wilted Violet Distress Oxide inks. I just recently got the Lost Shadow so I'm been anxious to play with it! Loving it so far!


I stamped the Peony Ledger a second time on a scrap of white card stock and colored it up with the following Copic markers: YG000, YG20, YG65, Y15, Y35, G0000, G82, YG91, Colorless Blender. I then fussy cut the flower on the line. I colored up the edges of the fussy cut flowers with a Memento Tuxedo Black marker so the edges would look nice. I then paper pieced the flowers over the ink smooshed peonies. I die cut the background using the largest die from the Make a Tag Die Set. I also die cut a piece of True Black card stock from Papertrey Ink.


I tore the left side of the peony tag... right along the edge of the stamped image. I then adhered the peony tag to the black tag. I stamped and fussy cut the sentiment. I also fussy cut a black mat from True Black card stock. I adhered them together and laid them across the top of the tag and then used a piece of washi tape to secure the Make a Tag die to the sentiment. I ran it through my Big Shot to achieve that stitched and scalloped edge. I splattered the tag with some diluted black acrylic paint. Once it was dry, I adhered the sentiment to the tag and wrapped the tag a few times with {Black} May Arts Burlap String.


The background layer was created by stamping the Wood Pile background stamp onto Weathervane card stock from Papertrey Ink with Weathervane ink, also from Papertrey Ink. I also added some black splatters to the background. I put a bunch of foam tape all over the back of the peony tag and popped it up on the card. I then adhered the card front to a white A2 top fold card base.


Head over to Unity to check out all the amazing new releases!! The current sale ends tonight!


Thanks so much for stopping by!
See ya next time.

Inky hugs,
Crystal


{Please note that comment moderation is on. Your lovely comment will appear once approved.}