Showing posts with label Summer. Show all posts

Wednesday, June 18, 2025

Membership Wednesday ~ June 2025 KOM Squeeze the Sweetness ~ Unity Stamp Co.

Hello there crafty friend!
Happy Membership Wednesday! Today I'm sharing a card featuring another really cute stamp from the June 2025 Kit of the Month membership from Unity called Squeeze the Sweetness. 


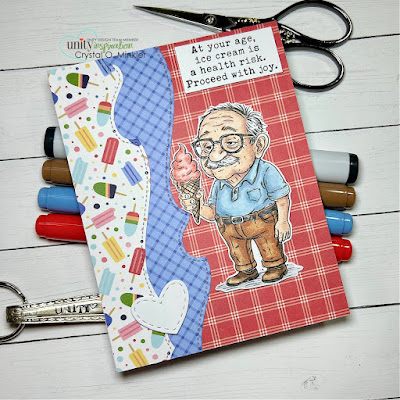
I stamped the sweet gentleman with Black Amalgam ink and colored him up with Copic markers. 

Here's a quick list of the Copic markers I used: 
Skin: E000, E00, E11, E04
Hair / Mustache: C0, C2
Glasses: N6, N8
Shirt: B000, B91, B93
Pants: E53, E15
Belt: N3, N6, N8, C0
Shoes: E53, E59
Cone: E21, E25
Ice Cream: R20, R14
Ground: C0, C2


I paired up this cute gentleman with the My Favorite Summer 6x6 Paper Pad from Echo Park Paper Co. I used the Stitched Wave Borders dies from Lawn Fawn for the fun edges on my paper layers. And I found a cute stitched heart in my scraps so I popped it up on the card, too.


I fussy cut the gentleman and trimmed the sentiment. I added foam tape to the back of both and popped them up on the card. I love the fun colors on this one!


Here's a quick look at this month's Kit of the Month membership!

Well, that's it for me today! I hope you've been inspired to play with your membership stamps! Have an ink-tastic day!


Thanks so much for stopping by!
See ya next time.

Inky Hugs,
Crystal


{Please note that comment moderation is on. Your lovely comment will appear once approved.}

Tuesday, June 17, 2025

Tawny Owl Paperie Inky Inspiration Sketch 33 ~ Sun's Out, Sass Out Pissy Kitty ~ Unity Stamp Co.

 Hello there crafty friend!
Today I'm sharing one last card for the Tawny Owl Paperie Inky Inspiration Sketch Challenge 33 in the Tawny Owl Paperie Inky Inspiration Facebook group. I inked up the cute and grumpy kitty from the Sun's Out, Sass Out Pissy Kitty stamps. Another super fun cat!


I stamped the kitty and sentiment with Amalgam Black ink on Stampers Select White card stock and colored the kitty up with Copic Markers. I fussy cut the kitty leaving a white border around the image. 

Here's a list of the Copic Markers I used:
Kitty: C0, C2, C3, R00, R20
Eyes: YG11, G14
Bikini: BG000, BG10, BG15
Flamingo Floatie: RV10, RV02, RV04, Y11, Y15, C0, C2
Water: B000, B00


Here's a look at the fun sketch for Tawny Owl Paperie Inky Inspiration Sketch Challenge 33. The sketch, as always, is meant to inspire not require. So let the sketch lead in your design, but don't feel limited by it. 


I paired up the pissy kitty with the awesome Sun's Out, Sass Out Pissy Kitty Coordinating {paper pack}. I adhered the circle, sentiment, flamingo papers and the leaves paper together and then added foam tape to the back and popped the panel up on the card. I also slipped a simple scalloped edge in there that I had punched out of white card stock using an old punch from Stampin' Up. My panel was then adhered to a white A2 top fold card base.


This fun kitty and the papers are also available together as a bundle here... Sun's Out, Sass Out Pissy Kitty Bundle. I finished off the card with a few white enamel dots from my stash. There's just a few days left to play along with this sketch challenge. I hope you can find time to play along. Have an ink-tastic week!

Thanks so much for stopping by!
See ya next time.

Inky Hugs,
Crystal


{Please note that comment moderation is on. Your lovely comment will appear once approved.}

Wednesday, June 11, 2025

Membership Wednesday ~ June 2025 KOM Squeeze the Sweetness ~ Unity Stamp Co.

Hello there crafty friend!
Happy Membership Wednesday! Today I'm sharing a card featuring a really cute stamp from the June 2025 Kit of the Month membership from Unity called Squeeze the Sweetness. 


I stamped this little lady with Black Amalgam ink and colored her up with some Copic markers. 

Here's a quick list of the Copic markers I used: 
Skin: E000, E00, E11
Hair: C0, RV000, RV10, RV02
Earring: B02
Dress: B000, B00, B02, RV10, RV02
Shoes: RV10, RV02
Cone: E21, E25, E29
Ice Cream: YG11, G000, G21, E25, E29
Ground: E00, E11
Outline: B000


I die cut the little lady with a die from the Deckle & Stitches Nesting Dies. I also die cut a piece of pattern paper from my stash. I used the Summer Splash 6x6 Paper Pad from Carta Bella for both of my background layers on a white A2 top fold card base.


I popped up the main panel using foam tape. I added some glossy accents to the glasses. And then I finished off the card with a few glitter enamel dots from my stash.


Here's a quick look at this month's Kit of the Month membership!

Well, that's it for me today! I hope you've been inspired to play with your membership stamps! Have an inkredible day!


Thanks so much for stopping by!
See ya next time.

Inky Hugs,
Crystal


{Please note that comment moderation is on. Your lovely comment will appear once approved.}

Friday, February 14, 2025

Coffee for All Seasons ~ Not 2 Shabby ~ Coffee Loving Papercrafters

 Hello there crafty friend!
I’m back as a guest designer for the month of February for the Coffee Loving Papercrafters!


Today I'm sharing a set of caffeinated seasonal cards that I created using awesome papers and fun ephemera from Not 2 Shabby. I am a huge fan of Not 2 Shabby's papers and coordinating ephemera. I have oodles and oodles and was happy to finally play with some of my stash.


First up is a lovely Valentine's Day card I created using the Lattes of Love 6x6 Paper Pad and the coordinating Lattes of Love Ephemera. I used all kinds of papers from the pack for all of my layers even the mats for my panels. And I used five different ephemera pieces for my focal piece.


Up next is a wonderful card for Summer... I used the gorgeous Make It Iced 6x6 Paper Pad and coordinating Make It Iced Ephemera. So many fab girls and summer drinks in this one! Love it! I used three pieces of ephemera for the focal image for this one and then a sentiment I added near the bottom of the card.


My third card features one of my favorite paper pad and ephemera pairings... the gorgeous Give Thanks 6x6 Paper Pad and coordinating Give Thanks ephemera. I love the beautiful pumpkins in these papers. I used three ephemera pieces for this one.


My card design was inspired by one of my favorite sketch from the {BYSHC} group... {BYSHC} Sketch 7. Lots of fun layers and endless possibilities! All of my measurements are directly from the sketch.


 Lastly, I just had to share a Christmas card. I love making them all year long! I used the adorable Brewing It Up 6x6 Paper Pad along with the Brewing It Up Ephemera. I used just two ephemera pieces for my focal image and then I fussy cut the sentiment from a third ephemera piece. So cute and so much fun to make! I hope you've been inspired to get crafty with some coffee papers and ephemera in your stash.


Thanks so much for stopping by!
See ya next time.

Inky hugs,
Crystal

{Please note that comment moderation is on. Your lovely comment will appear once approved.}

Monday, July 1, 2024

Inky Paws Challenge #226 ~ Summer Theme Challenge Reminder

Hello there crafty friend!
There's still time to play along with the Inky Paws Challenge #226 - Summer Theme Challenge! You have until this coming Friday, July 5th to get your entries in for this fun challenge and a chance to win a $20 store credit to Newton's Nook Designs!


I am loving this theme! I prefer Fall and Winter myself, but I do love beach stamps! And beach stamps are perfect for Summer!


I stamped the cute car from the Beach Bound Stamp Set using Memento Tuxedo Black ink. And then I had a blast coloring it up with Copic markers. I went with a classic red. I tried to coordinate it with the red in the papers. I think it works pretty well! Once I was happy with my coloring I die cut the car using the coordinating Beach Bound Die Set.

Here's the list of the Copic markers I used:
Car: R20, R14, R37
Windows: B0000, B000, B00
Bumpers / Door Handle / Roof Rack: N0, N1
Tires: N1, N2, N4, N6
Surfboard: YG11, YG23


I paired up the Beach Bound car with the awesome Summertime 6x6 Paper Pad. I had so much fun mixing and matching the papers that I die cut using the die from the A2 Card Layout Die Set. I also die cut the frame from Stampers Select White Card Stock from Papertrey Ink. That left me with extra white pieces so I made a little sandy hill for the car using the center white piece. I die cut it using the Land Borders Die Set and then I blended a bit of brown ink on the top without actually adding any ink to my blending brush because I didn't want it to be dark.


 All of my layers are centered on a 5-1/2 x 4-1/4" card front of Tempting Turquoise Card Stock from Stampin' Up and then adhered to a white A2 top fold card base turned on its side for a landscape card. I stamped the sentiment on a scrap of white card stock and mat it with a scrap of the same turquoise card stock. No foam tape for this one... just adhered all the layers directly on the card.


Now it's your turn to get your paws inky with your Newton's Nook Designs products and create a project with a Summer theme. Be sure to link up to the Inky Paws Challenge! Can't wait to see your projects!


Thanks so much for stopping by!
See ya next time.

Inky Hugs,
Crystal


{Please note that comment moderation is on. Your lovely comment will appear once approved.}

Monday, June 24, 2024

Inky Paws Challenge #226 ~ Summer Theme Challenge

Hello there crafty friend!
It's time for a new Inky Paws Challenge... a super fun Summer Theme Challenge! I sure hope that you'll play along with us using your Newton's Nook Designs products! You have until Friday, July 5th to get your entries in for the #226 Summer Theme Challenge and a chance to win a $20 store credit to Newton's Nook Designs!


Such a broad and fun theme! I'm excited to see the entries for this one!


I thought the Garden Mice Stamp Set was perfect for the Summer theme! Especially the mouse with the butterfly. Butterflies come to mind when I think of Summer. I stamped the adorable mouse and butterfly with Memento Tuxedo Black Ink and colored them up with my Copic markers. I then die cut the mouse and butterfly using the coordinating Garden Mice Die Set

Here's a quick list of the Copic markers I used:
Mouse: N0, N1, N2, N4, N6, R00, R20
Butterfly: Y11, Y15, YR15, YR16, N0, N1


I cut two pieces of pattern paper from the beautiful Summertime 6x6 Paper Pad. And then I die cut them together using the postage stamp die from the Framework Die Set. I ended up also die cutting a piece of thin card stock using the same postage stamp die and I adhered the pattern papers to the card stock. It was just easier to have them together on one piece of card stock when I adhered them to the white A2 card base. 


I die cut a circle of white card stock using a die from the Circle Frames Die Set. I laid the mouse and butterfly on the circle die cut so I could figure out where I wanted to stamp the sentiment. Once I had stamped the sentiment, I adhered the mouse and butterfly on the circle. Added foam tape to the back of the circle and popped it up on the card. To finish up the card, I added three enamel dots from my stash.


Now it's your turn to get your paws inky with your Newton's Nook Designs products and create a project with a Summer theme. Be sure to link up to the Inky Paws Challenge! Can't wait to see your projects!


Thanks so much for stopping by!
See ya next time.

Inky Hugs,
Crystal


{Please note that comment moderation is on. Your lovely comment will appear once approved.}

Monday, July 17, 2023

Inky Paws Challenge #202 ~ Summer Lovin' Challenge Reminder

 Hello there crafty friend!
 There's still time to play along with the Inky Paws Challenge #202 - Summer Lovin' Challenge!! You have until this coming Friday, July 21st to get your entries in for this fun challenge and a chance to win a $20 store credit to Newton's Nook Designs!


I'm still loving that cute pineapple!! I wish I had a pineapple stamp... does NND have a pineapple stamp I wonder? Hmmm. I'll have to look. Yes! There's a few pineapple goodies in the shop! That cool stencil is going on my wishlist!! Anywho, I decided to go with flowers again for my card. I love all the flowers in stores right now and in people's yards during the summer. So beautiful!


I wanted to do a CAS {Clean and Simple} design but also use some pattern papers. This was a fun card to make. I stamped the sweet girl holding tulips from the Loads of Blooms Stamp Set using Memento Tuxedo Black ink. I colored her up with a handful of Copic markers. And then I die cut her using the coordinating die from the Loads of Blooms Die Set. I also die cut a second girl and cut off the bottom portion. I adhered the top portion to the die cut so that she'd lay flat on the card.

Here's a quick list of the Copic markers I used:

Skin ~ E000, E00, E11
Dress / Shoes ~ R00, R01, R22, R05
Flowers ~ Y06, Y15, Y38, R00, R01, R22
Leaves / Stems ~ YG11, YG23


The pretty pattern papers from the Springtime 6x6 Paper Pad were die cut using the scalloped stitched square die from the Frames Squared Die Set. The scallops on this die are a little shorter than the scallops on the scalloped and stitched rectangle die in the Frames & Flags Die Set. But either one would work for this design. I cut the cloud pattern paper to be a bit shorter than the scalloped square die. It's just another way of using the dies to make your design.


I die cut my piece of green striped pattern paper using the bottom portion of the scalloped stitched square die and then I used the grass die from the Land Borders Die Set to die cut the grass layers from the one piece of green pattern paper. I was then able to adhere the layers all together creating my background scene. I finished off the card by stamping the sentiment underneath the scene I created. I used my grid transparency in my mini misti to get the sentiment just right before stamping. I didn't want to take any chances that it would stamp crooked. 


Now it's your turn to get your paws inky with your Newton's Nook Designs products and create a project with a Summer Lovin' theme. Be sure to link up to the Inky Paws Challenge! Can't wait to see your projects!


Thanks so much for stopping by!
See ya next time.

Inky Hugs,
Crystal


{Please note that comment moderation is on. Your lovely comment will appear once approved.}

Wednesday, July 12, 2023

Membership Wednesday ~ July 2023 Kit of the Month & Background of the Month ~ Unity Stamp Co.

 Hello there crafty friend!
I'm back for another Membership Wednesday and today I'm sharing a card using the sweet sandcastle stamp and a sentiment in the July 2023 Kit of the Month called Anchored by Love along with the July 2023 Background of the Month called Bubbles. Loving the summer themed stamps in this month's kit! This sandcastle stamp is the cutest!


The Bubbles background stamp is so fun in the background. When I was a kid, summer was all about blowing bubbles and making sandcastles on the beach. So much fun! The background was ink smooshed with Saltwater Taffy and Speckled Egg Distress Oxide inks. I then stamped the background using Archival Jet Black ink.


All of my layers were die cut with dies from the Deckle & Stitches Nesting Dies. The bottom layer is Ocean Tide card stock from Papertrey Ink. And all the layers are adhered to a white A2 top fold card base of Stampers Select card stock, also from Papertrey Ink.


The sentiment was trimmed and mat with Ocean Tide card stock. I then adhered them directly to the card. Here's a quick list of the Copic markers that I used to color up the sandcastle:

Sandcastle / Sand ~ E30, E33, R00, R22
Water ~ BG70, BG10
 Sky ~ BG000, BG10
Grass ~ YG23


Here's a look at the whole Kit of the Month for July!! A fabulous kit filled with awesome summer stamps! Can you believe that you get this full sheet of rubber for only $44.99. That includes shipping! You also get a $6.95 discount on every order from Unity over $45. And you can purchase any past kits for only $34 plus shipping. Such a great value!


And here's a look at the awesome Background of the Month stamp for July!! Love it! This membership is available for only $18.99. That includes shipping! Included with both of these memberships is a wonderful inspiration sheet with pictures and step-by-step instructions for two cards so you can easily recreate the cards yourself. And now when you sign up you have the ability to pause, skip or cancel your subscription within your Unity account.

I hope to see you next week for another Membership Wednesday blog post. I'll be sharing inspiration for the amazing new July 2023 Whit Kit membership.


Thanks so much for stopping by!
See ya next time.

Inky Hugs,
Crystal


{Please note that comment moderation is on. Your lovely comment will appear once approved.}

Monday, July 10, 2023

Inky Paws Challenge #202 ~ Summer Lovin' Challenge

Hello there crafty friend!
It's time for a new Inky Paws Challenge... a fun Summer Lovin' Challenge! 
I sure hope that you'll join in the fun and play along with us using your Newton's Nook Designs products! You have until Friday, July 21st to get your entries in for the #202 Summer Lovin' Challenge and a chance to win a $20 store credit to Newton's Nook Designs!


Oh my gosh... how cute is that challenge badge?! I love it!


Flowers come to mind when I think of Summer so I decided to ink up my Garden Mice Stamp Set. I used the sweet mouse with the mushroom from this same set back in February for a Color Challenge. I thought it would be so fun to use a couple more of the mice for another card. It was so handy to also use the Garden Mice Die Set to die cut the stamped and colored mice.


Inspiration for my card design came from the Tawny Owl Paperie Inky Inspiration Sketch 13. I have been having lots of fun with this sketch. I think this is my fourth card now using this sketch. It's really been great for paper scraps!


I stamped the sweet mice using Memento Tuxedo Black ink. I colored up the mice with some Copic Markers. I die cut a scrap of white card stock using the banner die from the Frames & Flags Die Set. I stamped the sentiment on the die cut banner and trimmed it. All of my layers are adhered directly to the card. I didn't want to pop anything up this time since there's so many layers already. Here's a quick list of the Copic Markers I used to color up the sweet mice and flowers:

Mice ~ W00, W2, W4, R00, R20, N1, N3, N5, Colorless Blender
Daisy ~ C00, C1, C3, Y02, Y15, Y38, YG11, YG05
Tulip ~ R000, R20, RV14, YG11, YG05


The white mats for the pattern papers are the measurements on the sketch. The pattern papers are 1/8" smaller on the side and top so that they fit on the mats just so. I used the flower-filled and beautiful Spring Blooms 6x6 Paper Pad for all my pretty pattern paper layers. I even die cut the gingham pattern paper using the grass die from the Land Borders Die Set just to ground the mice a bit more.


Now it's your turn to get your paws inky with your Newton's Nook Designs products and create a project using the Summer Lovin' theme. Be sure to link up to the Inky Paws Challenge! Can't wait to see your projects!


Thanks so much for stopping by!
See ya next time.

Inky Hugs,
Crystal


{Please note that comment moderation is on. Your lovely comment will appear once approved.}

Thursday, May 27, 2021

Hello Sunshine ~ Pool Hair Days ~ Polka Dot Orchard

 Hey there crafty friend!
Today I'm sharing a bit of sunshine with the fun Pool Hair Days digi stamp from Polka Dot Orchard! I am loving this beautiful summer inspired digi stamp set! Paired up with a fun summer color combo and it's perfect!! It doesn't hurt that the Mojo Monday sketch is a fun slimline sketch... I couldn't resist using it!


So fun & cheerful! It just makes me smile to look at it!
I started by preparing my background which is actually the piece I cut off of the full white sheet of card stock when I cut the slimline base of 7 x 8-1/2". I scored the base a 3-1/2" and set it aside. I was left with a 4 x 8-1/2" piece of white card stock to blend my background on. 


I used the Cloud & Wave stencil from Unity Stamp Co. and blended Kitsch Flamingo, Squeezed Lemonade and Spiced Marmalade over the stencil that I had to reposition with each color to cover the whole background piece. The pattern in the waves is repetitive though so it was easy to line up the stencil and blend the next color. I started at the bottom and blended my way up to the top.


Once I was happy with my blending, I set the background aside to dry and print off my digi stamps to color. I combined and resized both images and the sentiment on one Word document. I knew the approximate measurements I wanted to work with since the sketch I used had dimensions listed on it.


All that was left was to color them up with the following Copic markers:

Skin ~ E000, E00, E11
Hair ~ E00, E13, E21
Bikini ~ YR12, YR15, YR20
Flip Flop Floatie ~ RV10, RV52, RV63, Y06, Y15, Y35
Pineapple Cup ~ Y06, Y15, Y35, E55
Umbrella ~ Y06, Y18, Y35, RV10, RV52, RV63, YR12, YR15, YR20
Grounding / Outline ~ E33, E37, B0000, B000


Here's a look at the fun Mojo Monday 560 Slimline Edition sketch that I used... isn't it fun?!


And one more look at the card in whole... doesn't it just make you smile?! I love it!


Here's a look at all the fun digi stamps included in the Pool Hair Days digi stamp set!!
Polka Dot Orchard has some great new digi stamps in stock... but they also have over 200 fabulous digi stamps in the shop!! So many fun and fabulous designs to play with! Stop by and check them out!


Thanks so much for stopping by!
See ya next time.

Inky Hugs,
Crystal


{Please note that comment moderation is ON. Your comment will appear shortly.}