Showing posts with label #tawnyowlpaperie. Show all posts

Friday, September 12, 2025

{BYSHC} Sketch Challenge 61 ~ Meowy Kittymas ~ Crafty Stamp Co.

Hello there crafty friend!
I'm back with a little inspiration for the {BYSHC} Sketch Challenge 61 hosted in the Build Your Stash Holiday Cardmakers Facebook group! Today I'm sharing a cute card featuring a fun stenciled background and stamp from our fabulous Sponsor, Crafty Stamp Co.


I started with my background layers for this card. I blended Sugar Cube Pigment White ink over the Let it Snow Stencil. I did this on a 5-1/2 x 4-1/4" card front and a strip of Kraft card stock. I added a 1/8" strip of white card stock on the top of my Kraft strip which breaks up the pattern of the snowflakes a bit. I tried a few different things for the fishtail banner. I tried white card stock and it was too much white. I tried stenciling the Kraft again with the Let it Snow Stencil. And it just seemed like too much. So I flipped it over and I like the plain Kraft fishtail banner. I think it's a great background for the kitties.


I stamped the fun kitties from the Meowy Kittymas Stamp Set using Memento Tuxedo Black ink and colored it up with Copic markers. And then I fussy cut it leaving a border. 

Here's a quick list of the Copic markers I used:
Orange Kitty: YR20, YR15, YR27, R00, R20
White Kitty: C0, C2, R00, R20
Calico Kitty: N0, N2, N4, YR20, YR15, R00, R20
Truck: R20, R14, R27, N0, N2, N4, N6, C0, C2, Y11, Y15, B000, B00
Gifts: E30, E31, E33, R14, R27
Tree: YG11, G24, G46, E51, E23, E25
Stars: Y11, Y15


I heat embossed the sentiment using the Sugar Cube White Pigment ink from Taylored Expressions with Alabaster White Embossing Powder from Brutus Monroe. I ended up matting it with white card stock because I felt like it was getting lost in all the Kraft layers. The white border makes it pop. I added foam tape to the back of the kitties and the sentiment and I popped them both up on the card. I finished off the card with a few white enamel dots from my stash.


Here's a look at {BYSHC} Sketch Challenge 61 for the month of September. If you're interested in seeing a bit more inspiration for this sketch, check out the amazing inspiration from the design team over on the {BYSH} Cardmakers blog! The design team, as always, rocked this sketch!

Thanks so much for stopping by!

Inky hugs,
Crystal

Monday, September 1, 2025

{BYSHC} Sketch Challenge 61 ~ Here Comes Santa ~ Crafty Stamp Co.

Hello there crafty friend!
It's time for a new sketch challenge over in the Build Your Stash Holiday Cardmakers Facebook group! Today I'm sharing a fun Christmas card featuring a super cute stamp and beautiful papers from our fabulous Sponsor Crafty Stamp Co! There are two prizes this month up for grabs... (2) $25 gift codes to Crafty Stamp Co!! Yay! I sure hope you can play along!


So this adorable stamp is actually a sneak peek of a new release that will be available for preorder October 20th!! I'm so excited for this new holiday release!! SOOO many adorable stamps! I'll be sharing another sneak peek later in the month. But back to today's card, I used the adorable Here Comes Santa stamp set. I inked this cutie up with Memento Tuxedo Black ink and colored it with Copic markers.

Here's a quick list of the Copic markers I used:
Santa: E000, E00, E11, R20, R14, R27, C0, C2, N4, N6
Sleigh: R20, R14, R27, E51, E23, E25, G24, G46
Tree: YG11, G24, G46, Y11, Y15
Presents: B000, B00, B02, E51, E23, R20, R14, R27


I paired up the sweet Santa with the wonderful Gingerbread Christmas 6x6 Paper Pack. I adore the colors in these papers. One of my most favorite color combos for Christmas! The background paper measures 5-1/2 x 4-1/4". The wide center strip measures 5-1/2 x 2". The skinny strip of red measures 5-1/2 x 1/8". And the pretty glitter paper measures 4-1/2 x 1-1/4". I adhered all of the papers to a white A2 top fold card base that I turned on the side for a landscape card. I popped up the sentiment and Santa with foam tape.


And then I finished off the card with a few red glitter enamel dots from my stash. Such a fun card to make! I am loving this new sketch!


Here's a look at {BYSHC} Sketch Challenge 61 for the month of September. If you're interested in seeing a bit more inspiration for this sketch, check out the amazing inspiration from the design team over on the {BYSH} Cardmakers blog!

Thanks so much for stopping by!

Inky hugs,
Crystal

Friday, August 29, 2025

{BYSHC} Sketch Challenge 60 ~ Juniper Girl ~ Unity Stamp Co.

Hello there crafty friend!
I'm back with one last card for the {BYSHC} Sketch Challenge 60 hosted in the Build Your Stash Holiday Cardmakers Facebook group! Today I'm sharing a vintage style holiday card featuring beautiful papers and a lovely stamp from our wonderful Sponsor, Unity Stamp Co.


I adore the vintage vibe of the North Pole Collection {paper pack}. I wanted to pair these wonderful papers up with a sweet Angie Girl... it's been quite a long time since I inked up one of the girls. I chose Juniper Girl. I think she's just lovely.


I cut and die cut all of my papers from the North Pole Collection {paper pack} and adhered them to a vanilla card base. I used scraps for the center panel so the height of each one may be a smidge different but the width on all four is 2-3/4". I wanted a Christmas sentiment so I went looking through my other Angie Girl stamps and found this one from the December Girl stamps. I stamped it on a scrap of paper from the paper pack and adhered it to the center panel. And then I added foam tape to the back of both and popped it up on the card.


I stamped Juniper Girl with Black Amalgam ink and colored her up with Copic markers. I fussy cut the image leaving a border around the edges and then adhered her to the card with a mix of foam tape {for the right edge of the tree hanging off of the center panel} and liquid glue.

Here's a quick list of the Copic markers I used:
Skin: E000, E00, E11
Hair: E00, E11, E25
Hat / Scarf / Mittens: RV000, RV02, C0, C2
Coat: E0000, E81, E43
Pants: E11, E33
Shoes: E000, E11, E15
Cup: G000, G24, G46, C0, C2
Tree: G000, G24, G46, E11, E25
Ornaments: RV10, RV21, RV02, RV29
Snow: C0, C2


Here's a look at {BYSHC} Sketch Challenge 60 for the month of August. There's just a few days left to enter the challenge! If you're interested in seeing a bit more inspiration for this sketch, check out the amazing inspiration from the design team over on the {BYSH} Cardmakers blog! I'm always blown away by the creations from the DT... they are amazingly talented cardmakers!


Thanks so much for stopping by!

Inky hugs,
Crystal

Wednesday, August 20, 2025

Tawny Owl Paperie Inky Inspiration Sketch 34 Extended ~ Membership Wednesday ~ Unity Stamp Co.

Hello there crafty friend!
Happy Membership Wednesday! Today I'm sharing a fun Fall card featuring the cute gnome from the August 2025 Kit of the Month membership from Unity Stamp Co. A little inspiration for the Tawny Owl Paperie Inky Inspiration Sketch 34 that is hosted in the Tawny Owl Paperie Inky Inspiration Facebook group too.


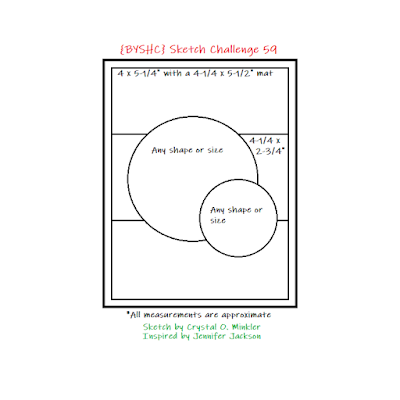
I started with a fun fall themed embossing folder for my background. It's an old one that I've had in my stash for a long time called Happy Fall. I ran it through my Big Shot with a piece of white cardstock. I chose white because the pattern paper I planned on using had a white-ish background. I trimmed four scraps of pattern paper from the Fallen Elegance {paper pack} down to 3-1/4 x 3/4". The embossed background is trimmed down to 4 x 5-1/4".


As I mentioned above, my inspiration for today's card came from the Tawny Owl Paperie Inky Inspiration Sketch 34. This sketch is coming to an end.... the last day to enter is August 25th. I hope you'll play along!


I stamped the cute gnome with Black Amalgam ink and colored it up with Copic markers. I fussy cut it leaving a white border and then popped it up on the card with foam tape.

Here's a quick list of the Copic markers I used:
Nose: E000, E00, E11, E04
Beard: C0, C2
Hat: Y000, Y11, YR20, YR15, R20, R14
Shoes: E00, E11, E25
Pants: G000, G21
Mushrooms: W0, W3, R20, R14
Pumpkin: YR20, YR15, YR27, E11, E25
Ground: E000, E11


I stamped the sentiment with Black Amalgam ink, trimmed it and adhered it directly to the card with liquid glue. I am so ready for Fall! These super hot days of summer can just be done. I'm hoping my Fall cards bring some Fall vibes our way!


Here's a quick look at this month's Kit of the Month membership!


Another option is to get this kit separately here... Lil' Cozy Keeper.

Well, that's it for me today! I hope you've been INKspired to play with your membership stamps! Have a fab day!


Thanks so much for stopping by!

Inky Hugs,
Crystal

Friday, August 15, 2025

{BYSHC} Sketch Challenge 60 ~ Frosty & Feisty {Pissy Kitty} ~ Unity Stamp Co.

Hello there crafty friend!
I'm back with a little inspiration for the {BYSHC} Sketch Challenge 60 hosted in the Build Your Stash Holiday Cardmakers Facebook group! Today I'm sharing a fun holiday card featuring fun papers, dies and stamp from our fabulous Sponsor, Unity Stamp Co.


I started with my paper layers for this card. I pulled out my Catmas Party {paper pack} and trimmed the background layer to 4 x 5-1/4". I adhered it to a red top fold card base. I cut four strips of patten paper measuring 2-5/8 x 7/8".  I die cut a piece of red card stock with a die from the Deckle & Stitches Nesting Die Set. And then I adhered the strips in the center. I started by adhering the top and the bottom pieces. And then I was able to center the middle pieces and glue them down.


I stamped the fun kitty from the Frosty & Feisty {Pissy Kitty} using Black Amalgam ink and colored it up with Copic markers. And then I fussy cut it leaving a border. 

Here's a quick list of the Copic markers I used:
Kitty: N0, N2, N4, C0, C2, R20
Eyes: YG11, YG09
Hat: RV10, RV02, RV14
Ground: C0, C2


I adhered the sentiment to the center panel and then popped up the center panel using foam tape. And then I adhered the kitty. I love this pissy kitty! That face cracks me up!


Here's a look at {BYSHC} Sketch Challenge 60 for the month of August. If you're interested in seeing a bit more inspiration for this sketch, check out the amazing inspiration from the design team over on the {BYSH} Cardmakers blog! The design team, as always, rocked this sketch!

Thanks so much for stopping by!

Inky hugs,
Crystal

Wednesday, August 13, 2025

Membership Wednesday ~ August 2025 Uniquely Unity Windowsill Woodlands ~ Unity Stamp Co.

Hello there crafty friend!
Happy Membership Wednesday! Today I'm sharing a fun card to brighten anyone's day featuring the adorable owl from the August 2025 Uniquely Unity membership along with the cute background stamp from the August 2025 Background of the Month membership. 


I stamped the awesome background on Kraft card stock using Gathered Twigs Distress Ink. I blended some Vintage Photo Distress Ink over the panel and then die cut it using the largest die from the Deckle & Stitches Nesting Die Set.


I then blended some Gathered Twigs Distress Ink around the edges of the die cut panel. I stamped the heart again on a scrap of Kraft card stock and blended a bit of Candied Apple Distress Ink in the center. I fussy cut the heart and set it aside. I stamped the adorable owl with Black Amalgam ink and colored it with Copic markers. I used a Sakura White Gelly roll pen to add some spots to the owl.

Here's a quick list of the Copic markers I used:
Owl: E000, E11, E25
Beak: YR20, YR15, YR68, YR27
Eyes: YG21, YG11


I fussy cut the owl and adhered it to the heart and then I popped up the heart on the card with foam tape. Can you see the hint of dimension? I cut three pieces of Natural May Arts Burlap String and tied them around the panel with a bow. And then I glued the panel to a Kraft A2 top fold card base. I heat embossed the sentiment on Kraft card stock and distressed the edges lightly with the residual ink on my brown blending brush.


Here's a quick look at this month's Uniquely Unity membership!


Here's a quick look at this month's Background of the Month membership!

Well, that's it for me today! I hope you've been inspired to play with your membership stamps! Have an INKriffic day!


Thanks so much for stopping by!

Inky Hugs,
Crystal

Friday, August 1, 2025

{BYSHC} Sketch Challenge 60 ~ Arctic Joyride ~ Unity Stamp Co.

Hello there crafty friend!
It's time for a new sketch challenge over in the Build Your Stash Holiday Cardmakers Facebook group! Today I'm sharing a fun Christmas card featuring a super cute stamp and pretty papers from our fabulous Sponsor Unity! This month's prize is a $25 gift card to Unity!! Yay!


I inked up the adorable penguin from the Arctic Joyride stamps using Black Amalgam ink. This cutie doesn't take much to color up. 

Here's a quick list of the Copic markers I used:
Penguin: C0, C2, Y15, YR15, YR68
Scarf: R20, R14
Sled: E25
Red Present: R20, R14
Blue Present: BG000, BG10, BG01


I paired the cute penguin up with the Snowflake Elegance {paper pack}. I used a soft white pattern paper for my bottom layer measuring 4-1/4 x 5-1/2". The blue layer measures 4 x 5-1/4". I die cut the next layer using a die from the Scallops & Rectangles {nesting dies}. And then I cut strips from my scraps to 2-5/8 x 3/4".


I stamped, trimmed and popped up the sentiment on the card with foam tape. I fussy cut the penguin and then popped him up on the card too. I finished it off with a couple glitter white enamel dots from my stash.


Here's a look at {BYSHC} Sketch Challenge 60 for the month of August. If you're interested in seeing a bit more inspiration for this sketch, check out the amazing inspiration from the design team over on the {BYSH} Cardmakers blog!

Thanks so much for stopping by!

Inky hugs,
Crystal

Wednesday, July 30, 2025

Membership Wednesday ~ July 2025 KOM Feelin' Fall the Things ~ Unity Stamp Co.

Hello there crafty friend!
Happy Membership Wednesday! Today I'm sharing a really quick card featuring a really cute stamp from the July 2025 Kit of the Month membership from Unity called Feelin' Fall the Things. Love the mix of stamps in this month's kit!


I wanted to do a CAS design but with a bit of dimension. I ink smooshed a 4-1/4 x 5-1/2" card front of white card stock with Salvaged Patina Distress Oxide ink leaving a good amount of white space. I trimmed the panel down to 4 x 5-1/4" and adhered it to a white A2 top fold card base. I die cut another panel of white card stock with the Stitched Hillside Borders from Lawn Fawn.


I stamped the adorable bird with Black Amalgam ink and colored it up with Copic markers. I fussy cut it leaving a white border and popped it up on the card with foam tape. I stamped the sentiment in the corner to finish this card.


Copic Markers Used
Bird: V000, V12, V15, Y11, Y15
Leaves / Grass: YG11, G14
Daisy: Y11, Y15, C0, C2


Here's a look at this month's Kit of the Month membership!


This adorable stamp is available separately here... Tweetest Friends.

Well, that's it for me today! I hope you've been inspired to play with your membership stamps! Have an INKriffic day!


Thanks so much for stopping by!

Inky Hugs,
Crystal

Friday, July 25, 2025

Christmas in July 2025 {BYSHC} Linky Party ~ {BYSHC} Sketch Challenge 59 ~ Jolly Christmas Tree ~ Lawn Fawn

Hello there crafty friend!
I'm back with one more card I made for the Christmas in July 2025 {BYSHC} Linky Party and one last card for the {BYSHC} Sketch Challenge 59 hosted in the Build Your Stash Holiday Cardmakers Facebook group! Today I'm sharing a sweet rainbow holiday card featuring a fun die, stamp and papers from our fab Sponsor Lawn Fawn.


I had a fun idea for a rainbow theme for this one so naturally I grabbed the retired Really Rainbow Christmas 6x6 paper pack from Lawn Fawn. I wish they would bring these papers back... they are just too cute! I thought the trees would look cute behind the awesome Jolly Christmas Tree die. I die cut the tree from green papers from the rainbow pack and then the rest of the tree was die cut from white card stock. I colored the star, trunk, and the baubles with Copic markers.


I stamped the adorable unicorn from the Winter Unicorn stamp set and I fussy cut it but if you're not one for fussy cutting there is a Winter Unicorn lawn cuts available for die cutting. I actually die cut mine, but the die slipped in my Big Shot so it was super wonky. So I just fussy cut it. Always remember to secure your dies with washi tape {or something similar}. I usually do, but for some reason I didn't for this cutie. Oh well... it all worked out.

Here's a quick list of the Copic markers I used:
Unicorn: C0, C1, C5, R00, R20, BV00, BV02, B000, B00, R20, R14, R27, Y11, Y15
Tree Topper / Yellow Baubles: Y11, Y15
Red Baubles: R20, R14, R27
Orange Baubles: YR20, YR15
Green Baubles: YG11, YG03
Blue Baubles: B000, B00, B02
Purple Baubles: BV00, BV02
Tree Trunk: E21, E25, E57


I chose a small sentiment since the paper has sentiments all over it. The sentiment is from the Say What? Holiday Critters stamp set. I just stamped it with black ink, trimmed it, and adhered it to the card. I adhered the unicorn to the tree and popped them up with iCraft 3D Foam Tape Jumbo Roll (white) from our lovely Linky Party Sponsor Therm O Web. 


Here's a look at {BYSHC} Sketch Challenge 59 for the month of July. There's just a few days left to enter the challenge! If you're interested in seeing a bit more inspiration for this sketch, check out the amazing inspiration from the design team over on the {BYSH} Cardmakers blog! I'm always blown away by the creations from the DT... they are amazingly talented cardmakers!


As I mentioned above, I'm also playing along with the Christmas in July 2025 {BYSHC} Linky Party. Have you stopped by to check out all the wonderful holiday inspiration being shared?! I sure hope you'll stop by and check it out! Have a wonderful day!

Thanks so much for stopping by!

Inky hugs,
Crystal

Wednesday, July 16, 2025

Membership Wednesday ~ July 2025 BOM Sunny Side Up ~ Unity Stamp Co.

Hello there crafty friend!
Happy Membership Wednesday! Today I'm sharing a fun card using the spotlight technique featuring the awesome Sunny Side Up background stamp from the July 2025 Background of the Month membership. 


Usually I color the spotlight when I do this technique, but this time I wanted to change things up and spotlight just the stamp in black and white. 


I die cut the one flower using a die from the Scallops & Circles {nesting dies} and then colored the background using a handful of Copic markers. I used B000, BV00, BV02, Y11, Y15.


I die cut the panel using the largest die from the Scallops & Rectangles {nesting dies} and adhered it to a white A2 top fold card base. I popped up the spotlight circle using foam tape and then I trimmed the sentiment from the July 2025 Kit of the Month and adhered it across the card.


Here's a quick look at this month's Background of the Month membership!

Well, that's it for me today! I hope you've been inspired to play with your membership stamps! Have an INKredible day!


Thanks so much for stopping by!

Inky Hugs,
Crystal

Friday, July 11, 2025

{BYSHC} Sketch Challenge 59 ~ Lovely Latte ~ Lawn Fawn

Hello there crafty friend!
I'm back with a little inspiration for the {BYSHC} Sketch Challenge 59 hosted in the Build Your Stash Holiday Cardmakers Facebook group! Today I'm sharing a fun holiday card featuring a cute die and stamp from our fabulous Sponsor, Lawn Fawn.


I started with my background for this card. I pulled out my retired Perfectly Plaid Christmas 6x6 Paper Pack and trimmed the background layer to 4 x 5-1/4". The teal paper was a scrap. It measures 4 x 1-3/4". I adhered those layers to a red A2 top fold card base of Pure Poppy card stock from Papertrey Ink.


I die cut the pieces for the cup using the Lovely Latte dies. The face and handle were die cut from Pure Poppy card stock. The coffee was die cut from Kraft card stock from Papertrey Ink. The lighter part of the coffee, the inner (green) portion of the cup, and the face/cheeks were die cut from Stampers Select White card stock and I colored them with Copics.

Here's a quick list of the Copic markers I used:
Green: YG11, G24, G46
Coffee: E51
Cheeks: R00, R20
Kitty: R00, R20, YR20, YR15, N0, N2, N4
Bell: Y15, Y28
Eyes / Mouth: 100 (black)


I die cut a circle from vellum card stock using a die from the Large Cross-Stitched Circle Stackables dies. I adhered the cup to the vellum and then adhered the vellum to the card by only applying liquid glue behind the cup. I stamped the adorable kitty from the Say What? Holiday Critters. I colored her like my sweet Quinn and die cut her with the coordinating Say What? Holiday Critters dies. I popped her up on the card with foam tape. I stamped the sentiment from the Thanks a Latte stamp set. I trimmed it and adhered it directly to the card.


Here's a look at {BYSHC} Sketch Challenge 59 for the month of July. If you're interested in seeing a bit more inspiration for this sketch, check out the amazing inspiration from the design team over on the {BYSH} Cardmakers blog! The design team, as always, rocked this sketch!

Thanks so much for stopping by!

Inky hugs,
Crystal

Wednesday, July 9, 2025

Membership Wednesday ~ July 2025 KOM Feelin' Fall the Things ~ Unity Stamp Co.

Hello there crafty friend!
Happy Membership Wednesday! Today I'm sharing a card featuring a really cute stamp from the July 2025 Kit of the Month membership from Unity called Feelin' Fall the Things. Such a fun play on words! I love all the fun stamps in this kit and now you can get them in individual kits! So exciting!


My process:


  • Covered my white A2 top fold card base with papers from the same pack
  • Adhered the sentiment to the mushroom layer
  • Added foam tape to the back of mushroom and sentiment; popped them up on the card


Copic Markers Used
Mushroom: W0, W1, RV10, RV02, RV25, RV29
Leaves / Grass: YG11, YG03
Flowers: Y11, YR23, RV02
Sky: B0000, B000 


Here's a look at this month's Kit of the Month membership!


Another option is to get this kit separately here... Spore the Love.

Well, that's it for me today! I hope you've been inspired to play with your membership stamps! Have an INKriffic day!


Thanks so much for stopping by!

Inky Hugs,
Crystal