Showing posts with label Angie Girls. Show all posts

Tuesday, September 16, 2025

Tawny Owl Paperie Inky Inspiration Sketch 35 ~ November Girl ~ Unity Stamp Co.

 Hello there crafty friend!
Today I'm sharing some inspiration for the Tawny Owl Paperie Inky Inspiration Sketch Challenge 35 in the Tawny Owl Paperie Inky Inspiration Facebook group. I inked up an oldie but a goodie stamp from my stash... the beautiful November Girl from Unity.


I had stamped this beauty probably last year but the project I wanted to use her for went in a different direction. She was perfect for my card today though. I used paper scraps from my stash to make my background. These papers are from the plaid papers I used earlier in the month for this card... HERE. I thought I'd use some of the scraps for my card today.


Here's a look at the fun sketch for Tawny Owl Paperie Inky Inspiration Sketch Challenge 35. The sketch, as always, is meant to inspire not require. So let the sketch lead in your design, but don't feel limited by it. I used the measurements on the sketch for my card today.


I colored up November Girl with similar colors to the papers but with a pop of blue and teal. I had fun coloring this one with my Copic markers.

Here's a list of the Copic Markers I used:
Skin: E000, E00, E11
Hair: C0, C5, C7
Bird: Y11, Y15, B000, B91
Sprig: R14, G82, G94
Hat / Mittens / Boots: E21, E23, E25
Jacket: BG10, BG70, BG72, BG75
Sweater: Y15, Y38
Jeans: B91, B93, B95, B97
Pumpkins: YR20, YR15, YR68, UR27, BG000, BG01, BG72, E21, E25, G82, G94
Scarf: YR20, YR15, R14, R37


I stamped the sentiment, trimmed each of the words and adhered them to the card. I fussy cut November Girl and popped her up with foam tape. And then I finished off the card with brown enamel dots.

Thanks so much for stopping by!

Inky Hugs,
Crystal

Friday, August 29, 2025

{BYSHC} Sketch Challenge 60 ~ Juniper Girl ~ Unity Stamp Co.

Hello there crafty friend!
I'm back with one last card for the {BYSHC} Sketch Challenge 60 hosted in the Build Your Stash Holiday Cardmakers Facebook group! Today I'm sharing a vintage style holiday card featuring beautiful papers and a lovely stamp from our wonderful Sponsor, Unity Stamp Co.


I adore the vintage vibe of the North Pole Collection {paper pack}. I wanted to pair these wonderful papers up with a sweet Angie Girl... it's been quite a long time since I inked up one of the girls. I chose Juniper Girl. I think she's just lovely.


I cut and die cut all of my papers from the North Pole Collection {paper pack} and adhered them to a vanilla card base. I used scraps for the center panel so the height of each one may be a smidge different but the width on all four is 2-3/4". I wanted a Christmas sentiment so I went looking through my other Angie Girl stamps and found this one from the December Girl stamps. I stamped it on a scrap of paper from the paper pack and adhered it to the center panel. And then I added foam tape to the back of both and popped it up on the card.


I stamped Juniper Girl with Black Amalgam ink and colored her up with Copic markers. I fussy cut the image leaving a border around the edges and then adhered her to the card with a mix of foam tape {for the right edge of the tree hanging off of the center panel} and liquid glue.

Here's a quick list of the Copic markers I used:
Skin: E000, E00, E11
Hair: E00, E11, E25
Hat / Scarf / Mittens: RV000, RV02, C0, C2
Coat: E0000, E81, E43
Pants: E11, E33
Shoes: E000, E11, E15
Cup: G000, G24, G46, C0, C2
Tree: G000, G24, G46, E11, E25
Ornaments: RV10, RV21, RV02, RV29
Snow: C0, C2


Here's a look at {BYSHC} Sketch Challenge 60 for the month of August. There's just a few days left to enter the challenge! If you're interested in seeing a bit more inspiration for this sketch, check out the amazing inspiration from the design team over on the {BYSH} Cardmakers blog! I'm always blown away by the creations from the DT... they are amazingly talented cardmakers!


Thanks so much for stopping by!

Inky hugs,
Crystal

Wednesday, March 19, 2025

Membership Wednesday ~ March 2025 KOM Chapters & Crossings ~ Unity Stamp Co.

Hello there crafty friend!
Happy Membership Wednesday! Today I'm sharing another sweet card featuring another fab stamp from the March 2025 Kit of the Month membership from Unity called Chapters & Crossings. 


Any other avid readers out there?! I love to read! I also read with the kids as part of our homeschool day and I just love it. I stamped the reading girl with Black Amalgam ink and colored her up with some Copic markers that coordinated with the papers I chose ahead of time.

Here's a quick list of the Copic markers I used:
Skin: E000, E00, E51, R00, R20
Hair: Y21, E43, E44
Flowers: Y11, Y15, R11, R22, R27, RV10, RV02, B91, YG11, YG03
Nail Polish: R22, R27
Clothes: C00, C2, BG10, BG01
Book: C00, C2, Y21, Y26
Ground: B0000, B91, B95


Just like with the mouse I shared last week, I paired up the girl with some old papers in my stash that just seemed perfect! Coincidentally enough, they are called Practically Perfect by Carta Bella. I trimmed the papers and adhered them to a white A2 top fold card base. They measure 4-1/8 x 5-3/8".


I die cut the girl and the sentiment using dies from the Scallops & Banners {nesting dies}. I adhered them directly to the card and trimmed off the top. I wrapped the front of the card using a couple pieces of natural May Arts Burlap string and tied a bow. And then I finished off the card with a few blue enamel dots from the stash.


Here's a quick look at this month's Kit of the Month membership! Love it!

Well, that's it for me today! I hope you've been inspired to play with your membership stamps! Have an inkredible day!


Thanks so much for stopping by!
See ya next time.

Inky Hugs,
Crystal


{Please note that comment moderation is on. Your lovely comment will appear once approved.}

Saturday, March 8, 2025

Trust the Journey ~ Savannah Girl ~ Unity Stamp Co.

Hello there crafty friend! 
I'm so excited to share a fun card for Unity's March release. I just had to play with the gorgeous new Angie Girl called Savannah Girl. She makes me want to buy a bike and go for a ride!


I was in a vintage chic kinda mood. And just had to play with the Grit & Grace {paper pack} again! I love these papers!! I stamped gorgeous Savannah Girl and colored her up with Copic markers.

Here's a quick list of the Copic markers I used:
Skin: E000, E00, E21
Hair: E43, E44 
Hat: E30, E31, RV10, RV02
Dress: Y11, Y15, RV10, RV02
Bike: RV10, RV02, C00
Basket: E30, E31
Flowers: RV10, RV02, R14, B000, B00, YR15, Y11, Y15


I die cut Savannah Girl using a die from the Big and Little Chain Mini Slimline dies from Gina Marie Designs. I really wanted to add a little something between the layers so I grabbed a white doily from Doodlebug Designs. I grunged it up a bit with my brown and red blending brushes. I didn't add any ink to the brushes... just used the residue ink already on them.


I wrapped the die cut panel with Ivory May Arts Burlap String and made a pretty bow. I adhered all of my layers to a Kraft A2 top fold card base. I adhered the trimmed sentiment to my focal panel and then popped them both us with foam tape. I finished off the card with a few raindrop embellishments. I think this turned out pretty cute.


Thanks so much for stopping by!
See ya next time.

Inky hugs,
Crystal

{Please note that comment moderation is on. Your lovely comment will appear shortly.}

Friday, November 8, 2024

Brown Thursday IG Hop ~ Juniper Girl ~ Unity Stamp Co.

Hello there crafty friend! 
Have you seen the awesome Brown Thursday Sale over at Unity Stamp Co.!?! What's Brown Thursday, you ask? Well, it's Unity's version of Black Friday and it's filled with a HUGE new release and a fabulous sale! I shared a lovely encouragement card yesterday featuring a new release. Today I'm sharing a cute holiday card for the Brown Thursday Instagram Hop that the Unity Design Team is having in celebration of Brown Thursday! Head over to IG and check it out... there's prizes!!


A super fun and cute holiday card featuring the adorable new Juniper Girl!! I love this beautiful new girl! I stamped her on a piece of Stampers Select white card stock from Papertrey Ink along with the sentiment. I colored Juniper Girl up with my Copic markers and fussy cut her leaving a white border.  I die cut the sentiment using a die from the Scalloped & Stitched Sentiment Nesting Dies. I also die cut a mat from Pure Poppy card stock, also from Papertrey Ink.

Here's a quick list of the Copic markers I used:
Skin: E000, E00, E11
Hair: E33, E35, E37
Hat / Scarf: C00, C2, R20, R14, R27
Cup: C00, C2, G00, G12, G05
Coat: E40, E81, E43, E35, E37
Pants: E30, E33
Shoes: E30, E33, E35, E37
Tree: YG11, G24, G46
Ornaments: Y00, Y11, Y15, R20, R14, R27, G00, G12, G05


I paired up Juniper Girl with the gorgeous Watercolor Tidings {paper pack}. I die cut a piece of Pure Poppy card stock using the largest die from the Scallops & Rectangles {nesting dies}. And then adhered the pretty papers. I fussy cut Juniper Girl leaving a white border and adhered her on the panel. The panel is adhered to a Kraft A2 top fold card base.


Inspiration for my card today comes from the Tawny Owl Paperie Inky Inspiration Sketch 27. When I'm stuck on a design it's so handy to just look through my stack of sketches to see what inspires me. I couldn't help but use the current sketch... it's so easy!


I wanted to add a 'Merry Christmas' sentiment so I die cut the Merry Christmas from the Greetings of the Season {die set} from Pure Poppy card stock three times. I adhered them all together for some wonderful dimension. I die cut the shadow from Vellum card stock, also from Papertrey Ink. I love how the vellum makes the sentiment pop but it doesn't take away from the image I colored. Well, that's it for me today! I hope you have a wonderful day!

Thanks so much for stopping by!
See ya next time.

Inky hugs,
Crystal

{Please note that comment moderation is on. Your lovely comment will appear shortly.}

Tuesday, October 15, 2024

September Scraps Cards in October ~ Purr-Fect Time Kitty with a Planner Gal ~ Unity Stamp Co.

 Hello there crafty friend!
Today I'm sharing the last two cards I created using the leftover scraps I opened up last month. I've been working on these for awhile. I'm so glad I finally got them finished up.


Here's a look at the cards together. I love how the kitty card turned out! If I could change one thing, I would distress the edges of the girl. Just add a bit of Vintage Photo Distress Ink around the edges so it isn't so white on all the Kraft.


I adhered the strips of pattern paper to the base leaving a nice edge around the card base. And then I adhered the pink layer over top. I think it's a fun design. I found the gal from Planner Gal: Brave & Beautiful already stamped on my pile of images. I thought she would look nice with these papers. I die cut her using a die from the Deckle & Stitches Nesting Die Set. Colored her up with my Copic markers and then popped her up on the card with foam tape.

Here's a list of the Copic markers I used:
Skin: E000, E00, E11
Hair: E43, E44, E47
Hat: E21, E23, E25, R81, R83, R20, R14, YR27
Blouse: R81, R83, YG61, YG63
Pants:B91, B97


I thought it would be fun to use one of my many sentiment dies from Unity. I die cut a scrap piece of white card stock with the hello die from Chic Script Salutations {die set}. It was way too white for the card so I decided to color it with Copics. I used R81, R83, R20, and R14. I die cut the hello outline from Kraft card stock.


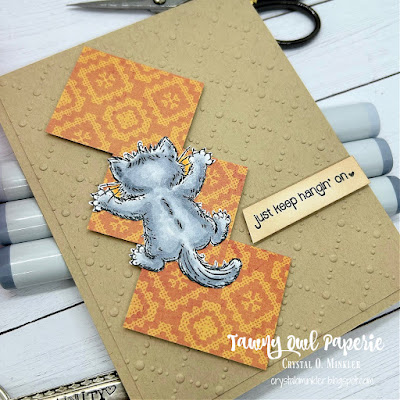
I really got stuck on this card! This card may be why it's taken me so long to finish up these paper scraps. I had the orange pattern paper rectangles adhered together and sitting on a Kraft card base... that's as far as I got. It just sat on my desk taunting me. Until I remembered the little kitty from the {Clearly Unity} Purr-Fect Time stamp set. {This stamp set is also available in red rubber... Purr-Fect Time.} I inked him up and colored him with the following Copic markers: C00, C2, C4, C5, YR21, and YR15 (orange background around the whiskers).


 I fussy cut the kitty and adhered him to the pattern paper. The Kraft card base was too plain so I ran a piece of Kraft card stock through my Big Shot with a random embossing folder. I trimmed the panel down to 4 x 5-1/4" and adhered it to the A2 top fold card base. I blended a bit of Vintage Photo Distress Ink around the sentiment to soften the white and then I popped it up and the kitty/pattern paper focal piece up using foam tape. So happy to finally be done with these papers! I'll be back next week with one last card for the Tawny Owl Paperie Inky Inspiration Sketch 26. Have a wonderfully inky week!

Thanks so much for stopping by!
See ya next time.

Inky Hugs,
Crystal


{Please note that comment moderation is on. Your lovely comment will appear once approved.}

Sunday, September 29, 2024

Fall Book Lovers Card ~ Just One More Chapter ~ Unity Stamp Co.

Hello there crafty friend! 
I'm back with a sweet book lovers card for Unity's latest release. I love to read!! I even listen to books while I craft. It's gotten to where I almost need to have a book playing in the background for my mojo to get going! I was so excited to play with the new Just One More Chapter! Love it!


I stamped the book girl  and sentiment using Black Amalgam ink from Gina K. Designs and then I colored up the girl with my Copic markers. The girl was die cut with the new Maple Leaf Die. The edges of the leaf were distressed with a bit of Antique Linen Distress Ink.

Here's a quick list of the Copic markers I used:
Skin: E000, E00, E11
Hair: E70, E71, E74
Shirt: E40, E81
Pants: B91, B93, Colorless Blender
Books: C00, C2, YR21, YR15, YR16, YR27, YG61, YG63, E51, E55, E57, B91, B93
Ring: N2, N4
Nails: YR16
Ground: C00, C2


My pattern paper layers are from the beautiful Enrich the Soul {paper pack}... definitely my top five Fall paper packs! Love the colors in these papers! I die cut the leaf and sentiment papers using the largest die from the Deckle & Stitches Nesting Die Set.

You can check out my process video for this card here... Fall Book Lovers Card | Just One More Chapter | Unity Stamp Co.


The sentiment was die cut using a die from the Scalloped & Stitched Sentiment Nesting Dies. I adhered all of my layers together using Tombow Mono Adhesive liquid glue and then I popped up the Maple Leaf girl using Scrapbook Adhesive Crafty Foam Tape. Loving how this turned out! I hope you have an inkredible day! 

Thanks so much for stopping by!
See ya next time.

Inky hugs,
Crystal

{Please note that comment moderation is on. Your lovely comment will appear shortly.}

Tuesday, September 17, 2024

Tawny Owl Paperie Inky Inspiration Sketch 25 ~ Bobbie Sue Girl ~ Unity Stamp Co.

 Hello there crafty friend!
Today I'm sharing more inspiration for the Tawny Owl Paperie Inky Inspiration Sketch Challenge 25 in the Tawny Owl Paperie Inky Inspiration Facebook group. I've made a few quick cards using the scraps I picked out a couple of weeks ago. And I still had Bobbie Sue Girl from Unity handy on my desk so I inked her up!


I love how fast these cards came together! I'm not usually one for using stickers on cards but they sure made for quick cards. I just need to add sentiments to cards with the stickers and they'll be all done.


Here's another look at the scraps I chose for September. Not Fall like I hoped, but Fall-ish colors and I do love the farm vibe. This is a photo from when I started with the leftover papers. I have just a few scraps left. I'm hoping to finish them up this month. We'll see!


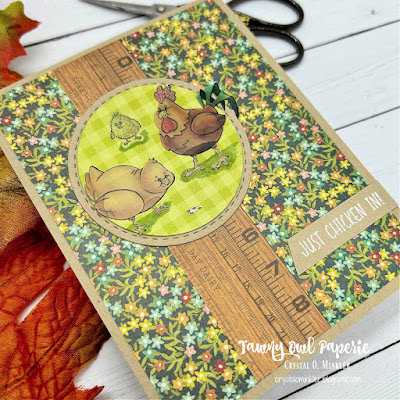
I trimmed the floral paper for the chicken card I shared a couple weeks ago. I also trimmed the green paper and the ruler paper. I used the leftover pieces from that card plus a couple of the longer strips for my three cards today. I adhered the pattern papers to a 4 x 5-1/4" piece of thin white card stock. This was way easier than trying to adhere the pattern papers directly to the Kraft card base and eyeball to make sure I had them evenly spaced.


Here's a look at the fun sketch for Tawny Owl Paperie Inky Inspiration Sketch Challenge 25. The sketch, as always, is meant to inspire not require. So let the sketch lead in your design, but don't feel limited by it. I moved the sentiment for my card today. It just fit better under the ruler paper.


I stamped Bobbie Sue Girl and the sentiment using Memento Tuxedo Black ink. Yup, I used a different ink. It was on top of the stack and I was lazy! LOL! Anywho, I die cut the image using a circle die from the Scallops & Circles {nesting dies}. I colored up the image with a bunch of Copic markers and then I blended my brown blending brush around the image. The white was too bright for the papers and the kraft base. It just didn't look right. I also blended or distressed the edges of the sentiment with the same brush. TIP: if you want to add just a tad bit of color, don't add ink to your blending brush. If you are like me, you leave your blending brushes unwashed and inky and they are perfect for just a little bit of color. 

Here's a list of the Copic Markers I used:
Skin: E000, E00, E11
Hair: E70, E71, E74
Dress: BG000, BG02, BG72
Apron: Y11, Y32
Chicken: R20, R14, E11, E13, E08


I popped up the circle and the sentiment using a bunch of foam tape. I love the dimension it gives to the card! This was such a fun and quick card! I hope you've been inspired to pull out those scraps and use them up! Have an inktastic week!

Thanks so much for stopping by!
See ya next time.

Inky Hugs,
Crystal


{Please note that comment moderation is on. Your lovely comment will appear once approved.}

Tuesday, September 3, 2024

Tawny Owl Paperie Inky Inspiration Sketch 25 ~ September Scraps

 Hello there crafty friend!
Today I'm sharing inspiration for the Tawny Owl Paperie Inky Inspiration Sketch Challenge 25 in the Tawny Owl Paperie Inky Inspiration Facebook group. I've cracked open another pack of leftover papers and made a super fast card just using scraps!


I love how fast this card came together! Just a few tweaks and cuts and it was done!


Here's a look at the scraps I chose for September. Not quite a Fall theme but the colors could really be used for a Fall card. The row of papers on the top are all 6x6", otherwise all the other papers are bits and pieces.


I trimmed the floral paper down to 4 x 5-1/4" and adhered it to an A2 top fold card of Kraft card stock from Papertrey Ink. I then trimmed the ruler paper into strips just using the lines on the paper as a guide. I adhered the ruler paper to the floral paper.


Here's a look at the fun sketch for Tawny Owl Paperie Inky Inspiration Sketch Challenge 25. The sketch, as always, is meant to inspire not require. So let the sketch lead in your design, but don't feel limited by it. I like to think my inspiration is usually a good example of this since I'm always adjusting the sketch. Today is good example as I turned the sketch for a portrait card and adjusted the sentiment.


I decided to trim the chicken circle that was in with my scraps. The white was too bright. I carefully pulled up the tail of the right chicken and just trimmed the white off going slightly under the green background. I die cut a stitched circle from Kraft card stock using a die from the Scallops & Circles {nesting dies} from Unity. And then I heat embossed a sentiment from the adorable Bobbie Sue Girl stamps, also from Unity. This was such a fun and quick card! I hope you've been inspired to pull out those scraps and use them up! Have an inktastic week!

Thanks so much for stopping by!
See ya next time.

Inky Hugs,
Crystal


{Please note that comment moderation is on. Your lovely comment will appear once approved.}

Friday, August 23, 2024

August Scraps Cards {Take Two} ~ Queen Girl & Some Other Stamps ~ Unity Stamp Co.

 Hello there crafty friend!
Today I'm sharing a trio of cards I created using up the rest of the leftover scraps I've been trying to finish up this month. SO excited to be done with another pack of scraps! Woohoo!! I also inked up some very neglected and untouched stamps from Unity Stamp Co. including the gorgeous Queen Girl.


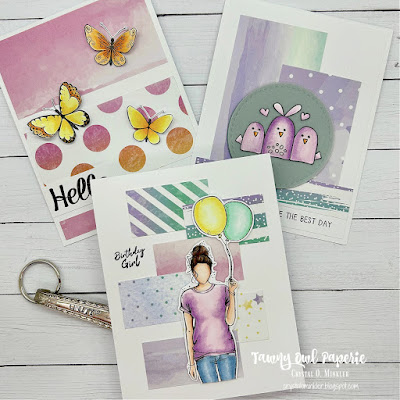
Here's a look at the three cards all together. All so sweet and fun! I'd love to know if you have a favorite of the three... mine is probably Queen Girl, but I do love how they all turned out.


I went with a simple background for my first card. I had two larger panels and a small strip of pattern paper so I adhered them as shown leaving some white space of my white card base showing. Such a fun and simple card design. The beautiful butterflies are from a retired set of stamps called 3 Little Butterflies. I got these a long time ago and finally inked them up! So sad to discover that they are no longer available at Unity. They are so pretty!


 I stamped them with Black Amalgam ink and colored them up with the following Copic markers: Y11, Y15, Y38, YR21, YR15, YR16. I fussy cut the butterflies and colored the edges using a Memento Tuxedo Black marker. I bent the wings up a bit and adhered the butterflies to the card just at the base of the their little bodies. I love the dimension this gives to the card! They look like they are just stopping by for a quick visit. I stamped the sentiment from the same set, trimmed it up and adhered it directly to the card.


My second card uses up three more pieces of pattern paper. They all had similar colors so it just made sense to pair these ones up. I also found a circle scrap that was die cut from Ocean Tide card stock from Papertrey Ink. It's the perfect shade for the greeny-blues in the pattern paper. I did die cut another circle from Vellum card stock also from Papertrey Ink to adhere over it just to soften the color a little bit. The pattern papers are adhered to 4 x 5-1/4" piece of Stampers Select White card stock from Papertrey Ink. And then I adhered the panel to a white A2 top fold card base. All of my white papers are almost always Stampers Select White card stock.


Inspiration for this card came from the Tawny Owl Paperie Inky Inspiration Sketch 22. Such a great sketch for these random pieces of pattern paper! It was perfect for these three pieces!


I stamped the adorable birds from the Many Happy Birdies... which is also retired. So sad! Just like the butterflies, I had never inked these cuties up so I'm glad I finally did. I colored up the birdies... OH MY. I just realized I didn't color the middle birdies dots! LOL!! Well, imagine they are white because that's what I planned on coloring them... anywho, I colored up the birdies with the following Copic markers: V0000, V000, V01, V12, V15, YR21, YR15, RV52. Also just like the butterflies, I fussy cut the birdies and colored the edges with a black marker. I adhered them to the vellum circle and then added glue to the vellum just behind the birdies. I popped up the circle layer with foam tape and stamped the sentiment. So easy peasy and cute!


My third and last card today uses up the last of my scraps. All of these six little rectangles are about the same size. I thought it would be fun to do a wonky stairs design with them. I really love how it turned out. And I think having the girl touch all six pieces of the pattern paper really brings the whole design together. All six pattern papers are just adhered to a white A2 top fold card base. No extra layers here.


I stamped the gorgeous Queen Girl and colored her with my Copic markers. I fussy cut her leaving a white border around the edges. Before I popped her up on the card with foam tape, I stamped the sentiment directly onto the card base. I am really loving this card and the fun design. I think I might turn it into a sketch... whatcha think?

I used the following Copic markers for Queen Girl:
Skin: E000, E00, E11
Hair: E33, E35, E37
Shirt: V0000, V000, V01, V12, V15
Jeans: B91, B93, B95
Balloons: Y000, Y11, Y13, G000, G00, G02


 I am so ecstatic to have another paper pack totally done! I'm going to look through my papers and see if there's a Fall themed one maybe for next month. There's just a few more days left to play along with the Tawny Owl Paperie Inky Inspiration Sketch Challenge 24. I'll be back on Tuesday of next week with a brand spanking new sketch challenge!! Woohoo! I hope you have a wonderfully inky weekend!

Thanks so much for stopping by!
See ya next time.

Inky Hugs,
Crystal


{Please note that comment moderation is on. Your lovely comment will appear once approved.}

Wednesday, August 14, 2024

Membership Wednesday ~ August 2024 KOM and BOM ~ Unity Stamp Co.

  Hello there crafty friend!
Today I'm sharing a lovely card featuring gorgeous stamps from the August 2024 Kit of the Month and August 2024 Background of the Month memberships from Unity. Fall is my absolute favorite! I love the colors and all the cozy vibes!


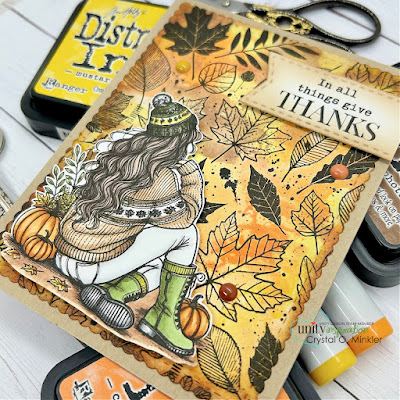
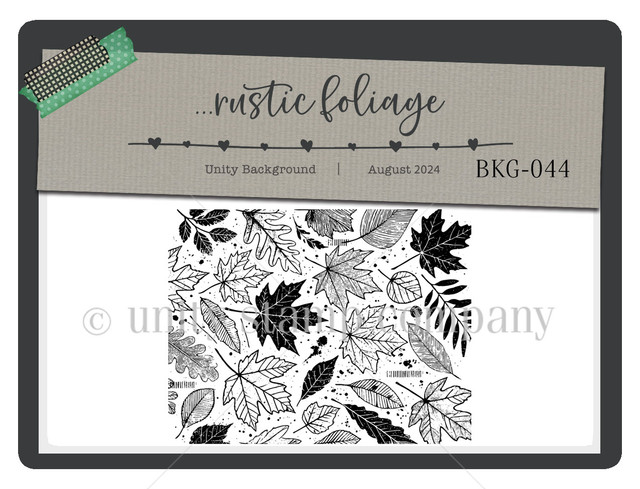
I stamped the beautiful August 2024 Background of the Month called Rustic Foliage with Black Amalgam ink on Stampers Select White card stock from Papertrey Ink. I ink smooshed the panel with Mustard Seed, Carved Pumpkin, and Vintage Photo Distress Inks. This is my favorite combo for Fall inks. After I dried the panel with a Wagner Precision Heat Tool I die cut the panel with the largest die from the Scallops & Rectangles {nesting dies}. I then blended a bit of the Vintage Photo Distress Ink around the edges.


I adhered the panel to an A2 top fold card base of Kraft card stock from Papertrey Ink. I set that aside and stamped the gorgeous girl and the sentiment from the August 2024 Kit of the Month. I Copic colored the girl using a bunch of fun markers. Once I was done, I fussy cut the girl leaving a very thin border around the edges. 

Quick list of the Copic Markers I used:
Hand: E00, E11
Hair: E70, E71, E74, E79, E95
Hat: G43, G85, G99, Y11, Y15, C00, C1
Sweater: E51, E55, E57, C00, C1
Pants: C00, C1
Boots: G43, G85, G99, Y15, N2, N4, N6
Pumpkins: YR21, YR15, YR27
Green Leaves: G43, G99
Yellow Leaves: Y11, Y15, YR15, E55


I die cut the sentiment using a die from the Scallops & Banners {nesting dies}. It was very white and took attention away from the pretty girl so I decided to distress the edges with my brown blending brush. I didn't actually add ink to the brush, but it's the same brush I used earlier with the Vintage Photo Distress Ink.  I added iCraft 3D Foam Tape Jumbo Roll (white) from Therm O Web to the back of the girl and the sentiment and popped them up on the card. To finish it up, I added three enamel dots from my stash.
 

Here's a quick look at this month's Kit of the Month membership! LOVE everything about it!! So many gorgeous stamps!


Here's a quick look at this month's Background of the Month membership! Love it so much!!

Well, that's it for me today! I hope you've been inspired to play with your membership stamps! 
Hope you have an ink-redible day!


Thanks so much for stopping by!
See ya next time.

Inky Hugs,
Crystal


{Please note that comment moderation is on. Your lovely comment will appear once approved.}