Showing posts with label bird. Show all posts

Friday, July 25, 2025

Wrapped with Extra Love ~ Holiday Flock Talk ~ Unity Stamp Co.

Hello there crafty friend! 
I couldn't help myself... sharing one last card for the Christmas in July 2025 {BYSHC} Linky Party! I promise! It's the last one! But I just HAD to play with Holiday Flock Talk! It's a brand new stamp from our wonderful Sponsor Unity that just released! Yay!


What's better than a cute holiday birdie?! Well, THREE cute holiday birdies, of course! I stamped all three together for a mini slimline card. I colored them up with some festive colors using Copic markers.

Here's a quick list of the Copic markers I used:
Purple Bird: BV00, BV02, YR20, YR15, C0, C2
Hats: C0, C2, R20, R14, R27
Scarf: G000, G21, G82
Tree: G000, G21, G82, E57
Striped Present: R20, R14, R27, Y11, Y15
Blue Bird: B000, B00, B02, Y11, Y15, C0, C2, YR20, YR15
Tiny Present: G000, G21, R14, R27
Orange Bird: Y11, YR20, YR15, YR20, YR15, R20, R14, R27
Ground: C0, C2


I hope you'll stop by the Christmas in July 2025 {BYSHC} Linky Party to check out all the wonderful Holiday inspiration being shared and maybe you can even play along! I've been inspired by so many of the cards! That's why I've been making so many extras! LOL! Today is the last day to enter the linky party!


I die cut the trio using the Big Little Chain Mini Slimline dies from Gina Marie Designs. I popped up the die cut panel using foam tape.


I paired up these cuties with the Minty Christmas {paper pack}. My mini slimline measures 6-1/2 x 3-1/2" so I trimmed a piece of pattern paper to 6 x 3-1/2" and then cut it in half. I adhered the pieces to the sides of the mini slimline card base. And then I had a scrap of the mint paper. It's probably 2-1/2" wide by 3-1/2". That's a wrap for the linky party! I hope you've enjoyed my cards. 

Thanks so much for stopping by!

Inky hugs,
Crystal

Tuesday, July 8, 2025

Tawny Owl Paperie Inky Inspiration Sketch 34 ~ September 2024 KOM Wander and Wonder ~ Unity Stamp Co.

 Hello there crafty friend!
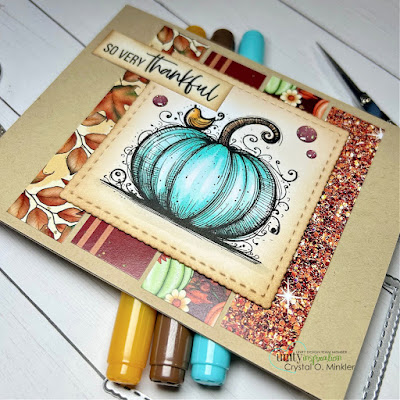
Today I'm sharing some fun inspiration for the Tawny Owl Paperie Inky Inspiration Sketch Challenge 34 in the Tawny Owl Paperie Inky Inspiration Facebook group. I found this sweet stamp already inked up and sitting on my desk so I thought I'd color it up. It's from the September 2024 Kit of the Month called Wander and Wonder from Unity.


My process:
  • The pumpkin was stamped with Black Amalgam ink and colored with Copic markers
  • Die cut with a square die from the Scallops & Squares {nesting dies}
  • The papers are scraps from the Autumn Vibes Paper Pad from Not 2 Shabby
  • I trimmed the lengths of the scraps to 3-7/8" and 4"
  • Adhered the scraps to a Kraft A2 top fold card turned on it's side for a landscape card
  • Trimmed the sentiment and distressed the edges of the sentiment and pumpkin square with Vintage Photo Distress Ink
  • Adhered the sentiment to the pumpkin square
  • Added foam tape to the back of the sentiment and the pumpkin square and popped it up on the card
  • Finished it off with a few glitter enamel dots


Here's a look at the fun sketch for Tawny Owl Paperie Inky Inspiration Sketch Challenge 34. The sketch, as always, is meant to inspire not require. So let the sketch lead in your design, but don't feel limited by it. I adjusted my design this time by turning it.


Copic Markers used:
Pumpkin: BG000, BG11, BG01, BG15, E21, E25
Bird: YR20, YR23, YR15
Ground: W0, W1


I am so ready for Fall and the cooler temperatures it brings. I hope you can find time to play along with the sketch challenge. Have an INKtastic week!

Thanks so much for stopping by!

Inky Hugs,
Crystal

Wednesday, April 23, 2025

Membership Wednesday ~ April 2025 UU Chirps & Cheer ~ Unity Stamp Co.

Hello there crafty friend!
Happy Membership Wednesday! Today I'm sharing a card featuring the adorable stamp from the April 2025 Uniquely Unity membership from Unity called Chirps & Cheer. 


I stamped this adorable bird with Black Amalgam ink on Kraft card stock and colored it up with some Copic markers. I love this technique and it's been awhile since I've done some coloring on kraft. I made a fun swirl in the center of the flower using English Mustard Nuvo Drops. I just used a toothpick to define the swirl a little more.

Here's a quick list of the Copic markers I used:
Bird: Y11, Y15, YR23
Beak: YR04
Flower: R20, RV04, YG11, YG17, G99
Outline: BG10


I had this fun fold card base in my stash and I thought I'd use it for this card. It's an A2 card base that measures 4-1/4 x 11" and it's scored at 2-3/4" and 5-1/2". I die cut the bird with a square die from the Scallops & Squares {nesting dies}. I trimmed up the sentiment and adhered it to the top right corner of the bird.


I paired up this sweet image with the beautiful Enveloped in Love {paper pack}. I forgot to take a picture of the card open... ooops! The heart paper and the pink heart paper I cut for the inside folded panel both measure 2-1/2 x 4". The pink panel measures 5-1/4 x 4. And I also cut a 2-3/8 x 3-3/4" panel of kraft card stock that is inside the card so I can write a note to the recipient.


Here's a quick look at this month's Uniquely Unity membership! Loving this cutie!

Well, that's it for me today! I hope you've been inspired to play with your membership stamps!


Thanks so much for stopping by!
See ya next time.

Inky Hugs,
Crystal


{Please note that comment moderation is on. Your lovely comment will appear once approved.}

Monday, April 7, 2025

Inky Paws Challenge #239 ~ Color Challenge {Week 1}

Hello there crafty friend!
It's time for a new Inky Paws Challenge! We're playing with a fun mix of colors this month for a Color Challenge! I sure hope that you'll join us and play along with your Newton's Nook Designs products! Don't forget... our challenges are a whole month long so there's lots of time to play along! Yay! You have until Friday, May 2nd to get your entries in for the #239 Color Challenge and a chance to win a $20 store credit to Newton's Nook Designs!


Our beautiful colors are... Dusty Violet, Spring Green, Sunshine Yellow, and Cocoa Brown!! Love this combo!


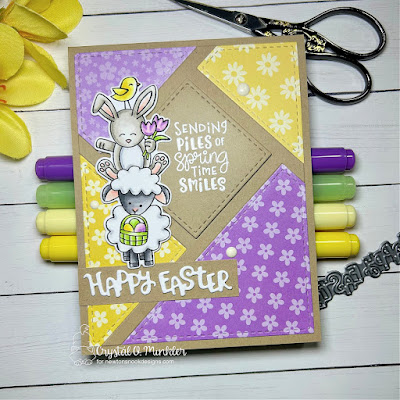
I stamped the adorable critters from Spring Pile Up Stamp Set with Memento Tuxedo Black ink and colored the critters with Copic Markers. I die cut them using the coordinating Spring Pile Up Die Set

Here's a quick list of the Copic markers I used for the kitty and heart:
Bird: Y11, Y15, YR15
Bunny: W00, W1, W3, R00, R20, C00, C2
Tulips: V000, V12, V15, YG11, YG03, YG23
Sheep: C00, C2, N0, N2, N4, R00, R20
Basket: YG11, YG03, YG23
Eggs: Y11, Y15, V000, V12, V15, YG11, YG03, YG23


I created my background by die cutting scraps of pattern paper using the awesome Fractured Card Layout Die. I also die cut a piece of Kraft card stock to get the outline and the center piece. I heat embossed the sentiment using Sugar Cube Pigment White ink from Taylored Expressions, Alabaster White Embossing Powder from Brutus Monroe and I melted the powder with a Wagner Precision Heat Tool.


These beautiful pattern papers are from the Spring Blooms 6x6 Paper Pad. Such pretty papers! I also die cut the Happy Easter sentiment using the die from the Spring Pile Up Die Set. I wanted to ground the critters with a strip of card stock but it looked so plain so I added the extra sentiment. I finished off the card with a few white enamel dots. 


Now it's your turn to get your paws inky with your Newton's Nook Designs products and create a project using the color combo of Dusty Violet, Spring Green, Sunshine Yellow, and Cocoa Brown. Be sure to link up to the Inky Paws Challenge! Can't wait to see your projects!


Thanks so much for stopping by!
See ya next time.

Inky Hugs,
Crystal


{Please note that comment moderation is on. Your lovely comment will appear once approved.}

Wednesday, March 12, 2025

You Are My Sunshine ~ Preview Day 2 ~ The Greeting Farm

 Hello there crafty friend!
It's Day 2 of previews at The Greeting Farm for the March release. Oh. My. Cuteness... all the critters in the You Are My Sunshine stamp set are just too cute for words!!


I created a sweet little scene on a slimline card with some fun layers. I used the Slim Line Cloud Coverage Stencil from Picket Fence along with the Hills & Grass Stencil from Newton's Nook Designs. And I used Tumbled Glass & Mowed Lawn Distress Inks to blend over those stencils.


I stamped all the images with Memento Tuxedo black ink and colored them up with Copic Markers. I used a bunch of markers so the list is a bit long this time:
Bird: B000, B00, Y11, Y15, YR15
Deer: R00, R20, E21, E51, E23, E25
Daisy Garland: C00, C2, Y11, Y15
Bunny: C00, C2, R00, R20
Bear: R00, R20, E51, E33, E35, E37, N2, N4, N6
Bear's Flower Crown: YG11, YG03, YG63, R11, R22, V000, V12, V15, Y11, Y15
Fox: E51, E95, E97, E09, N2, N6
Flowers: Y11, Y15, YR15, V000, V12, R00, R11, B000, B00


I die cut the stenciled layers using dies from the Scalloped Card Panels Die from Trinity Stamps. I fussy cut all the critters and flowers and then colored the edges of my fussy cutting with a black marker.


I adhered the layers to a slimline card measuring 7 x 8-1/2"; scored at 3-1/2". And then I adhered all the critters and flowers to the card. To finish it off, I stamped the sentiment directly onto the card. This was so fun to make! I enjoyed coloring all the critters and flowers for the scene. The release goes live in the store on the 15th at 12am EST.

Thanks so much for stopping by!
See ya next time.

Inky Hugs,
Crystal


{Please note that comment moderation is on. Your lovely comment will appear once approved.}


Wednesday, November 27, 2024

Membership Wednesday ~ November 2024 KOM Every Step of the Way ~ Unity Stamp Co.

  Hello there crafty friend!
Today I'm sharing a sweet holiday card featuring the adorable bird stamp from the November 2024 Kit of the Month membership from Unity called Every Step of the Way. 


I stamped the bird with Black Amalgam ink from Gina K. Designs and colored her up with my Copic markers. I fussy cut the bird leaving a bit of a white border around it.  

Here's a quick list of the Copic markers I used:
Bird: E41, E21, E23, E25, C3
Hat: C00, C1, BV31, BV02, BV13


I ink smooshed a fun iCraft Deco Foil Toner Card Front Winter Sparkle using Spun Sugar and Wilted Violet Distress Inks. And then I blended over the white areas with Shaded Lilac and Kitsch Flamingo Distress Inks using blending brushes until I was happy with the background. I wiped off the excess ink and ran the toner card front through my laminator in a Deco Foil Carrier Sheet with iCraft Deco Foil Transfer Foils Blizzard on top. I wish you could see more of the pretty shine in the photos.


I trimmed the background and adhered it to a white A2 top fold card that I turned on the side for a landscape card. I die cut a large banner from Stampers Select White Card Stock from Papertrey Ink using a die from the Scallops & Banners {nesting dies}. I also die cut a circle from Vellum Card Stock also from Papertrey Ink using a die from the Scallops & Circles {nesting dies}. The lovely sentiment is also from this month's KOM.


Here's a quick look at this month's Kit of the Month membership! Love it!

Well, that's it for me today! I hope you've been inspired to play with your membership stamps! 
Hope you have an inktastic day!


Thanks so much for stopping by!
See ya next time.

Inky Hugs,
Crystal


{Please note that comment moderation is on. Your lovely comment will appear once approved.}

Friday, August 23, 2024

August Scraps Cards {Take Two} ~ Queen Girl & Some Other Stamps ~ Unity Stamp Co.

 Hello there crafty friend!
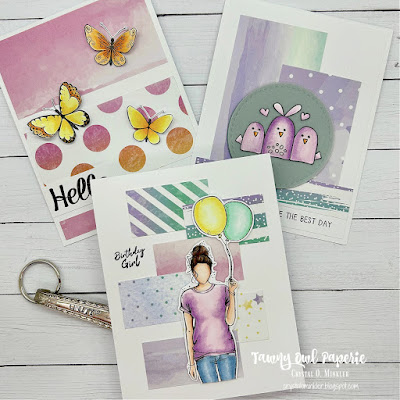
Today I'm sharing a trio of cards I created using up the rest of the leftover scraps I've been trying to finish up this month. SO excited to be done with another pack of scraps! Woohoo!! I also inked up some very neglected and untouched stamps from Unity Stamp Co. including the gorgeous Queen Girl.


Here's a look at the three cards all together. All so sweet and fun! I'd love to know if you have a favorite of the three... mine is probably Queen Girl, but I do love how they all turned out.


I went with a simple background for my first card. I had two larger panels and a small strip of pattern paper so I adhered them as shown leaving some white space of my white card base showing. Such a fun and simple card design. The beautiful butterflies are from a retired set of stamps called 3 Little Butterflies. I got these a long time ago and finally inked them up! So sad to discover that they are no longer available at Unity. They are so pretty!


 I stamped them with Black Amalgam ink and colored them up with the following Copic markers: Y11, Y15, Y38, YR21, YR15, YR16. I fussy cut the butterflies and colored the edges using a Memento Tuxedo Black marker. I bent the wings up a bit and adhered the butterflies to the card just at the base of the their little bodies. I love the dimension this gives to the card! They look like they are just stopping by for a quick visit. I stamped the sentiment from the same set, trimmed it up and adhered it directly to the card.


My second card uses up three more pieces of pattern paper. They all had similar colors so it just made sense to pair these ones up. I also found a circle scrap that was die cut from Ocean Tide card stock from Papertrey Ink. It's the perfect shade for the greeny-blues in the pattern paper. I did die cut another circle from Vellum card stock also from Papertrey Ink to adhere over it just to soften the color a little bit. The pattern papers are adhered to 4 x 5-1/4" piece of Stampers Select White card stock from Papertrey Ink. And then I adhered the panel to a white A2 top fold card base. All of my white papers are almost always Stampers Select White card stock.


Inspiration for this card came from the Tawny Owl Paperie Inky Inspiration Sketch 22. Such a great sketch for these random pieces of pattern paper! It was perfect for these three pieces!


I stamped the adorable birds from the Many Happy Birdies... which is also retired. So sad! Just like the butterflies, I had never inked these cuties up so I'm glad I finally did. I colored up the birdies... OH MY. I just realized I didn't color the middle birdies dots! LOL!! Well, imagine they are white because that's what I planned on coloring them... anywho, I colored up the birdies with the following Copic markers: V0000, V000, V01, V12, V15, YR21, YR15, RV52. Also just like the butterflies, I fussy cut the birdies and colored the edges with a black marker. I adhered them to the vellum circle and then added glue to the vellum just behind the birdies. I popped up the circle layer with foam tape and stamped the sentiment. So easy peasy and cute!


My third and last card today uses up the last of my scraps. All of these six little rectangles are about the same size. I thought it would be fun to do a wonky stairs design with them. I really love how it turned out. And I think having the girl touch all six pieces of the pattern paper really brings the whole design together. All six pattern papers are just adhered to a white A2 top fold card base. No extra layers here.


I stamped the gorgeous Queen Girl and colored her with my Copic markers. I fussy cut her leaving a white border around the edges. Before I popped her up on the card with foam tape, I stamped the sentiment directly onto the card base. I am really loving this card and the fun design. I think I might turn it into a sketch... whatcha think?

I used the following Copic markers for Queen Girl:
Skin: E000, E00, E11
Hair: E33, E35, E37
Shirt: V0000, V000, V01, V12, V15
Jeans: B91, B93, B95
Balloons: Y000, Y11, Y13, G000, G00, G02


 I am so ecstatic to have another paper pack totally done! I'm going to look through my papers and see if there's a Fall themed one maybe for next month. There's just a few more days left to play along with the Tawny Owl Paperie Inky Inspiration Sketch Challenge 24. I'll be back on Tuesday of next week with a brand spanking new sketch challenge!! Woohoo! I hope you have a wonderfully inky weekend!

Thanks so much for stopping by!
See ya next time.

Inky Hugs,
Crystal


{Please note that comment moderation is on. Your lovely comment will appear once approved.}

Thursday, August 22, 2024

Best Chick in Town ~ Witty Chick Whimsy ~ Unity Stamp Co.

Hello there crafty friend! 
I'm back with another fun chicken card for Unity's latest release. I can't get enough of all the awesome chicken stamps!! The Witty Chick Whimsy stamp is just so beautiful with the flowers and the glasses!! Love it!! This beautiful stamp is also available in photopolymer... {Clearly Unity} Witty Chick Whimsy. I love the options of either red rubber or clear photopolymer!!


I stamped the sweet chicken and sentiment using Black Amalgam ink from Gina K. Designs and then I colored up the chicken with my Copic markers. I then die cut the chicken using a die from the Scallops & Circles {nesting dies}.

Here's a quick list of the Copic markers I used:
Chicken: YR000, YR12, YR07, Y21, Y15, Y26, BG70, BG72, BG75
Flowers: Y21, Y15, Y26, YR000, YR07, YG91, YG03
Ground: C00, C1


Even though the {BYSHC} Sketch Challenge 48 is for Christmas cards, it doesn't mean it can't be used for other occasions! {Please just remember if you do use the sketch, you can't share it in the BYSHC Facebook group unless it's Christmas or winter themed.} But I'd love for you to share in my Tawny Owl Paperie Inky Inspiration group! As with all of my sketches, it's meant to inspire not require! So as I often do, I altered the design just a bit by adding another layer.


This sketch is fantastic for paper scraps but since this is a new paper pack that I just added to my stash, I cut random strips from all of the papers. I think I just did 1/4" and 1/2" strips and then made a fun pattern with them on a 4 x 5-1/4" piece of thin white card stock. I cut off the excess from the edges and die cut the papers using the stitched rectangle die from Scallops & Rectangles {nesting dies}. I then die cut the grid pattern paper using the largest die from the same die set. I think it's a wonderful contrast to the different patterns! I adhered my layers together on an A2 top fold card base of Kraft card stock from Papertrey Ink.


I placed the circle on the top layer and used a pencil to mark where I wanted to cut the edge. I used the Tim Holtz Tonic Guillotine Comfort Paper Trimmer to cut that edge. I trimmed up the sentiment and adhered both pieces to the card. To finish this one off, I added some Ranger Glossy Accents to the glasses for some fun shine. Love how this turned out! I hope you have an inkredible day! 

Thanks so much for stopping by!
See ya next time.

Inky hugs,
Crystal

{Please note that comment moderation is on. Your lovely comment will appear shortly.}

Tuesday, August 13, 2024

August Scraps Cards ~ Flock Talk ~ Unity Stamp Co.

 Hello there crafty friend!
Today I'm sharing a trio of cards I created using the larger pieces of leftover scraps I've been trying to finish up this month. Every little bit used up counts! I'm close to being finished up with these latest papers. Yay! I also played with some super cute stamps called Flock Talk from Unity Stamp Co.


Here's a look at the three cards all together. All so cute! I'd love to know if you have a favorite of the batch. I think my favorite it the one on the bottom right. I just love that birdie and the colors in the papers.


To make my backgrounds for each of these cards I used washi tape to hold the two pattern papers together. And then I secured the stitched die from the Scallops & Rectangles {nesting dies} over the pattern papers also with washi tape and ran it through my Big Shot. For this first card I used the following Copic markers: YR000, YR21, YR15, YR27, G00, G02, N0, N2.


I trimmed up three thin pieces of white card stock to 3-1/4 x 4-1/2" and adhered them to the back of the scraps panels securing them together. And I adhered them right over the washi tape on the back so I didn't have to worry about them shifting or anything. For my second card I used the following Copic markers: V0000, BV0000, BV20, BV11, YR21, YR15, YR27, G00, G02.


All of the pattern paper panels are adhered to white A2 top fold card bases. All of the birds are stamped with Memento Tuxedo Black ink. They are all die cut using dies from the Scallops & Circles {nesting dies}. And the sentiments you may remember from some of my past cards. It's becoming my favorite sentiment for birthday cards. It's from the Bitty Birthday Bash stamps. For my third card I used the following Copic markers: V0000, V12, V06, C00, C1, YR21, YR15, YR27, YG11, YG03.


I trimmed the sentiments and adhered them to the circles and then I added foam tape to the back of the circles and sentiments. So happy to be nearly done with these papers! I haven't quite decided if I'm going to finish them off next week or do another card for the Tawny Owl Paperie Inky Inspiration Sketch 24. I guess we'll see next week! Have a wonderfully inky week!

Thanks so much for stopping by!
See ya next time.

Inky Hugs,
Crystal


{Please note that comment moderation is on. Your lovely comment will appear once approved.}

Tuesday, July 30, 2024

Tawny Owl Paperie Inky Inspiration Sketch 24 ~ Bitty Birthday Bash ~ Unity Stamp Co.

 Hello there crafty friend!
Today I'm sharing my first card for the Tawny Owl Paperie Inky Inspiration Sketch Challenge 24 in the Tawny Owl Paperie Inky Inspiration Facebook group.  I've been wanting to play with the adorable Bitty Birthday Bash from Unity. It's been sitting on my desk for weeks!


I am continuing to use up some of my leftover papers. I came across these pretty rainbow papers in my stash. No idea what these papers are called or who made them. They sure are pretty though!
 

Here's a look at the leftovers I'll be using up. I'm hoping to finish these up quick this month.


Here's a look at the fun sketch for Tawny Owl Paperie Inky Inspiration Sketch Challenge 24. The sketch, as always, is meant to inspire not require. So let the sketch lead in your design, but don't feel limited by it. I moved my sentiment and added the sequins in place of the little rectangle. A good example of letting the sketch lead, but not limiting the design.


 I stamped the Bitty Birthday Bash birds using Black Amalgam ink for the birds and Picked Raspberry and Wilted Violet Distress Ink for the balloons. I colored up the birds and a bit more of the balloons using my Copic markers. Fussy cut them leaving a bit of a white border around the images.

Here's a quick list of the Copic markers I used: 
Birds: Y11, Y15, YR12
Pink Hat / Pink Balloons: RV000, RV11, C1
Purple Hat / Purple Balloons: V000, V12, C1
Grass: YG11, YG23
Flowers: B000, B00


I love how quick these cards came together! All my layers are adhered directly to a white A2 top fold card base. No foam tape or popping up of anything on this one.


 I hope you all have fun with this sketch! I can't wait to see what you create with it. 
Have an ink-tastic week!

Thanks so much for stopping by!
See ya next time.

Inky Hugs,
Crystal


{Please note that comment moderation is on. Your lovely comment will appear once approved.}