Showing posts with label Holiday. Show all posts

Monday, December 16, 2024

Inky Paws Challenge #235 ~ Year End Cards Theme Challenge {Week 3}

Hello there crafty friend!
 Sharing some more inspiration for week 3, our final week of the Inky Paws Challenge #235 - Year End Cards Theme Challenge! You have until this coming Friday, December 20th to get your entries in for the challenge and a chance to win a $20 store credit to Newton's Nook Designs!


I usually find myself in need of a thank you card. And what's better than a coffee themed thank you card!?


I inked up the beautiful girl from Pumpkin Latte Stamp Set with Memento Tuxedo Black ink. I colored her up with my Copic markers and then I die cut her with the coordinating die from the Pumpkin Latte Die Set. I love these stamps! And was excited to see that I could use it for a holiday card.

Here's a quick list of the Copic markers I used:
Skin: E000, E00, E11
Hair: Y21, Y02, E23, Y26, E25
Blue Jacket: BG10, BG70, BG72
Buttons / Belt / Sleeve: R20, R14, R56
Scarf: BG10, BG72, R20, R14, R56
Boots: E51, E55, E57
Cup: C00, C1, R20, R14, YG11, G24, G46


I created a simple background by blending white pigment ink over the Evergreens Stencil onto Kraft card stock. I die cut the background using a die from the Frames & Flags Die Set. I also die cut the red scalloped mat using a die from the same set. And the white card stock layer is die cut using a die from the Basic Frames Die Set.


Before adhering all of my layers, I die cut the Thanks a Latte Dies from the white layer and the red layer. A fun trick I like to use to stretch out my card stock supply sometimes. I finished off the card with a few enamel dots from my stash.


Now it's your turn to get your paws inky with your Newton's Nook Designs products and create a card using this month's fun theme. Be sure to link up to the Inky Paws Challenge! Can't wait to see your projects!


Thanks so much for stopping by!
See ya next time.

Inky Hugs,
Crystal


{Please note that comment moderation is on. Your lovely comment will appear once approved.}

Wednesday, December 11, 2024

Membership Wednesday ~ December 2024 WK Joyous Village ~ Unity Stamp Co.

  Hello there crafty friend!
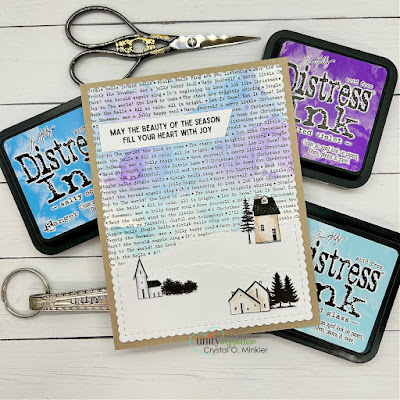
Today I'm sharing a sweet holiday card featuring the adorable little houses and church stamps from the December 2024 Whit Kit membership from Unity called Joyous Village. 


These adorable little houses and church are just TOO cute! I stamped them with Black Amalgam ink from Gina K. Designs and colored them very simply with Copic markers. I fussy cut the buildings on the line and cut the trees and bushes leaving a bit of a white border around them.  

Here's a quick list of the Copic markers I used:
House Top Right: E0000, E31
Church Mid Left: C00, C1
House Bottom Right: E40, E31


I ink smooshed a fun background over the A Little Christmas Carol Background stamp that I had stamped on Canson XL watercolor paper with Black Amalgam ink and dry set with a Wagner Precision Heat Tool. I ink smooshed with Tumbled Glass, Shaded Lilac, Wilted Violet and Salty Ocean Distress Inks.


I die cut the ink smooshed background using the largest die from the Scallops & Rectangles {nesting dies}. I also die cut a piece of white card stock. I tore the white layer in half and then stacked those pieces on the bottom to create my snowy hills. All the layers are adhered to a Kraft A2 top fold card base.


Here's a quick look at this month's Whit Kit membership! Isn't is glorious!

Well, that's it for me today! I hope you've been inspired to play with your membership stamps! 
Hope you have an inkcredible day!


Thanks so much for stopping by!
See ya next time.

Inky Hugs,
Crystal


{Please note that comment moderation is on. Your lovely comment will appear once approved.}

Wednesday, November 27, 2024

Membership Wednesday ~ November 2024 KOM Every Step of the Way ~ Unity Stamp Co.

  Hello there crafty friend!
Today I'm sharing a sweet holiday card featuring the adorable bird stamp from the November 2024 Kit of the Month membership from Unity called Every Step of the Way. 


I stamped the bird with Black Amalgam ink from Gina K. Designs and colored her up with my Copic markers. I fussy cut the bird leaving a bit of a white border around it.  

Here's a quick list of the Copic markers I used:
Bird: E41, E21, E23, E25, C3
Hat: C00, C1, BV31, BV02, BV13


I ink smooshed a fun iCraft Deco Foil Toner Card Front Winter Sparkle using Spun Sugar and Wilted Violet Distress Inks. And then I blended over the white areas with Shaded Lilac and Kitsch Flamingo Distress Inks using blending brushes until I was happy with the background. I wiped off the excess ink and ran the toner card front through my laminator in a Deco Foil Carrier Sheet with iCraft Deco Foil Transfer Foils Blizzard on top. I wish you could see more of the pretty shine in the photos.


I trimmed the background and adhered it to a white A2 top fold card that I turned on the side for a landscape card. I die cut a large banner from Stampers Select White Card Stock from Papertrey Ink using a die from the Scallops & Banners {nesting dies}. I also die cut a circle from Vellum Card Stock also from Papertrey Ink using a die from the Scallops & Circles {nesting dies}. The lovely sentiment is also from this month's KOM.


Here's a quick look at this month's Kit of the Month membership! Love it!

Well, that's it for me today! I hope you've been inspired to play with your membership stamps! 
Hope you have an inktastic day!


Thanks so much for stopping by!
See ya next time.

Inky Hugs,
Crystal


{Please note that comment moderation is on. Your lovely comment will appear once approved.}

Wednesday, November 20, 2024

Membership Wednesday ~ November 2024 UU Snow Buddies & BOM Evergreen Wonderland ~ Unity Stamp Co.

  Hello there crafty friend!
Today I'm sharing a sweet holiday card featuring the adorable snowman from the November 2024 Uniquely Unity membership called Snow Buddies and I paired him up with the fantastic background stamp from the November 2024 Background of the Month membership from Unity called Evergreen Wonderland. These two fabulous stamps were made for each other!!


I inked smooshed a background very lightly with Tumbled Glass and Shaded Lilac Distress Oxide inks. I purposely left a lot of white space in the background. I dried the background completely with a Wagner Precision heat tool. And then I heat embossed the fab Evergreen Wonderland on the background. I prepped the card stock with the TE Anti-Static Powder Tool, stamped with Sugar Cube White Pigment ink from Taylored Expressions and dusted the background with Alabaster White Embossing powder. And then I melted the powder with my heat tool.


I stamped the sweet snowman using Black Amalgam ink from Gina K. Designs. I colored him up with my Copic markers and then fussy cut the little scene leaving a white border around the images.

Here's a quick list of the Copic markers I used:
Snowman: B0000, B00
Nose: YR15
Hat / Scarf: C0, C1, C3, V000, V12, V15
Around the Buttons: C0, C1
Snowy Ground: B0000, B00


I cut a simple hill from white card stock and adhered it to the background. I adhered the background to a white A2 top fold card base. Stamped the sentiment, trimmed it and popped it up on the card with foam tape. I adhered the snowman scene directly to the card.


Here's a quick look at this month's Uniquely Unity membership! Isn't it just the sweetest?!


Here's a quick look at this month's Background of the Month membership! Love it!

Well, that's it for me today! I hope you've been inspired to play with your membership stamps! 
Hope you have an inktastic day!


Thanks so much for stopping by!
See ya next time.

Inky Hugs,
Crystal


{Please note that comment moderation is on. Your lovely comment will appear once approved.}

Wednesday, October 16, 2024

Membership Wednesday ~ October 2024 UU Simply Holiday Deer with BOM Holiday Jingle ~ Unity Stamp Co.

  Hello there crafty friend!
Today I'm sharing another pretty holiday card featuring the fantastic background stamp from the October 2024 Background of the Month membership from Unity called Holiday Jingle. This time I paired it up with the gorgeous stamps in the October 2024 Uniquely Unity membership. I just can't get enough of these fabulous holiday stamps this month!


I stamped the gorgeous Holiday Jingle background onto True Black card stock from Papertrey Ink using Wow Clear Embossing ink and dusted the wet ink with Night Red Embossing Powder from Brutus Monroe. This fun embossing powder actually came in a set of three for a special Halloween mix. No clue if it's still available. I just wanted to try a red and this was the only thing close to red in my stash.


I stamped the sweet deer and two of the trees using Black Amalgam ink from Gina K. Designs. I colored them up with my Copic markers and then fussy cut them leaving a white border around the images.

Here's a quick list of the Copic markers I used:
Deer: E21, E23, E25, C00, C2
Scarf: C00, C1, C2, R20, R14, R46
Ornaments: R20, R14, R46, YG11, G24, G46, Y11, Y15
Trees: YG11, G24, G46


A tore a scrap of Stampers Select White Card Stock from Papertrey Ink and adhered it to the bottom of the 4 x 5-1/4" black background. I adhered the trees and deer to the card. Stamped the sentiment using Candied Apple Distress Ink on a scrap of white card stock. Trimmed it up and adhered it to the card too. No foam tape for this one! The panel was adhered to a white A2 top fold card base.


Here's a quick look at this month's Uniquely Unity membership! Isn't it just the sweetest?!


Here's a quick look at this month's Background of the Month membership! Love it!

Well, that's it for me today! I hope you've been inspired to play with your membership stamps! 
Hope you have an ink-tastic day!


Thanks so much for stopping by!
See ya next time.

Inky Hugs,
Crystal


{Please note that comment moderation is on. Your lovely comment will appear once approved.}

Wednesday, October 9, 2024

Membership Wednesday ~ October 2024 BOM Holiday Jingle ~ Unity Stamp Co.

  Hello there crafty friend!
Today I'm sharing a pretty simple holiday card featuring the fantastic background stamp from the October 2024 Background of the Month membership from Unity called Holiday Jingle. I used one of my favorite color combos of kraft and red... love it!


The beautiful background was stamped on Kraft card stock with Candied Apple Distress Ink. I mat it with Pure Poppy card stock from Papertrey Ink. And then adhered the panel to a Kraft A2 top fold card base.


My sweet card was inspired by an adorable card by Julissa Sargo that is included with this month's Background of the Month membership. Did you know that some of the members of the Unity Design Team share step-by-step instructions of cards for the memberships each month? I just had to CASE Julissa's card and put my own twist on it!


The adorable chicken from Hold on Santa was colored up with Copic markers. I die cut the sweet chicken using a die from the Scallops & Banners {nesting dies} and the sentiment and mat were die cut using a pair of dies from the Scalloped & Stitched Sentiment Nesting Dies. I distressed the edges of the chicken and sentiment with a bit of Vintage Photo Distress Ink. The chicken banner and sentiment are both popped up on the card with foam tape. I finished off the card with a few shiny pieces of confetti from the Hologram Red Card Bling set from A Colorful Life Designs.

Here's a quick list of the Copic markers I used:
Chicken: E21, E23, E25
Beak: YR21, YR15
Feet: YR15, YR27
Wattle: R00, R14, R46
Hat: C00, C2, R20, R14, R46
Ground: E21, E23


Here's a quick look at this month's Background of the Month membership! So much fun!

Well, that's it for me today! I hope you've been inspired to play with your membership stamps! 
Hope you have an inkredible day!


Thanks so much for stopping by!
See ya next time.

Inky Hugs,
Crystal


{Please note that comment moderation is on. Your lovely comment will appear once approved.}

Wednesday, September 11, 2024

Membership Wednesday ~ September 2024 KOM Wander and Wonder ~ Unity Stamp Co.

  Hello there crafty friend!
Today I'm sharing a vintage style holiday card featuring the awesome poinsettia stamp from the September 2024 Kit of the Month membership from Unity called Wander and Wonder. I love to color poinsettias!! And I was so excited to find the background piece in my stash of 'maybe later' panels.


I started this card by stamping the lovely poinsettia and sentiment on white card stock with Black Amalgam ink. I then Copic colored the beautiful poinsettia. I actually recorded my coloring for this one and have a short video sharing that with you all {below}. 

Here's a quick list of the Copic markers I used:
Pinks: RV0000, RV00, RV10, RV11, RV14
Greens: YG11, G24, G46
Yellows: YG21, Y15, Y35


Once I was happy with my coloring I fussy cut the poinsettia on the line and distressed the edges just a bit with Vintage Photo Distress Ink. I trimmed the sentiment and then distressed it a bit with the same blending brush. I wanted to keep it light so I didn't add any more ink to the brush.


 I set aside the poinsettia and looked through my background panels that didn't work out for another project and went into my 'maybe later' container. I found a kraft panel from last year that I had blended over the Burlap Stencil using the Tsukineko's Champagne ink, both from the October 2023 Whit Kit. It was perfect for my card! I ink smooshed the panel with some Kitsch Flamingo and Vintage Photo Distress Inks. I then die cut the panel using the largest die from the Deckle & Stitches Nesting Dies from Unity. I distressed the edges of the panel using Vintage Photo Distress Ink and then splattered the panel with some watered down Ground Espresso Distress Ink. I adhered the sentiment to the poinsettia and then added a bunch of foam tape to the back of both and popped them up on the card.
 

Here's a quick look at this month's Kit of the Month membership! So in love with this month's KOM!!

Well, that's it for me today! I hope you've been inspired to play with your membership stamps! 
Hope you have an inkredible day!


Thanks so much for stopping by!
See ya next time.

Inky Hugs,
Crystal


{Please note that comment moderation is on. Your lovely comment will appear once approved.}
Saturday, June 1, 2024

{BYSHC} Sketch Challenge 46 ~ Cheery Deer ~ Lawn Fawn

Hello there crafty friend!
It's time for a new sketch challenge over in the Build Your Stash Holiday Cardmakers Facebook group! Today I'm sharing a sweet Christmas card featuring the adorable deer die from our amazing sponsor, Lawn Fawn! Lawn Fawn has generously offered up a $25 gift card as a prize for the {BYSHC} Sketch Challenge 46 this month! So awesome!!


This month's sketch is pretty simple! I think it'll be a great one to make multiple cards with. Of course, that does depend on what your focal image is for the card. LOL! I chose the adorable Cheery Deer dies from our amazing sponsor Lawn Fawn. And this adorable die is really fun to work with but it's also a bit time consuming. I did have some leftover die cuts in with my dies from the last card I made using this die so that was cool. And then I just used scraps of card stock to cut the other pieces I needed. I used Kraft, Berry Sorbet, Tropical Teal, Pure Poppy and True Black card stock from Papertrey Ink along with Close to Cocoa, Chocolate Chip and Pretty in Pink card stock from Stampin' Up.


I paired up the adorable deer with the beautiful Perfectly Plaid Christmas 6x6 Petite Paper Pack. Sadly, I can't find these papers on the website. I adhered the plaid pattern paper to the front of a white A2 top fold card turned on its side. I trimmed another piece of Stampers Select White card stock from Papertrey Ink to 4-1/4 x 5-1/2" and die cut it using a die from the Stitched Hillside Borders dies.


I stamped the sentiment from the Winter Wavy Sayings stamp set using my Mini Misti so I could bend the sentiment to fit along the stitched edge. I used an acetate grid sheet over the card to check the position and adjust until I was happy. It's not perfect but it's handmade so I'm happy with it. I die cut a piece of vellum using a die from the Large Cross-Stitched Circle Stackables. I adhered the deer to the vellum and then added glue just behind the deer to adhere it to the card. This way no glue showed through the vellum. I added a cute enamel dot to the deer's nose to finish this one off.


Here's a look at {BYSHC} Sketch Challenge 46 for the month of June. I am loving this sketch! I can't wait to see what everyone does with it. I hope you'll join us and play along with the sketch. If you're interested in seeing a bit more inspiration for this sketch, check out the amazing inspiration from the design team over on the {BYSH} Cardmakers blog! Lots of creative and sweet inspiration this month from the design team.


Thanks so much for stopping by!
See ya next time.

Inky hugs,
Crystal


{Please note that comment moderation is ON. Your lovely comment will appear shortly.}

Friday, May 31, 2024

{BYSHC} Sketch Challenge 45 ~ Fireside Friends ~ Newton's Nook Designs

Hello there crafty friend!
I'm back with one last card for the {BYSHC} Sketch 45 over in the Build Your Stash Holiday Cardmakers Facebook group! Today I'm sharing an adorable Christmas card featuring the cute Fireside Friends Stamp Set from our amazing sponsor, Newton's Nook Designs! Newton's Nook Designs has generously offered up a $20 gift code as a prize for the winner of this month's challenge! Please take note that today is the last day to enter the challenge!


I paired up the super sweet Fireside Friends Stamp Set with the cute Christmas Time 6x6 Paper Pad. I thought the houses complimented the fireside scene so well! I was very tempted to add more to the background of the scene. That's a lot of white... but I didn't want to take away from the cute stamp.


I stamped the sweet Fireside Friends and sentiment using Memento Tuxedo Black ink on Stampers Select White Card Stock from Papertrey Ink that I had cut down to 4-1/16 x 4". And then I colored up the critters and fireplace using a bunch of Copic markers. 

Here's a quick list of the Copic Markers I used:
White Kitty: C00, C1, C3, R00, R20
Orange Kitty: YR21, YR15, R00, R20, Colorless Blender
Pup: E51, E55, E57, N3, N5, N7, B0000, B00
Rug: R20, R14, R46
Garland: YG11, G24, G46
Bow: R20, R14, R46
Fireplace: C00, C1, C3, N0, N1, N3, N5
Grate: N3, N5, N7
Wood: E53, E55, E57
Fire: Y06, YR21, YR15, YR68


I trimmed the angle on the right of the stamped panel using the measurements from the sketch. I measured 3-1/4" on the top of the paper and made a tick mark with pencil. I measured the bottom at 3" and made another tick mark. And then I measured up from the bottom right corner to 1-3/4". I made my final tick mark and then I trimmed the angle using my Tim Holtz Tonic Guillotine Comfort Paper Trimmer. I adhered the panel to my 5-1/4 x 4" piece of pattern paper and then adhered it to a 5-1/2 x 4-1/4" piece of Pure Poppy Card Stock from Papertrey Ink. I then adhered the panel to a white A2 top fold card base that I turned on the side for a landscape card. I finished off the card with a few enamel dots.


Here's a look at {BYSHC} Sketch Challenge 45 for the month of May. I've really enjoyed this sketch! Remember... today is the last day to enter this challenge! If you're interested in seeing a bit more inspiration for this sketch, check out the amazing inspiration from the design team over on the {BYSH} Cardmakers blog! The design team has really done a phenomenal job with this sketch.


Thanks so much for stopping by!
See ya next time.

Inky hugs,
Crystal


{Please note that comment moderation is ON. Your lovely comment will appear shortly.}

Friday, May 17, 2024

{BYSHC} Sketch Challenge 45 ~ Newton's Stocking ~ Newton's Nook Designs

Hello there crafty friend!
I'm back with more inspiration for the {BYSHC} Sketch 45 over in the Build Your Stash Holiday Cardmakers Facebook group! Today I'm sharing a sweet Christmas card featuring the adorable Newton's Stocking Stamp Set from our awesome sponsor, Newton's Nook Designs! Newton's Nook Designs has generously offered up a $20 gift code as a prize for the  this month! Have you played along with the sketch?!


I paired up sweet Newton from the Newton's Stocking Stamp Set with the adorable Meowy Christmas 6x6 Paper Pad. They compliment each other so well. I couldn't help but color up a red stocking. So classic for Christmas but now that I'm looking at it with the papers maybe I should have done blue or green. 


I stamped the sweet kitty and sentiment using Memento Tuxedo Black ink on Stampers Select White Card Stock from Papertrey Ink. And then I colored up the kitty using a handful of Copic markers. 

Here's a quick list of the markers I used:

Kitty: R00, R20, YR21, YR15, Colorless Blender
Stocking / Santa Hat: C00, C1, R20, R14, R46


I adhered the pattern papers together and then I cut a few strands of twine, thread it through the hole in the tag and then I tied a pretty bow. I added a few pieces of foam tape to the top and bottom of the tag so it lays flat over the twine. I then adhered the panel to a white A2 top fold card base that I turned on the side for a landscape card. I fussy cut the kitty on the black line and popped him up on the card with foam tape. I can't believe I still don't have the coordinating Newton's Stocking Die Set. Definitely adding that to my next order! I actually die cut the cute tag using a small tag from the Frames & Tags Die Set before I stamped the sentiment. 


Here's a look at {BYSHC} Sketch Challenge 45 for the month of May. I am loving this sketch! I can't wait to see what everyone does with it. I hope you'll join us and play along with the sketch. If you're interested in seeing a bit more inspiration for this sketch, check out the amazing inspiration from the design team over on the {BYSH} Cardmakers blog! Lots of wonderful inspiration this month from the design team.


Thanks so much for stopping by!
See ya next time.

Inky hugs,
Crystal


{Please note that comment moderation is ON. Your lovely comment will appear shortly.}

Wednesday, May 1, 2024

{BYSHC} Sketch Challenge 45 ~ Bells & Holly ~ Newton's Nook Designs

Hello there crafty friend!
It's time for a new sketch challenge over in the Build Your Stash Holiday Cardmakers Facebook group! Today I'm sharing a sweet Christmas card featuring the beautiful holly stamp from our awesome sponsor, Newton's Nook Designs! Newton's Nook Designs has generously offered up a $20 gift code as a prize for the {BYSHC} Sketch 45 this month! So amazing!! Thanks so much, Jen and Jeff!


I am loving this month's sketch! It was inspired by a Christmas card that I received from my sweet friend, Vannessa Osbourn. I loved the card and the design so much I just had to turn it into a sketch. I used all of the measurements noted in the sketch this time.


I paired up the beautiful Christmas Time 6x6 Paper Pad with the beautiful Bells & Holly Stamp Set. I trimmed the green polka dot paper to 4 x 5-1/4". I then trimmed the holly paper to 4 x 4-1/16". From the bottom right corner I measured 1-3/4" up and marked my paper with pencil. I then measured from the top left corner 3-1/4" to the right and marked my paper with pencil again. And lastly, I measured from the bottom left corner 3" to the right and marked my paper one last time. I cut the angle of my paper using the three pencil marks on the paper. I sure hope that makes sense. 


I adhered the pattern papers together and then adhered them to a white A2 top fold card base that I turned on the side for a landscape card. I colored up the beautiful holly from the Bells & Holly Stamp Set with a handful of Copic markers. I then die cut the holly and adhered it to a vellum oval I had die cut using a die from the Oval Frames Die Set. I then adhered the oval to the card by adding glue just behind the holly so no glue would show through the vellum. I stamped the sentiment and trimmed it. I then mat it with a piece of Green Parakeet card stock from Papertrey Ink. I adhered it directly to the card.

Here's a quick list of the Copic markers I used:

Holly Leaves: G000, YG11, G24, G46
Holly Berries / Ribbon: R20, R14, R46
Branch: E21, E23, E25


Here's a look at {BYSHC} Sketch Challenge 45 for the month of May. I am loving this sketch! I can't wait to see what everyone does with it. I hope you'll join us and play along with the sketch. If you're interested in seeing a bit more inspiration for this sketch, check out the amazing inspiration from the design team over on the {BYSH} Cardmakers blog! Lots of creative and sweet inspiration this month from the design team.


Thanks so much for stopping by!
See ya next time.

Inky hugs,
Crystal


{Please note that comment moderation is ON. Your lovely comment will appear shortly.}

Friday, April 12, 2024

{BYSHC} Sketch Challenge 44 ~ Holiday Birds ~ RAM Stamps

Hello there crafty friend!
I'm back with another sweet holiday card for the {BYSHC} Sketch Challenge 44 over in the Build Your Stash Holiday Cardmakers Facebook group! Today I'm sharing a card featuring the Holiday Birds Digital Stamp from this month's fabulous sponsor, RAM Stamps


Aren't these birdies just TOO cute! I adore them so! I resized them in a Word Document and printed them off. Paired these cuties up with the Miss Mary Christmas Paper Pad from Hobby Lobby. I had no idea that Hobby Lobby was making their own pattern papers. Is that a recent thing or have I just been hidden under a rock?! 


I trimmed the printed panel down and then die cut the birdies using a die from the Wonky Stitched Mini Slimline die from Gina Marie Designs. I've been in a groove making simple cards and this month's sketch is as simple as can be! Since I wanted this card simple too, I chose papers that have a sentiment. No need to add another sentiment!


This is a mini slimline card measuring 6 x 3". So I cut a 6 x 6" piece of Stampers Select White card stock from Papertrey Ink and scored it at 3". To add a bit of dimension to the card, I added foam tape to the back of the birdie panel and popped it up on the card. 


Here's a look at {BYSHC} Sketch Challenge 44 for the month of April. Loving this simple sketch! I can't wait to see what everyone does with it. I hope you'll join us and play along with the sketch! If you're interested in seeing a bit more inspiration for this sketch, check out the amazing inspiration from the design team over on the {BYSH} Cardmakers blog! Lots of sweet inspiration this month from the design team.


Thanks so much for stopping by!
See ya next time.

Inky hugs,
Crystal


{Please note that comment moderation is ON. Your lovely comment will appear shortly.}