Showing posts with label Deco Foil. Show all posts

Wednesday, November 27, 2024

Membership Wednesday ~ November 2024 KOM Every Step of the Way ~ Unity Stamp Co.

  Hello there crafty friend!
Today I'm sharing a sweet holiday card featuring the adorable bird stamp from the November 2024 Kit of the Month membership from Unity called Every Step of the Way. 


I stamped the bird with Black Amalgam ink from Gina K. Designs and colored her up with my Copic markers. I fussy cut the bird leaving a bit of a white border around it.  

Here's a quick list of the Copic markers I used:
Bird: E41, E21, E23, E25, C3
Hat: C00, C1, BV31, BV02, BV13


I ink smooshed a fun iCraft Deco Foil Toner Card Front Winter Sparkle using Spun Sugar and Wilted Violet Distress Inks. And then I blended over the white areas with Shaded Lilac and Kitsch Flamingo Distress Inks using blending brushes until I was happy with the background. I wiped off the excess ink and ran the toner card front through my laminator in a Deco Foil Carrier Sheet with iCraft Deco Foil Transfer Foils Blizzard on top. I wish you could see more of the pretty shine in the photos.


I trimmed the background and adhered it to a white A2 top fold card that I turned on the side for a landscape card. I die cut a large banner from Stampers Select White Card Stock from Papertrey Ink using a die from the Scallops & Banners {nesting dies}. I also die cut a circle from Vellum Card Stock also from Papertrey Ink using a die from the Scallops & Circles {nesting dies}. The lovely sentiment is also from this month's KOM.


Here's a quick look at this month's Kit of the Month membership! Love it!

Well, that's it for me today! I hope you've been inspired to play with your membership stamps! 
Hope you have an inktastic day!


Thanks so much for stopping by!
See ya next time.

Inky Hugs,
Crystal


{Please note that comment moderation is on. Your lovely comment will appear once approved.}

Friday, September 27, 2024

{BYSHC} Sketch Challenge 49 ~ Transfer Gel Duo Spatters ~ Therm O Web

Hello there crafty friend!
I'm back to share one last card for the {BYSHC} Sketch Challenge 49 in the Build Your Stash Holiday Cardmakers Facebook group! I experimented a little bit and was pleasantly surprised that it worked! Hee hee! I'm sharing a fun ink blended and spattered Christmas card featuring some awesome crafty goodies from our amazing sponsor, Therm O Web! Therm O Web has generously offered up a $25 gift card as a prize for this month's challenge! There's still a few days to enter! They also shared an exclusive code with us for 10% OFF our orders on their website... use code BYSHC10.


I wasn't quite sure where this card was going until I got there! LOL! Do you ever have that happen to you?! I started with a vibrant background that I blended using Picked Raspberry, Wilted Violet, and Blueprint Sketch Distress Inks. I did a bit of water spatters on the background. And then I got to thinking how could I do some foiling spatters... oh, how fun it was to figure out how and then see that it worked!


While I was thinking about how I'd add foil spatters, I trimmed my background and die cut a scrap of Stampers Select White card stock from Papertrey Ink using the hill die from the Land Borders Die Set from Newton's Nook Designs. I adhered them together with iCraft UltraBond Adhesive and then set the panel aside. Next, I stamped the adorable critters from the fun exclusive 2024 STAMPtember set from Newton's Nook Designs and Simon Says Stamp called Happy Paw-lidays {sadly, it's sold out}. Speaking of Simon Says Stamp... I'm entering this fun card in the Simon Says Stamp Wednesday Challenge Anything Goes over on the SSS Blog.


I decided to Copic color the adorable kitty and stamped the sentiment using Wilted Violet Distress Ink. I actually stamped the sentiment on the card but I messed it up by pushing too hard. It happens! So I stamped the sentiment again, trimmed it up and popped it up on the card using iCraft 3D Foam Tape Jumbo Roll (white). I die cut the kitty using the coordinating Happy Paw-lidays die set and also popped up the kitty on the card. But I'm getting ahead of myself. The foil spatters created with Transfer Gel Duo and Silver Shattered Glass Deco Foil Transfer Sheets were done before the popping up of anything {check out the video below!}.

Here's a quick list of the Copic Markers I used for the kitty:
Kitty: R00, R20, N0, N2, N4
Hat / Scarf: C00, C2, B00, B02, B04, B28
Present: V000, V12, V15, V17
Ribbon: RV10, RV11, RV14

You can check out the quick video showing how I made the fun foiled spatters here... Fun Foil Spatters | Transfer Gel Duo | Therm O Web.


Here's a look at {BYSHC} Sketch Challenge 49 for the month of September. I've had a blast with this sketch! There's just a few more days to play along with the sketch! If you're interested in seeing a bit more inspiration for this sketch, check out the amazing inspiration from the design team over on the {BYSH} Cardmakers blog! Lots of super creative inspiration this month from the design team. Loving it!!


Thanks so much for stopping by!
See ya next time.

Inky hugs,
Crystal


{Please note that comment moderation is ON. Your lovely comment will appear shortly.}

Friday, September 13, 2024

{BYSHC} Sketch Challenge 49 ~ Flurry Forest ~ Therm O Web

Hello there crafty friend!
I'm back again to share more inspiration for the Build Your Stash Holiday Cardmakers Facebook group! Today I'm sharing a fun Christmas card featuring some awesome crafty goodies from our amazing sponsor, Therm O Web! Therm O Web has generously offered up a $25 gift card as a prize for the {BYSHC} Sketch Challenge 49 this month! Awesome!! They also shared an exclusive code with us for 10% OFF our orders on their website... use code BYSHC10.


I wanted to go with a nearly CAS design for my card today. I wanted a lot of white in the background. I started with a fun Deco Foil Toner Card Front called Flurry Forest by Therm O Web and Unity. I'm a bit obsessed with the Silver Shattered Glass Deco Foil Transfer Sheets. I just love the mix of colors you get from the silver shine. So stinking fun! I heated up my laminator for a good 10-15 minutes so it was nice and hot. I ran the card front through my laminator with the deco foil sheet shiny side facing up. I always love the reveal when you pull off the deco foil sheet... AWWWW!!! 


I had my snowflake scrap leftover from my first card for this month's sketch using the Deco Foil Toner Card Front called Snow Many Flakes by Therm O Web and Unity. Unfortunately, this card front is retired. I adhered the snowflake panel to the tree panel and then adhered the whole card front to a white A2 top fold card base turned on its side for a landscape card using iCraft UltraBond Adhesive from Therm O Web. I set the card aside and started looking for a stamp set to play with.


Confession: my desk, actually, my entire studio looks like a tornado ran right through it. There's stuff all over my desk and on the floor. It's almost scary to walk in there right now. I hope some of you can relate. Or am I the only one?

While I was looking for a stamp set, I thought I'd tidy my desk just a bit. Well, I came across this adorable stamped image already colored and ready to go! BINGO!! Isn't she just the cutest?! This super cute stamp is from The Greeting Farm and it's called Anya Reboot. It's a big 8-1/2 x 11" photopolymer stamp set with a bunch of Anyas. Sadly, I don't see it on the website right now but you can always request it for the next Farmer's Market!


Anya was stamped on Stampers Select White card stock and colored up with Copic markers. Now, because I found this cutie already colored up on my desk, I'm not totally positive what markers I used. But I have a pretty good idea what I used {listed down below} because I tend to use my favorite combos. Especially for Christmas coloring. I fussy cut Anya and colored the edges with a black marker to make the fussy cutting nice and neat. I added foam tape to the back of Anya called iCraft 3D Foam Tape Jumbo Roll (white), also from Therm O Web. I stamped a cute sentiment from The More the Merrier, also from The Greeting Farm. I colored the tree and ornament on the sentiment. I trimmed up the sentiment and then adhered it using the iCraft UltraBond Adhesive from Therm O Web again. 

Copic markers I believe I used for Anya, plus the sentiment tree and ornament:
Skin: E000, E00, E11, E04
Hair: E51, E53, E55, E57
Reds: R20, R14, R46
Greens: YG11, G24, G46
Boots: N0, N2, N4
Tree: YG11, G24, G46, Y15
Ornament: R20, R14, R46, Y15


Here's a look at {BYSHC} Sketch Challenge 49 for the month of September. Loving this sketch! It's even fun turned on its side. I can't wait to see what everyone does with it. I hope you'll join us and play along with the sketch. If you're interested in seeing a bit more inspiration for this sketch, check out the amazing inspiration from the design team over on the {BYSH} Cardmakers blog! Lots of super creative inspiration this month from the design team. Loving it!!


Thanks so much for stopping by!
See ya next time.

Inky hugs,
Crystal


{Please note that comment moderation is ON. Your lovely comment will appear shortly.}

Sunday, September 1, 2024

{BYSHC} Sketch Challenge 49 ~ Snow Many Flakes ~ Therm O Web

Hello there crafty friend!
It's time for a new sketch challenge over in the Build Your Stash Holiday Cardmakers Facebook group! Today I'm sharing a fun Christmas card featuring some awesome crafty goodies from our amazing sponsor, Therm O Web! Therm O Web has generously offered up a $25 gift card as a prize for the {BYSHC} Sketch Challenge 49 this month! So awesome!!


I started with a fun, but sadly retired Deco Foil Toner Card Front called Snow Many Flakes by Therm O Web and Unity for my snowflake layer. Therm O Web has a whole bunch of Deco Foil Toner Card Fronts available on their website though. I trimmed a piece of Silver Shattered Glass Deco Foil Transfer Sheet and laid it on top of the card front foil facing up. I heated up my laminator for a few extra minutes after the green light turned on and ran the foil topped card front through my laminator. I've found my laminator does better if it has those extra couple of minutes. I grabbed my Stormy Sky and Chipped Sapphire Distress Mini Ink pads and just pulled them across the card front giving a windy look to the background. I used a water pen to blend out the harsh lines from the ink pads. It's softened up with not much water. The card fronts hold up pretty well to water anyways. I then scraped the edge of the card front with the Chipped Sapphire just giving it a darker edge. A substitute for using a mat.


I die cut a piece of Stampers Select White card stock from Papertrey Ink using a Stitched Hillside Borders die from Lawn Fawn. I adhered the snowflake panel to a white A2 top fold card base using iCraft UltraBond Adhesive from Therm O Web and then adhered the hill on the bottom edge using the same glue. I set the card base aside and started die cutting all the fun pieces from the Sizzix Tim Holtz Cozy Winter Thinlits dies. I pretty much used the cover sheet from the dies as my guide for colors... except for the bears scarf. I wanted to do a fun green. I used Dark Chocolate, Kraft, New Leaf, True Black, Pure Poppy and Stampers Select White card stock from Papertrey Ink for the bear. I Copic colored with YG11, G24 and G46 on the scarf; and colored the front of the mug on white card stock using BG70 and BG72. For the branch I die cut it from Early Espresso card stock from Stampin' Up. The snow is Stampers Select White card stock that I added some shadow to with a C00 and C1 Copic marker.


I die cut all the pieces for the little bird and adhered them all together using the iCraft UltraBond Adhesive from Therm O Web. I used Stampers Select White, Kraft, and Pure Poppy card stocks for the bird. I Copic colored the beak using YR12 and Y11; the Kraft and white card stock of the bird's body using E000, E51, and E55; the Pure Poppy card stock of the head and tail using R20, R14 and a tiny bit of R46; the white card stock of the wing using N0, N2, N4; and lastly YR12 and E55 on the white feet of the bird. To finish off the card, I stamped a sentiment from the Simple Little Joys itty bitty stamp from Unity. It was a perfect fit because I find joy in snow and a good cup of coffee. This was such a fun card to make!


Here's a look at {BYSHC} Sketch Challenge 49 for the month of September. Loving this sketch! I can't wait to see what everyone does with it. I hope you'll join us and play along with the sketch. If you're interested in seeing a bit more inspiration for this sketch, check out the amazing inspiration from the design team over on the {BYSH} Cardmakers blog! Lots of super creative inspiration this month from the design team.


Thanks so much for stopping by!
See ya next time.

Inky hugs,
Crystal


{Please note that comment moderation is ON. Your lovely comment will appear shortly.}

Monday, August 15, 2022

Membership Monday ~ August 2022 BOM Autumn Bounty ~ Unity Stamp Co.

 Hello there crafty friend!
I just love the colors of Fall!! So warm and inviting! I was curious to see what they would look like ink smooshed on Kraft card stock. And I had a fun idea for some layers and dimension for a card using the gorgeous new Autumn Bounty background stamp. This stamp is the current Background of the Month stamp... a wonderful Membership at Unity Stamp Co. If you love background stamps, this membership is for you! A wonderful deep red rubber background stamp delivered to your door each month!! Yes, please! I can't wait for mine to arrive each month!


I used Mustard Seed, Carved Pumpkin, Seedless Preserves, Peacock Feathers, and Vintage Photo Distress Oxide inks for my ink smooshing on Kraft card stock from Papertrey Ink. The Kraft card stock from Papertrey Ink is 110lb and holds up really well with ink smooshing.


I stamped the Autumn Bounty background stamp three times on three pieces of Kraft card stock. I trimmed one to 4 x 5-1/4" for my bottom layer. I trimmed the second one for my middle layer measuring 3-1/8 x 2-5/8". I mat both layers on True Black card stock also from Papertrey Ink. 


For the sentiment I used a new Adhesive Transfer sentiment from the {Blooming Friendship} Deco Foil Adhesive Transfers by Unity, a collaboration with Therm O Web. I applied the Adhesive Transfer sentiment to a piece of True Black card stock and trimmed it up. I added a couple layers of scrap under the right side of the sentiment so it would lay flat and adhered it to the card. All done... and I really low how this turned out! You can check out my process video for this card here... Membership Monday | Ink Smooshing with Layers | August 2022 BOM Autumn Bounty | Unity Stamp Co. 


Such an amazing new background stamp! I'm anxious to also ink it up and color with my Copic markers, too! You can check out the Background of the Month membership over at Unity Stamp Co. I'll be back next Monday with a card using the beautiful new August 2022 Uniquely Unity membership!


Thanks so much for stopping by!
See ya next time.

Inky Hugs,
Crystal


{Please note that comment moderation is ON. Your lovely comment will appear shortly.}

Thursday, August 11, 2022

Celebrate Your Special Day ~ Adhesive Transfers ~ Unity & Therm O Web

 Hello there crafty friend!
Today I'm so excited to be joining Design Team members from Unity Stamp Co. and Therm O Web in an inspiration filled YouTube Hop featuring the newly released Deco Foil Adhesive Transfers!! These fabulous Adhesive Transfers make foiling SO easy and, of course, they're beautiful!


I used the wonderful {Let's Celebrate} Deco Foil Adhesive Transfer along with the gorgeous new Wildflowers Stand Tall background stamp from Unity. This gorgeous background stamp was a dream to color up... so fun! Here's a quick list of the Copic Markers I used to color up the background:

Yellow Flowers ~ Y13, Y06, Y35, E53, E55, E57, E59
Pink Flowers ~ RV10, RV21, RV14, Y06, Y35
Purple Flowers ~ V000, V12, V15
Blue Flowers ~ B00, B02, B16
Leaves / Green Background ~ YG11, YG05, YG03


I trimmed it to 4-7/8 x 3-5/8" and adhered it to a piece of white card stock that I had die cut with the largest scalloped die from the Scallops & Rectangles {nesting dies} from Unity. I adhered it to a black card front measuring 5-1/2 x 4-1/4" and then to a white A2 top fold card base that I turned on the side.


These sentiments are so gorgeous in person!! I love how the Mystic Rainbow foil compliments the colors in the Copic colored background.


I'd love for you to check out my process video for this card and please also hop along and see all the wonderful inspiration shared using the fabulous Adhesive Transfers!! The Adhesive Transfers make foiling SO easy! Here's a link to my video or you can click below... Unity & Therm O Web YouTube Hop | Celebrate Your Special Day | Adhesive Transfers.


Here's a look at the 6 new Adhesive Transfers that are available... 4 are from Unity and the other 2 are from Brutus Monroe. All are so much fun! 


Thanks so much for stopping by!
See ya next time.

Inky Hugs,
Crystal


{Please note that comment moderation is on. Your lovely comment will appear shortly.}

Tuesday, August 9, 2022

You Are Simply Amazing ~ New Adhesive Transfers ~ Unity & Therm O Web

 Hello there crafty friend!
Have you seen the amazing new release from Unity and ThermoWeb?! They've collaborated on some more new Adhesive Transfers and both design teams have shared a bunch of amazing inspiration on Instagram for a fun Instagram hop, along with the Brutus Monroe design team, too!! I'm in awe of all the amazing inspiration shared!


I ink smooshed a pretty background with Mustard Seed, Carved Pumpkin and Seedless Preserves Distress Oxide inks. Such pretty colors for Fall! I stamped the beautiful background with the new gorgeous Fall Stems stamp with Ranger Jet Black Archival ink.


No need for a laminator for these amazing Adhesive Tranfers!! I just used my Big Shot to apply the 'You Are Simply' and 'Amazing' sentiments from the {Simply Amazing} Deco Foil Adhesive Transfers pack to my ink smooshed and stamped background. And then I used the Gold Deco Foil Transfer Foils over the Adhesive Transfers and ran it through my Big Shot again. Super easy peasy and gorgeous!

*** Crafty Tip ~ be sure to completely dry your Distress Oxide inks either with a heat tool or let them sit overnight so the Adhesive Transfer will adhere to the oxides. ***


I trimmed my background and adhered it to a dry embossed layer of True Black card stock from Papertrey Ink that I had also trimmed and then adhered to a black card front measuring 5-1/2 x 4-1/4". The embossing folder is an old one in my stash so I don't have a name to share for it. I added some depth and shadows in and under the flowers with a few Prismacolor pencils to help the flowers pop. I think it turned out pretty nice.


A pretty birthday card for my second card! I'm loving this new floral stamp called Happiness & Wildflowers... it's so beautiful! I stamped it twice with Gina K Black Amalgam ink and then colored it up with the following Copic Markers:

Yellow Flowers ~ Y11, Y06, Y35
Pink Flowers ~ RV10, RV21, RV14
Leaves ~ YG01, YG11, YG23


Once I was happy with the coloring, I fussy cut each floral leaving a skinny white border around the image. I set those aside and started on my card front. I die cut a piece of white card stock with the largest die from the Eyelet Elegance Rectangle dies from Gina Marie Designs. I cut my sentiment from the {Blooming Friendship} Deco Foil Adhesive Transfers and applied it to the center of the die cut.


I placed the die cut in a Deco Foil Craft & Carrier sheet that I had cut in half. I placed a piece of card stock approximately 8-1/2 x 5-1/2" on top of my die cut for two reasons... first to protect the adhesive transfer from getting all scratchy and messed up since my plates are well used and secondly to add a bit of pressure when going through my Big Shot. I cut a piece of Pink Melon Deco Foil Transfer Foil and placed that on top with the pretty pink shine face up. I ran it through my Big Shot again and revealed the pretty foiled sentiment!! Love it! And so easy just with my die cutting machine! I adhered my die cut to a Melon Mambo card front measuring 4-1/4 x 5-1/2". I popped up the flowers with foam tape and added a few enamel dots from my stash. I adhered the card front to an A2 top fold card base of Stampers Select White card stock from Papertrey Ink. All done and so pretty! 


I sure hope you'll head over to Unity and check out these amazing new Adhesive Transfers... they are so fun to play with and you can use them with a die cut machine or a laminator! Also be sure to check out all the amazing new stamps that were just released... I spy a new adorable Winnie the Pooh stamp! Oh, and there's a super cute gnome too! Eeeep! 


Thanks so much for stopping by!
See ya next time.

Inky Hugs,
Crystal


{Please note that comment moderation is ON. Your lovely comment will appear shortly.}

Thursday, March 31, 2022

Nature of Friendship Happy Day ~ New Adhesive Transfer Sentiments ~ Unity & ThermoWeb

 Hello there crafty friend!
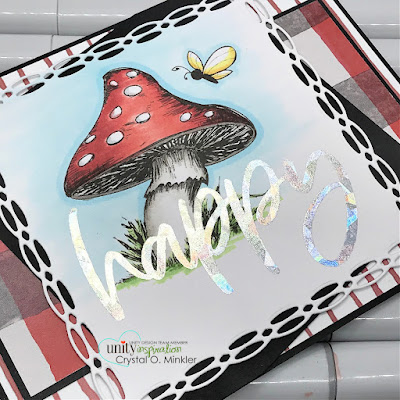
I couldn't help but play a bit more with the new amazing Adhesive Transfers from Unity and ThermoWeb!! I made one more card to share using the new beautiful Nature of Friendship stamp along with the big beautiful happy sentiment from the Adhesive Transfers Sentiment 1 pack.


It's always a good idea to pick out your pattern papers before you color but for this one I didn't. LOL... I knew I wanted to go with a red mushroom, though. Those dots just call for a red mushroom! I colored up the stamps with the following Copic Markers:

Mushroom Cap ~ R20, R14, R27, W1, W5, C00, C2
Mushroom Stem ~ W0, W1, W3, W5
Grass ~ YG23, YG17
Butterfly ~ Y11, Y06, Y35
Background ~ B0000, B00


Once all the coloring was done, I ran the colored image through my big shot with the happy Adhesive Transfer sentiment and then ran it through again with the Silver Shattered Glass Deco Foil Transfer Sheets. So easy peasy and beautiful!!


I die cut the colored and foiled panel with the Double Roped Square dies from Gina Marie Designs. Now, I had to start digging through my pattern papers. I wasn't sure what I was going to go with until I saw the Let Your Soul Wander {paper pack}... I remembered the black and red plaid paper and bam! 


I kinda wish I hadn't done such a bright blue in the background but it is what it is! Although it does actually work with the shine off of the amazing foils so I guess it's okay. I do love that shine from the pretty foils! If you've been hesitant to get into the foiling thing... it's time to try them! These Adhesive Transfers are seriously a game changer! Head over to Unity and check them out!


Thanks so much for stopping by!
See ya next time.


Inky Hugs,
Crystal


{Please note that comment moderation is ON. Your lovely comment will appear shortly.}

Wednesday, March 30, 2022

Thanks So Much Tulips ~ New Adhesive Transfers ~ Unity Stamp Co. & ThermoWeb Collab

 Hello there crafty friend!
Have you seen the amazing new release from Unity and ThermoWeb today?! They've collaborated on the cool new Adhesive Transfers and both design teams have shared a bunch of amazing inspiration on their blogs and on a fun Instagram hop, along with the Gina K. Design design team too!! I'm in awe of all the amazing inspiration shared!


First of all, please forgive the photos... these amazing Adhesive Transfers make such shiny and beautiful cards that they are hard to get good photos! But they are gorgeous in person, I promise! CAS is one of my fave styles of cards so this idea came to mind while the beautiful Layering Tulip Stencil was re-released last week.


I ink blended some Squeezed Lemonade, Mustard Seed, Kitsch Flamingo, Shabby Shutters, and Bundled Sage Distress Oxide inks over the Layering Tulips Stencil.


No need for a laminator for these amazing Adhesive Tranfers!! I just used my Big Shot to apply the Thanks and So Much sentiments from the Adhesive Transfers Sentiments 1 pack to my card stock. I used the Gold Glitter Deco Foil Transfer Foils by Unity, as well.
Super easy peasy and gorgeous!

*** Crafty Tip ~ be sure to completely dry your Distress Oxide inks either with a heat tool or let them sit overnight so the Adhesive Transfer will adhere to the oxides. ***


I used a couple amazing dies from Gina Marie Designs for my focal piece layers... the Wonky Stitched Oval and Pleated Lace Oval dies. I adhered those to a white A2 top fold card base. And finished off the card with a few black rhinestones from the Rainbow Bling Rhinestones pack from Gina Marie Designs.

You can check out my process video here... Thanks So Much Tulips | New Adhesive Transfers | Unity & ThermoWeb.


I sure hope you'll head over to Unity and check out these amazing new Adhesive Transfers... they are so fun to play with and you don't need a laminator to use them! 


Thanks so much for stopping by!
See ya next time.

Inky Hugs,
Crystal


{Please note that comment moderation is ON. Your lovely comment will appear shortly.}

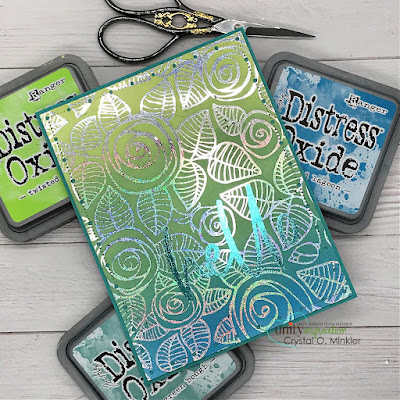
Rosy Days Hello ~ New Adhesive Transfers ~ Unity Stamp Co. & ThermoWeb Collab

 Hello there crafty friend!
I sure hope you're having a wonderful day! I'm super excited to share a pretty card using new Adhesive Tranfers Sentiments 2 pack from Unity and ThermoWeb!! 


Die cut with the Big and Little Chain Rectangle dies from Gina Marie Designs and adhered to a Bermuda Bay {Stampin' Up!} card front measuring 4-1/4 x 5-1/2".


I used my Big Shot to add the needed pressure to adhere the Adhesive Transfer Hello sentiment to my card front. And then I ran it through my Big Shot again with the Aqua deco foil.


Super easy peasy and beautiful!! Loving these new Adhesive Transfers!

You can check out my quick process video here... Rosy Days Hello | New Adhesive Transfers | Unity Stamp Co. & ThermoWeb.


I sure hope you'll head over to Unity and check out these amazing new Adhesive Transfers... they are so fun to play with and you don't need a laminator to use them! 


Thanks so much for stopping by!
See ya next time.

Inky Hugs,
Crystal


{Please note that comment moderation is ON. Your lovely comment will appear shortly.}