Showing posts with label #distressoxide. Show all posts

Wednesday, May 29, 2024

Membership Wednesday ~ May 2024 UU Wind in Your Hair ~ Unity Stamp Co.

  Hello there crafty friend!
Today I'm sharing a fun card featuring the girls stamp from the May 2024 Uniquely Unity membership called Wind in Your Hair from Unity. I absolutely adore this stamp! It reminds me of the bug my auntie had when I was a kid. I don't think it was a convertible like the one in the stamp but I loved going for rides in that car. 


I stamped the car and sentiment on scraps of Stampers Select White Card Stock from Papertrey Ink using Black Amalgam Ink from Gina K. Designs. I colored up the car using my Copic markers and die cut the image using a die from the Deckle & Stitches Nesting Die Set from Unity.

Here's a quick list of the Copic markers I used:
Car: R20, R14, R46, C00, C1, C3, Colorless Blender
Left Girl Hair: E70, E71, E74
Left Girl Shirt: BG11, BG23, BG45
Right Girl Hair: E51, E55, E57
Right Girl Shirt: V000, V12, V15
Outline: C00, C1


I set aside the car panel and grabbed a 4-1/4 x 11" piece of Stampers Select White Card Stock from Papertrey Ink. I scored the A2 top fold card base at 5-1/2" and then turned it on the side for a landscape card. I secured the card base to my table with purple tape. And then I laid the sunray of the 3-in-1 Stencil from Unity over top, also securing it to my table with purple tape. I blended Mustard Seed, Spiced Marmalade and Abandoned Coral Distress Oxide Inks using three of my TE Blender Brushes from Taylored Expressions.  


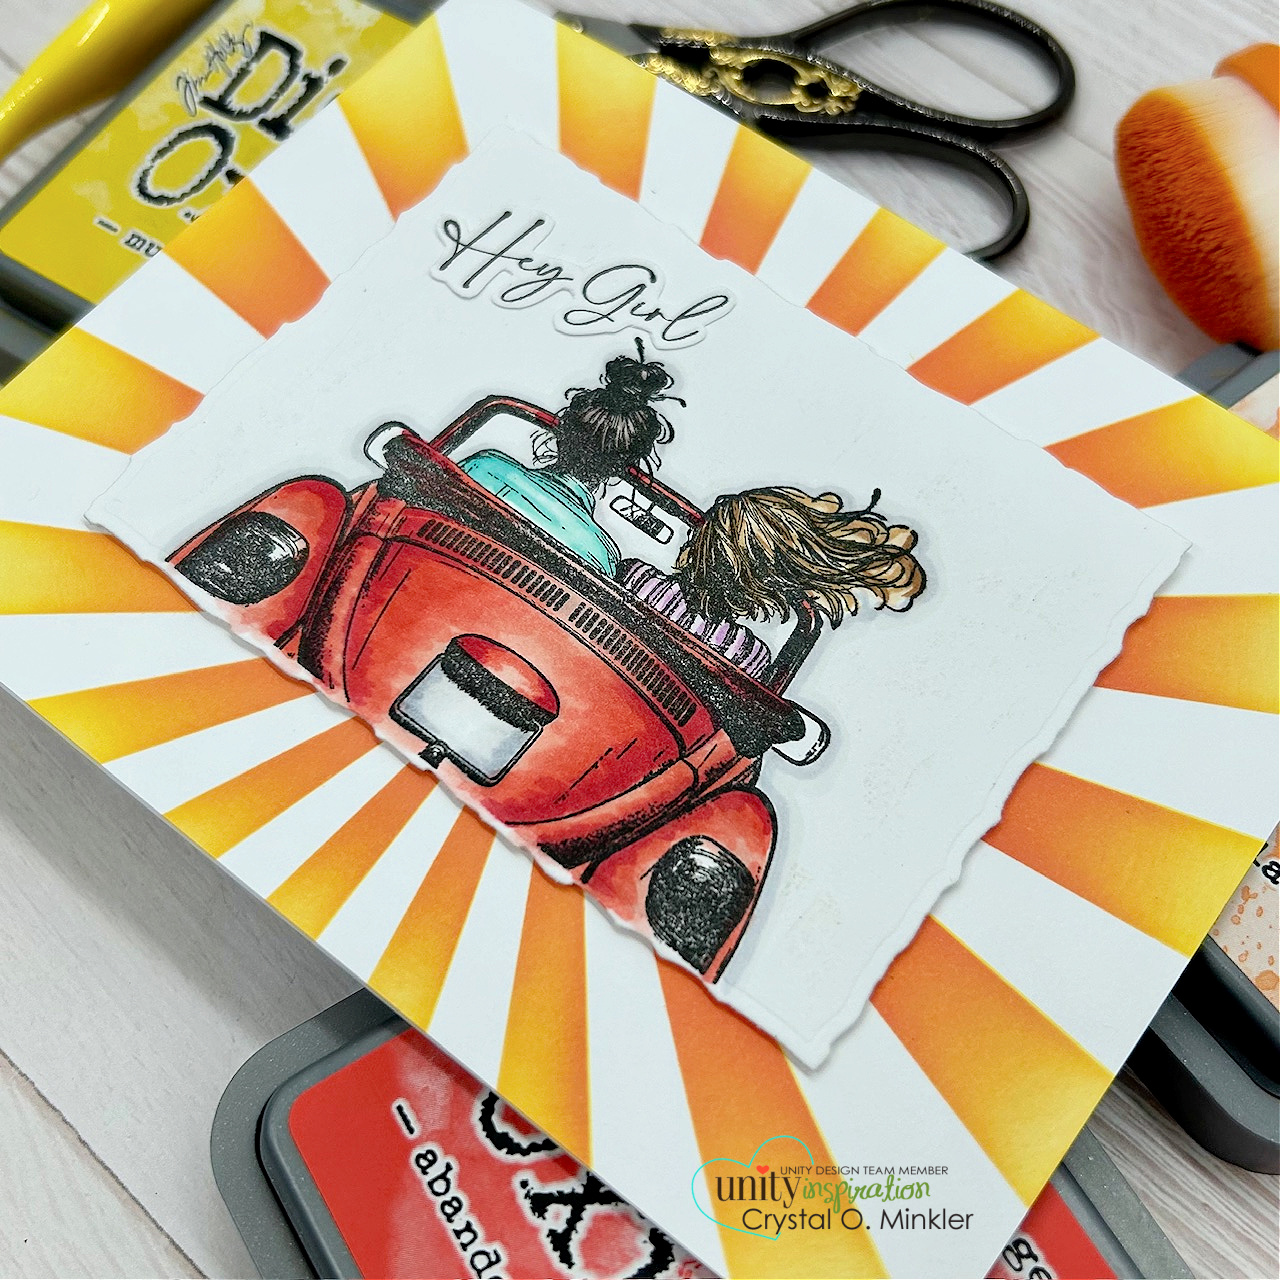
I fussy cut the sentiment and just adhered it directly to the car panel. I added foam tape to the back of the car panel and popped it up on the card base. I really love how this one turned out!
 

And here's a look at the awesome Uniquely Unity membership! I am seriously loving this month's stamp. Well, that's it for me today! I hope you've been inspired to play with your membership stamps!
Have an ink-redible day!


Thanks so much for stopping by!
See ya next time.

Inky Hugs,
Crystal


{Please note that comment moderation is on. Your lovely comment will appear once approved.}

Monday, May 13, 2024

Inky Paws Challenge #223 ~ Friendship Theme Challenge

Hello there crafty friend!
It's time for a new Inky Paws Challenge... a super fun Friendship Theme Challenge! I sure hope that you'll play along with us using your Newton's Nook Designs products! You have until Friday, May 24th to get your entries in for the #223 Friendship Theme Challenge and a chance to win a $20 store credit to Newton's Nook Designs!


Such a broad theme! I'm excited to see the entries for this one! So fun!


I thought the Newton's Movie Night Stamp Set was perfect for the Friendship theme! I stamped the adorable kitties with Memento Tuxedo Black Ink and colored them up with my Copic markers. I then die cut the kitties using the coordinating Newton's Movie Night Die Set

Here's a quick list of the Copic markers I used:

Tortoise Shell Kitty: R00, R20, YR21, YR15, N0, N1, N3, N5
White Kitty: R00, R20, C00, C1, C3
Orange Tabby Kitty: R00, R20, YR21, YR15
Chairs: N0, N1, N3, N5
Drink: C00, C1, B000, B00, B02
Candy Box: YG11, YG13, Y11, Y15
Popcorn: Y11, YR21, R20, R14, R46, C00, C1
Die Cut Popcorn: Y11, YR21


I die cut a half sheet of cheap card stock using the largest stitched oval die from the Oval Frames Die Set to create an oval stencil. I placed the die over a white A2 top fold card base and then placed the oval stencil over top. This way I was able to figure out placement for the oval stencil. I secured the oval stencil with purple tape. I then placed the Popcorn Stencil over top and secured it in place with some purple tape. I blended Mustard Seed and Spiced Marmalade Distress Oxide inks over the cool Popcorn Stencil using a light touch around the outer edge of the oval stencil. I love the way the popcorn just fades out into the white edges of the card base.


I die cut three popcorn pieces using the dies from the coordinating Newton's Movie Night Die Set. I colored them very simply with just two Copic markers - Y11 and YR21. I adhered the popcorn pieces to the kitties and added foam tape to the back of them. Before I popped them up on the card, I stamped the sentiment on the card base using my Mini Misti. It took me a couple times to ink it up just right over the oxide ink.


Now it's your turn to get your paws inky with your Newton's Nook Designs products and create a project with a Friendship theme. Be sure to link up to the Inky Paws Challenge! Can't wait to see your projects!


Thanks so much for stopping by!
See ya next time.

Inky Hugs,
Crystal


{Please note that comment moderation is on. Your lovely comment will appear once approved.}

Thursday, February 29, 2024

Unity Lovers ATC ~ Galentines ~ Unity Stamp Co.

Hello there crafty friend! 
I know that Galentines and Valentine's Day are well passed us but I just wanted to share the Galentines ATCs that I made for the Unity Lovers ATC swap. I used a whole bunch of Unity goodies to make these ATCs. It's always so much fun to turn on one of my audible e-books and get inky while I listen. Often times I can remember bits of the story that I listened to when I look at the projects I was working on. In fact, I remember I was listening to Divine Rivals by Rebecca Ross. I really enjoyed this book... a bit of romance, some fantasy and magic all during a time of war between gods. A really good read!


I started with two full sheets of Distress Watercolor Card Stock from Ranger measuring 8-1/2 x 11". I ink smooshed Lost Shadow, Spun Sugar, Picked Raspberry, Vintage Photo, and Speckled Egg Distress Oxide inks on each sheet. I dried the card stock completely with a heat tool. Stamped the cute hearts from Mousing Around: Hiya Pal all over the card stock using Speckled Egg, Ground Espresso, and Picked Raspberry. I wasn't thinking about the direction of the hearts and how I'd need to cut the card stock for the ATCs. So I ended up needing to ink smoosh another full sheet of card stock. Ooops! I splattered all three sheets using Tarnished Brass Mica Spray and Picket Fence Spray Stain and cut them up into ATCs. And then I distressed the edges with Vintage Photo Distress Oxide ink.


I stamped the distressed hearts from A Little Grunge Love using Picked Raspberry Distress Oxide ink and lightly blended some Kitsch Flamingo Distress Oxide ink over them. I also stamped the 'love' sentiment from Winter Cheer and Deer using the same Picked Raspberry ink. I fussy cut each of the hearts and the 'love' sentiments. Oy... that took some time! I think my eyes went a bit cross eyed once or twice! LOL!


And then I die cut Early Espresso card stock from Stampin' Up using the Unity {metal die}... I die cut 36 of those babies! {Sadly, I'm not seeing this die on the website right now... it must be out of stock}. Adhered two together using my new favorite Bearly Art Precision Craft Glue. I love this glue for die cut sentiments! The fine tip is amazing and I haven't had an issue with clogging. All that was left to do was adhere the sentiments to the ATCs and I popped up the hearts with foam tape. I did shift the placement of the popped up hearts depending on the ATC. I didn't want to cover up all the pretty hearts in the background. So the cards aren't quite identical but they are pretty close!

That's it for me today! Have an ink-tastic day!

Thanks so much for stopping by!
See ya next time.

Inky hugs,
Crystal

{Please note that comment moderation is on. Your lovely comment will appear shortly.}

Monday, November 20, 2023

Inky Paws Challenge #211 ~ Meowy Christmas Theme Challenge Reminder

Hello there crafty friend!
There's still time to play along with the Inky Paws Challenge #211 - Meowy Christmas Theme Challenge!! You have until this coming Friday, November 24th to get your entries in for this fun challenge and a chance to win a $20 store credit to Newton's Nook Designs!


This is our first Christmas with sweet Quinn as part of the family and I'm a bit nervous to see how she does with our Christmas tree. Any advice?


Speaking of Christmas Trees... isn't this tree of kitties just the sweetest?! I adore this fun stamp set! It's the Cat Christmas Tree Stamp Set. I stamped it with Memento Tuxedo Black ink - my go-to black ink for clear stamp sets because it cleans off beautifully. I die cut it using the coordinating Cat Christmas Tree Die Set.


Here's a quick list of the Copic markers I used to color up the Cat Christmas Tree:

Star: Y11, Y06, Y15
Christmas Lights: YG11, G14, Y06, Y15, R20, R14, B000, B00, V12, V15, N0, N1, N3
Purple Ornament: V000, V12, V15, N0, N1, N3
Blue Ornament: B000, B00, N0, N1, N3
Ears / Noses: R00, R20
Dark Grey Striped Cat: N1, N3, N5
White Cats: C00, C1
Orange Cat: YR21, YR15
Dark Grey Cat: N1, N3, N5
Orange Striped Cat: YR21, YR15, YR68
Light Grey Striped Cat: N0, N1, N3


I decided to go with a CAS design for this card. I pulled out the Snowfall Stencil and secured it over a white A2 top fold card base measuring 4-1/4 x 11"; scored at 5-1/2". I blended a bit of Tumbled Glass and Wilted Violet Distress Oxide inks. I blended heavier in the center of the card and lighter as I blended out towards the edges so there would still be lots of white. Once I was happy with the background I stamped the sentiment. I added some foam tape to the back of the Cat Christmas Tree and popped it up on the card. Another quick and cute holiday card!


Now it's your turn to get your paws inky with your Newton's Nook Designs products and create a project with a Meowy Christmas theme. Be sure to link up to the Inky Paws Challenge! Can't wait to see your projects!


Thanks so much for stopping by!
See ya next time.

Inky Hugs,
Crystal


{Please note that comment moderation is on. Your lovely comment will appear once approved.}

Wednesday, October 25, 2023

Falling for the Holidays 2023 {BYSHC} Linky Party ~ Stellar Snowflake Stencil ~ Gina K. Designs

 Hello there crafty friend!
I'm back with my sixth card for the Falling for the Holidays 2023 {BYSHC} Linky Party! My card today features a mix of products from a few of our wonderful Sponsors of the Linky Party. I went a bit out of my comfort zone and made a pink-red snowflake card featuring the awesome Stellar Snowflake Stencil from our return Sponsor Gina K. Designs. I also used a die from the Scallops & Rectangles {nesting dies} from Sponsor Unity Stamp Co.


Normally I would use a blue or a purple for a snowflake. Last year I used green with this beautiful stencil. I really loved how that card turned out. This time I was thinking a mix of pink and red would be fun. What do you think? I blended Kitsch Flamingo and Candied Apple Distress Oxide inks over the Stellar Snowflake Stencil. It would be so easy to make multiples of this card! 


I die cut the panel using the larger stitched rectangle die from the Scallops & Rectangles {nesting dies} from Unity. I stamped the sentiment from the Joy of the Season STAMPtember stamp set from Gina K. Designs and Simon Says Stamp. Unfortunately, that's an exclusive set that was sold in 2018. I mat the snowflake panel with a piece of True Black card stock measuring 3-3/4 x 5" and then I adhered it to a card front of Real Red card stock measuring 4-1/4 x 5-1/2" using the Bearly Art Precision Craft Glue from our Sponsor Bearly Art. I recently bought THE MINI... and I have to say I'm enjoying this glue!! If you follow my blog or cardmaking... you know that I LOVE my liquid glue!! 


I added some sparkle to the card with some Holiday Glitter enamel dots from Sponsor Gina Marie Designs. They are the perfect size for these dots in the snowflake! I adhered the card front panel to a white A2 top fold card base measuring 4-1/4 x 11"; scored at 5-1/2".


 Have you stopped by the Falling for the Holidays 2023 {BYSHC} Linky Party to check out all the wonderful Holiday inspiration being shared?! I am blown away by all the amazing cards! I sure hope you'll stop by and check them out.


Thanks so much for stopping by!
See ya next time.

Inky Hugs,
Crystal


{Please note that comment moderation is ON. Your comment will appear shortly.}

Wednesday, October 18, 2023

Membership Wednesday ~ October 2023 Whit Kit ~ Unity Stamp Co.

 Hello there crafty friend!
Today I'm sharing a bit of inspiration for the October 2023 Whit Kit from Unity Stamp Co. I made four quick cards featuring this fabulous kit. A set of three cards featuring the gorgeous papers in the Fallen Elegance paper pack with some of the ephemera pieces from the kit and a fourth card using the awesome Burlap Stencil along with the Harvest of Gratitude stamps. All goodies from this month's card kit!


First up... the cards featuring a few pattern papers from the Fallen Elegance paper pack from the kit. I just fell in love with these papers. So delicate and pretty! I couldn't pick just one piece so I thought it would be fun to cut them up and combine them on each card.


I cut each pattern paper down to 3-3/4 x 5". And then I cut them to 1-1/4" strips. I adhered the pattern papers to a scrap of card stock measuring 3-3/4 x 5" and then adhered them to a kraft A2 card base measuring 4-1/4 x 11"; scored at 5-1/2".


I combined three ephemera pieces for the focal image of each card. There are so many beautiful pieces. It was hard to narrow it down, but I love how they turned out.


I then heat embossed the sentiment from the Harvest of Gratitude stamps using white pigment ink, white embossing powder and I melted it with a heat tool. Three very quick and easy Thanksgiving cards ready to send!


The card kit has a pretty Champagne pigment ink included that I thought would make a lovely background. I tried it on kraft first but it wasn't very visible so I decided to give it a try on white and I love it! So delicate and beautiful!


I blended the Champagne ink over the Burlap Stencil using a blending brush. Blended heavier in the center of the card front and lighter on the edges leaving some white for a border.


I then stamped the pretty pumpkins using Spiced Marmalade Distress Oxide ink first. I cleaned the stamp and added some Carved Pumpkin Distress Oxide on the bottom portion of the stamp. I cleaned the stamp again and then I inked just a touch of Vintage Photo Distress Oxide ink on the bottom portion of the stamp. I fussy cut the pumpkins leaving a skinny border. I stamped the sentiment directly on the card using Vintage Photo Distress Oxide ink. And then adhered the pumpkins to the card.


Easy peasy and I love the dimension the different colors of oxide inks gives to the stamped image. 


Here's a look at all four cards together. All so quick and easy!! 
Another wonderful card kit!


Here's a look at the wonderful Whit Kit for October!! Gorgeous!! This wonderful card kit is available for only $42.99. That includes shipping! Members get a $6.95 discount on every order from Unity over $45. Members are also able to purchase past Whit Kit stamp sets for just $14 and past Whit Kit paper packs for $2 off!! So awesome!!! 

That's it for me today! Have an ink-tastic day!

Thanks so much for stopping by!
See ya next time.

Inky Hugs,
Crystal


{Please note that comment moderation is on. Your lovely comment will appear once approved.}

Wednesday, October 11, 2023

Membership Wednesday ~ October 2023 BOM & KOM ~ Unity Stamp Co.

  Hello there crafty friend!
Today I'm sharing a pretty Fall card using the awesome October 2023 Background of the Month membership from Unity called Woodgrain Whisper along with the October 2023 Kit of the Month membership from Unity called Golden Glow. 


A fun ink smooshed background of Fossilized Amber, Carved Pumpkin, Peeled Paint and Vintage Photo Distress Oxide inks. I stamped the Woodgrain Whisper background stamp over the ink smooshed background using Ground Espresso Distress Oxide ink. 


I stamped the pretty flower from the Golden Glow Kit of the Month membership using Squeezed Lemonade and Fossilized Amber Distress Oxide inks and a bit of Vintage Photo Distress ink in the center. I also painted the center of the flower using the Vintage Photo Distress ink. The leaves were stamped with Peeled Paint Distress Oxide ink.


The lines in the center of the flower were lost when I painted it so I used a white gel pen to add some highlights. I may have gone a little overboard with them. I also did some dots. I fussy cut the flower and the leaves and adhered them together. The sentiment from the October 2023 KOM was heat embossed with white pigment ink, white embossing powder and a heat tool.


Here's a look at the whole Kit of the Month for October!! Another great kit fill with Fall images! Can you believe that you get this full sheet of rubber for only $44.99. That includes shipping! You also get a $6.95 discount on every order from Unity over $45. And you can purchase any past kits for only $34 plus shipping. Such a great value!


Here's a quick look at the Background of the Month membership this month! So fun! This membership is available for only $18.99. That includes shipping! Included with both of these memberships is a wonderful inspiration sheet with pictures and step-by-step instructions for two cards so you can easily recreate the cards yourself. And now when you sign up you have the ability to pause, skip or cancel your subscription within your Unity account.


 Well, that's it for me today! I'll be back next week with inspiration using the gorgeous October 2023 Whit Kit. Have an ink-tastic day!

Thanks so much for stopping by!
See ya next time.

Inky Hugs,
Crystal


{Please note that comment moderation is on. Your lovely comment will appear once approved.}

Friday, October 6, 2023

Hug in a Mug ~ Christmas Quilt ~ A Colorful Life Designs

 Hello there crafty friend!
I had started another card for my guest designing gig with A Colorful Life Designs last month, but time got away from me and I didn't get it completed until now. So today I'm sharing a fun Winter card featuring a lovely stencil from A Colorful Life Designs. Have you checked out the selection of stencils over at A Colorful Life Designs yet? All so AMAZING! AND they just released a crazy amount of new holiday stencils! OMG!! You have to go take a look! 


I had a fun idea while playing with the Christmas Quilt Stencil from A Colorful Life Designs. I wondered how it would look if I shifted it using two different colors. I did it originally on a scrap of white card stock and I really liked it. So I decided for this card, I wanted to give it a go on Kraft card stock. I blended Lumberjack Plaid Distress Oxide ink over the stencil. I shifted the stencil so the design would overlap and I blended Rustic Wilderness over top. I love it! 


These fun ladies are from an exclusive STAMPtember stamp set, a collaboration from Art Impressions and Simon Says Stamp called Hug in a Mug. This exclusive set from 2021 is no longer available, unfortunately. But I'm super happy that I finally inked it up! Here's a quick list of the Copic markers I used to color up these ladies:

Skin: E000, E00, E11, E04
Brown Hair: E51, E53, E55
Green Hat: YG11, G24, G46, E51, E53, E55, C00, C1, C3
Teal Hoodie: BG70, BG72, BG75
Jeans: B91, B95, B97
Black Boots: N0, N1, N3, N5, N7
Tan Glove: E53, E55, BG72, BG75
Red Mug: R20, R14, R46
Straw: G24, G46
White Hair: C00, C1, C3
Red Hat: C00, C1, C3, R20, R14, R46
Red Scarf: R20, R14, R46
Ivory Sweater: E81, E43
Black Pants: N0, N1, N3, N5, N7
Brown Boots: E51, E53, E55, E57, E59
Blue Gloves: BG70, BG72
Green Mug: YG11, G24, G46


I heat embossed the sentiment using Sugar Cube Pigment ink, Alabaster White embossing powder and my heat tool on Kraft card stock from Papertrey Ink that I had die cut using the Land Border Die Set from Newton's Nook Designs. I trimmed the stenciled panel and adhered the sentiment. Trimmed off the excess and adhered the whole panel onto a white A2 top fold card base.

You can check out my process video here... Hug in a Mug | Christmas Quilt Stencil | A Colorful Life Designs.


 Be sure to head over to A Colorful Life Designs and check out their amazing selection of stencils. Since I'm no longer a guest designer for them my code doesn't work, but my sweet friend Von Marie is on the design team so you can use code VonFan10 for 10% OFF your order! Have a wonderful weekend friends!

Thanks so much for stopping by!
See ya next time.

Inky hugs,
Crystal


{Please note that comment moderation is on. Your lovely comment will appear once approved.}

Wednesday, September 27, 2023

Membership Wednesday ~ September 2023 BOM Off the Grid ~ Unity Stamp Co.

  Hello there crafty friend!
Today I'm sharing a fun card using the cool September 2023 Background of the Month membership from Unity called Off the Grid. I had a fun idea for a background only using a portion of the stamp.


I stamped a piece of white card stock using Sugar Cube Pigment ink from Taylored Expressions. I applied Alabaster White Embossing powder from Brutus Monroe and melted it with my heat tool. 


Then came the fun part... I ink smooshed some Candy Apple and Wilted Violet Distress Oxide inks. I also blended some of the inks to fill in the background.


I die cut the background using the largest die from the Deckle & Stitches Nesting Dies, also from Unity. I dried the background completely, added some white acrylic paint splatters, and then adhered it to a white A2 top fold card base.


I stamped the beautiful Zinnia on a scrap of white card stock really only focusing on the one flower. I didn't want the whole cluster for my card so the grid background would show. I colored up the zinnia with just a few purple Copic markers: V0000, V000, V12, V17. I didn't want it very dark so it would pop on the background. I stamped the 'hello' sentiment from the September 2023 Kit of the Month called Harvest Hues. Love the distressed look of the sentiment. The flower is fussy cut and I colored up the edges using a Memento Tuxedo Black marker to make it all nice and neat. I also fussy cut the sentiment but I left the edges white. Both are popped up on the card with foam tape.


Here's a quick look at the Background of the Month membership this month! So fun! This membership is available for only $18.99. That includes shipping! Included with both of these memberships is a wonderful inspiration sheet with pictures and step-by-step instructions for two cards so you can easily recreate the cards yourself. And now when you sign up you have the ability to pause, skip or cancel your subscription within your Unity account.


I'm playing along with the Color Hues Challenge #72: Purple & Red


 Well, that's it for me today! I'll be back in two weeks with inspiration for one of the fab October memberships. Just not sure at this point which one I want to play with first. {Be warned... they are ALL amazing!!} Until then, have an ink-tastic day!


Thanks so much for stopping by!
See ya next time.

Inky Hugs,
Crystal


{Please note that comment moderation is on. Your lovely comment will appear once approved.}

Wednesday, September 20, 2023

Membership Wednesday ~ September 2023 Whit Kit Worthy of a Good Thing ~ Unity Stamp Co.

 Hello there crafty friend!
I had so much fun playing with the Fall-filled September 2023 Whit Kit from Unity Stamp Co. I made three cards featuring this fabulous kit. A couple focusing on the gorgeous papers in the Golden Autumn Whispers paper pack and the last one using the awesome Spotlight Stencil.


First up is a card featuring a few pattern papers from the Golden Autumn Whispers paper pack from the kit. I just fell in love with these papers. I really love this front maple leaf paper. It's so pretty! I wanted to feature it on the front of the card. I just die cut it and a darker pattern paper using the larger rectangle dies in the Scallops & Rectangles Nesting Dies. I adhered all my layers together and adhered them to a white A2 top fold card base. I trimmed a sentiment and adhered it directly to the card. Done. Easy peasy and oh so lovely for Fall.


Card number two features two lovely pattern papers. Loving the yellows and golds! I die cut the yellow pattern paper using the second largest die from the Make a Tag Die Set. I also die cut a piece of Early Espresso card stock from Stampin' Up using the largest die from that same die set. I adhered those together and then I went a little nuts wrapping them with gold metallic thread from my stash. I adhered the tag element directly to the pattern paper that I had adhered to a white A2 top fold card base. The sentiment was heat embossed using Sugar Cube White Pigment ink from Taylored Expressions along with Alabaster White Embossing Powder from Brutus Monroe. I trimmed the right side at an angle, added foam tape to the back of the sentiment and popped it up on the card.


And my last card is an abstract Fall-ish card using the awesome Spotlight Stencil. I debated back and forth doing a super CAS card but I thought it would be fun to play with some Fall colors and try out all the different shapes on the stencil. The sentiment and little branches are heat embossed with an Antique Gold Embossing Powder from Simon Says Stamp.


I used Mustard Seed, Barn Door, Carved Pumpkin, and Vintage Photo Distress Oxide inks over the Spotlight Stencil. I also did a bit of water splatter over the Distress Oxide inks. And added a bit of gold watercolor splatters using the gold watercolors included in the kit.

You can check out my process for this final card here... Abstract Fall Card | September 2023 Whit Kit | Unity Stamp Co.


Here's a look at all three cards together. All so different, but so fun!! 
Another wonderful card kit!


Speaking of... here's a look at the wonderful Whit Kit for September!! Those papers are so gorgeous!! This wonderful card kit is available for only $42.99. That includes shipping! Members get a $6.95 discount on every order from Unity over $45. Members are also able to purchase past Whit Kit stamp sets for just $14 and past Whit Kit paper packs for $2 off!! So awesome!!! 

That's it for me today! I'll be back next week with inspiration for the Background of the Month membership... at least, that's what I'm leaning towards. I may change my mind. I hope you'll come back to visit and check it out - whatever 'it' may be. LOL! Have an ink-tastic day!

Thanks so much for stopping by!
See ya next time.

Inky Hugs,
Crystal


{Please note that comment moderation is on. Your lovely comment will appear once approved.}