Showing posts with label A Colorful Life Designs. Show all posts

Friday, July 25, 2025

Christmas in July 2025 {BYSHC} Linky Party ~ {BYSHC} Sketch Challenge 59 ~ Jolly Christmas Tree ~ Lawn Fawn

Hello there crafty friend!
I'm back with one more card I made for the Christmas in July 2025 {BYSHC} Linky Party and one last card for the {BYSHC} Sketch Challenge 59 hosted in the Build Your Stash Holiday Cardmakers Facebook group! Today I'm sharing a sweet rainbow holiday card featuring a fun die, stamp and papers from our fab Sponsor Lawn Fawn.


I had a fun idea for a rainbow theme for this one so naturally I grabbed the retired Really Rainbow Christmas 6x6 paper pack from Lawn Fawn. I wish they would bring these papers back... they are just too cute! I thought the trees would look cute behind the awesome Jolly Christmas Tree die. I die cut the tree from green papers from the rainbow pack and then the rest of the tree was die cut from white card stock. I colored the star, trunk, and the baubles with Copic markers.


I stamped the adorable unicorn from the Winter Unicorn stamp set and I fussy cut it but if you're not one for fussy cutting there is a Winter Unicorn lawn cuts available for die cutting. I actually die cut mine, but the die slipped in my Big Shot so it was super wonky. So I just fussy cut it. Always remember to secure your dies with washi tape {or something similar}. I usually do, but for some reason I didn't for this cutie. Oh well... it all worked out.

Here's a quick list of the Copic markers I used:
Unicorn: C0, C1, C5, R00, R20, BV00, BV02, B000, B00, R20, R14, R27, Y11, Y15
Tree Topper / Yellow Baubles: Y11, Y15
Red Baubles: R20, R14, R27
Orange Baubles: YR20, YR15
Green Baubles: YG11, YG03
Blue Baubles: B000, B00, B02
Purple Baubles: BV00, BV02
Tree Trunk: E21, E25, E57


I chose a small sentiment since the paper has sentiments all over it. The sentiment is from the Say What? Holiday Critters stamp set. I just stamped it with black ink, trimmed it, and adhered it to the card. I adhered the unicorn to the tree and popped them up with iCraft 3D Foam Tape Jumbo Roll (white) from our lovely Linky Party Sponsor Therm O Web. 


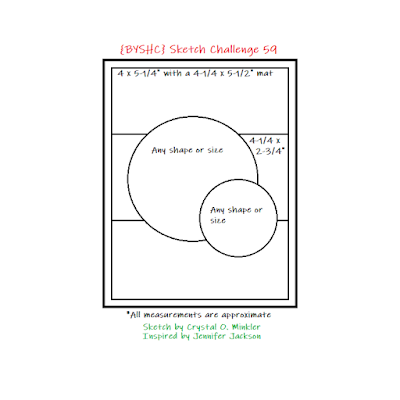
Here's a look at {BYSHC} Sketch Challenge 59 for the month of July. There's just a few days left to enter the challenge! If you're interested in seeing a bit more inspiration for this sketch, check out the amazing inspiration from the design team over on the {BYSH} Cardmakers blog! I'm always blown away by the creations from the DT... they are amazingly talented cardmakers!


As I mentioned above, I'm also playing along with the Christmas in July 2025 {BYSHC} Linky Party. Have you stopped by to check out all the wonderful holiday inspiration being shared?! I sure hope you'll stop by and check it out! Have a wonderful day!

Thanks so much for stopping by!

Inky hugs,
Crystal

Thursday, July 24, 2025

Christmas in July 2025 {BYSHC} Linky Party ~ Nautilus Swirl Stencil ~ A Colorful Life Designs

 Hello there crafty friend!
I'm back with another card I made for the Christmas in July 2025 {BYSHC} Linky Party! I've been so inspired by the cards shared over at the Linky Party... I just HAD to get inky! I saw a fab card by sweet Holly Brown not too long ago and I immediately thought it would be fun to use the same stencil but for a Christmas card.


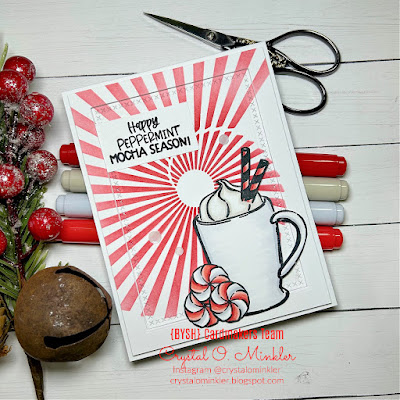
Voila! I think it's peppermint perfection!! Haha! I used the awesome Nautilus Swirl Stencil from our amazing Sponsor A Colorful Life Designs for my fun background. I blended over the stencil using Candied Apple Distress Ink. I focused the blending in the center and lightened the blends with a softer touch around the edges.


I trimmed the panel to 4 x 5-1/4" and die cut it using the Large Cross-Stitched Rectangle Stackables from Sponsor Lawn Fawn. I adhered the die cut piece directly to the white A2 top fold card and then added iCraft 3D Foam Tape Jumbo Roll (white) from our lovely Sponsor Therm O Web to the outer portion making it into a fun frame. It gives some really fun dimension to the card.


I stamped the cute cup and peppermints from the retired Peppermint Mocha Season stamp set from Sponsor Not 2 Shabby using the fabulous Pressure Pal from our awesome Sponsor Twiddler's Nook to get an even pressure on my Misti while stamping. This tool really comes in handy when my hands are hurting. I colored the fun images with Copic markers. I fussy cut each of the images on the line, colored the edges with a Memento Tuxedo Black marker, and then adhered them together. I added foam tape to the portions of the images that laid in the center of the card and then I used iCraft UltraBond Adhesive from Therm O Web for the handle and bottom portion that sat on the frame. The sentiment is also from the same stamp set. I finished off the card with some White Glossy Card Bling from A Colorful Life Designs. 


I hope you'll stop by the Christmas in July 2025 {BYSHC} Linky Party to check out all the wonderful Holiday inspiration being shared! I've been inspired by so many of the cards! I sure hope you'll stop by and check it out! Have an ink-tastic day!

Thanks so much for stopping by!

Inky Hugs,
Crystal

Sunday, July 20, 2025

Christmas in July 2025 {BYSHC} Linky Party ~ Cozy Vibes Girl ~ Angie Blom Digital Designs

 Hello there crafty friend!
It's day 3 of the Christmas in July 2025 {BYSHC} Linky Party!! I'm excited to share another holiday card that I've made to add to my Christmas stash! This time I played with an awesome digital stamp from our fabulous Sponsor Angie Blom Digital Designs. I love this fab girl and the great big coffee cup!! I could use one of those this morning! LOL!


This beautiful girl is from the Cozy Vibes Girl digital stamps. I used one of the printable sheets so there was no need to resize or combine anything. I just printed it off... easy peasy! I colored the images with Copic markers and used a ruler to get that line above her head just right. I fussy cut around the images leaving some white around the pom pom and hair, otherwise the rest is cut on the black line. I colored the edges of my fussy cutting on the line with a black marker so the cutting looks nice.

Here's a quick list of the Copic markers I used:
Skin: E000, E00, E11, E04
Hair: E21
Coat: E21, E25
Hat / Scarf / Gloves: BG10, BG01, BG23
Snowflake: B000, B00, B02
Cup: BV31, BV02
Lid: C0, C2, C3


Keeping with a wintry theme, I chose the Christmas Snow 6x6 Pattern Paper Pad from our NEW Sponsor Crafty Stamp Co. I wanted a pretty blue paper that would coordinate with the blue of the snowflake.


Inspiration for my card came from one of our past sketches... BYSHC Sketch 23. I love using the past sketches and changing them up a bit to fit my card is always fun too.


All of my background paper layers are adhered using iCraft UltraBond Adhesive from Sponsor Therm O Web. I added foam tape called iCraft 3D Foam Tape Jumbo Roll (white), also from Therm O Web, to the back of the main panel and popped it up on the card. And then I finished it off with a little confetti called Metallic Turquoise Card Bling from A Colorful Life Designs.


If you haven't already, stop by the Christmas in July 2025 {BYSHC} Linky Party to check out all the wonderful Holiday inspiration being shared!! I have so many wonderful ideas for future cards! So inspiring! I hope you have an ink-redible day!

Thanks so much for stopping by!

Inky Hugs,
Crystal

Friday, July 18, 2025

Christmas in July 2025 {BYSHC} Linky Party ~ All Ears ~ Unity Stamp Co.

Hello there crafty friend!
I'm so excited to share my first card for the Christmas in July 2025 {BYSHC} Linky Party hosted by the Build Your Stash Holiday Cardmakers Facebook group! This is our sixth annual Christmas in July Linky Party! Woohoo!! Even though were in the middle of Summer the linky party is focused on Christmas and wintry holiday cards. It's a great way to get ahead on those holiday cards to relieve some of the stress later on in the year during the holidays. I am super excited to add a few more holiday cards to my Christmas card stash and I sure hope that you'll join in the fun!


For my first card I'm featuring the super cute and adorable pup from the All Ears stamps from our lovely Sponsor Unity Stamp Co. The fun knit hat is from the Best of 'Em stamps, also from Unity. The hats a little big but I think it looks so cute! And the sentiment is from the Woofy Christmas stamps. Yup, also from Unity.

Copic markers I used:
Dog: E21, E25, E59
Hat: C0, C1, YG11, G24, G46, R20, R14, R27


The fun background was created using the Cozy Knit Stencil from Sponsor A Colorful Life Designs. I masked the card front using iCraft Pixie Tape from our Sponsor Therm O Web and blended Vintage Photo Distress Ink on the top portion. I moved the Pixie Tape to the other side and used two more pieces of tape so I could blend Mowed Lawn and Candied Apple Distress Inks in stripes.


The background was die cut using the largest die from the Wonky Stitched Rectangle dies from Sponsor Gina Marie Designs. I adhered the background to a Kraft A2 top fold card base using the iCraft UltraBond Adhesive from Sponsor Therm O Web. And then I popped up the pup using iCraft 3D Foam Tape Jumbo Roll (white) from Sponsor Therm O Web. I finished off the card with a few red confetti pieces from the Hologram Red Card Bling from A Colorful Life Designs. A quick and cute card to start off the Linky Party!


My card was inspired by the {BYSHC} Sketch 58 from last month! Have you visited the Build Your Stash Holiday Cardmakers Facebook group? We host a fun sketch challenge each month to inspire our holiday cardmaking all year long. I love using sketches for my cards... makes designing the cards so easy!


I'm also a Sponsor for the Christmas in July 2025 {BYSHC} Linky Party!! I have a wonderful prize set aside for one lucky winner. For a chance to win my fun prize make a Christmas card and link it up to the linky party blog post on the Build Your Stash Holiday Cardmakers blog. All of the winners of all the amazing prizes will be announced on the {BYSHC} blog on Tuesday, July 29th.


Before you leave, be sure to stop by the Christmas in July 2025 {BYSHC} Linky Party to check out all the wonderful Holiday inspiration from our Sponsors and the {BYSHC} Design Team!! I'm so excited to continue building my stash of holiday cards for 2025... I hope you'll join in the fun and play along!


Thanks so much for stopping by!

Inky Hugs,
Crystal

Friday, June 27, 2025

{BYSHC} Sketch Challenge 58 ~ Layered Holly with Fancy Merry Christmas ~ A Colorful Life Designs

Hello there crafty friend!
I'm back with one last card for the {BYSHC} Sketch Challenge 58 hosted in the Build Your Stash Holiday Cardmakers Facebook group! Today I'm sharing a vintage style holiday card featuring a couple of great stencils from our wonderful Sponsor, A Colorful Life Designs.


I started by laying down a postage stencil from the Marvelous Masks Postage Stamp Stencil A over a card front of Kraft card stock from Papertrey Ink. I then laid the holly leaf stencil overtop of the postage stencil. I used a piece of iCraft Removable Pixie Tape to diagonally mask the other half of the card front and then blended Mowed Lawn Distress Ink over the holly stencil. I replaced the holly for the berry stencil. Also replacing the pixie tape mask and blended Candied Apple Distress Ink. The holly and berries stencils are from the Layered Holly Stencil


I removed the stencil and laid the Fancy Merry Christmas Stencil. I again used the pixie tape to mask the card this time covering the holly and berries. I blended Vintage Photo over the whole stencil being more heavy in the center and a lighter touch around the edges. I then blended Walnut Stain Distress Ink over the Merry Christmas sentiment. 


I trimmed the stenciled panel to 4 x 5-1/4" and adhered it to an A2 card base of Dark Chocolate card stock from Papertrey Ink. I finished off the card with a few confetti pieces from the Hologram Red Card Bling.


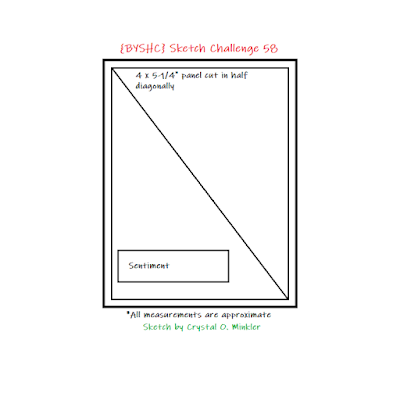
Here's a look at {BYSHC} Sketch Challenge 58 for the month of June. There's just a few days left to enter the challenge! If you're interested in seeing a bit more inspiration for this sketch, check out the amazing inspiration from the design team over on the {BYSH} Cardmakers blog! I'm always blown away by the creations from the DT... they are amazingly talented cardmakers!


Thanks so much for stopping by!
See ya next time.

Inky hugs,
Crystal


{Please note that comment moderation is ON. Your lovely comment will appear shortly.}

Friday, June 13, 2025

{BYSHC} Sketch Challenge 58 ~ Snowflake Net with Cozy Knit ~ A Colorful Life Designs

Hello there crafty friend!
I'm back with a little inspiration for the {BYSHC} Sketch Challenge 58 hosted in the Build Your Stash Holiday Cardmakers Facebook group! Today I'm sharing a really cool holiday card featuring an awesome stencil from our fabulous Sponsor, A Colorful Life Designs.


I thought it would be fun to combine a couple of stencils for my second card so I grabbed the Snowflake Net Stencil and the Cozy Knit Stencil. I love the use blues and purples for snowflake cards. Love those cool colors! 


I laid the Snowflake Net Stencil on my white card front measuring 4-1/4 x 5-1/2". I used a strip of iCraft Removable Pixie Tape to mask the left bottom area of the card front and I blended some Salty Ocean and Wilted Violet Distress Inks over the stencil until I was happy with the blends. I replaced the stencil with the Cozy Knit Stencil. I used that same strip of pixie tape and blended the other side of the card front. 


I die cut the panel using the largest die from the Deckle & Stitches Nesting Die Set from Unity. I adhered the panel to a white A2 top fold card base. I sentiment is from Arctic Joyride from Unity. I die cut the sentiment using a die from the Scallops & Banners {nesting dies}, also from Unity. I finished off the card with a bunch of confetti from the White Glossy Card Bling from A Colorful Life Designs.


Here's a look at {BYSHC} Sketch Challenge 58 for the month of June. If you're interested in seeing a bit more inspiration for this sketch, check out the amazing inspiration from the design team over on the {BYSH} Cardmakers blog! The design team, as always, rocked this sketch!


Thanks so much for stopping by!
See ya next time.

Inky hugs,
Crystal


{Please note that comment moderation is ON. Your lovely comment will appear shortly.}

Sunday, June 1, 2025

{BYSHC} Sketch Challenge 58 ~ Christmas Tree Deer ~ A Colorful Life Designs

Hello there crafty friend!
It's time for a new sketch challenge over in the Build Your Stash Holiday Cardmakers Facebook group! Today I'm sharing a fun Christmas card featuring one of my all-time favorite stencils from our amazing Sponsor, A Colorful Life Designs! A Colorful Life Designs has generously offered up a $25 gift code as a prize for the {BYSHC} Sketch Challenge 58 this month! So fantastic!


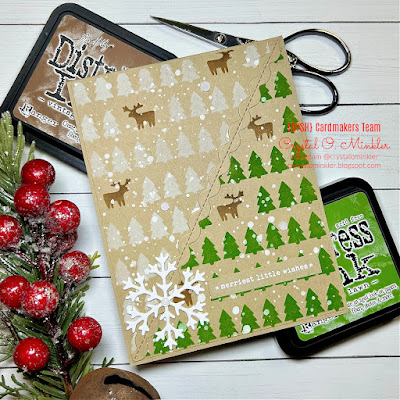
The fabulous Christmas Tree Deer Stencil is the very first stencil I purchased at A Colorful Life Designs. It's my most favorite and I just had to use it! I secured it to my Kraft card stock panel using iCraft Removable Pixie Tape. I also ran a strip of the tape diagonally across the panel and then I blended Mowed Lawn Distress Ink over the bottom portion of the stencil. 


I removed the tape and cleaned the stencil. I like to clean the stencil with just a touch of hand soap and then I rinse it thoroughly. I replaced the tape and blended Sugar Cube White Pigment ink from Taylored Expressions over the top portion of the stencil. I cleaned the stencil once again and placed it back on the panel. I masked around the deer and blended Vintage Photo Distress Ink with just a touch of Walnut Stain Distress Ink on the top.


I spattered the panel with White Acrylic paint spatters that I spritzed with just a drop of water to thin it out. I die cut two pieces of ric rac using the retired Ric Rac die from My Favorite Things. I also die cut two snowflakes using the Small Snowflake die from Gina Marie Designs. I adhered those together and then adhered it over the spot where the two ric rac pieces meet. I heat embossed a quick sentiment using the Simple Little Wishes from Unity. And then I finished off the card with a few confetti pieces from the White Glossy Card Bling from A Colorful Life Designs.


Here's a look at {BYSHC} Sketch Challenge 58 for the month of June. I flipped the sketch for my card today! If you're interested in seeing a bit more inspiration for this sketch, check out the amazing inspiration from the design team over on the {BYSH} Cardmakers blog!


Thanks so much for stopping by!
See ya next time.

Inky hugs,
Crystal


{Please note that comment moderation is ON. Your lovely comment will appear shortly.}

Friday, May 9, 2025

Spring into Christmas 2025 {BYSHC} Linky Party ~ Winter Cardinals Set 2 ~ Pink & Main

 Hello there crafty friend!
I can't believe how fast the time is going by! It's the last day of the Spring into Christmas 2025 {BYSHC} Linky Party! It's always so sad to reach the end, but I'm super happy to be adding so many cards to my stash! Yay!


This time I used the adorable Winter Cardinals Set 2 from our wonderful Sponsor Pink & Main. I just adore this stamp!! The birds are so cute and they're kissing under the mistletoe... AWWWW... Super cute! I stamped the image using Memento Tuxedo Black ink on white card stock and colored them up with Copic markers.

Here's a quick list of the markers I used:
Left Bird: R20, R14, R27, C00, C2, YR21, YR04
Right Bird: R20, R14, R37, C00, C2, YR21, YR04
Scarves: YG11, G24, G46
Branches: E21, E23, E25
Mistletoe: G24, G46
Bow: R20, R14, R27


As always, I used the fabulous Pressure Pal from our awesome Sponsor Twiddler's Nook when I stamped the sweet birds. I also used it when I stamped the sentiment. I die cut the panel using the X Stitched Mini Slimline Die from Sponsor Gina Marie Designs. I wrapped the corners with some Natural May Arts Burlap String and tied a pretty bow. I popped up the panel using iCraft 3D Foam Tape Jumbo Roll (white) from Therm O Web. 


My card design was inspired by past {BYSHC} Sketch 44. This simple sketch has become a favorite and it was perfect with this cute stamp.


I wanted to use another fun stencil for a lovely background for these two lovebirds. I grabbed the Simple Christmas Trees Stencil from Sponsor A Colorful Life Designs. I blended lightly with Vintage Photo Distress Ink over the stencil on Kraft card stock. I trimmed the panel to 5-1/4 x 4" and adhered it to an A2 kraft card base.


I hope you'll stop by the Spring into Christmas 2025 {BYSHC} Linky Party to check out all the wonderful Holiday inspiration being shared! I've been inspired by so many of the cards! I sure hope you'll stop by and check it out! Have an ink-tastic day!


Thanks so much for stopping by!
See ya next time.

Inky Hugs,
Crystal


{Please note that comment moderation is ON. Your comment will appear shortly.}

Thursday, May 8, 2025

Spring into Christmas 2025 {BYSHC} Linky Party ~ Little Love Deer ~ Unity Stamp Co.

 Hello there crafty friend!
It's day 7 of the Spring into Christmas 2025 {BYSHC} Linky Party! I colored up this sweet deer while on Spring Break with the fam. I just had to make it into a card for the linky party!


I stamped the adorable deer from the Little Love Deer from our fab Sponsor Unity Stamp Co. using Black Amalgam ink from Sponsor Gina K Designs. I colored it up with a handful of Copic markers and fussy cut the image leaving a white border. Once the ink was dry, I added touches of white gel pen to the dots on the deer.

Here's a quick list of the Copic markers I used:
Deer: E000, E21, E23
Scarf: R20, R14, R27


I had a scrap embossed panel in my stash of scraps and I thought it would be fun to use for my background on this card. I love the texture it adds even though I covered most of it up. The panel was embossed with the retired Peaceful Poinsettia embossing folder from Sponsor Taylored Expressions.


My card was inspired by past {BYSHC} Sketch 41. I altered the measurements just a bit. For the top left piece I cut my paper to 3-1/4 x 1-3/8". The bottom left piece measures 3-1/4 x 2-1/4". And the right side piece measures 1-3/4 x 3-7/8". The pattern paper is called Christmas and it's from Carta Bella.
 

 I die cut two circles from white card stock for the deer layers using dies from the Scallops & Circles {nesting dies} from Unity. I adhered all of my layers using iCraft UltraBond Adhesive from Sponsor Therm O Web and then adhered the panel to a white A2 top fold card base that I turned on the side for a landscape card. I finished off the card with a few confetti pieces from the Hologram Red Card Bling from Sponsor A Colorful Life Designs.


I am having so much fun playing along with the Spring into Christmas 2025 {BYSHC} Linky Party! I hope that you'll stop by the Linky Party and check out the cards that have been linked up. Lots of fabulous inspiration!! Don't forget the Linky Party ends at 11:59pm PST on Friday May 9th. Get those entries in! Have an ink-tastic day!


Thanks so much for stopping by!
See ya next time.

Inky Hugs,
Crystal


{Please note that comment moderation is ON. Your comment will appear shortly.}

Tuesday, May 6, 2025

Spring into Christmas 2025 {BYSHC} Linky Party ~ Large Gingerbread Girl ~ Jaded Blossom

 Hello there crafty friend!
I'm back with another fun holiday card for the Spring into Christmas 2025 {BYSHC} Linky Party! My card today features a cute stamp from our wonderful Sponsor Jaded Blossom called Large Gingerbread Girl. I adore this large ginger!! So cute!


I inked up a cute background using the Layered Gingerbread Men Stencil from Sponsor A Colorful Life Designs. This fab stencil has two stencils in the set. I inked up the gingerbread cookies on Kraft card stock using Vintage Photo Distress Ink. And then I replaced the stencils and blended Candied Apple Distress Ink over the second stencil.


I also stamped the cute sentiment in my mini misti and used the fabulous Pressure Pal from Sponsor Twiddler's Nook. The sentiment is from the retired Gingerbread Hugs from Sponsor Not 2 Shabby. I heat embossed the sentiment by prepping the card stock with the TE Anti Static Powder tool from Sponsor Taylored Expressions. I stamped the sentiment using Sugar Cube Pigment ink from Taylored Expressions. I dusted the wet ink using Alabaster White embossing powder from Brutus Monroe and then melted the powder with a Wagner Precision Heat tool.


My card is inspired by the current Tawny Owl Paperie Inky Inspiration Sketch 32. I turned the sketch on the side for a fun twist. Such a fun sketch! Join us in the Tawny Owl Paperie Inky Inspiration Facebook group to play along with this month's sketch challenge!


I inked up the adorable gingerbread and the name of this stamp is true! It's a large gingerbread girl! LOL! I colored her up with my Copic markers and then die cut her using a die from the BIG Scallops & Rectangles {nesting dies} from Sponsor Unity. I die cut a scrap of red card stock using a die from the Stitched Hillside Borders from Sponsor Lawn Fawn. I trimmed and adhered the sentiment to the card and adhered the red hillside piece to the card. And then I popped up the gingerbread panel using 3D Foam Squares from Sponsor Therm O Web.

Here's a quick list of the Copic Markers I used:
Gingerbread: E21, E23, E25
Bow / Cheeks / Hearts: R20, R14, R27
Icing: C00, C2


I hope you'll stop by the Spring into Christmas 2025 {BYSHC} Linky Party to check out all the wonderful Holiday inspiration being shared! I've been inspired by so many of the cards! I sure hope you'll stop by and check it out! Have an ink-tastic day!


Thanks so much for stopping by!
See ya next time.

Inky Hugs,
Crystal

{Please note that comment moderation is ON. Your comment will appear shortly.}